1.模块化编程思想
模块化编程思想即是一种设计方式,又是一种思维方式,利用模块化可以把一个非常复杂的系统结构细化到具体的功能点,每个功能点看做一个模块,然后通过某种规则把这些小的模块组合到一起,构成模块化系统。
根据外设类型划分模块(文件),也就是采用不同的文件,根据外设不同功能划分模块(函数),也就是采用不同的函数。
在本章我们对LED、按键和串口进行简单的模块化,实现一个同时三个模块的小demo。
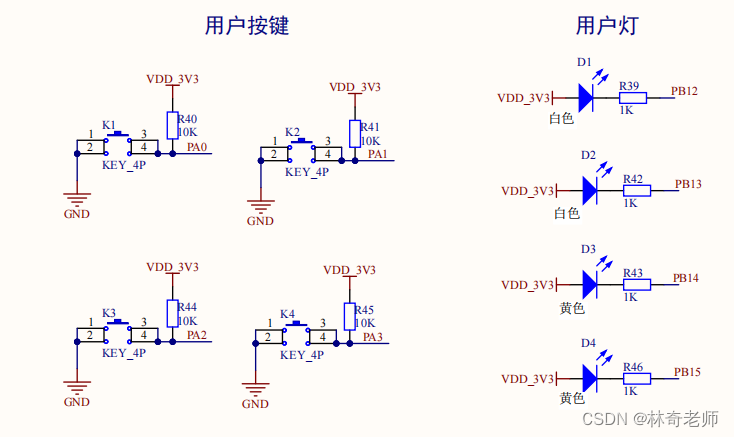
2.查看硬件原理图

3.创建工程
3.1配置老三样
3.2配置LED和按键

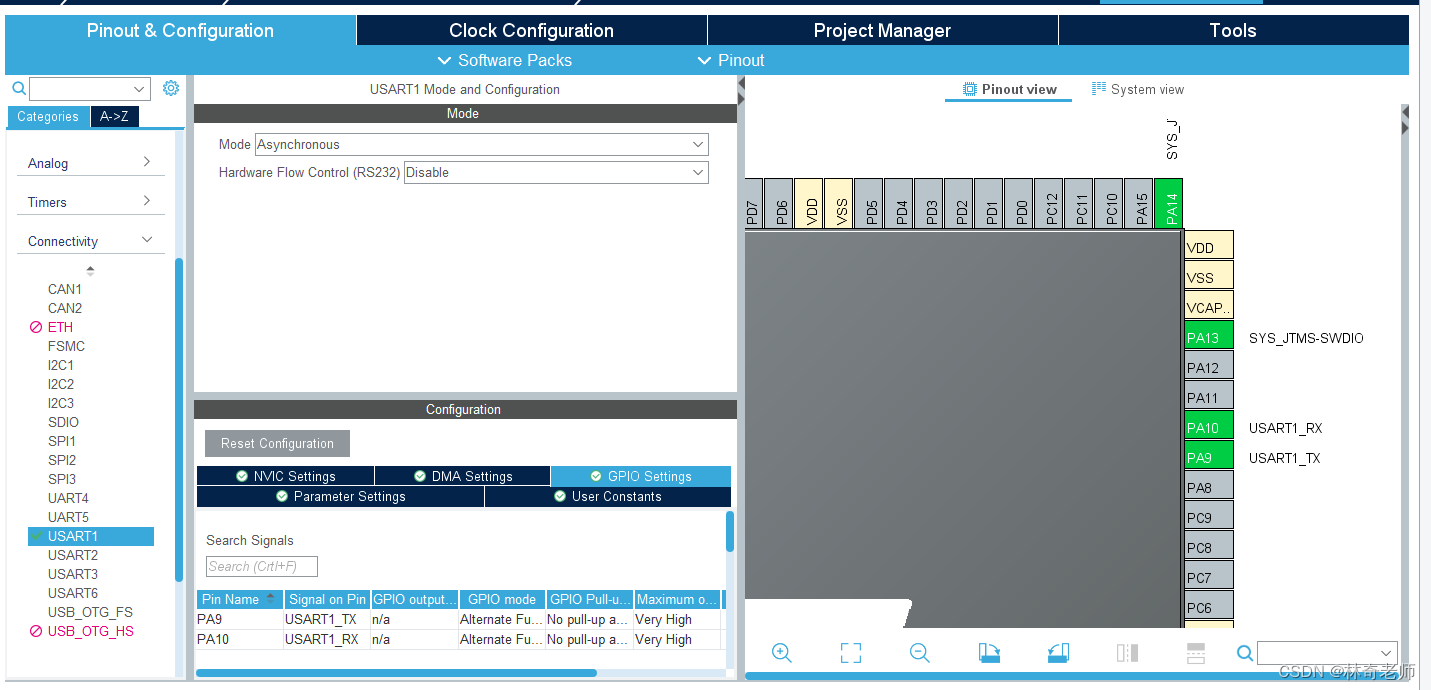
3.3配置串口
4.模块化编程
4.1创建文件
首先在创建的工程里新填一个文件夹,用来存放我自己所编写的模块,以及相对应的模块文件如下。

 4.2编写相关的模块化文件
4.2.1LED
/*drv_led.c*/
#include "drv_led.h"
#include "stm32f4xx_hal.h"

int LedDrvInit(BoarLed led)
{
    switch(led)
    {
        case D1:
        {
            break;
        }
        case D2:
        {
            break;
        }
        case D3:
        {
            break;
        }
        case D4:
        {
            break;
        }
        default:break;
    }
    return 0;
}

int LedDrvWrite(BoarLed led,Ledstatus status)
{
    switch(led)
    {
        case D1:
        {
            HAL_GPIO_WritePin(D1_PORT,D1_PIN,(GPIO_PinState)status);
            break;
        }
        case D2:
        {
            HAL_GPIO_WritePin(D2_PORT,D2_PIN,(GPIO_PinState)status);
            break;
        }
        case D3:
        {
            HAL_GPIO_WritePin(D3_PORT,D3_PIN,(GPIO_PinState)status);
            break;
        }
        case D4:
        {
            HAL_GPIO_WritePin(D4_PORT,D4_PIN,(GPIO_PinState)status);
            break;
        }
        default:break;
    }
    return 0;
}

int LedDrvRead(BoarLed led)
{
    Ledstatus status = led_on;
    switch(led)
    {
        case D1:
        {
            status  = (Ledstatus)HAL_GPIO_ReadPin(D1_PORT,D1_PIN);
            break;
        }
        case D2:
        {
            status  = (Ledstatus)HAL_GPIO_ReadPin(D2_PORT,D2_PIN);
            break;
        }
        case D3:
        {
            status  = (Ledstatus)HAL_GPIO_ReadPin(D3_PORT,D3_PIN);
            break;
        }
        case D4:
        {
            status  = (Ledstatus)HAL_GPIO_ReadPin(D4_PORT,D4_PIN);
            break;
        }
        default:break;
    }

    return status;
}

/*drv_led.h*/
#ifndef __DRV_LED_H
#define __DRV_LED_H

typedef enum{
    D1 = 1,
    D2,
    D3,
    D4
}BoarLed;

typedef enum{
    led_on = 0,
    led_off = 1
}Ledstatus;

#define D1_PORT     GPIOB
#define D1_PIN      GPIO_PIN_12

#define D2_PORT     GPIOB
#define D2_PIN      GPIO_PIN_13

#define D3_PORT     GPIOB
#define D3_PIN      GPIO_PIN_14

#define D4_PORT     GPIOB
#define D4_PIN      GPIO_PIN_15

int LedDrvInit(BoarLed led);
int LedDrvWrite(BoarLed led,Ledstatus status);
int LedDrvRead(BoarLed led);

#endif  /* __DRV_LED_H */
4.2.2按键
/*drv_key.c*/
#include "drv_key.h"
#include "stm32f4xx_hal.h"


int KeyDrvInit(BoardKey key)
{
    switch(key)
    {
        case K1:
        {
            break;
        }
        case K2:
        {
            break;
        }
        case K3:
        {
            break;
        }
        case K4:
        {
            break;
        }
        default:break;
    }
    return 0;
}


int KeyDrvRead(BoardKey key)
{
    KeyStatus status = isNoPress;
    switch(key)
    {
        case K1:
        {
            status  = (KeyStatus)HAL_GPIO_ReadPin(K1_PORT,K1_PIN);
            break;
        }
        case K2:
        {
            status  = (KeyStatus)HAL_GPIO_ReadPin(K2_PORT,K2_PIN);
            break;
        }
        case K3:
        {
            status  = (KeyStatus)HAL_GPIO_ReadPin(K3_PORT,K3_PIN);
            break;
        }
        case K4:
        {
            status  = (KeyStatus)HAL_GPIO_ReadPin(K4_PORT,K4_PIN);
            break;
        }
        default:break;
    }
    return status;
}

/*drv_key.h*/
#ifndef __DRV_KEY_H
#define __DRV_KEY_H

typedef enum{
    K1 = 1,
    K2,
    K3,
    K4
}BoardKey;

typedef enum{
    isPress = 0,
    isNoPress = 1
}KeyStatus;

#define K1_PORT     GPIOA
#define K1_PIN      GPIO_PIN_0

#define K2_PORT     GPIOA
#define K2_PIN      GPIO_PIN_1

#define K3_PORT     GPIOA
#define K3_PIN      GPIO_PIN_2

#define K4_PORT     GPIOA
#define K4_PIN      GPIO_PIN_3

int KeyDrvInit(BoardKey key);
int KeyDrvRead(BoardKey key);

#endif  /*__DRV_KEY_H*/
4.2.3串口
/*drv_uart.c*/
#include "drv_uart.h"
#include "usart.h"
#include "stm32f4xx_hal.h"

int UartDrvInit(BoarUart uart)
{
    switch(uart)
    {
        case DbgUart:
        {
            break;
        }
        case WiFiBtUart:
        {
            break;
        }
        default:break;
    }
    return 0;
}

int UartDrvWrite(BoarUart uart,unsigned char *buf,unsigned int length)
{
    int ret = -1;
    switch(uart)
    {
        case DbgUart:
        {
            HAL_UART_Transmit(&huart1,buf,length,length*5);
            break;
        }
        case WiFiBtUart:
        {
            break;
        }
        default:break;
    }
    return 0;
}

int UarDrvRead(BoarUart uart,unsigned char *buf,unsigned int length)
{
    switch(uart)
    {
        case DbgUart:
        {
            HAL_UART_Receive(&huart1,buf,length,length*5);
            break;
        }
        case WiFiBtUart:
        {
            break;
        }
        default:break;
    }
    return 0;
}

/*drv_uart.h*/
#ifndef __DRV_UART_H
#define __DRV_UART_H

typedef enum{
    DbgUart = 1,
    WiFiBtUart
}BoarUart;

#define DbgUart_PORT        USART1
#define WiFiBtUart_PORT     USART3

int UartDrvInit(BoarUart uart);
int UartDrvWrite(BoarUart uart,unsigned char *buf,unsigned int length);
int UarDrvRead(BoarUart uart,unsigned char *buf,unsigned int length);

#endif  /*__DRV_UART_H*/
4.2.4main函数
实现效果为,首先打印一个hello,然后按键按下,LED灯的状态进行反转。
int main(void)
{
  HAL_Init();

  SystemClock_Config();

  MX_GPIO_Init();
  MX_USART1_UART_Init();

  LedDrvInit(D1);
  KeyDrvInit(K1);
  UartDrvInit(DbgUart);

  char *c = "hello\r\n";

  UartDrvWrite(DbgUart,(unsigned char*)c,strlen(c));
  Ledstatus led_1 = led_off;
  while (1)
  {
    if(isPress == KeyDrvRead(K1))
    {
        HAL_Delay(100);
        if(isPress == KeyDrvRead(K1))
        {
            led_1 =! led_1;
            LedDrvWrite(D1,led_1);
            HAL_Delay(100);

        }
    }
  }

}


 1969
1969

 被折叠的 条评论
为什么被折叠?


