


Servo Motor Arduino code and its Power Supply, Advantages & Application
Servo Motor Arduino, Description:
Servo Motor Arduino tutorial- In this Tutorial, you will learn how to control a servo motor using Arduino. Servo motors are great devices that can turn to a specified position. This tutorial is all about how to achieve smooth movement and accurate positioning by making an external power supply for the Servo Motor. This tutorial covers
伺服电机 Arduino 教程 - 在本教程中,您将学习如何使用 Arduino 控制伺服电机。 伺服电机是可以转动到指定位置的出色设备。 本教程主要介绍如何通过为伺服电机制作外部电源来实现平滑移动和精确定位。 本教程包括
- What is a Servo Motor?
- Servo Motor Advantages
- Servo Motor Applications
- How to make an external power supply for a Servo Motor
- Servo Motor Interfacing with Arduino
- Servo Motor Programming and finally
- Testing
For the step-by-step explanation watch the video tutorial available at the end of this Article.
Amazon Links:
Arduino Nano USB-C Type (Recommended)
Servo Motor:
A Servo Motor is a Rotary actuator or linear actuator that allows for precise control of angular or linear position, velocity and acceleration. It consists of a suitable motor coupled to a sensor for position feedback. Servo Motors comes in different sizes and shapes, but the basic working principle of all the Servo Motors is exactly the same.
伺服电机是一种旋转执行器或线性执行器,可对角度或线性位置、速度和加速度进行精确控制。 它由一个合适的电机和一个用于位置反馈的传感器组成。 伺服电机有不同的尺寸和形状,但所有伺服电机的基本工作原理都完全相同。
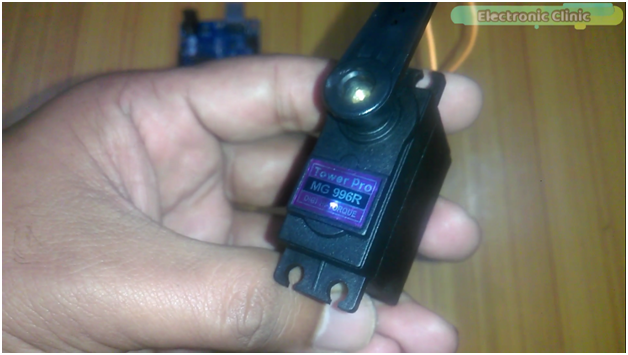
This is High-Torque MG996R Servo Motor that I have used in this Tutorial. MG996R is an upgraded version of MG995 Servo Motor, and features upgraded shock-proofing and a redesigned PCB and IC control system that make it much more accurate than its predecessor. The gearing and motor have also been upgraded to improve dead bandwidth and centering.
这是我在本教程中使用的高扭矩 MG996R 伺服电机。 MG996R 是 MG995 伺服电机的升级版,具有升级的防震功能,并重新设计了 PCB 和 IC 控制系统,使其比上一代产品更加精确。 齿轮和电机也进行了升级,以改善死区带宽和居中性。
MG996R Specifications:
- Weight: 55 g
- Dimension: 40.7 x 19.7 x 42.9 mm approx.
- Stall torque: 9.4 kgf·cm (4.8 V ), 11 kgf·cm (6 V)
- Operating speed: 0.17 s/60º (4.8 V), 0.14 s/60º (6 V)
- Operating voltage: 4.8 V a 7.2 V
- Running Current 500 mA –
- Stall Current 2.5 A (6V)
- Dead band width: 5 µs
- Stable and shock proof double ball bearing design
- Temperature range: 0 ºC –
- 4.8 V a 7.2 V
- – 900 mA (6V)
- Double ball bearing design
- 55 ºC
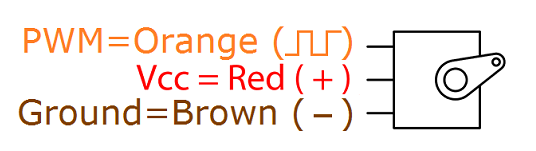
Servo Motor Pinout:
Advantages of Servo Motor:
- Low Cost -低成本
- Smooth rotation at low speeds -低速平稳旋转
- No Power is used at standstill -静止时不耗电
- With no static loads on the motor, no current is required to hold position.=由于电机上没有静态负载,因此不需要电流来保持位置。
- Wide variety of types available.–种类繁多。
Servo motor applications:
- Servo motors are most commonly used in robots for precise positioning, these are used in Grippers, Pick and place mechanism, robotic Arms joints etc. S
- Servo motors are also used in industries for labeling and packaging etc.
- Camera Auto Focus.
- Solar Tracking Systems.
- Antenna positioning.
- CNC machines.
- Automatic door openers and so on.
- 伺服电机最常用于机器人的精确定位,如机械手、拾取和放置机构、机器人手臂关节等。
- 伺服电机还可用于贴标和包装等行业,如相机自动对焦、太阳能跟踪系统、天线定位、数控机床、自动开门机等。
Servo Motor Rotation Problem and how to solve this?
Your servo may behave erratically, and you may find that this only happens when the Arduino is plugged into certain USB ports. This is because the servo draws quite a lot of power, especially as the motor is starting up, and this sudden high demand can be enough to drop the voltage on the Arduino board, so that it resets itself. The same thing happened to me, my Arduino was resetting and I wasn’t able to achieve the smooth movement and accurate positioning. I solved this problem by making an external power supply for my servo motor. Let’s have a look at the circuit diagram.
您的伺服器可能会表现不稳定,而且您可能会发现只有当 Arduino 插入某些 USB 端口时才会出现这种情况。 这是因为伺服器需要消耗大量电能,尤其是在电机启动时,这种突然的高需求足以降低 Arduino 板上的电压,从而使其自我复位。 同样的情况也发生在我身上,我的 Arduino 正在重置,我无法实现平滑移动和精确定位。 我为伺服电机制作了一个外部电源,从而解决了这个问题。 让我们来看看电路图。
Servo Motor Power Supply Circuit Diagram:
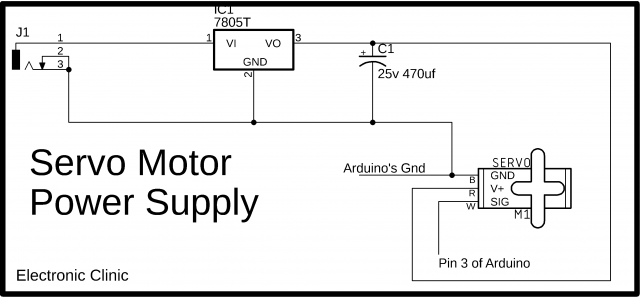
This schematic is designed in cadsoft eagle 9.1.0 version. If you want to learn how to make a schematic and PCB then watch my tutorial.
J1 is the dc female power jack; this is where you connect your 12v adaptor, or a battery. This voltage should be greater than 6 volts and less than the max input voltage of 7805 voltage regulator; the recommended voltages are 9 to 18 volts. In my case I will be using 12 volts. A 25v 470 UF capacitor is connected between the output and ground pins. The output of the voltage regulator is connected with the supply wire of the servo motor. The ground wire of the servo motor is connected with the regulator ground and also with the Arduino’s ground. While the signal wire is connected with the Arduino’s pin number 3.
本原理图使用 cadsoft eagle 9.1.0 版本设计。 如果您想学习如何制作原理图和印刷电路板,请观看我的教程。 J1 是直流母电源插孔,用于连接 12 伏适配器或电池。 该电压应大于 6 伏,小于 7805 稳压器的最大输入电压;建议电压为 9 至 18 伏。 我的情况是使用 12 伏。 输出和接地引脚之间连接了一个 25 伏 470 UF 电容器。 稳压器的输出端与伺服电机的电源线相连。 伺服电机的地线与稳压器的地线以及 Arduino 的地线相连。 信号线与 Arduino 的 3 号引脚相连。
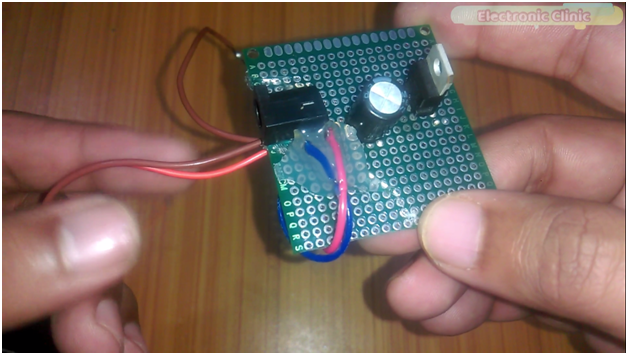
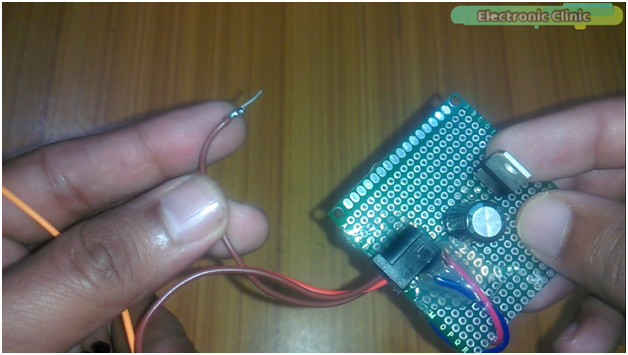
This is the final circuit; the components are soldered as per the circuit diagram. The supply wire of the servo motor, which is the red wire, is connected with the output leg of the 7805 voltage regulator, and the brown wire which is the ground wire is connected with the middle leg of the 7805 voltage regulator and a 470UF capacitor is connected between the output and ground.
这是最终电路;各元件已按电路图焊接完毕。 伺服电机的电源线(即红线)与 7805 稳压器的输出端相连,棕色线(即地线)与 7805 稳压器的中间端相连,输出端和地线之间连接了一个 470UF 的电容器。
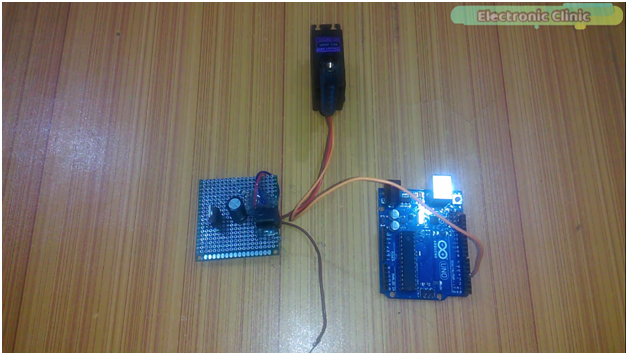
This is the ground wire and should be connected with the Arduino’s ground. The yellow wire is the signal wire and it can be connected with any PWM pin of the Arduino, in my case I will connect this with pin number 3 of the Arduino. Now this servo motor is ready and can be used with Arduino, Mega or any other controller board.
这是接地线,应与 Arduino 的地线相连。 黄线是信号线,可与 Arduino 的任何 PWM 引脚连接,在我的例子中,我将把它与 Arduino 的 3 号引脚连接。 现在,这个伺服电机已经准备就绪,可以与 Arduino、Mega 或任何其他控制板一起使用。
Servo Motor Arduino Interfacing:
Connect the yellow wire with pin number 3.
Connect the power supply ground wire with The Arduino’s ground.
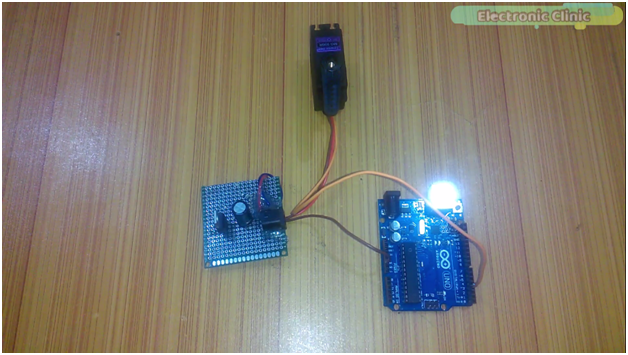
We are done with the Interfacing. This servo motor can be powered up using a 12v adaptor.
Servo Motor Arduino Code/Programming:
#include <Servo.h>
Servo myservo;

void setup()
{
    Serial.begin(9600); // Initialize serial communications with the PC
    myservo.attach(3);  // servo motor connected here
}

void loop()
{
    myservo.write(0);
    delay(1000);
    myservo.write(45);
    delay(1000);
    myservo.write(90);
    delay(1000);
    myservo.write(180);
    delay(1000);
    myservo.write(0);
    delay(1000);
    for (int i = 0; i <= 180; i++)
    {
        myservo.write(i);
        delay(20);
    }

    myservo.write(0);
    delay(1000);
    for (int i = 0; i <= 180; i++)
    {
        myservo.write(i);
        delay(5);
    }
}


 4502
4502

 被折叠的 条评论
为什么被折叠?
被折叠的 条评论
为什么被折叠?
 到【灌水乐园】发言


