


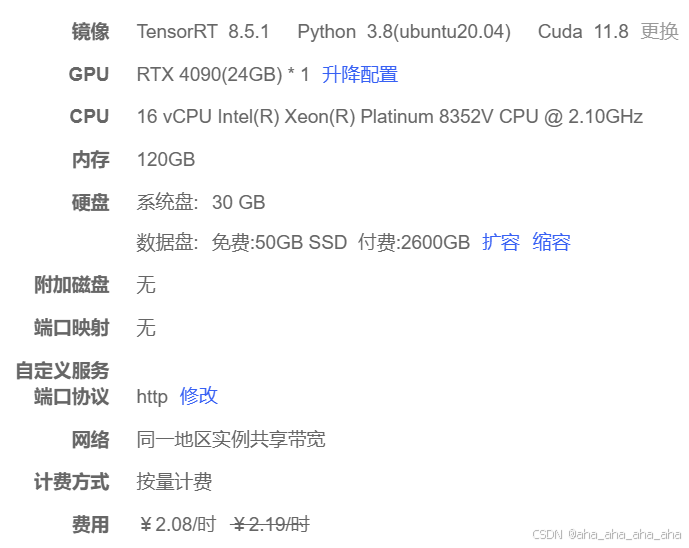
我是在AutoDL上租服务器来部署的,硬件如下
环境部署(conda),其实直接按照下面这篇博客安装就好了,我这里主要讲讲我踩的雷
原博文链接:https://blog.csdn.net/weixin_40192882/article/details/135993286
下载数据库可以和环境部署可以同时进行,所以可以先跳到下载数据库那里,把数据库挂后台下载!下载数据库也踩了坑,我下了快一周才下好。
1. 确认已安装的cudatoolkit版本和cudnn版本
用命令nvidia-sm查看CUDA driver版本,
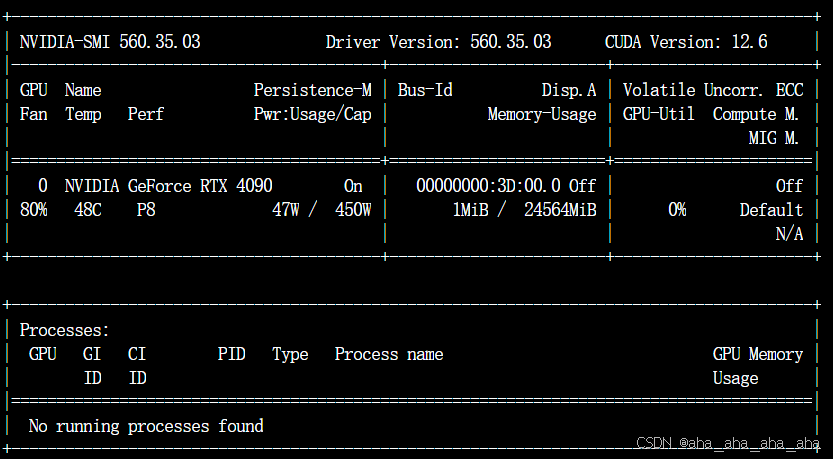
不是说只可以用12.6,是你在conda环境里面要用小于12.6的cuda版本(这篇文讲得非常详细了,原文链接:https://blog.csdn.net/weixin_45811857/article/details/124457280)
用命令通过 dpkg -l | grep cudnn 查看cudnn版本

cuda和cudnn两个版本要对应的来,使得jax和jaxlib可以正常使用:storage.googleapis.com/jax-releases/jax_cuda_releases.html
nvidia-sm
dpkg -l | grep cudnn
2. 创建虚拟环境alphafold-env并激活,指定python=3.9
conda create -n alphafold-env python=3.9
conda activate alphafold-env
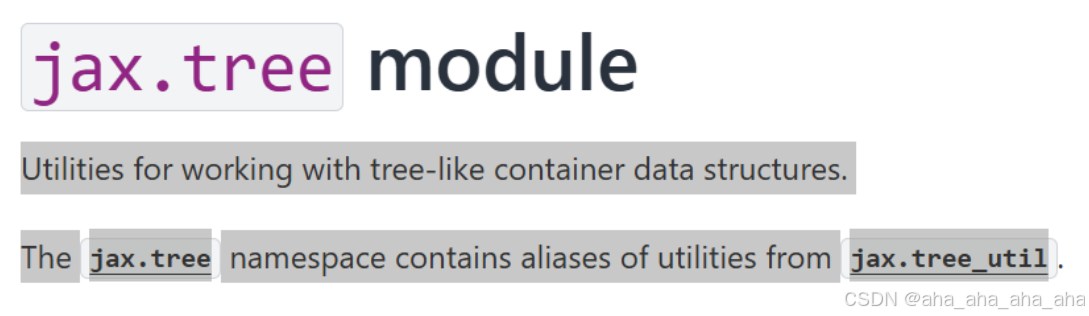
注意这里是3.9,这是其中一个坑,因为3.8的jaxlib包没有tree模块,可能因为包更新的缘故,代码就会报错。我现在想想,看到jax.tree module — JAX documentation,想着是不是只要把报错文件的import方式改一下就可以了,但是我没试过。
评论说用3.10,我试过了,会因为包兼容问题在安装conda install -c bioconda hmmer3.3.2 hhsuite3.3.0 kalign2==2.04这些玩意儿的时候报错,但是0.4.25这个版本的包确实是个好东西

3.安装AlphaFold2.3支持的新版openmm,CUDA等
conda install -c conda-forge openmm==7.7.0 cudatoolkit==11.8.0
conda install -c bioconda hmmer==3.3.2 hhsuite==3.3.0 kalign2==2.04
conda install mock
conda install -c conda-forge pdbfixer #这里也是一个坑,记得要这样安装才找得到想要的包
4. clone alphafold并进入文件夹
git clone https://kkgithub.com/deepmind/alphafold.git
cd ./alphafold
#下载残基性质参数到common文件夹
wget -q -P alphafold/common/ https://git.scicore.unibas.ch/schwede/openstructure/-/raw/7102c63615b64735c4941278d92b554ec94415f8/modules/mol/alg/src/stereo_chemical_props.txt
5. 下载数据库及模型参数文件(参考官方说明)
#安装下载软件
sudo apt install aria2
使用官方脚本,位于alphafold/scripts/
sh scripts/download_all_data.sh <DOWNLOAD_DIR> > download.log 2> download_all.log &
数据库下载
坑:数据库一起下载的时候特别容易停,建议把数据库分开下载:
把下面代码的download_all_data.sh依次改为(建议挂载后台下载,可以用screen命令:参考AutoDL帮助文档):
- download_alphafold_params.sh
- download_bfd.sh
- download_mgnify.sh
- download_pdb70.sh
- download_pdb_mmcif.sh
- download_pdb_seqres.sh
- download_small_bfd.sh
- download_uniprot.sh
- download_uniref30.sh
- download_uniref90.sh
nohup ./scripts/download_all_data.sh /root/autodl-tmp/database > /root/autodl-tmp/database/download.log 2>&1 &
下载完把各个文件的大小对一下,一定要全部下载完全:
在各个目录下用sh -du来对一下文件的大小,只会多不会少,括号里是压缩包的大小(下面这个表格来自GitHub - google-deepmind/alphafold: Open source code for AlphaFold 2.可能过几年又更新了,所以和官网的比对比较准确)
$DOWNLOAD_DIR/                             # Total: ~ 2.62 TB (download: 556 GB)
    bfd/                                   # ~ 1.8 TB (download: 271.6 GB)
        # 6 files.
    mgnify/                                # ~ 120 GB (download: 67 GB)
        mgy_clusters_2022_05.fa
    params/                                # ~ 5.3 GB (download: 5.3 GB)
        # 5 CASP14 models,
        # 5 pTM models,
        # 5 AlphaFold-Multimer models,
        # LICENSE,
        # = 16 files.
    pdb70/                                 # ~ 56 GB (download: 19.5 GB)
        # 9 files.
    pdb_mmcif/                             # ~ 238 GB (download: 43 GB)
        mmcif_files/
            # About 199,000 .cif files.
        obsolete.dat
    pdb_seqres/                            # ~ 0.2 GB (download: 0.2 GB)
        pdb_seqres.txt
    small_bfd/                             # ~ 17 GB (download: 9.6 GB)
        bfd-first_non_consensus_sequences.fasta
    uniref30/                              # ~ 206 GB (download: 52.5 GB)
        # 7 files.
    uniprot/                               # ~ 105 GB (download: 53 GB)
        uniprot.fasta
    uniref90/                              # ~ 67 GB (download: 34 GB)
        uniref90.fasta
6. 安装涉及到的依赖包。
将如下内容保存到requirement.txt文件,使用pip安装。
absl-py==1.0.0
biopython==1.79
chex==0.0.7
dm-haiku==0.0.9
dm-tree==0.1.6
docker==5.0.0
immutabledict==2.0.0
ml-collections==0.1.0
pillow==10.1.0
numpy==1.21.6
pandas==1.3.4
scipy==1.7.3
tensorflow-gpu==2.11.0
zipp==3.17.0
jax==0.4.13
#根据安装情况调整
pip install -r requirement.txt
pip uninstall jax jaxlib
#安装jaxlib:与CUDA和cudnn硬件的版本可以查看https://storage.googleapis.com/jax-releases/jax_cuda_releases.html
pip install --upgrade jax==0.4.25 jaxlib==0.4.25+cuda11.cudnn86 -f https://storage.googleapis.com/jax-releases/cuda11/jaxlib-0.4.25+cuda11.cudnn86-cp310-cp310-manylinux2014_x86_64.whl
这里我试了一天这个jaxlib包,才找到真正可以用的包,其实一开始看评论就有试过这个包了,但是报错之后我就换别的版本试,试了一圈下来,发现其实原来那个报错是可以改正的。
用0.4.25还是会报错,改正方法如下:
从 JAX v0.4.16 开始,jax.linear_util 被弃用,并在 v0.4.24 中被完全删除。
解决方案:升级Haiku版本
尝试升级 haiku 到最新版本。最新版本的 haiku 应该已经修复了对 jax.linear_util 的依赖
改正报错的代码:
pip install --upgrade dm-haiku
检查tensorflow-gpu安装:输入:python
import tensorflow as tf
tf.config.list_physical_devices('GPU')
显示有类似如下信息,即为正常。
[PhysicalDevice(name='/physical_device:GPU:0', device_type='GPU')]
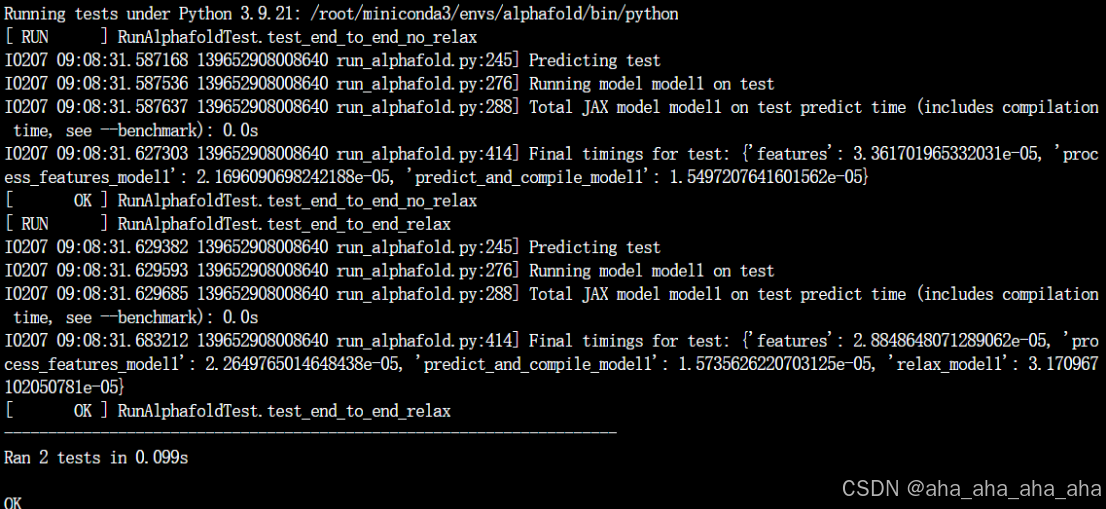
7. 验证环境是否安装成功
cd alphafold
#在主文件夹运行:
python run_alphafold_test.py
如有提示缺少安装文件,用conda或者pip安装。最终提示OK即可,示意如下图。
对了,这里可能还会报错,说找不到Could not load dynamic library ‘libnvinfer.so.7‘,我参考这篇博客:Tensorflow 报错 Could not load dynamic library ‘libnvinfer.so.7‘ 解决方法_could not load dynamic library 'libnvinfer.so.7-CSDN博客
找到TensorRT-8.5.1.7目录下的lib文件,直接简单粗暴的改文件名称!!!虽然很粗暴,但是管它呢,反正不报错就好~~~~~
直接复制两个 libnvinfer.so 到 libnvinfer.so.7 就可以。
cp libnvinfer_plugin.so libnvinfer_plugin.so.7
cp libnvinfer.so libnvinfer.so.7
8. 运行alphafold
这里我直接用原博主改的脚本来跑,就避免很多因为更新遇到的问题了。
脚本名称 run_alphafold23.sh,其他运行方法可以参考原文或者是官网,都是ok的
#!/bin/bash
# Description: AlphaFold non-docker version
# Author: Sanjay Kumar Srikakulam
# modifier: Blockbuater_drug according to AF v2.3

usage() {
        echo ""
        echo "Please make sure all required parameters are given"
        echo "Usage: $0 <OPTIONS>"
        echo "Required Parameters:"
        echo "-d <data_dir>         Path to directory of supporting data"
        echo "-o <output_dir>       Path to a directory that will store the results."
        echo "-f <fasta_paths>      Path to FASTA files containing sequences. If a FASTA file contains multiple sequences, then it will be folded as a multimer. To fold more sequences one after another, write the files separated by a comma"
        echo "-t <max_template_date> Maximum template release date to consider (ISO-8601 format - i.e. YYYY-MM-DD). Important if folding historical test sets"
        echo "Optional Parameters:"
        echo "-g <use_gpu>          Enable NVIDIA runtime to run with GPUs (default: true)"
        echo "-r <models_to_relax>  For AF2.3 replacing run_relax by models_to_relax, "all", "none" and "best", "best" in default. Whether to run the final relaxation step on the predicted models. Turning relax off might result in predictions with distracting stereochemical violations but might help in case you are having issues with the relaxation stage (default: true)"
        echo "-e <enable_gpu_relax> Run relax on GPU if GPU is enabled (default: true)"
        echo "-n <openmm_threads>   OpenMM threads (default: all available cores)"
        echo "-a <gpu_devices>      Comma separated list of devices to pass to 'CUDA_VISIBLE_DEVICES' (default: 0)"
        echo "-m <model_preset>     Choose preset model configuration - the monomer model, the monomer model with extra ensembling, monomer model with pTM head, or multimer model (default: 'monomer')"
        echo "-c <db_preset>        Choose preset MSA database configuration - smaller genetic database config (reduced_dbs) or full genetic database config (full_dbs) (default: 'full_dbs')"
        echo "-p <use_precomputed_msas> Whether to read MSAs that have been written to disk. WARNING: This will not check if the sequence, database or configuration have changed (default: 'false')"
        echo "-l <num_multimer_predictions_per_model> How many predictions (each with a different random seed) will be generated per model. E.g. if this is 2 and there are 5 models then there will be 10 predictions per input. Note: this FLAG only applies if model_preset=multimer (default: 5)"
        echo "-b <benchmark>        Run multiple JAX model evaluations to obtain a timing that excludes the compilation time, which should be more indicative of the time required for inferencing many proteins (default: 'false')"
        echo ""
        exit 1
}

while getopts ":d:o:f:t:g:r:e:n:a:m:c:p:l:b:" i; do
        case "${i}" in
        d)
                data_dir=$OPTARG
        ;;
        o)
                output_dir=$OPTARG
        ;;
        f)
                fasta_path=$OPTARG
        ;;
        t)
                max_template_date=$OPTARG
        ;;
        g)
                use_gpu=$OPTARG
        ;;
        r)
                models_to_relax=$OPTARG
        ;;
        e)
                enable_gpu_relax=$OPTARG
        ;;
        n)
                openmm_threads=$OPTARG
        ;;
        a)
                gpu_devices=$OPTARG
        ;;
        m)
                model_preset=$OPTARG
        ;;
        c)
                db_preset=$OPTARG
        ;;
        p)
                use_precomputed_msas=$OPTARG
        ;;
        l)
                num_multimer_predictions_per_model=$OPTARG
        ;;
        b)
                benchmark=$OPTARG
        ;;
        esac
done

# Parse input and set defaults
if [[ "$data_dir" == "" || "$output_dir" == "" || "$fasta_path" == "" || "$max_template_date" == "" ]] ; then
    usage
fi

if [[ "$benchmark" == "" ]] ; then
    benchmark=false
fi

if [[ "$use_gpu" == "" ]] ; then
    use_gpu=true
fi

if [[ "$gpu_devices" == "" ]] ; then
    gpu_devices=0
fi

if [[ "$models_to_relax" == "" ]] ; then
    models_to_relax="best"
fi

if [[ "$models_to_relax" != "best" && "$models_to_relax" != "all" && "$models_to_relax" != "none" ]] ; then
    echo "Unknown models to relax preset! Using default ('best')"
    db_preset="best"
fi

if [[ "$enable_gpu_relax" == "" ]] ; then
    enable_gpu_relax="true"
fi

if [[ "$enable_gpu_relax" == true && "$use_gpu" == true ]] ; then
    use_gpu_relax="true"
else
    use_gpu_relax="false"
fi

if [[ "$num_multimer_predictions_per_model" == "" ]] ; then
    num_multimer_predictions_per_model=5
fi

if [[ "$model_preset" == "" ]] ; then
    model_preset="monomer"
fi

if [[ "$model_preset" != "monomer" && "$model_preset" != "monomer_casp14" && "$model_preset" != "monomer_ptm" && "$model_preset" != "multimer" ]] ; then
    echo "Unknown model preset! Using default ('monomer')"
    model_preset="monomer"
fi

if [[ "$db_preset" == "" ]] ; then
    db_preset="full_dbs"
fi

if [[ "$db_preset" != "full_dbs" && "$db_preset" != "reduced_dbs" ]] ; then
    echo "Unknown database preset! Using default ('full_dbs')"
    db_preset="full_dbs"
fi

if [[ "$use_precomputed_msas" == "" ]] ; then
    use_precomputed_msas="false"
fi

# This bash script looks for the run_alphafold.py script in its current working directory, if it does not exist then exits
current_working_dir=$(pwd)
alphafold_script="$current_working_dir/run_alphafold.py"

if [ ! -f "$alphafold_script" ]; then
    echo "Alphafold python script $alphafold_script does not exist."
    exit 1
fi

# Export ENVIRONMENT variables and set CUDA devices for use
# CUDA GPU control
export CUDA_VISIBLE_DEVICES=-1
if [[ "$use_gpu" == true ]] ; then
    export CUDA_VISIBLE_DEVICES=0

    if [[ "$gpu_devices" ]] ; then
        export CUDA_VISIBLE_DEVICES=$gpu_devices
    fi
fi

# OpenMM threads control
if [[ "$openmm_threads" ]] ; then
    export OPENMM_CPU_THREADS=$openmm_threads
fi

# TensorFlow control
export TF_FORCE_UNIFIED_MEMORY='1'

# JAX control
export XLA_PYTHON_CLIENT_MEM_FRACTION='4.0'

# Path and user config (change me if required)
uniref90_database_path="$data_dir/uniref90/uniref90.fasta"
mgnify_database_path="$data_dir/mgnify/mgy_clusters_2022_05.fa"
template_mmcif_dir="$data_dir/pdb_mmcif/mmcif_files"
obsolete_pdbs_path="$data_dir/pdb_mmcif/obsolete.dat"
uniprot_database_path="$data_dir/uniprot/uniprot.fasta"
pdb_seqres_database_path="$data_dir/pdb_seqres/pdb_seqres.txt"
pdb70_database_path="$data_dir/pdb70/pdb70"
bfd_database_path="$data_dir/bfd/bfd_metaclust_clu_complete_id30_c90_final_seq.sorted_opt"
small_bfd_database_path="$data_dir/small_bfd/bfd-first_non_consensus_sequences.fasta"
uniref30_database_path="$data_dir/uniref30/UniRef30_2021_03"

# Binary path (change me if required)
hhblits_binary_path=$(which hhblits)
hhsearch_binary_path=$(which hhsearch)
jackhmmer_binary_path=$(which jackhmmer)
kalign_binary_path=$(which kalign)

binary_paths="--hhblits_binary_path=$hhblits_binary_path --hhsearch_binary_path=$hhsearch_binary_path --jackhmmer_binary_path=$jackhmmer_binary_path --kalign_binary_path=$kalign_binary_path"

database_paths="--uniref90_database_path=$uniref90_database_path --mgnify_database_path=$mgnify_database_path --data_dir=$data_dir --template_mmcif_dir=$template_mmcif_dir --obsolete_pdbs_path=$obsolete_pdbs_path"

if [[ $model_preset == "multimer" ]]; then
	database_paths="$database_paths --uniprot_database_path=$uniprot_database_path --pdb_seqres_database_path=$pdb_seqres_database_path"
else
	database_paths="$database_paths --pdb70_database_path=$pdb70_database_path"
fi

if [[ "$db_preset" == "reduced_dbs" ]]; then
	database_paths="$database_paths --small_bfd_database_path=$small_bfd_database_path"
else
	database_paths="$database_paths --uniref30_database_path=$uniref30_database_path --bfd_database_path=$bfd_database_path"
fi

command_args="--fasta_paths=$fasta_path --output_dir=$output_dir --max_template_date=$max_template_date --db_preset=$db_preset --model_preset=$model_preset --benchmark=$benchmark --use_precomputed_msas=$use_precomputed_msas --num_multimer_predictions_per_model=$num_multimer_predictions_per_model --models_to_relax=$models_to_relax --use_gpu_relax=$use_gpu_relax --logtostderr"

# Run AlphaFold with required parameters
$(python $alphafold_script $binary_paths $database_paths $command_args)
使用示例:
conda activate alphafold-env
cd alphafold
bash run_alphafold23.sh -d /root/autodl-tmp/database -o /root/alphafold/output -f /root/alphafold/input/input.fasta -t 2023-10-31 -c reduced_dbs
各个参数的意思:
Usage: run_alphafold23.sh <OPTIONS>
Required Parameters:
-d <data_dir>         Path to directory of supporting data
-o <output_dir>       Path to a directory that will store the results.
-f <fasta_paths>      Path to FASTA files containing sequences. If a FASTA file contains multiple sequences, then it will be folded as a multimer. To fold more sequences one after another, write the files separated by a comma
-t <max_template_date> Maximum template release date to consider (ISO-8601 format - i.e. YYYY-MM-DD). Important if folding historical test sets

Optional Parameters:
-g <use_gpu>          Enable NVIDIA runtime to run with GPUs (default: true)
-r <models_to_relax>  For AF2.3 replacing run_relax by models_to_relax, all, none and best, best in default. Whether to run the final relaxation step on the predicted models. Turning relax off might result in predictions with distracting stereochemical violations but might help in case you are having issues with the relaxation stage (default: true)
-e <enable_gpu_relax> Run relax on GPU if GPU is enabled (default: true)
-n <openmm_threads>   OpenMM threads (default: all available cores)
-a <gpu_devices>      Comma separated list of devices to pass to 'CUDA_VISIBLE_DEVICES' (default: 0)
-m <model_preset>     Choose preset model configuration - the monomer model, the monomer model with extra ensembling, monomer model with pTM head, monomer_casp14 or multimer model (default: 'monomer')
-c <db_preset>        Choose preset MSA database configuration - smaller genetic database config (reduced_dbs) or full genetic database config (full_dbs) (default: 'full_dbs')
-p <use_precomputed_msas> Whether to read MSAs that have been written to disk. WARNING: This will not check if the sequence, database or configuration have changed (default: 'false')
-l <num_multimer_predictions_per_model> How many predictions (each with a different random seed) will be generated per model. E.g. if this is 2 and there are 5 models then there will be 10 predictions per input. Note: this FLAG only applies if model_preset=multimer (default: 5)
-b <benchmark>        Run multiple JAX model evaluations to obtain a timing that excludes the compilation time, which should be more indicative of the time required for inferencing many proteins (default: 'false')
运行后生成的文件:
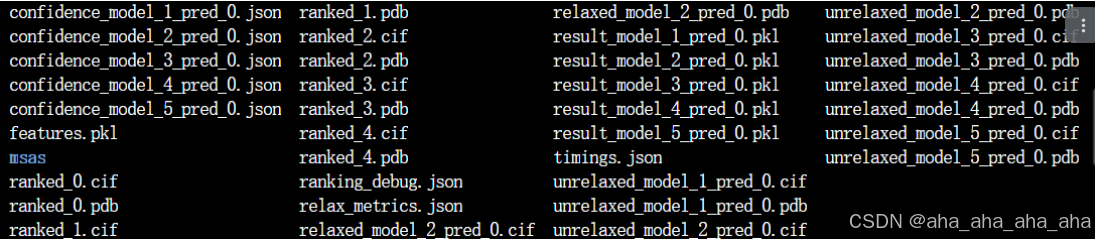
好咯!跑完啦啦啦啦!!完结撒花~~~~~~happy ending


 17万+
17万+

 被折叠的 条评论
为什么被折叠?
被折叠的 条评论
为什么被折叠?
 到【灌水乐园】发言


