


Mac and Windows apps in C#.
看到这句话,你就知道Xamarin是什么了,对于C#开发者,这样的标语还是会让你激动一下下的。
可能很多人知道Mono,类似于.net framework ,但是跨平台:Linux, Unix, OS x等等都支持,意味着可以在这些平台运行C#程序。这里想说一下Mono和Xamarin的关系,Mono最早是Novell公司的产品,但是Novell公司被收购后,Mono的开发者基本都被遣散了。而这些开发者失业后,选择创业,成立了Xamarin公司,继续开发Mono并发行自己的版本,命名和公司名相同,所以Xamarin既是公司名,也是产品名。
由于Xamarin运行的时候有很多依赖项,所以现在在官网上下载的XamarinInstall只是一个下载安装器,并不是软件包。它会自动下载安装所需的依赖软件,诸如JDK,ADK,GTK之类的,而且指定了版本。这两天发现如果不开VPN的话,好像无法正常进入安装步骤,所以安装前备好梯子。如果你时间充足,并且VPN稳定,可以使用自动安装的方法。这里记录下Windows平台下手动安装的步骤,以及破解方法。
1. 安装环境
Win8.1 X64专业版,VS2013英文版(Xamarin支持VS2010-2013)
这是Xamarin的安装配置文件,里面记录了所需的安装包下载地址及版本。官方可能会根据需要,随时更新安装包链接及版本,建议以这里面的内容为准。
3. 安装JDK
XML里面给了链接:http://download.xamarin.com/Installer/MonoForAndroid/jdk-6u39-windows-i586.exe 。下载安装配置。需要注意的是目前Xamarin只支持JDK 1.6的版本,即便你安装了最新版也不行,或者因为电脑是64位,安装了64位的jdk1.6也不行,否则最后一步的时候XamarinInstall还是会给你装上这个版本。如果这个地址下载太慢,可以到Oracle官网上下载,找到相同版本号就可以了。
4. Android SDK
xml里面的给的是R22的版本,但是我下载了最新的R23版本,也是支持的。这是官网地址http://developer.android.com/sdk/index.html,点击介绍内容下面的VIEW ALL DOWNLOADS AND SIZES,下载SDK Tools Only表格里面的版本就可以了。安装完成后,运行SDK Manager下载API和Tools,这几个版本的API是必须的:API 7、8、10、12、15、19,镜像随便选一个版本的下载就好了。下图是我的SDK安装情况:

5. Android NDK
xml里面给的是R8D的版本,我安装的是R9D版本,正常使用,这是官网地址:http://developer.android.com/tools/sdk/ndk/index.html 自己选择下载合适版本。下载完成后解压到Android SDK的安装路径,和android-sdk同一个根目录即可。Android SDK:http://dl.google.com/Android/adt/22.6.2/adt-bundle-windows-x86_64-20140321.zip (500M)
6. 安装GTK#
xml里面的地址就是最新版,下载安装即可:http://download.xamarin.com/GTKforWindows/Windows/gtk-sharp-2.12.25.msi,安装的时候最好右击以管理员权限安装。
7.Xamarin Studio
前面都是准备,现在我们需要的东西才算开始,下载安装: http://download.xamarin.com/studio/Windows/XamarinStudio-5.1.4.0-0.msi
8. Xamarin for Visual Studio
这是针对VS的插件,下载安装: http://download.xamarin.com/XamarinforVisualStudio/Windows/Xamarin.VisualStudio_Setup-3.1.224.0.msi
9. XamarinInstaller
最后再运行一次安装器,检查确认每一个所需的软件。如果有不符合的,它会自动安装正确的软件包。安装完成后会自动跳出一个网页。
至此所有安装步骤完成,建议电脑做一次重启,重启后开始下面的破解步骤。(千万不要登陆Xamarin账号,否则破解不成功)
10. 破解
下载破解包:http://pan.baidu.com/s/1bnlc2vX,密码:43dg,里面有破解步骤。
破解完成后,就可以享受跨平台编码的乐趣了(记得先在Android模拟器中创建一个虚拟机):
http://download.xamarin.com/Installer/MonoForAndroid/jdk-7u71-windows-i586.exe
http://dl.google.com/android/installer_r22-windows.exe
http://dl.google.com/android/ndk/android-ndk-r10d-windows-x86.exe
http://dl.google.com/android/ndk/android-ndk-r10d-windows-x86_64.exe
http://download.xamarin.com/GTKforWindows/Windows/gtk-sharp-2.12.26.msi
http://download.xamarin.com/studio/Windows/XamarinStudio-5.9.5.9-0.msi
http://download.xamarin.com/XamarinforVisualStudio/Windows/Xamarin.VisualStudio_3.11.836.msi

说明:
- Xamarin目前只支持java6和java7.我当时没注意,直接下载了个最新的java8,结果在运行的时候提示找到不到java6 和 java7。也就说下载jdk1.6或jdk1.7,并且是32位的,因为Android SDK依赖32位的JDK。上述链接中的jdk版本是1.7 32位的
- 根据官方文档,Android SDK要包含特定的Tools和API。如果你下载的Android sdk版本不合适可能不包含那些特定的Tools和API。上述链接中已经包含了所有需要的tools和api。
- 还有一个组件是 Android NDK(Android native develop kit ),它用来将 .net 类库嵌入到本地库。官方说他不是必选的,但是推荐安装。这是下载地址:https://developer.Android.com/tools/sdk/ndk/index.html.注意要选择32位的。
配置Xamarin
安装完成后只需简单的配置就行,由于我是在VS2013 update 2中开发Xamarin,所以先以vs2013为例来演示如何配置:
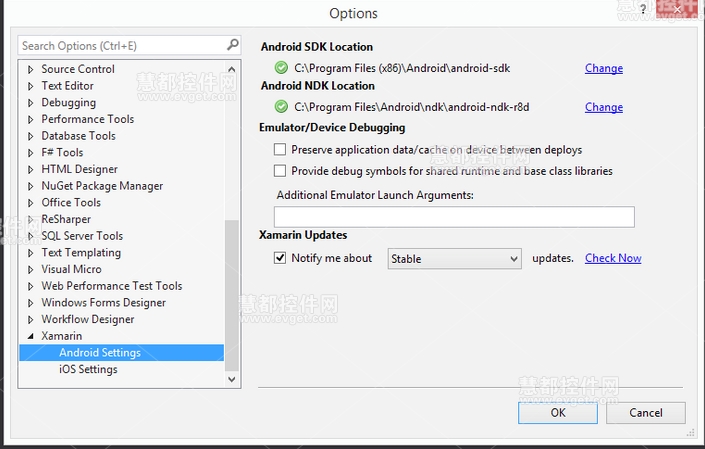
1、打开vs2013,工具-选项-Xamarin-Android setting。分别设置Android SDK和 Android NDk(可选),如下图:
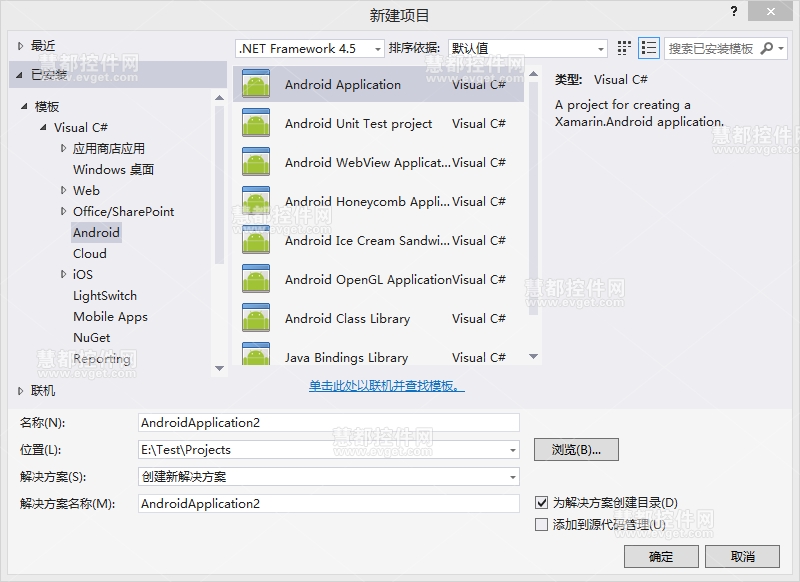
2、配置完成后重启vs2013,在新建项目的时候会看到项目模板中多了两个类型,如下图,看到 Android和iOS了吧,爽吗?
3、如果是在Xamarin studio中开发,打开 Xamarin studio 工具-选项-SDK Location-Android,打开如下界面进行配置:
恭喜,到此你已经完成了在windows平台下的Xamarin安装和配置。还差一步你就可以进行开发了,那就是安装和配置模拟器。

配置Android模拟器
官方说Android自带的模拟器启动非常慢(确实是这样,我搞Android开发时,是用自己手机来调试的),并推荐使用 Genymotion来充当模拟器。下面说明Genymotion的安装和使用。ios开发就没有这么幸运了,因为苹果公司的限制必须安装xcode,所以需要有一台苹果电脑。但是老夫很穷,只有个 thinkpadt 440p,所以Xamarin ios的配置就不说了。如果你有条件,那么请看上两篇的安装和配置过程:http://www.evget.com/article/2014/8/1/21402.html
官方给出的方式是先下载并安装Oracle VM VirtualBox,然后再安装Genymotion,但是我在Genymotion官网上发现,它有个大的安装包,已经集成了vm virtualbox和genymotion。只要安装这个大包即可,这是下载路径:http://files2.genymotion.com/genymotion/genymotion-2.2.2/genymotion-2.2.2-vbox.exe。
如果你愿意分开下载,那么这是genymotion独立下载界面https://cloud.genymotion.com/page/launchpad/download/。注意:genymotion分免费版,独立版和商业版。
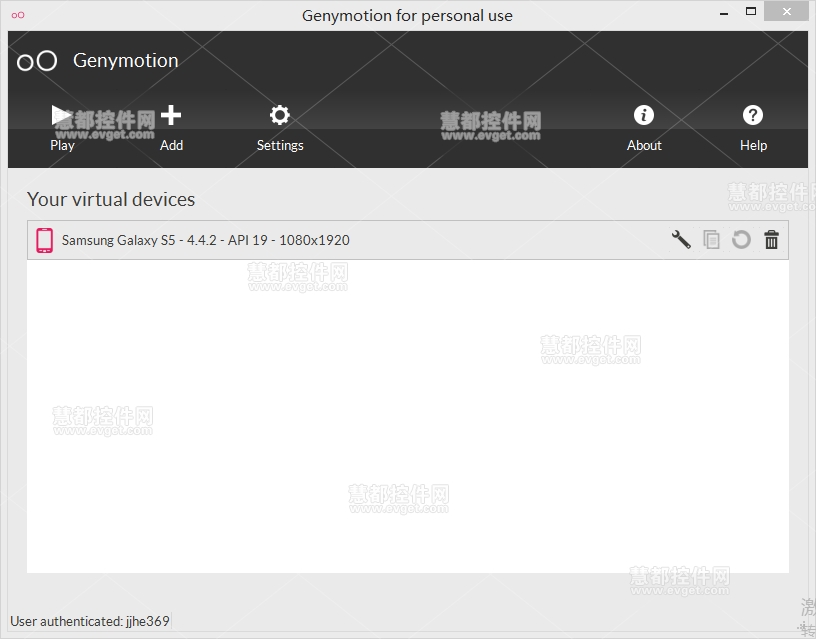
下载完就是安装了,按照默认选项安装即可。安装完成后就是简单配置了。具体如下:运行genymotion,将弹出如下界面:
如果是第一次使用,点击上方的Add按钮,弹出如下界面:
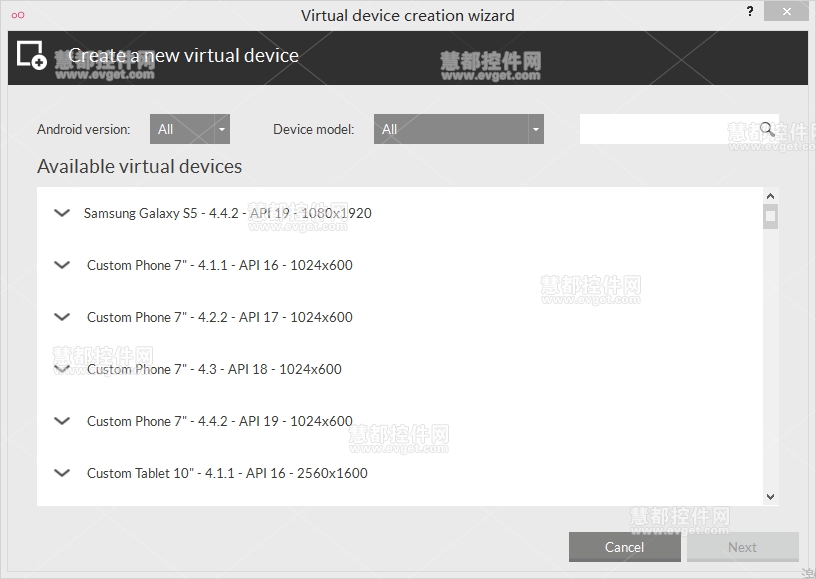
选择你需要的设备,然后点击Next后 genymotion会自动安装所选驱动。然后点击Play ,模拟器就运行起来了。如下图:

启动后,就可以开始你的Android开发之旅了,等你开发完点击运行的时候,模拟器会显示相关界面,如下图:

OK,到此你已经完成了在windows平台上安装和配置Xamarin,以及如何使用第三方模拟器来运行和调试Android程序。
<?xml version="1.0" encoding="utf-8"?>
<updates>
<Global>
	<WelcomeUrl>http://xamarin.com/customer-success</WelcomeUrl>
</Global>
<Update>
	<Name>Java JDK</Name>
	<GenericName>JDK</GenericName>
	<Version>1.7</Version>

	<UpdateVersion>71</UpdateVersion>

	<IncompatibleVersions>
		<ge>1.7.0.0</ge>
	</IncompatibleVersions>
	<Url>http://download.xamarin.com/Installer/MonoForAndroid/jdk-7u71-windows-i586.exe</Url>

	<ManualInstructions>
<Para>Download the <Link handler="variable" target="Url"><Name /> v<Version/> installer</Link> to any directory on your disk, double-click the downloaded file and follow the on-screen instructions.</Para>
<Para><Note>It is <Bold>very important</Bold> to install the 32-bit version of <Name/> even if you're using 64-bit Windows. It is also important that <Name/> v1.6 is installed (although it is fine to have
<Name/> 1.7 or newer installed at the same time)</Note></Para>
	</ManualInstructions>
</Update>
<Update Long="true">
	<Name>Android SDK</Name>
	<Version>22</Version>
	<GenericName>ASDK</GenericName>
	<Url>http://dl.google.com/android/installer_r22-windows.exe</Url>
	<RepositoryUrl>http://dl.google.com/android/repository/repository-10.xml</RepositoryUrl>
	<RepositoryNS>http://schemas.android.com/sdk/android/repository/10</RepositoryNS>
	<Platforms>15,19,21</Platforms>
	<Samples></Samples>
	<DownloadDocs>false</DownloadDocs>
	<ManualInstructions>
<Optional if="NeedMainSDK"><Para>Download the <Link handler="variable" target="Url"><Name/> for Windows version <Version/></Link> to any directory on your disk and double-click it to start main SDK installation process. You
can install the SDK either system wide or only for your account. You will need to point your IDE to that location after the installation is completed.</Para></Optional>
<Para><Link handler="exec" target="SdkManager">Click here</Link> in order to start the Android SDK Manager application. In the GUI make sure the following components are installed or selected for installation:
<List type="ul">
	<ListItem>Android SDK Tools</ListItem>
	<ListItem>Android SDK Platform-tools</ListItem>
	<ListItem>Android SDK Build-tools</ListItem>
	<Repeat for="Platforms" format="csl">
		<ListItem>Android API <RepeatItem/></ListItem>
	</Repeat>
</List>
</Para>
<Para>Once all the required components are selected (you can select others as well, if you wish) start the installation. <Link handler="file" target="TargetDir">Click here to open target dir</Link></Para>
<Optional if="NeedNDK"><Para>Download the <Link handler="variable" target="NDKUrl">Android NDK for Windows version <NDKVersion/></Link> to any directory on your disk and double-click it to start the NDK installation.</Para></Optional>
<Para>When the <Name/> installation is finished you might want to start the <Link handler="exec" target="AvdManager">Android Emulator Manager</Link> and create as many emulator images as you
might need for your development. This step can be performed at any time, on an as-needed basis.</Para>
	</ManualInstructions>
	<NDK>
		<Version>10</Version>
		<VersionTag>d</VersionTag>
		<Url architecture="32">http://dl.google.com/android/ndk/android-ndk-r10d-windows-x86.exe</Url>
		<Url architecture="64">http://dl.google.com/android/ndk/android-ndk-r10d-windows-x86_64.exe</Url>
		<TargetDir>|ProgramFiles|\Android\ndk</TargetDir>
	</NDK>
	<AVD>
		<Name>Xamarin Android API 15</Name>
		<BasePlatform>15</BasePlatform>

		<SdCardSize>512</SdCardSize>
		<SkinName>QVGA</SkinName>

		<RamSize>512</RamSize>


		<LcdDensity>120</LcdDensity>
		<HeapSize>48</HeapSize>
	</AVD>
	<AVD>
		<Name>Xamarin Android API 21</Name>
		<BasePlatform>21</BasePlatform>
		<SdCardSize>512</SdCardSize>
		<SkinName>QVGA</SkinName>
		<RamSize>512</RamSize>
		<LcdDensity>240</LcdDensity>
		<HeapSize>48</HeapSize>
	</AVD>
</Update>
<Update>
	<Name>GTK#</Name>
	<Version>2.12.26</Version>
	<GenericName>GTKSHARP</GenericName>
	<Url>http://download.xamarin.com/GTKforWindows/Windows/gtk-sharp-2.12.26.msi</Url>
	<RequiresAdminRights>true</RequiresAdminRights>
	<ManualInstructions>
<Para>Download the <Link handler="variable" target="Url"><Name /> v<Version/> installer</Link> to any directory on your disk, double-click the downloaded file and follow the on-screen instructions.</Para>
	</ManualInstructions>
</Update>
<Update>
	<Name>Xamarin Studio</Name>
	<Version>5.9.5</Version>
	<ReleaseId></ReleaseId>
	<GenericName>MonoDevelop</GenericName>
	<Url>http://download.xamarin.com/studio/Windows/XamarinStudio-5.9.5.9-0.msi</Url>
	<RequiresAdminRights>false</RequiresAdminRights>
	<ManualInstructions>
<Para>Download the <Link handler="variable" target="Url"><Name/> v<Version/> installer</Link> to any directory on your disk, double-click it and follow the on-screen instructions.</Para>
	</ManualInstructions>
</Update>
<Update Selectable="false">
    <Name>Xamarin</Name>
    <Version>3.11.836</Version>
    <GenericName>XVS</GenericName>
    <DependsOn>JDK,ASDK,GTKSHARP,MonoDevelop</DependsOn>
    <Disables>XAndroid,MTVS</Disables>
    <Url>http://download.xamarin.com/XamarinforVisualStudio/Windows/Xamarin.VisualStudio_3.11.836.msi</Url>
    <RequiresAdminRights>true</RequiresAdminRights>
	<AdditionalDownloads>
		<Url id="nuget" nugetVersion="2.8.50926.602" description="NuGet Tools for VS 2010-2012" quiet="true" vsver="2010,2012">https://visualstudiogallery.msdn.microsoft.com/27077b70-9dad-4c64-adcf-c7cf6bc9970c/file/37502/38/NuGet.Tools.vsix</Url>
		<Url id="nuget" nugetVersion="2.8.50926.663" description="NuGet Tools for VS 2013" quiet="true" vsver="2013">https://visualstudiogallery.msdn.microsoft.com/4ec1526c-4a8c-4a84-b702-b21a8f5293ca/file/105933/7/NuGet.Tools.2013.vsix</Url>
	</AdditionalDownloads>
	<ManualInstructions>
<Para>Download the <Link handler="variable" target="Url"><Name/> v<Version/> installer</Link> to any directory on your disk, double-click it and follow the on-screen instructions.</Para>
<Note>After installation, restart your Windows workstation to make sure all of the installed system services are running.</Note>
	</ManualInstructions>
</Update>

<ManualInstructionsIntro>
   <Para><Note>It was not possible to complete an automatic installation.  This might be due to a problem with your network, proxy servers or an unsolvable installation conflict.    At this point, you can continue the installation by manually downloading and installing the independent pieces.   The list below shows each component that you need to install.</Note></Para>
</ManualInstructionsIntro>
<ManualInstructionsStyleSheet>
<![CDATA[
body {
  font-size: 10pt;
  font-family: sans-serif;
  color: black;
}

.monospace {
  font-family: monospace;
}

.executableName, .fsLocation {
  font-family: monospace;
  font-weight: bold;
}

.shellCode {
  display: block;
  font-family: monospace;
  margin-left: 5em;
  margin-right: 5em;
  margin-top: 1em;
  margin-bottom: 1em;
  padding: 0.5em;
  border: darkgray 1px dotted;
}

.note {
  display: block;
  font-size: 11pt;
  background-color: lightgray;
  color: darkred;
  padding: 10px;
  border: gray 1px solid;
  margin-left: 5em;
  margin-right: 5em;
  margin-top: 1em;
  margin-bottom: 1em;
}

.item {
  margin-top: 1em;
  border-top: darkgray 1px solid
}

.itemTitle {
  background-color: #eeeeee;
  font-size: 12pt;
  font-weight: bold;
  margin-bottom: 0.5em;
}
]]>
</ManualInstructionsStyleSheet>
</updates>


 73
73

 被折叠的 条评论
为什么被折叠?
被折叠的 条评论
为什么被折叠?
 到【灌水乐园】发言


