


我下面介绍的使用CMake的方式编译native的,直接使用Android.mk也可以。
1.建立一个support c++的Android工程
2.MainActivity.java复制过去,把res复制过去(之后可能会报一些xml形式的drawable找不到某些图片,这时可以随便复制命名一张图片放到drawable上就好了),在main下面建立一个叫jniLibs的文件夹,把so文件复制到jniLibs,结构如下图。把c、cpp源文件放到main/cpp下。把头文件放到main/cpp/include下。


4.配置app/build.gradle文件。主要看配置CMakeList和abiFilters
apply plugin: 'com.android.application'

android {
    compileSdkVersion 26
    defaultConfig {
        applicationId "com.example.champion.ffmpegtranscode"
        minSdkVersion 24
        targetSdkVersion 26
        versionCode 1
        versionName "1.0"
        testInstrumentationRunner "android.support.test.runner.AndroidJUnitRunner"
        externalNativeBuild {
            cmake {
                cppFlags ""
            }
            ndk {
                // abiFiliter: ABI 过滤器(application binary interface,应用二进制接口)
                // Android 支持的 CPU 架构
                abiFilters 'armeabi'//,'armeabi-v7a','arm64-v8a','x86','x86_64','mips','mips64'
            }
        }
    }
    buildTypes {
        release {
            minifyEnabled false
            proguardFiles getDefaultProguardFile('proguard-android.txt'), 'proguard-rules.pro'
        }
    }
    externalNativeBuild {
        cmake {
            path "CMakeLists.txt"
        }
    }
}

dependencies {
    implementation fileTree(dir: 'libs', include: ['*.jar'])
    implementation 'com.android.support:appcompat-v7:26.1.0'
    implementation 'com.android.support.constraint:constraint-layout:1.1.1'
    testImplementation 'junit:junit:4.12'
    androidTestImplementation 'com.android.support.test:runner:1.0.2'
    androidTestImplementation 'com.android.support.test.espresso:espresso-core:3.0.2'
}
5.配置CMakeList.txt,上面已经指明路径了,就是在app/CMakeList.txt
主要编译无源动态库(so为src)和有源动态库(c,cpp文件为src)。最后要把log-lib和所有ffmpeg标准so和自己编写代码的那个so使用target_link_libraries链接到一起。在该文件中指明头文件的目录,使用的是include_directories( src/main/cpp/include )。可以直接复制该文件覆盖原来的,然后修改自己编译的so库的名字和编译所需的源文件。
# For more information about using CMake with Android Studio, read the
# documentation: https://d.android.com/studio/projects/add-native-code.html

# Sets the minimum version of CMake required to build the native library.

cmake_minimum_required(VERSION 3.4.1)

# Creates and names a library, sets it as either STATIC
# or SHARED, and provides the relative paths to its source code.
# You can define multiple libraries, and CMake builds them for you.
# Gradle automatically packages shared libraries with your APK.

add_library( # Sets the name of the library.
             native-lib

             # Sets the library as a shared library.
             SHARED

             # Provides a relative path to your source file(s).
             src/main/cpp/native-lib.cpp )

# Searches for a specified prebuilt library and stores the path as a
# variable. Because CMake includes system libraries in the search path by
# default, you only need to specify the name of the public NDK library
# you want to add. CMake verifies that the library exists before
# completing its build.

find_library( # Sets the name of the path variable.
              log-lib

              # Specifies the name of the NDK library that
              # you want CMake to locate.
              log )

# Specifies libraries CMake should link to your target library. You
# can link multiple libraries, such as libraries you define in this
# build script, prebuilt third-party libraries, or system libraries.

target_link_libraries( # Specifies the target library.
                       native-lib

                       # Links the target library to the log library
                       # included in the NDK.
                       ${log-lib} )


add_library(
             sfftranscoder
             SHARED
             src/main/cpp/cmdutils.c
             src/main/cpp/ffmpeg_filter.c
             src/main/cpp/ffmpeg_jni.c
             src/main/cpp/ffmpeg_mod.c
             src/main/cpp/ffmpeg_opt.c
             )


add_library(
             avcodec-56
             SHARED
             IMPORTED )
set_target_properties(avcodec-56
                      PROPERTIES IMPORTED_LOCATION
                      ${CMAKE_SOURCE_DIR}/src/main/jniLibs/${ANDROID_ABI}/libavcodec-56.so)


add_library(
             avdevice-56
             SHARED
             IMPORTED )
set_target_properties(avdevice-56
                      PROPERTIES IMPORTED_LOCATION
                      ${CMAKE_SOURCE_DIR}/src/main/jniLibs/${ANDROID_ABI}/libavdevice-56.so)
find_library( # Sets the name of the path variable.
              log-lib

              # Specifies the name of the NDK library that
              # you want CMake to locate.
              log )
#target_link_libraries(
#                       avdevice-56
#                       ${log-lib} )

add_library(
             avfilter-5
             SHARED
             IMPORTED )
set_target_properties(avfilter-5
                      PROPERTIES IMPORTED_LOCATION
                      ${CMAKE_SOURCE_DIR}/src/main/jniLibs/${ANDROID_ABI}/libavfilter-5.so)
find_library( # Sets the name of the path variable.
              log-lib

              # Specifies the name of the NDK library that
              # you want CMake to locate.
              log )
#target_link_libraries(
 #                      avfilter-5
 #                      ${log-lib} )

add_library(
             avformat-56
             SHARED
             IMPORTED )
set_target_properties(avformat-56
                      PROPERTIES IMPORTED_LOCATION
                      ${CMAKE_SOURCE_DIR}/src/main/jniLibs/${ANDROID_ABI}/libavformat-56.so)
find_library( # Sets the name of the path variable.
              log-lib

              # Specifies the name of the NDK library that
              # you want CMake to locate.
              log )
#target_link_libraries(
#                       avformat-56
 #                      ${log-lib} )

add_library(
             avutil-54
             SHARED
             IMPORTED )
set_target_properties(avutil-54
                      PROPERTIES IMPORTED_LOCATION
                      ${CMAKE_SOURCE_DIR}/src/main/jniLibs/${ANDROID_ABI}/libavutil-54.so)
find_library( # Sets the name of the path variable.
              log-lib

              # Specifies the name of the NDK library that
              # you want CMake to locate.
              log )
#target_link_libraries(
#                       avutil-54
 #                      ${log-lib} )

add_library(
             postproc-53
             SHARED
             IMPORTED )
set_target_properties(postproc-53
                      PROPERTIES IMPORTED_LOCATION
                      ${CMAKE_SOURCE_DIR}/src/main/jniLibs/${ANDROID_ABI}/libpostproc-53.so)
find_library( # Sets the name of the path variable.
              log-lib

              # Specifies the name of the NDK library that
              # you want CMake to locate.
              log )
#target_link_libraries(
#                       postproc-53
#                       ${log-lib} )


add_library(
             swresample-1
             SHARED
             IMPORTED )
set_target_properties(swresample-1
                      PROPERTIES IMPORTED_LOCATION
                      ${CMAKE_SOURCE_DIR}/src/main/jniLibs/${ANDROID_ABI}/libswresample-1.so)
find_library( # Sets the name of the path variable.
              log-lib

              # Specifies the name of the NDK library that
              # you want CMake to locate.
              log )
#target_link_libraries(
#                       swresample-1
#                       ${log-lib} )


add_library(
             swscale-3
             SHARED
             IMPORTED )
set_target_properties(swscale-3
                      PROPERTIES IMPORTED_LOCATION
                      ${CMAKE_SOURCE_DIR}/src/main/jniLibs/${ANDROID_ABI}/libswscale-3.so)
find_library( # Sets the name of the path variable.
              log-lib

              # Specifies the name of the NDK library that
              # you want CMake to locate.
              log )
#target_link_libraries(
 #                      swscale-3
 #                      ${log-lib} )

target_link_libraries(sfftranscoder
avcodec-56
avdevice-56
avfilter-5
avformat-56
avutil-54
postproc-53
swresample-1
swscale-3
${log-lib} )

include_directories( src/main/cpp/include )
6.修改jni文件中的jni方法的名字,与声明native方法所在的包名+类名一致的名字。
7.可能有些头文件需要增加声明,或者修改头文件的路径,如#include "libavutil/dict.h"改成#include "libxxxx/dict.h"
8.如果有些资源的错误会导致R编译不出来就会缺少R文件,如果R文件有了,还是不行,就是声明一下R。app_packagename.R
9.在Manifest中声明读写权限,在代码中动态申请读写,加上一个回调方法。如果不动态申请,那么在native中打开文件也会permission denied
<uses-permission android:name="android.permission.WRITE_EXTERNAL_STORAGE"/>
    <uses-permission android:name="android.permission.READ_EXTERNAL_STORAGE"/>
checkSelfPermission("android.permission.WRITE_EXTERNAL_STORAGE");
shouldShowRequestPermissionRationale("android.permission.WRITE_EXTERNAL_STORAGE");
requestPermissions(new String[]{"android.permission.WRITE_EXTERNAL_STORAGE"}, 10);@Override
public void onRequestPermissionsResult(int requestCode, String[] permissions,int[] grantResults) {
super.onRequestPermissionsResult(requestCode, permissions, grantResults);
Log.e(TAG, "requestCode: " + requestCode + " permissions: " + permissions.toString()
+ "grantResults: " + grantResults.toString());
}调试,如果执行程序不顺利,logcat > 重定向到一个文件中,可以看到下面的native的log:
06-12 20:46:16.549 30100 30100 F libc    : Fatal signal 11 (SIGSEGV), code 1, fault addr 0x18 in tid 30100 (ffmpegtranscode)
06-12 20:46:16.629 30169 30169 F DEBUG   : *** *** *** *** *** *** *** *** *** *** *** *** *** *** *** ***
06-12 20:46:16.629 30169 30169 F DEBUG   : Build fingerprint: 'honor/FRD-AL10/HWFRD:7.0/HUAWEIFRD-AL10/C00B391:user/release-keys'
06-12 20:46:16.629 30169 30169 F DEBUG   : Revision: '0'
06-12 20:46:16.629 30169 30169 F DEBUG   : ABI: 'arm'
06-12 20:46:16.630 30169 30169 F DEBUG   : pid: 30100, tid: 30100, name: ffmpegtranscode  >>> com.example.champion.ffmpegtranscode <<<
06-12 20:46:16.630 30169 30169 F DEBUG   : signal 11 (SIGSEGV), code 1 (SEGV_MAPERR), fault addr 0x18
06-12 20:46:16.630 30169 30169 F DEBUG   :     r0 00000000  r1 00000000  r2 de0cbcb3  r3 00000000
06-12 20:46:16.630 30169 30169 F DEBUG   :     r4 d367f8d9  r5 c62db08c  r6 d367f8d9  r7 ffd7d890
06-12 20:46:16.630 30169 30169 F DEBUG   :     r8 ffd7ddc8  r9 e5404f00  sl ffd7dcd0  fp e5404f00
06-12 20:46:16.630 30169 30169 F DEBUG   :     ip de0d5bd0  sp ffd7d6f0  lr de0b1f8b  pc de0c04ca  cpsr 600f0030
06-12 20:46:16.643 30169 30169 F DEBUG   :
06-12 20:46:16.643 30169 30169 F DEBUG   : backtrace:
06-12 20:46:16.651 30169 30169 F DEBUG   :     #00 pc 0001f4ca  /data/app/com.example.champion.ffmpegtranscode-1/lib/arm/libsfftranscoder.so
06-12 20:46:16.651 30169 30169 F DEBUG   :     #01 pc 0001ee37  /data/app/com.example.champion.ffmpegtranscode-1/lib/arm/libsfftranscoder.so
06-12 20:46:16.651 30169 30169 F DEBUG   :     #02 pc 0001ec93  /data/app/com.example.champion.ffmpegtranscode-1/lib/arm/libsfftranscoder.so (ffmpeg_parse_options+158)
06-12 20:46:16.651 30169 30169 F DEBUG   :     #03 pc 0001116f  /data/app/com.example.champion.ffmpegtranscode-1/lib/arm/libsfftranscoder.so (ffmpegmain+178)
06-12 20:46:16.651 30169 30169 F DEBUG   :     #04 pc 00010cb1  /data/app/com.example.champion.ffmpegtranscode-1/lib/arm/libsfftranscoder.so (Java_com_example_champion_ffmpegtranscode_MainActivity_ffmpegcore+184)
06-12 20:46:16.651 30169 30169 F DEBUG   :     #05 pc 000adf19  /system/lib/libart.so (art_quick_generic_jni_trampoline+40)
06-12 20:46:16.651 30169 30169 F DEBUG   :     #06 pc 000a9541  /system/lib/libart.so (art_quick_invoke_stub_internal+64)
06-12 20:46:16.651 30169 30169 F DEBUG   :     #07 pc 00406c6d  /system/lib/libart.so (art_quick_invoke_stub+232)
06-12 20:46:16.651 30169 30169 F DEBUG   :     #08 pc 000b0809  /system/lib/libart.so (_ZN3art9ArtMethod6InvokeEPNS_6ThreadEPjjPNS_6JValueEPKc+136)
06-12 20:46:16.651 30169 30169 F DEBUG   :     #09 pc 001eca3f  /system/lib/libart.so (_ZN3art11interpreter34ArtInterpreterToCompiledCodeBridgeEPNS_6ThreadEPNS_9ArtMethodEPKNS_7DexFile8CodeItemEPNS_11ShadowFrameEPNS_6JValueE+198)
06-12 20:46:16.651 30169 30169 F DEBUG   :     #10 pc 001e6fdf  /system/lib/libart.so (_ZN3art11interpreter6DoCallILb0ELb0EEEbPNS_9ArtMethodEPNS_6ThreadERNS_11ShadowFrameEPKNS_11InstructionEtPNS_6JValueE+478)
06-12 20:46:16.651 30169 30169 F DEBUG   :     #11 pc 003fe63f  /system/lib/libart.so (MterpInvokeVirtual+422)
06-12 20:46:16.651 30169 30169 F DEBUG   :     #12 pc 0009c394  /system/lib/libart.so (ExecuteMterpImpl+14228)
06-12 20:46:16.652 30169 30169 F DEBUG   :     #13 pc 001cad4b  /system/lib/libart.so (_ZN3art11interpreterL7ExecuteEPNS_6ThreadEPKNS_7DexFile8CodeItemERNS_11ShadowFrameENS_6JValueEb+290)
06-12 20:46:16.652 30169 30169 F DEBUG   :     #14 pc 001cf815  /system/lib/libart.so (_ZN3art11interpreter30EnterInterpreterFromEntryPointEPNS_6ThreadEPKNS_7DexFile8CodeItemEPNS_11ShadowFrameE+92)
06-12 20:46:16.652 30169 30169 F DEBUG   :     #15 pc 003f611d  /system/lib/libart.so (artQuickToInterpreterBridge+716)
06-12 20:46:16.652 30169 30169 F DEBUG   :     #16 pc 000adf93  /system/lib/libart.so (art_quick_to_interpreter_bridge+34)
06-12 20:46:16.652 30169 30169 F DEBUG   :     #17 pc 74f1a40f  /data/dalvik-cache/arm/system@framework@boot-framework.oat (offset 0x17b1000)
06-12 20:47:21.716 30465 30465 F libc : Fatal signal 11 (SIGSEGV), code 1, fault addr 0x18 in tid 30465 (ffmpegtranscode)06-12 20:46:16.651 30169 30169 F DEBUG : #03 pc 0001116f /data/app/com.example.champion.ffmpegtranscode-1/lib/arm/libsfftranscoder.so (ffmpegmain+178)
进入了ffmpegmain,然后再进入ffmpeg_parse_options方法,那么就打log调试究竟具体是出在哪个一句代码,在每个有点可疑的语句前后加log,最笨最有效的方法。
在jni和native中打log:
#include <jni.h>
#include <android/log.h>
#define LOGE(FORMAT, ...) __android_log_print(ANDROID_LOG_ERROR,"LC",FORMAT,##__VA_ARGS__);
在代码中就是使用了: LOGE("注册成功")
搜索LC就可以过滤出所有由这个宏打出来的log,注意LC是上面定义的,可以更改的。
static void syslog_print(void *ptr, int level, const char *fmt, va_list vl)
{
    switch(level) {
        case AV_LOG_DEBUG:
            ALOG(ANDROID_LOG_VERBOSE, SYS_LOG_TAG, fmt, vl);
            break;
        case AV_LOG_VERBOSE:
            ALOG(ANDROID_LOG_DEBUG, SYS_LOG_TAG, fmt, vl);
            break;
        case AV_LOG_INFO:
            ALOG(ANDROID_LOG_INFO, SYS_LOG_TAG, fmt, vl);
            break;
        case AV_LOG_WARNING:
            ALOG(ANDROID_LOG_WARN, SYS_LOG_TAG, fmt, vl);
            break;
        case AV_LOG_ERROR:
        case AV_LOG_FATAL:
            ALOG(ANDROID_LOG_ERROR, SYS_LOG_TAG, fmt, vl);
            break;
    }
}

static void syslog_init()
{
    av_log_set_callback(syslog_print);
}
使用:
syslog_init();
//    av_log_set_callback(custom_log);
av_log(NULL, AV_LOG_ERROR, "ffmpegmain_log: ");也可以把他输出到一个文件中:
定义一个回调(注意:如果该so库的其他文件中定义了这个custom_log方法那么就不能定义了否则会编译报错,只需在使用的位置前面声明就好了):
//Output FFmpeg's av_log()
void custom_log(void *ptr, int level, const char* fmt, va_list vl){

	//To TXT file

	FILE *fp=fopen("/storage/emulated/0/av_log.txt","a+");
	if(fp){
		vfprintf(fp,fmt,vl);
		fflush(fp);
		fclose(fp);
	}


	//To Logcat
	//LOGE(fmt, vl);
}
设置一个回调:av_log_set_callback(custom_log);
使用,和之前的方法一样的:av_log(NULL, AV_LOG_ERROR, "ffmpegmain_log: ");
关于ffmpeg的log输出系统:
----------------------------------------------------------------------------------------------------------------------
转载自:http://blog.51cto.com/ticktick/1867059
由于如今的工作比以前忙了,已经有好些日子没有分享技术博文了,还是得继续坚持下去。鉴于如今视频直播如此火爆,那就选个主题,聊聊播放器、聊聊 FFMPEG 那些事吧。
FFMPEG 是个好东西,可以说目前市面上的任何一款“通用型”播放器,都离不开 FFMPEG,因为没有什么其他的库比它支持的格式更加全面了。
这里首先致敬一下雷神,博客地址:《雷霄骅的专栏》,分享了很多音视频方面的技术文章、开源代码以及 FFMPEG 源码的分析,无论对入门者还是资深开发,都有很大的价值。
我要写的主题,与雷神不同,我会测重介绍使用 FFMPEG 开发播放器过程中的一些比较基础的小经验或者说开发笔记,因此,使用 Tips 这个单词,意味小技巧、小帖士,因此,本系列的目标读者是 FFMPEG 的入门者,也欢迎路过的高手们能对分享的内容给出宝贵的建议和意见。
本文则从开发和调试程序最重要的一点:打 LOG 说起,看看基于 FFMPEG 开发,如何打印 LOG,如何设置日志的级别。
1. FFMPEG 打印日志的函数
FFMPEG 有一套自己的日志系统,它使用 av_log() 函数来打印日志,其声明位于:<libavutil/log.h>
它的函数原型如下:
|
1
2
3
4
5
6
7
8
9
10
11
12
13
14
15
|
/**
* Send the specified message to the log if the level is less than or equal
* to the current av_log_level. By default, all logging messages are sent to
* stderr. This behavior can be altered by setting a different logging callback
* function.
* @see av_log_set_callback
*
* @param avcl A pointer to an arbitrary struct of which the first field is a
* pointer to an AVClass struct.
* @param level The importance level of the message expressed using a @ref
* lavu_log_constants "Logging Constant".
* @param fmt The format string (printf-compatible) that specifies how
* subsequent arguments are converted to output.
*/
void
av_log(
void
*avcl,
int
level,
const
char
*fmt, …);
|
参数含义:
avcl:指定一个包含 AVClass 的结构体,指定该 log 所属的结构体,如 AVFormatContext、AVCodecContext 等等,可以设置为 NULL
level:log 的级别,下面给出可选的值
fmt:跟 c 语言的 printf() 定义一样
2. FFMPEG 日志级别
LOG 的级别是一个 int 类型,其可选的数值及其含义如下:
|
1
2
3
4
5
6
7
8
9
10
11
12
13
14
15
16
17
18
19
20
21
22
23
24
25
26
27
28
29
30
31
32
33
34
35
36
37
38
39
40
41
42
43
|
/**
* Print no output.
*/
#define AV_LOG_QUIET -8
/**
* Something went really wrong and we will crash now.
*/
#define AV_LOG_PANIC 0
/**
* Something went wrong and recovery is not possible.
* For example, no header was found for a format which depends
* on headers or an illegal combination of parameters is used.
*/
#define AV_LOG_FATAL 8
/**
* Something went wrong and cannot losslessly be recovered.
* However, not all future data is affected.
*/
#define AV_LOG_ERROR 16
/**
* Something somehow does not look correct. This may or may not
* lead to problems. An example would be the use of '-vstrict -2'.
*/
#define AV_LOG_WARNING 24
/**
* Standard information.
*/
#define AV_LOG_INFO 32
/**
* Detailed information.
*/
#define AV_LOG_VERBOSE 40
/**
* Stuff which is only useful for libav* developers.
*/
#define AV_LOG_DEBUG 48
|
3. FFMPEG 设置和获取当前日志级别
由一个全局的变量来控制哪个级别及以上的日志会打印输出,设置和获取这个全局变量的函数如下:
|
1
2
3
4
5
6
7
8
9
10
11
12
13
14
15
16
17
|
/**
* Get the current log level
*
* @see lavu_log_constants
*
* @return Current log level
*/
int
av_log_get_level(
void
);
/**
* Set the log level
*
* @see lavu_log_constants
*
* @param level Logging level
*/
void
av_log_set_level(
int
level);
|
例如,当全局的日志级别设置为 `AV_LOG_ERROR`,那么凡是日志级别高于 `AV_LOG_ERROR` 的日志,都不会被打印出来。
4. FFMPEG 日志打印函数的使用示例
假设要打印 DEBUG 和 ERROR 级别的日志,用法示例如下:
|
1
2
|
av_log(NULL, AV_LOG_DEBUG,
"Hello World ! \n"
);
av_log(NULL, AV_LOG_ERROR,
"Error:%d ! \n"
, errorCode);
|
5. FFMPEG 日志打印函数的封装
当然,如果你觉得 av_log 用起来不是很顺手,你可以定义个宏封装下,例如:
|
1
2
3
4
5
6
7
8
9
10
11
12
|
#ifndef _SYS_LOG_
#define _SYS_LOG_
#include <libavutil/log.h>
#define LOGD(format, ...) av_log(NULL, AV_LOG_DEBUG, format, ##__VA_ARGS__);
#define LOGV(format, ...) av_log(NULL, AV_LOG_VERBOSE, format, ##__VA_ARGS__);
#define LOGI(format, ...) av_log(NULL, AV_LOG_INFO, format, ##__VA_ARGS__);
#define LOGW(format, ...) av_log(NULL, AV_LOG_WARNING, format, ##__VA_ARGS__);
#define LOGE(format, ...) av_log(NULL, AV_LOG_ERROR, format, ##__VA_ARGS__);
#endif
|
6. Android 中打印 FFMPEG 的日志
由于 FFMPEG 默认使用的是 printf 来打印日志,而 Android 系统有着一套自己的 LOG 系统,因此,需要让 FFMPEG 的日志重定向使用 Android 的日志系统,具体方法描述如下:
通过 FFMPEG 的 av_log_set_callback() 注册一个 LOG callback function,FFMPEG 就会把 LOG 打印功能重定向到 callback function 中,代码示例如下(你也可以到我的 Github 查看封装好的源代码: https://github.com/Jhuster/clib):
|
1
2
3
4
5
6
7
8
9
10
11
12
13
14
15
16
17
18
19
20
21
22
23
24
25
26
27
28
29
30
31
32
33
34
|
#ifdef __ANDROID_API__
#include <android/log.h>
#define ALOG(level, TAG, ...) ((void)__android_log_vprint(level, TAG, __VA_ARGS__))
#define SYS_LOG_TAG "nmplayer"
static
void
syslog_print(
void
*ptr,
int
level,
const
char
*fmt,
va_list
vl)
{
switch
(level) {
case
AV_LOG_DEBUG:
ALOG(ANDROID_LOG_VERBOSE, SYS_LOG_TAG, fmt, vl);
break
;
case
AV_LOG_VERBOSE:
ALOG(ANDROID_LOG_DEBUG, SYS_LOG_TAG, fmt, vl);
break
;
case
AV_LOG_INFO:
ALOG(ANDROID_LOG_INFO, SYS_LOG_TAG, fmt, vl);
break
;
case
AV_LOG_WARNING:
ALOG(ANDROID_LOG_WARN, SYS_LOG_TAG, fmt, vl);
break
;
case
AV_LOG_ERROR:
ALOG(ANDROID_LOG_ERROR, SYS_LOG_TAG, fmt, vl);
break
;
}
}
static
void
syslog_init()
{
av_log_set_callback(syslog_print);
}
#endif // __ANDROID_API__
|
在代码初始化的地方调用一下 syslog_init() 后,就可以使用 av_log() 在 Android 平台输出调试日志了。
7. FFPlay 设置日志级别
平时自己写的播放器播放某些流播放有问题的话,也可以使用 ffplay 来对比调试一下,看看使用 ffplay 是否可以播放,报错信息是什么,ffplay 打开 DEBUG 日志输出的方法示例如下:
|
1
|
$ ffplay -v debug $URL
|
-v 参数是用于配制 ffplay 的日志级别,其定义如下:
|
1
2
3
4
5
6
7
8
9
10
11
12
13
14
15
16
17
18
19
20
21
22
23
24
25
26
27
28
29
30
|
-loglevel [repeat+]loglevel | -v [repeat+]loglevel
Set the logging level used by the library. Adding
"repeat+"
indicates that repeated
log
output should not be compressed to the first line and the
"Last message repeated n times"
line will be omitted.
"repeat"
can also be used alone. If
"repeat"
is used alone, and with no prior loglevel set, the
default
loglevel will be used. If multiple loglevel parameters are given,
using
’repeat’ will not change the loglevel. loglevel is a string or a number containing one of the following values:
‘quiet, -8’
Show nothing at all; be silent.
‘panic, 0’
Only show fatal errors which could lead the process to crash, such as an assertion failure. This is not currently used
for
anything.
‘fatal, 8’
Only show fatal errors. These are errors after which the process absolutely cannot
continue
.
‘error, 16’
Show all errors, including ones which can be recovered from.
‘warning, 24’
Show all warnings and errors. Any message related to possibly incorrect or unexpected events will be shown.
‘info, 32’
Show informative messages during processing. This is in addition to warnings and errors. This is the
default
value.
‘verbose, 40’
Same as info, except more verbose.
‘debug, 48’
Show everything, including debugging information.
‘trace, 56’
By
default
the program logs to stderr. If coloring is supported by the terminal, colors ar
|
-----------------------------------------------------------------------------------------------------------
转自:https://blog.csdn.net/leixiaohua1020/article/details/44243155
FFmpeg的库函数源代码分析文章列表:
【架构图】
【通用】
FFmpeg 源代码简单分析:av_register_all()
FFmpeg 源代码简单分析:avcodec_register_all()
FFmpeg 源代码简单分析:内存的分配和释放(av_malloc()、av_free()等)
FFmpeg 源代码简单分析:常见结构体的初始化和销毁(AVFormatContext,AVFrame等)
FFmpeg 源代码简单分析:av_find_decoder()和av_find_encoder()
FFmpeg 源代码简单分析:avcodec_open2()
FFmpeg 源代码简单分析:avcodec_close()
【解码】
图解FFMPEG打开媒体的函数avformat_open_input
FFmpeg 源代码简单分析:avformat_open_input()
FFmpeg 源代码简单分析:avformat_find_stream_info()
FFmpeg 源代码简单分析:av_read_frame()
FFmpeg 源代码简单分析:avcodec_decode_video2()
FFmpeg 源代码简单分析:avformat_close_input()
【编码】
FFmpeg 源代码简单分析:avformat_alloc_output_context2()
FFmpeg 源代码简单分析:avformat_write_header()
FFmpeg 源代码简单分析:avcodec_encode_video()
FFmpeg 源代码简单分析:av_write_frame()
FFmpeg 源代码简单分析:av_write_trailer()
【其它】
FFmpeg源代码简单分析:日志输出系统(av_log()等)
FFmpeg源代码简单分析:结构体成员管理系统-AVClass
FFmpeg源代码简单分析:结构体成员管理系统-AVOption
FFmpeg源代码简单分析:libswscale的sws_getContext()
FFmpeg源代码简单分析:libswscale的sws_scale()
FFmpeg源代码简单分析:libavdevice的avdevice_register_all()
FFmpeg源代码简单分析:libavdevice的gdigrab
【脚本】
【H.264】
=====================================================
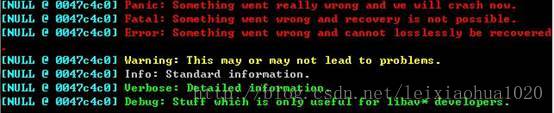
本文分析一下FFmpeg的日志(Log)输出系统的源代码。日志输出部分的核心函数只有一个:av_log()。使用av_log()在控制台输出日志的效果如下图所示。
函数调用结构图
FFmpeg日志输出系统的函数调用结构图如图所示。

av_log()
av_log()是FFmpeg中输出日志的函数。随便打开一个FFmpeg的源代码文件,就会发现其中遍布着av_log()函数。一般情况下FFmpeg类库的源代码中是不允许使用printf()这种的函数的,所有的输出一律使用av_log()。av_log()的声明位于libavutil\log.h,如下所示。
- /**
- * Send the specified message to the log if the level is less than or equal
- * to the current av_log_level. By default, all logging messages are sent to
- * stderr. This behavior can be altered by setting a different logging callback
- * function.
- * @see av_log_set_callback
- *
- * @param avcl A pointer to an arbitrary struct of which the first field is a
- * pointer to an AVClass struct.
- * @param level The importance level of the message expressed using a @ref
- * lavu_log_constants "Logging Constant".
- * @param fmt The format string (printf-compatible) that specifies how
- * subsequent arguments are converted to output.
- */
- void av_log(void *avcl, int level, const char *fmt, ...) av_printf_format(3, 4);
这个函数的声明有两个地方比较特殊:
(1)函数最后一个参数是“…”。在C语言中,在函数参数数量不确定的情况下使用“…”来代表参数。例如printf()的原型定义如下
- int printf (const char*, ...);
后文中对此再作详细分析。
(2)它的声明后面有一个av_printf_format(3, 4)。有关这个地方的左右还没有深入研究,网上资料中说它的作用是按照printf()的格式检查av_log()的格式。av_log()每个字段的含义如下:由此可见,av_log()和printf()的不同主要在于前面多了两个参数。其中第一个参数指定该log所属的结构体,例如AVFormatContext、AVCodecContext等等。第二个参数指定log的级别,源代码中定义了如下几个级别。
avcl:指定一个包含AVClass的结构体。
level:log的级别
fmt:和printf()一样。
- /**
- * Print no output.
- */
- #define AV_LOG_QUIET -8
- /**
- * Something went really wrong and we will crash now.
- */
- #define AV_LOG_PANIC 0
- /**
- * Something went wrong and recovery is not possible.
- * For example, no header was found for a format which depends
- * on headers or an illegal combination of parameters is used.
- */
- #define AV_LOG_FATAL 8
- /**
- * Something went wrong and cannot losslessly be recovered.
- * However, not all future data is affected.
- */
- #define AV_LOG_ERROR 16
- /**
- * Something somehow does not look correct. This may or may not
- * lead to problems. An example would be the use of '-vstrict -2'.
- */
- #define AV_LOG_WARNING 24
- /**
- * Standard information.
- */
- #define AV_LOG_INFO 32
- /**
- * Detailed information.
- */
- #define AV_LOG_VERBOSE 40
- /**
- * Stuff which is only useful for libav* developers.
- */
- #define AV_LOG_DEBUG 48
从定义中可以看出来,随着严重程度逐渐下降,一共包含如下级别:AV_LOG_PANIC,AV_LOG_FATAL,AV_LOG_ERROR,AV_LOG_WARNING,AV_LOG_INFO,AV_LOG_VERBOSE,AV_LOG_DEBUG。每个级别定义的数值代表了严重程度,数值越小代表越严重。默认的级别是AV_LOG_INFO。此外,还有一个级别不输出任何信息,即AV_LOG_QUIET。
当前系统存在着一个“Log级别”。所有严重程度高于该级别的Log信息都会输出出来。例如当前的Log级别是AV_LOG_WARNING,则会输出AV_LOG_PANIC,AV_LOG_FATAL,AV_LOG_ERROR,AV_LOG_WARNING级别的信息,而不会输出AV_LOG_INFO级别的信息。可以通过av_log_get_level()获得当前Log的级别,通过另一个函数av_log_set_level()设置当前的Log级别。
av_log_get_level(), av_log_set_level()
av_log_get_level()的定义如下所示
- /**
- * Get the current log level
- *
- * @see lavu_log_constants
- *
- * @return Current log level
- */
- int av_log_get_level(void);
可以通过av_log_set_level()设置当前Log的级别。
- /**
- * Set the log level
- *
- * @see lavu_log_constants
- *
- * @param level Logging level
- */
- void av_log_set_level(int level);
- int av_log_get_level(void)
- {
- return av_log_level;
- }
- void av_log_set_level(int level)
- {
- av_log_level = level;
- }
- static int av_log_level = AV_LOG_INFO;
- void av_log(void* avcl, int level, const char *fmt, ...)
- {
- AVClass* avc = avcl ? *(AVClass **) avcl : NULL;
- va_list vl;
- va_start(vl, fmt);
- if (avc && avc->version >= (50 << 16 | 15 << 8 | 2) &&
- avc->log_level_offset_offset && level >= AV_LOG_FATAL)
- level += *(int *) (((uint8_t *) avcl) + avc->log_level_offset_offset);
- av_vlog(avcl, level, fmt, vl);
- va_end(vl);
- }
(1)va_list变量va_list是一个指向函数的参数的指针。va_start()用于初始化va_list变量。va_arg()用于返回可变参数。va_start()用于结束可变参数的获取。有关它们的用法可以参考一个小demo,如下所示。
(2)va_start()
(3)va_arg()
(4)va_end()
- #include <stdio.h>
- #include<stdarg.h>
- void fun(int a,...){
- va_list pp;
- va_start(pp,a);
- do{
- printf("param =%d\n",a);
- a=va_arg(pp,int);//使 pp 指向下一个参数,将下一个参数的值赋给变量 a
- }
- while (a!=0);//直到参数为 0 时停止循环
- }
- void main(){
- fun(20,40,60,80,0);
- }
有关这方面的知识很难用简短的语言描述清楚,因此不再详述。av_log()的源代码中,在va_start()和va_end()之间,调用了另一个函数av_vlog()。
av_vlog()
av_vlog()是一个FFmpeg的API函数。它的声明位于libavutil\log.h中,如下所示。- /**
- * Send the specified message to the log if the level is less than or equal
- * to the current av_log_level. By default, all logging messages are sent to
- * stderr. This behavior can be altered by setting a different logging callback
- * function.
- * @see av_log_set_callback
- *
- * @param avcl A pointer to an arbitrary struct of which the first field is a
- * pointer to an AVClass struct.
- * @param level The importance level of the message expressed using a @ref
- * lavu_log_constants "Logging Constant".
- * @param fmt The format string (printf-compatible) that specifies how
- * subsequent arguments are converted to output.
- * @param vl The arguments referenced by the format string.
- */
- void av_vlog(void *avcl, int level, const char *fmt, va_list vl);
从声明中可以看出,av_vlog()和av_log()的参数基本上是一模一样的。唯一的不同在于av_log()中的“…”变成了av_vlog()中的va_list。
av_vlog()的定义位于libavutil\log.c中,如下所示。- void av_vlog(void* avcl, int level, const char *fmt, va_list vl)
- {
- void (*log_callback)(void*, int, const char*, va_list) = av_log_callback;
- if (log_callback)
- log_callback(avcl, level, fmt, vl);
- }
- static void (*av_log_callback)(void*, int, const char*, va_list) =
- av_log_default_callback;
av_log_set_callback()的声明如下所示。
- /**
- * Set the logging callback
- *
- * @note The callback must be thread safe, even if the application does not use
- * threads itself as some codecs are multithreaded.
- *
- * @see av_log_default_callback
- *
- * @param callback A logging function with a compatible signature.
- */
- void av_log_set_callback(void (*callback)(void*, int, const char*, va_list));
av_log_set_callback()的定义很简单,做了一个函数指针赋值的工作,如下所示。
- void av_log_set_callback(void (*callback)(void*, int, const char*, va_list))
- {
- av_log_callback = callback;
- }
- void my_logoutput(void* ptr, int level, const char* fmt,va_list vl){
- FILE *fp = fopen("my_log.txt","a+");
- if(fp){
- vfprintf(fp,fmt,vl);
- fflush(fp);
- fclose(fp);
- }
- }
- av_log_set_callback(my_logoutput);
av_log_default_callback()
下面我们看一下FFmpeg的默认Log输出函数av_log_default_callback()。它的定义如下。- void av_log_default_callback(void* ptr, int level, const char* fmt, va_list vl)
- {
- static int print_prefix = 1;
- static int count;
- static char prev[LINE_SZ];
- AVBPrint part[4];
- char line[LINE_SZ];
- static int is_atty;
- int type[2];
- unsigned tint = 0;
- if (level >= 0) {
- tint = level & 0xff00;
- level &= 0xff;
- }
- if (level > av_log_level)
- return;
- #if HAVE_PTHREADS
- pthread_mutex_lock(&mutex);
- #endif
- format_line(ptr, level, fmt, vl, part, &print_prefix, type);
- snprintf(line, sizeof(line), "%s%s%s%s", part[0].str, part[1].str, part[2].str, part[3].str);
- #if HAVE_ISATTY
- if (!is_atty)
- is_atty = isatty(2) ? 1 : -1;
- #endif
- if (print_prefix && (flags & AV_LOG_SKIP_REPEATED) && !strcmp(line, prev) &&
- *line && line[strlen(line) - 1] != '\r'){
- count++;
- if (is_atty == 1)
- fprintf(stderr, " Last message repeated %d times\r", count);
- goto end;
- }
- if (count > 0) {
- fprintf(stderr, " Last message repeated %d times\n", count);
- count = 0;
- }
- strcpy(prev, line);
- sanitize(part[0].str);
- colored_fputs(type[0], 0, part[0].str);
- sanitize(part[1].str);
- colored_fputs(type[1], 0, part[1].str);
- sanitize(part[2].str);
- colored_fputs(av_clip(level >> 3, 0, 6), tint >> 8, part[2].str);
- sanitize(part[3].str);
- colored_fputs(av_clip(level >> 3, 0, 6), tint >> 8, part[3].str);
- end:
- av_bprint_finalize(part+3, NULL);
- #if HAVE_PTHREADS
- pthread_mutex_unlock(&mutex);
- #endif
- }
av_log_default_callback()的代码是比较复杂的。其实如果我们仅仅是希望把Log信息输出到屏幕上,远不需要那么多代码,只需要简单打印一下就可以了。av_log_default_callback()之所以会那么复杂,主要是因为他还包含了很多的功能,比如说根据Log级别的不同将输出的文本设置成不同的颜色等等。下图显示了不同级别的Log不同的背景颜色。
(1)如果输入参数level大于系统当前的日志级别av_log_level,表明不需要做任何处理,直接返回。
(2)调用format_line()设定Log的输出格式。
(3)调用colored_fputs()设定Log的颜色。
format_line(), av_log_format_line()
format_line()用于设定Log的输出格式。它本身并不是一个FFmpeg的API,但是FFmpeg有一个API函数av_log_format_line()调用了这个函数。av_log_format_line()的声明如下所示。- /**
- * Format a line of log the same way as the default callback.
- * @param line buffer to receive the formated line
- * @param line_size size of the buffer
- * @param print_prefix used to store whether the prefix must be printed;
- * must point to a persistent integer initially set to 1
- */
- void av_log_format_line(void *ptr, int level, const char *fmt, va_list vl,
- char *line, int line_size, int *print_prefix);
av_log_format_line()的定义如下所示。
- void av_log_format_line(void *ptr, int level, const char *fmt, va_list vl,
- char *line, int line_size, int *print_prefix)
- {
- AVBPrint part[4];
- format_line(ptr, level, fmt, vl, part, print_prefix, NULL);
- snprintf(line, line_size, "%s%s%s%s", part[0].str, part[1].str, part[2].str, part[3].str);
- av_bprint_finalize(part+3, NULL);
- }
从代码中可以看出,首先声明了一个AVBPrint类型的数组,其中包含了4个元素;接着调用format_line()设定格式;最后将设置格式后的AVBPrint数组中的4个元素连接起来。
在这里遇到了一个结构体AVBPrint,它的定义位于libavutil\bprint.h,如下所示。
- /**
- * Buffer to print data progressively
- *
- * The string buffer grows as necessary and is always 0-terminated.
- * The content of the string is never accessed, and thus is
- * encoding-agnostic and can even hold binary data.
- *
- * Small buffers are kept in the structure itself, and thus require no
- * memory allocation at all (unless the contents of the buffer is needed
- * after the structure goes out of scope). This is almost as lightweight as
- * declaring a local "char buf[512]".
- *
- * The length of the string can go beyond the allocated size: the buffer is
- * then truncated, but the functions still keep account of the actual total
- * length.
- *
- * In other words, buf->len can be greater than buf->size and records the
- * total length of what would have been to the buffer if there had been
- * enough memory.
- *
- * Append operations do not need to be tested for failure: if a memory
- * allocation fails, data stop being appended to the buffer, but the length
- * is still updated. This situation can be tested with
- * av_bprint_is_complete().
- *
- * The size_max field determines several possible behaviours:
- *
- * size_max = -1 (= UINT_MAX) or any large value will let the buffer be
- * reallocated as necessary, with an amortized linear cost.
- *
- * size_max = 0 prevents writing anything to the buffer: only the total
- * length is computed. The write operations can then possibly be repeated in
- * a buffer with exactly the necessary size
- * (using size_init = size_max = len + 1).
- *
- * size_max = 1 is automatically replaced by the exact size available in the
- * structure itself, thus ensuring no dynamic memory allocation. The
- * internal buffer is large enough to hold a reasonable paragraph of text,
- * such as the current paragraph.
- */
- typedef struct AVBPrint {
- FF_PAD_STRUCTURE(1024,
- char *str; /**< string so far */
- unsigned len; /**< length so far */
- unsigned size; /**< allocated memory */
- unsigned size_max; /**< maximum allocated memory */
- char reserved_internal_buffer[1];
- )
- } AVBPrint;
AVBPrint的注释代码很长,不再详细叙述。在这里只要知道他是用于打印字符串的缓存就可以了。它的名称BPrint的意思应该就是“Buffer to Print”。其中的str存储了将要打印的字符串。
format_line()函数的定义如下所示。
- static void format_line(void *avcl, int level, const char *fmt, va_list vl,
- AVBPrint part[4], int *print_prefix, int type[2])
- {
- AVClass* avc = avcl ? *(AVClass **) avcl : NULL;
- av_bprint_init(part+0, 0, 1);
- av_bprint_init(part+1, 0, 1);
- av_bprint_init(part+2, 0, 1);
- av_bprint_init(part+3, 0, 65536);
- if(type) type[0] = type[1] = AV_CLASS_CATEGORY_NA + 16;
- if (*print_prefix && avc) {
- if (avc->parent_log_context_offset) {
- AVClass** parent = *(AVClass ***) (((uint8_t *) avcl) +
- avc->parent_log_context_offset);
- if (parent && *parent) {
- av_bprintf(part+0, "[%s @ %p] ",
- (*parent)->item_name(parent), parent);
- if(type) type[0] = get_category(parent);
- }
- }
- av_bprintf(part+1, "[%s @ %p] ",
- avc->item_name(avcl), avcl);
- if(type) type[1] = get_category(avcl);
- if (flags & AV_LOG_PRINT_LEVEL)
- av_bprintf(part+2, "[%s] ", get_level_str(level));
- }
- av_vbprintf(part+3, fmt, vl);
- if(*part[0].str || *part[1].str || *part[2].str || *part[3].str) {
- char lastc = part[3].len && part[3].len <= part[3].size ? part[3].str[part[3].len - 1] : 0;
- *print_prefix = lastc == '\n' || lastc == '\r';
- }
- }
从代码中可以看出,其分别处理了AVBPrint类型数组part的4个元素。由此我们也可以看出FFmpeg一条Log可以分成4个组成部分。在这里涉及到几个与AVBPrint相关的函数,由于篇幅的关系,不再分析它们的源代码,仅仅列出它们的定义:
初始化AVBPrint的函数av_bprint_init()。
- /**
- * Init a print buffer.
- *
- * @param buf buffer to init
- * @param size_init initial size (including the final 0)
- * @param size_max maximum size;
- * 0 means do not write anything, just count the length;
- * 1 is replaced by the maximum value for automatic storage;
- * any large value means that the internal buffer will be
- * reallocated as needed up to that limit; -1 is converted to
- * UINT_MAX, the largest limit possible.
- * Check also AV_BPRINT_SIZE_* macros.
- */
- void av_bprint_init(AVBPrint *buf, unsigned size_init, unsigned size_max);
向AVBPrint添加一个字符串的函数av_bprintf()。
- /**
- * Append a formatted string to a print buffer.
- */
- void av_bprintf(AVBPrint *buf, const char *fmt, ...) av_printf_format(2, 3);
向AVBPrint添加一个字符串的函数av_vbprintf (),注意与av_bprintf()的不同在于其第3个参数不一样。
- /**
- * Append a formatted string to a print buffer.
- */
- void av_vbprintf(AVBPrint *buf, const char *fmt, va_list vl_arg);
- void av_bprintf(AVBPrint *buf, const char *fmt, ...)
- {
- unsigned room;
- char *dst;
- va_list vl;
- int extra_len;
- while (1) {
- room = av_bprint_room(buf);
- dst = room ? buf->str + buf->len : NULL;
- va_start(vl, fmt);
- extra_len = vsnprintf(dst, room, fmt, vl);
- va_end(vl);
- if (extra_len <= 0)
- return;
- if (extra_len < room)
- break;
- if (av_bprint_alloc(buf, extra_len))
- break;
- }
- av_bprint_grow(buf, extra_len);
- }
可以看出av_bprintf()实际上调用了系统的vsnprintf()完成了相应的功能。
看完以上几个与AVBPrint相关函数之后,就可以来看一下format_line()的代码了。例如,part[0]对应的是目标结构体的父结构体的名称(如果父结构体存在的话);其打印格式形如“[%s @ %p]”,其中前面的“%s”对应父结构体的名称,“%p”对应其所在的地址。part[1]对应的是目标结构体的名称;其打印格式形如“[%s @ %p]”,其中前面的“%s”对应本结构体的名称,“%p”对应其所在的地址。part[2]用于输出Log的级别,这个字符串只有在flag中设置AV_LOG_PRINT_LEVEL的时候才能打印。part[3]则是打印原本传送进来的文本。将format_line()函数处理后得到的4个字符串连接其来,就可以的到一条完整的Log信息。下面图显示了flag设置AV_LOG_PRINT_LEVEL后的打印出来的Log的格式。


colored_fputs()
colored_fputs()函数用于将输出的文本“上色”并且输出。在这里有一点需要注意:Windows和Linux下控制台程序上色的方法是不一样的。Windows下是通过SetConsoleTextAttribute()方法给控制台中的文本上色;Linux下则是通过添加一些ANSI控制码完成上色。
Linux下控制台文字上色的方法
Linux下控制台颜色是通过添加专用数字来选择的。这些数字夹在 "\e["和 "m"之间。如果指定一个以上的数字,则用分号将它们分开。
举几个例子:
(1)第一个数字(31)为前景颜色(红色);第二个数字为(42)背景颜色(绿色)
- echo -e "\e[31;42m"
- echo -e "\e[0m" 或 echo -e "\033[0m"
\e[30m -- \e[37m 设置前景色(字体颜色)
echo -e "\e[30m" 灰色
echo -e "\e[31m" 红色
echo -e "\e[32m" 绿色
echo -e "\e[33m" 黄色
echo -e "\e[34m" 蓝色
echo -e "\e[35m" 紫色
echo -e "\e[36m" 淡蓝色
echo -e "\e[37m" 白色
\e[40m -- \e[47m 设置背景色
echo -e "\e[40m" 灰色
echo -e "\e[41m" 红色
echo -e "\e[42m" 绿色
echo -e "\e[43m" 黄色
echo -e "\e[44m" 蓝色
echo -e "\e[45m" 紫色
echo -e "\e[46m" 淡蓝色
echo -e "\e[47m" 白色
具体到编程中,printf() 颜色设置示例代码如下所示。
- int main()
- {
- printf("\e[31m Hello World. \e[0m \n"); // 红色字体
- return 0;
- }
Windows下控制台文字上色的方法
Windows下控制台颜色是通过SetConsoleTextAttribute()函数完成的。SetConsoleTextAttribute()函数的原型如下所示。- BOOL SetConsoleTextAttribute(HANDLE hConsoleOutput, WORD wAttributes);
hConsoleOutput:指向控制台的句柄。
wAttributes:文本属性。
hConsoleOutput可以选择以下3种句柄:
STD_INPUT_HANDLE: 标准输入的句柄wAttributes可以控制前景色和背景色:
STD_OUTPUT_HANDLE: 标准输出的句柄
STD_ERROR_HANDLE: 标准错误的句柄
FOREGROUND_BLUE: 字体颜色:蓝控制台文本上色demo代码如下所示。
FOREGROUND_GREEN: 字体颜色:绿
FOREGROUND_RED: 字体颜色:红
FOREGROUND_INTENSITY: 前景色高亮显示
BACKGROUND_BLUE: 背景颜色:蓝
BACKGROUND_GREEN: 背景颜色:绿
BACKGROUND_RED: 背景颜色:红
BACKGROUND_INTENSITY 背景色高亮显示
- /**
- * 雷霄骅 Lei Xiaohua
- * leixiaohua1020@126.com
- * http://blog.csdn.net/leixiaohua1020
- */
- #include <stdio.h>
- #include <windows.h>
- int main()
- {
- SetConsoleTextAttribute(GetStdHandle(STD_OUTPUT_HANDLE), FOREGROUND_RED);
- printf("red\n");
- SetConsoleTextAttribute(GetStdHandle(STD_OUTPUT_HANDLE), FOREGROUND_GREEN);
- printf("green\n");
- SetConsoleTextAttribute(GetStdHandle(STD_OUTPUT_HANDLE), FOREGROUND_BLUE);
- printf("blue\n");
- SetConsoleTextAttribute(GetStdHandle(STD_OUTPUT_HANDLE), FOREGROUND_RED|FOREGROUND_GREEN);
- printf("red+green=yellow\n");
- SetConsoleTextAttribute(GetStdHandle(STD_OUTPUT_HANDLE), FOREGROUND_RED|FOREGROUND_BLUE);
- printf("red+blue=purple\n");
- SetConsoleTextAttribute(GetStdHandle(STD_OUTPUT_HANDLE), FOREGROUND_GREEN|FOREGROUND_BLUE);
- printf("green+blue=cyan\n");
- SetConsoleTextAttribute(GetStdHandle(STD_OUTPUT_HANDLE), FOREGROUND_RED|BACKGROUND_GREEN);
- printf("Add background\n");
- return 0;
- }
程序的运行结果如下图所示。

colored_fputs()源代码
下面看一下colored_fputs()函数的源代码。
- static void colored_fputs(int level, int tint, const char *str)
- {
- int local_use_color;
- if (!*str)
- return;
- if (use_color < 0)
- check_color_terminal();
- if (level == AV_LOG_INFO/8) local_use_color = 0;
- else local_use_color = use_color;
- #if defined(_WIN32) && !defined(__MINGW32CE__) && HAVE_SETCONSOLETEXTATTRIBUTE
- if (local_use_color)
- SetConsoleTextAttribute(con, background | color[level]);
- fputs(str, stderr);
- if (local_use_color)
- SetConsoleTextAttribute(con, attr_orig);
- #else
- if (local_use_color == 1) {
- fprintf(stderr,
- "\033[%d;3%dm%s\033[0m",
- (color[level] >> 4) & 15,
- color[level] & 15,
- str);
- } else if (tint && use_color == 256) {
- fprintf(stderr,
- "\033[48;5;%dm\033[38;5;%dm%s\033[0m",
- (color[level] >> 16) & 0xff,
- tint,
- str);
- } else if (local_use_color == 256) {
- fprintf(stderr,
- "\033[48;5;%dm\033[38;5;%dm%s\033[0m",
- (color[level] >> 16) & 0xff,
- (color[level] >> 8) & 0xff,
- str);
- } else
- fputs(str, stderr);
- #endif
- }
从colored_fputs()的源代码中可以看出如下流程:
首先判定根据宏定义系统的类型,如果系统类型是Windows,那么就调用SetConsoleTextAttribute()方法设定控制台文本的颜色,然后调用fputs()将Log记录输出到stderr(注意不是stdout);如果系统类型是Linux,则通过添加特定字符串的方式设定控制台文本的颜色,然后将Log记录输出到stderr。
至此FFmpeg的日志输出系统的源代码就分析完毕了。


 86
86

 被折叠的 条评论
为什么被折叠?
被折叠的 条评论
为什么被折叠?
 到【灌水乐园】发言


