


常用的分类预测模型:逻辑回归、KNN、朴素贝叶斯、LDA、SVC、GBDT、决策树
如果需要了解相关原理的话,可以另行百度,这里只讲解训练流程,废话不多说,直接开始讲解训练流程
训练流程
一、导入训练数据
train_data = pd.read_csv('training.csv', header = True)
train_data
- 这里用的数据就是一个普通的 DataFrame 数据,样式大概如下
- 第一列不需要,后面读取数据的时候不读入即可
- 主要预测目标是最后一列 Type

二、属性和预测值编码
- 这里主要做的是数据的向量化,把非数字的其他类型编码数字
- 这里用的是 LabelEncoder
- x、y 每个 encoder 会对应着每个编码器的类型,后面解码要使用对应的解码器
- x:表示属性值
- y:表示预测值
from sklearn.preprocessing import LabelEncoder
y_encoder = LabelEncoder()
x_encoder = LabelEncoder()
x = train_data[['C', 'H', 'O', 'N', 'S', 'group', 'AImod', 'DBE', 'MZ', 'OC', 'HC', 'SC', 'NC', 'NOSC', 'DBE.C', 'DBE.O', 'location', 'sample']]
for col in ['group', 'location', 'sample']:
    x[col] = x_encoder.fit_transform(x[col])
y = y_encoder.fit_transform(train_data['Type'])
三、划分训练、测试集
- 在当前数据上划分一部分为训练集和测试集
- test_size:这是测试集大小比例,可以自行修改,会影响后面使用测试集测试模型准确度,这里的设置是当前数据集测试出来较好的配置
- random_state:这个随机因素也是会影响后面模型的准确度,按需配置
from sklearn.model_selection import train_test_split
x_train, x_test, y_train, y_test = train_test_split(x, y, test_size=0.24, random_state=3)
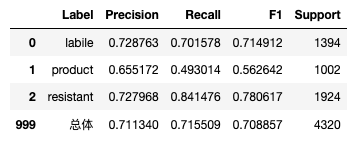
四、测试结果评价指标
- 这里主要输出 Precision、Recall、F1、Support 这四个关键指标
import numpy as np
from sklearn.metrics import confusion_matrix,precision_recall_fscore_support
# 计算各项评价指标
def eval_model(y_true, y_pred, labels):
    # 计算每个分类的Precision, Recall, f1, support
    p, r, f1, s = precision_recall_fscore_support(y_true, y_pred)
    # 计算总体的平均Precision, Recall, f1, support
    tot_p = np.average(p, weights=s)
    tot_r = np.average(r, weights=s)
    tot_f1 = np.average(f1, weights=s)
    tot_s = np.sum(s)
    res1 = pd.DataFrame({
        u'Label': labels,
        u'Precision': p,
        u'Recall': r,
        u'F1': f1,
        u'Support': s
    })
    res2 = pd.DataFrame({
        u'Label': [u'总体'],
        u'Precision': [tot_p],
        u'Recall': [tot_r],
        u'F1': [tot_f1],
        u'Support': [tot_s]
    })
    res2.index = [999]
    res = pd.concat([res1, res2])
    return res[[u'Label', u'Precision', u'Recall', u'F1', u'Support']]
五、模型训练
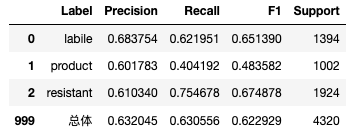
5.1 逻辑回归
- LogisticRegression 相关参数这里就不一一阐述了,需要的去看看其他的
- 一般空着不配置参数也是可以的
from sklearn.linear_model import LogisticRegression
model = LogisticRegression(multi_class='multinomial', solver='lbfgs')
# 训练
model.fit(x_train, y_train)
# 测试集测试
test_y_pred =model.predict(x_test)
# 测试结果输出
res = eval_model(y_test,test_y_pred,y_encoder.classes_)
res
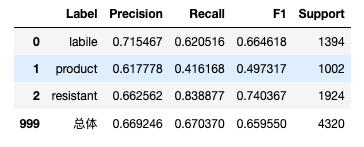
5.2 KNN
- 相关内容同上
from sklearn.neighbors import KNeighborsClassifier
model = KNeighborsClassifier(n_neighbors=9)
model.fit(x_train, y_train)
test_y_pred = model.predict(x_test)
res = eval_model(y_test,test_y_pred,encoder.classes_)
res
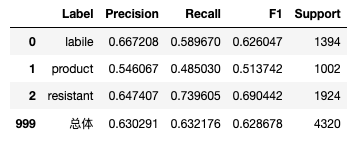
5.3 朴素贝叶斯
- 相关内容同上
from sklearn.naive_bayes import GaussianNB
model = GaussianNB()
model.fit(x_train, y_train)
test_y_pred = model.predict(x_test)
res = eval_model(y_test,test_y_pred,encoder.classes_)
res
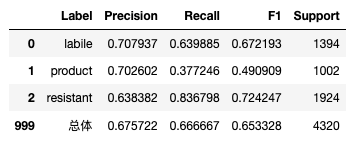
5.4 LDA
- 这里有个问题就是 LDA 这个包的问题,注意导入的包就行
- 其他相关内容同上
from sklearn.discriminant_analysis import LinearDiscriminantAnalysis as LDA
model = LDA()
model.fit(x_train, y_train)
test_y_pred = model.predict(x_test)
res = eval_model(y_test,test_y_pred,encoder.classes_)
res
5.5 支持向量机
- 相关内容同上
from sklearn.svm import SVC
model = SVC(gamma='auto')
model.fit(x_train, y_train)
test_y_pred = model.predict(x_test)
res = eval_model(y_test,test_y_pred,encoder.classes_)
res
5.6 GBDT
- 相关内容同上
from sklearn.ensemble import GradientBoostingClassifier
model = GradientBoostingClassifier(n_estimators=100, learning_rate=1.0,max_depth=1, random_state=0)
model.fit(x_train, y_train)
test_y_pred = model.predict(x_test)
res = eval_model(y_test,test_y_pred,encoder.classes_)
res
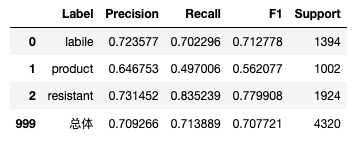
5.7 决策树
- 相关内容同上
from sklearn.tree import DecisionTreeClassifier
model = DecisionTreeClassifier()
model.fit(x_train, y_train)
test_y_pred = model.predict(x_test)
res = eval_model(y_test,test_y_pred,y_encoder.classes_)
res

六、模型保存
- 这里使用的是 .pkl 文件进行保存
import dill
import pickle
model_file = os.path.join('output',u'model.pkl')
with open(model_file,'wb') as outfile:
    dill.dump({
        'y_decoder':y_encoder,
        'x_encoder':x_encoder,
        'model':model
    },outfile)
七、模型调用
- 引入 .pkl 文件然后输入属性值进行预测
import pickle
with open('./output/model.pkl','rb') as mo:
    model = pickle.load(mo)
test_data = pd.read_csv('test.csv', header = True)
test = test_data[['C', 'H', 'O', 'N', 'S', 'group', 'AImod', 'DBE', 'MZ', 'OC', 'HC', 'SC', 'NC', 'NOSC', 'DBE.C', 'DBE.O', 'location', 'sample']]
for col in ['group', 'location', 'sample']:
    test[col] = model['x_encoder'].fit_transform(test[col])
test = model['model'].predict(test)
result = model['decoder'].inverse_transform(test)
result


 857
857


 被折叠的 条评论
为什么被折叠?
被折叠的 条评论
为什么被折叠?
 到【灌水乐园】发言


