


使用腾讯云知识引擎接入满血DeepSeek-R1打造您专属的个人知识库
一、介绍
最近的DeepSeek好火,它是由杭州深度求索人工智能基础技术研究有限公司出品的一款先进的人工智能产品。DeepSeek以其强大的技术实力和创新应用,迅速在人工智能领域崭露头角,成为行业关注的焦点。
DeepSeek官网:DeepSeek | 深度求索
不过在使用chat聊天的功能中,经常出现服务器繁忙,请稍后再试的问题
这有服务器资源的原因,也有境外势力攻击的原因。总的来说,DeepSeek产品爆火后,带来巨大的关注与流量的同时,也要看DeepSeek能否稳稳地吃下这波流量。
那么是否有机会,使用DeepSeek打造自己的个人知识库呢,诶,腾讯云知识引擎正好给了我们这个机会。
下面我们就使用腾讯云知识引擎打造的个人知识库。一共152篇文章,我的文章已经急不可耐了
二、个人知识库
首先,在看了文档之后,发现其中有两种方式可以创建知识库,
第一种比较简单,使用腾讯云知识引擎内置的应用产品能力,来搭建个人知识库管家
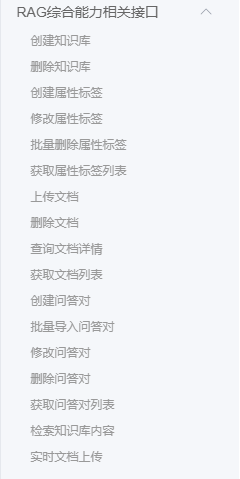
第二种就是使用其API的能力,来打造知识库来进行对话,如下图所示RAG综合能力来进行
文档链接:知识引擎原子能力 DeepSeek API 接口-API 文档-文档中心-腾讯云
那么本文将会使用SpringBoot来打造自己的个人知识库。
三、代码
首先,我们还是需要腾讯云SDK的,引入引入
<dependency>
    <groupId>com.tencentcloudapi</groupId>
    <artifactId>tencentcloud-sdk-java</artifactId>
    <version>3.1.1165</version>
</dependency>
随后跟着接口一步一步走就行,首先是创建知识库,由于SpringBoot的复杂结构问题,我只展示关键的代码
关键在于service层,调用到腾讯云接口,如果成功就落库,保留响应中的知识库ID,后面会有用的
    @Override
    public void save(AiKnowledgeBaseSaveRequest request) {
        try {
            String name = request.getName();
            CommonClient client = new CommonClient(AI_PRODUCT_NAME, AI_VERSION, credential, AI_REGION, clientProfile);
            String responseBody = client.call(TencentApiActionEnum.KNOWLEDGE_BASE_CREATE.getCode(), StrUtil.EMPTY_JSON);
            TencentCommonResponse<TencentKnowledgeBaseCreateResponse> response = JsonUtil.parseToObject(responseBody, new TypeReference<TencentCommonResponse<TencentKnowledgeBaseCreateResponse>>() {});
            AiKnowledgeBaseEntity entity = new AiKnowledgeBaseEntity();
            entity.setName(name);
            entity.setKnowledgeBaseId(response.getResponse().getKnowledgeBaseId());
            baseMapper.insert(entity);
        } catch (TencentCloudSDKException | IOException e) {
            log.error("知识库创建失败", e);
            throw new BanmoonException("知识库创建失败");
        }
    }
然后就是我们的上传文件,哦对,上传文件最好选用腾讯云的存储桶,不会受到网络波动限制
    @Override
    public void uploadFile(AiKnowledgeBaseUploadFileRequest request) {
        try {
            Integer id = request.getId();
            MultipartFile file = request.getFile();
            String fileName = file.getOriginalFilename();
            InputStream is = file.getInputStream();
            String fileType = MyFileUtil.getFileType(file);
            AiKnowledgeBaseEntity entity = baseMapper.selectById(id);
            if (Objects.isNull(entity)) {
                throw new BanmoonException("无效的知识库");
            }
            String path = StrUtil.format(KNOWLEDGE_BASE_FILE_PATH_TEMPLATE, DateUtil.today(), fileName);
            String fileUrl = OssFactory.build().upload(is, path);
            String knowledgeBaseId = entity.getKnowledgeBaseId();
            TenctentKnowledgeBaseUploadFileRequest uploadFileRequest = new TenctentKnowledgeBaseUploadFileRequest();
            uploadFileRequest.setKnowledgeBaseId(knowledgeBaseId);
            uploadFileRequest.setFileType(fileType);
            uploadFileRequest.setFileName(fileName);
            uploadFileRequest.setFileUrl(fileUrl);
            CommonClient client = new CommonClient(AI_PRODUCT_NAME, AI_VERSION, credential, AI_REGION, clientProfile);
            String responseBody = client.call(TencentApiActionEnum.KNOWLEDGE_BASE_UPLOAD_FILE.getCode(), JSONUtil.toJsonStr(uploadFileRequest));
            TencentCommonResponse<TencentKnowledgeBaseUploadFileResponse> response = JsonUtil.parseToObject(responseBody, new TypeReference<TencentCommonResponse<TencentKnowledgeBaseUploadFileResponse>>() {});
            String docId = response.getResponse().getDocId();
            // 创建文档记录
            AiKnowledgeBaseFileEntity fileEntity = new AiKnowledgeBaseFileEntity();
            fileEntity.setKnowledgeBaseId(id);
            fileEntity.setKnowledgeBaseDocId(docId);
            fileEntity.setFileUrl(fileUrl);
            fileEntity.setFileName(fileName);
            fileEntity.setFileType(fileType);
            aiKnowledgeBaseFileService.save(fileEntity);
        } catch (IOException | TencentCloudSDKException e) {
            log.error("知识库上传文件失败", e);
            throw new BanmoonException("知识库上传文件失败");
        }
    }
这一段也非常简单,就是将文件上传到存储桶,得到url,再讲必要参数组装起来,调用上传接口给到对应的知识库。
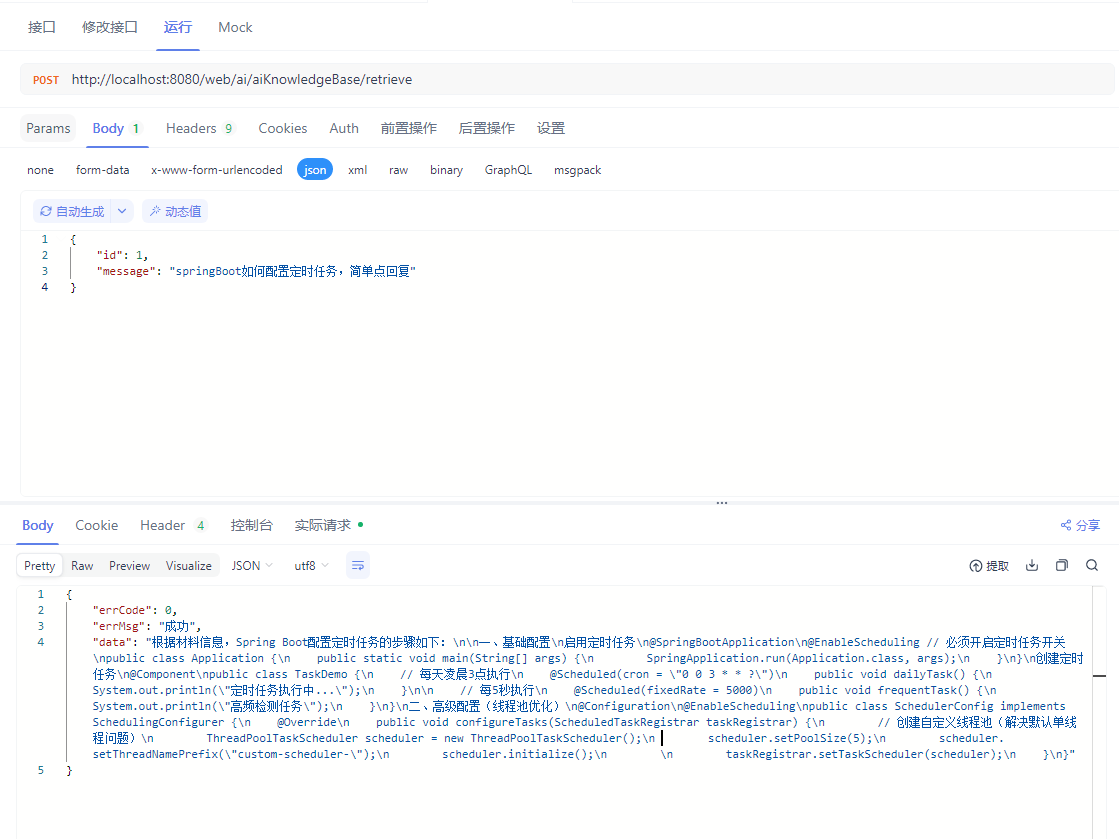
前面处理都完成了,那么还差最后一步,检索知识库。
简单来说,就是向知识库提问检索,腾讯云知识引擎会帮助你在知识库中检索答案进行回答
    @Override
    public String retrieve(AiKnowledgeBaseRetrieveRequest request) {
        try {
            Integer id = request.getId();
            String message = request.getMessage();
            AiKnowledgeBaseEntity entity = baseMapper.selectById(id);
            if (Objects.isNull(entity)) {
                throw new BanmoonException("无效的知识库");
            }
            TenctentKnowledgeBaseRetrieveRequest retrieveRequest = new TenctentKnowledgeBaseRetrieveRequest();
            retrieveRequest.setKnowledgeBaseId(entity.getKnowledgeBaseId());
            retrieveRequest.setQuery(message);
            CommonClient client = new CommonClient(AI_PRODUCT_NAME, AI_VERSION, credential, AI_REGION, clientProfile);
            String responseBody = client.call(TencentApiActionEnum.KNOWLEDGE_BASE_RETRIEVE.getCode(), JSONUtil.toJsonStr(retrieveRequest));
            TencentCommonResponse<TenctentKnowledgeBaseRetrieveResponse> response = JsonUtil.parseToObject(responseBody, new TypeReference<TencentCommonResponse<TenctentKnowledgeBaseRetrieveResponse>>() {});
            return StreamUtil.listToString(response.getResponse().getRecords(), TenctentKnowledgeBaseRetrieveResponse.RetrieveRecord::getContent, "\n");
        } catch (TencentCloudSDKException | IOException e) {
            throw new BanmoonException();
        }
    }
不过这里没有流式响应,就是将检索到的回答一口气返回出去,这点看来需要在界面做出优化了
前面的两个接口我就不贴图了,大家可以自己试试,我们直接来访问这个检索,答案也是能够出来的
但显示效果不是很好,我们缺少一个前端界面,让这块内容能够正常漂亮的展示
四、前端
至于前端,我选择使用IDEA的腾讯云AI代码助手来帮助我写一个简单的聊天对话页面
生成代码如下,也是比较简单的vue单页面,这种另类的写法给助手提示,也能够完美的输出
经过几轮对话调试之后,代码如下
<!DOCTYPE html>
<!--suppress JSUnresolvedLibraryURL -->
<html lang="en" xmlns="">

<head>
    <meta charset="UTF-8">
    <meta name="viewport" content="width=device-width, initial-scale=1.0">
    <title>个人知识库</title>
    <link rel="stylesheet" href="css/antd@4.2.1.css">
    <style>
        html,
        body {
            width: 100%;
            height: 100%;
        }
        [v-cloak] {
            display: none;
        }
        #app {
            display: flex;
            justify-content: center;
            align-items: center;
            height: 100%;
        }
        .chatbox {
            width: 80%;
            height: 80%;
            border: 1px solid #ccc;
            border-radius: 8px;
            display: flex;
            flex-direction: column;
        }
        .messages {
            flex: 1;
            padding: 10px;
            overflow-y: auto;
        }
        .message {
            margin-bottom: 10px;
            max-width: 80%;
            padding: 8px;
            border-radius: 8px;
            white-space: pre-wrap;
        }
        .message.user {
            background-color: #e1f5fe;
            margin-left: auto;
            text-align: right;
        }
        .message.ai {
            background-color: #f5f5f5;
            margin-right: auto;
            text-align: left;
        }
        .input-area {
            display: flex;
            padding: 20px 10px;
            border-top: 1px solid #ccc;
        }
        .input-area input {
            flex: 1;
            margin-right: 10px;
        }
    </style>
</head>

<body>
    <div id="app" v-cloak>
        <div class="chatbox">
            <div class="messages">
                <div v-for="(message, index) in messages" :key="index" :class="['message', message.type]">
                    <span v-if="message.type=='ai'">
                        <strong>{{ message.sender }}: </strong> {{ message.text }}
                    </span>
                    <span v-if="message.type=='user'">
                        {{ message.text }} <strong> :{{ message.sender }}</strong>
                    </span>
                </div>
            </div>
            <div class="input-area">
                <input v-model="inputMessage" @keyup.enter="sendMessage" placeholder="Type a message...">
                <button @click="sendMessage">Send</button>
            </div>
        </div>
    </div>

    <script src="js/vue@3.3.0.js"></script>
    <script src="https://unpkg.com/http-vue-loader"></script>
    <script src="https://unpkg.com/axios/dist/axios.min.js"></script>
    <script src="https://unpkg.com/dayjs/dayjs.min.js"></script>
    <script src="https://unpkg.com/dayjs/plugin/customParseFormat.js"></script>
    <script src="https://unpkg.com/dayjs/plugin/weekday.js"></script>
    <script src="https://unpkg.com/dayjs/plugin/localeData.js"></script>
    <script src="https://unpkg.com/dayjs/plugin/weekOfYear.js"></script>
    <script src="https://unpkg.com/dayjs/plugin/weekYear.js"></script>
    <script src="https://unpkg.com/dayjs/plugin/advancedFormat.js"></script>
    <script src="https://unpkg.com/dayjs/plugin/quarterOfYear.js"></script>
    <script src="js/antd@4.2.1.js"></script>
    <script src="js/notify.js"></script>
    <script src="js/request-util.js"></script>
    <script src="js/web-ai.js"></script>
</body>
<script>
    const app = Vue.createApp({
        data() {
            return {
                messages: [],
                inputMessage: ''
            }
        },
        methods: {
            sendMessage() {
                if (this.inputMessage.trim() === '')
                    return;
                this.messages.push({ sender: 'You', text: this.inputMessage, type: 'user' });
                API.sendMessage({id: 1, message: this.inputMessage}).then(res => {
                    let msg = res.data;
                    this.messages.push({ sender: 'AI', text: msg, type: 'ai' });
                    this.inputMessage = '';
                });
            }
        }
    });
    app.use(antd);
    app.mount("#app");
</script>

</html>
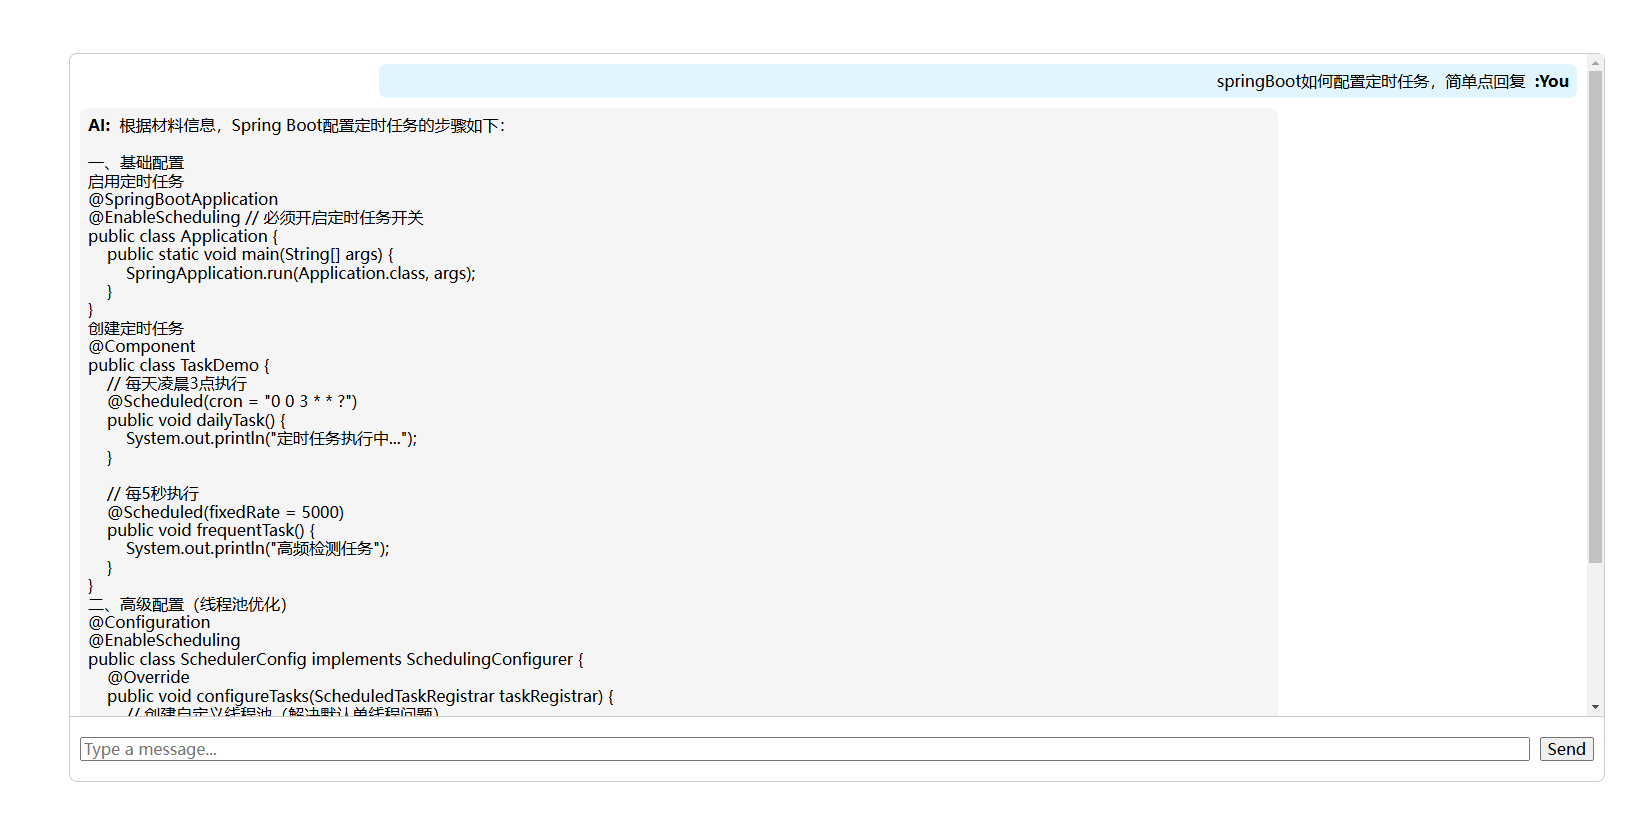
我们输入上面同样的信息,来看下结果
五、最后
在整个RGA功能里,还有创建问答对等其它的功能
总之通过这个能力,我就能将我以前写的markdown格式的文章,通通喂给腾讯云知识引擎
再对整个知识库进行检索,就能快速的帮助到其它的人,分享我的知识库。
另外,上面代码只放了关键的代码,其它零碎的、稍稍重要的代码我就放在最后这边了
package com.banmoon.config;

import lombok.Data;
import org.springframework.boot.context.properties.ConfigurationProperties;
import org.springframework.context.annotation.Configuration;

@Data
@Configuration
@ConfigurationProperties("tencent-api")
public class TencentApiProperties {

    /**
     * 腾讯云domain
     */
    private String domain;

    /**
     * 腾讯云SecretId
     */
    private String secretId;

    /**
     * 腾讯云SecretKey
     */
    private String secretKey;

}
package com.banmoon.config;

import com.banmoon.constant.TencentApiConstant;
import com.tencentcloudapi.common.Credential;
import com.tencentcloudapi.common.profile.ClientProfile;
import com.tencentcloudapi.common.profile.HttpProfile;
import org.springframework.context.annotation.Bean;
import org.springframework.context.annotation.Configuration;

import javax.annotation.Resource;

@Configuration
public class TencentApiConfig {

    @Resource
    private TencentApiProperties tencentApiProperties;

    @Bean
    public Credential credential() {
        return new Credential(tencentApiProperties.getSecretId(), tencentApiProperties.getSecretKey());
    }

    @Bean(TencentApiConstant.AI_BEAN_NAME)
    public ClientProfile aiClientProfile() {
        HttpProfile httpProfile = new HttpProfile();
        httpProfile.setEndpoint(TencentApiConstant.AI_ENDPOINT);
        ClientProfile clientProfile = new ClientProfile();
        clientProfile.setHttpProfile(httpProfile);
        return clientProfile;
    }

}
package com.banmoon.enums;

import lombok.AllArgsConstructor;
import lombok.Getter;

@Getter
@AllArgsConstructor
public enum TencentApiActionEnum {

    KNOWLEDGE_BASE_CREATE("CreateKnowledgeBase", "创建知识库"),
    KNOWLEDGE_BASE_UPLOAD_FILE("UploadDoc", "知识库上传文件"),
    KNOWLEDGE_BASE_RETRIEVE("RetrieveKnowledge", "检索知识库"),
    ;

    private final String code;
    private final String msg;

}
controller、dao层的代码我就不贴了,就是将一些关键信息落库而已
这种方式能很好的打造知识库,但需要一定的成本,所以我是更推荐使用另一种方式,自己创建一个腾讯云知识引擎应用产品能力,来搭建个人知识库管家


 266
266

 被折叠的 条评论
为什么被折叠?
被折叠的 条评论
为什么被折叠?
 到【灌水乐园】发言


