


效果

实现这个非常简单巧妙
源码在文末
实现思路
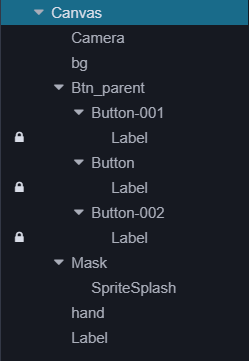
节点有点多,一个一个讲解下
bg是游戏背景图,主要是为了和灰黑色的遮罩区别

Btn_parent是三个按钮的父节点,加了一个layout,使每个按钮不互相挨着挤得慌
hand是白色的引导手

label是引导文字

Mask是遮挡节点,他还有一个单色精灵子节点,单色精灵子节点就是所有灰色的部分,单色精灵上加了一个widget保持和canvas上下左右为0


代码奉上~
import { _decorator, Component, Node, ButtonComponent, Vec3, SystemEventType, LabelComponent, CCFloat, CCString, error } from 'cc';
const { ccclass, property } = _decorator;

@ccclass('Guide')
export class Guide extends Component {

    @property({displayName: "按钮", tooltip: "按钮,请按想要引导的顺序绑定", type: ButtonComponent})
    all_btn: ButtonComponent[] = [];

    @property({displayName: "遮挡节点", tooltip: "遮挡节点", type: Node})
    mask: Node = null!;

    @property({displayName: "半透明精灵", tooltip: "半透明精灵", type: Node})
    sprite: Node = null!;

    @property({displayName: "引导手", tooltip: "白色的手,用来指向按钮的", type: Node})
    hand: Node = null!;

    @property({
        displayName: "引导文字内容",
        tooltip: "引导的文字内容,绑定了多少个按钮就要有多少个文字内容,如果文字内容数量少于按钮数量会出现错误",
        type: CCString
    })
    label_string: string[] = [];

    @property({displayName: "引导的文字", tooltip: "引导的文字", type: LabelComponent})
    label: LabelComponent = null!;

    @property({displayName: "每几秒多显示一个字", tooltip: "打字机每几秒多显示一个字", type: CCFloat})
    label_time: number = 0.1;

    // 每个按钮的位置
    pos: Vec3[] = [];
    // 当前进行到了第几个按钮
    num: number = 0;

    // 引导的文字是否可以继续显示,如果用户在打字机文字全部显示出来之前点击下一个按钮,就会出现文字乱套的现象,这个变量就是防止文字乱套所做的
    is_string: boolean[] = [];

    onLoad () {
        let self = this;

        // 给每个按钮绑定onbtn方法
        for (let i = 0; i < this.all_btn.length; i++) {
            this.all_btn[i].node.on(SystemEventType.TOUCH_END, function () {
                self.onbtn();
            }, this);
        }

        // 记录每个按钮的位置
        for (let i = 0; i < this.all_btn.length; i++) {
            this.pos.push(this.all_btn[i].node.position);
        }

        // 遮罩位置到第一个按钮
        this.mask.position = this.pos[0];

        // 设置文字显示内容
        this.set_lable_string(this.label, this.label_string[0]);

        if (this.label_string.length < this.all_btn.length) {
            error("引导文字内容的数量少于按钮的数量,请在编辑器添加引导文字,否则会出现错误");
        }
    }


    update () {
        // 如果遮挡节点还没被销毁就往下执行
        if (this.mask.isValid == false) {
            return;
        }
        // 精灵的位置必须是负的这样才能填充整个屏幕
        this.sprite.position = new Vec3(-this.mask.position.x, -this.mask.position.y, 1.0);
        // 引导手的位置和遮挡节点的位置一样   引导手的锚点是0.5, 1
        this.hand.position = this.mask.position;
    }

    // 点击按钮专用函数
    onbtn () {
        // 更新进行到哪个按钮
        this.num ++;

        // console.log("num", this.num, "allbtn长度", this.all_btn.length);

        // 如果所有按钮都进行过了
        if (this.num >= this.all_btn.length) {
            // 销毁手和遮挡节点和引导文字
            this.mask.destroy();
            this.hand.destroy();
            this.label.destroy();
            // 点击按钮什么也不发生
            this.onbtn = function () {};
            console.log("新手引导完毕!!!mask,hand和label节点已经销毁");

            // 销毁本脚本
            this.destroy();

            return;
        }

        // 设置文字显示内容
        this.set_lable_string(this.label, this.label_string[this.num]);
        // 遮挡节点到按钮的位置
        this.mask.position = this.pos[this.num];
    }

    // 设置label显示内容   打字机效果   label为指定组件,string为显示内容
    set_lable_string (label: LabelComponent, string: string) {
        let self = this;

        // 文字可以继续显示
        this.is_string.push(true);
        let num = this.is_string.length - 1;
        // 上一次文字不可以继续显示
        this.is_string[num - 1] = false;

        // 设置显示内容为空
        label.string = "";
        // 将文本截成一个字一个字的数组
        let str: string[] = string.split("");

        // for循环利用定时器实现打字机效果
        for (let i = 0; i < str.length; i++) {
            // 文本的每个字
            let string = str[i];
            this.scheduleOnce(function () {
                // 如果可以显示
                if (self.is_string[num] == true) {
                    // 显示给label
                    label.string = label.string + string;
                }
            }, i * this.label_time);
        }
    }

}
脚本随便找个节点挂上就可以

介绍完了节点也给出了代码,来讲下实现原理
在单色精灵上加了cc.BlockInputEvents,它的作用是将拦截所属节点 bounding box 内的所有输入事件(鼠标和触摸),防止输入穿透到下层节点,一般用于上层 UI 的背景。简单点说就是在它之下的(被灰黑精灵遮住的)按钮全部点不了,只有在mask遮挡节点遮住的那一小块白色不发灰暗的区域能点击按钮

不需要给button一个一个绑定事件,只需要把按钮都绑定到Guide脚本即可
在onLoad中给每个按钮绑定事件,并且记录下每个按钮的位置,之后每点击一次按钮就设置mask位置为下一个按钮的位置

灰黑色精灵的坐标必须是负的mask的坐标,这样灰黑色精灵才能填充满整个屏幕
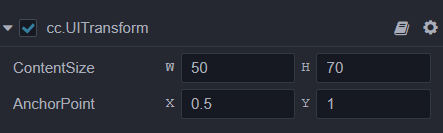
引导的白色手位置设置成和遮挡节点一样就可以,但是一定要设置好锚点,不然会很奇怪

点击按钮会判断是否完毕引导,完毕引导会销毁遮挡节点、引导白色手节点和引导文字节点,最后销毁脚本
最重要的是设置文本的显示内容,为了达到打字机的效果我自己封装了set_label_string方法,只需要传入label组件和字符串就可以以打字机效果显示文本
最后根据进行到了哪个按钮和之前存起来的每个按钮的位置,更新mask节点位置

set_label_string方法如下

源码:https://gitee.com/propertygame/cocos-creator3.x-demos/tree/master/NoviceGuide
技术交流Q群:1130122408
更多内容请关注微信公众号


 1968
1968


 被折叠的 条评论
为什么被折叠?
被折叠的 条评论
为什么被折叠?
 到【灌水乐园】发言


