


简介
此项目主要使用ESP32-S3实现一个AI语音聊天助手,可以通过该项目熟悉ESP32-S3 arduino的开发,百度语音识别,语音合成API调用,百度文心一言大模型API的调用方法,音频的录制及播放,SD卡的读写,Wifi的配置(smartconfig方式)等基本开发方法。本项目的所有软硬件工程开源,并配备了详细的教程文档,和对应的视频教程,对零基础的同学非常适用,希望能够帮助到大家。具备的功能
+ 支持小程序实现Wifi配网 + 语音唤醒词唤醒ESP32-S3 + 自定义唤醒词模型训练 + 百度语音识别语音合成api访问 + 百度文心一言大模型api访问开源地址
1. 项目开源网址:https://gitee.com/chging/esp32s3-ai-chat
- 视频教程网址:
【厚国兄的个人空间-哔哩哔哩】 https://b23.tv/AsFNSeJ
软件环境
Arduino 软件安装
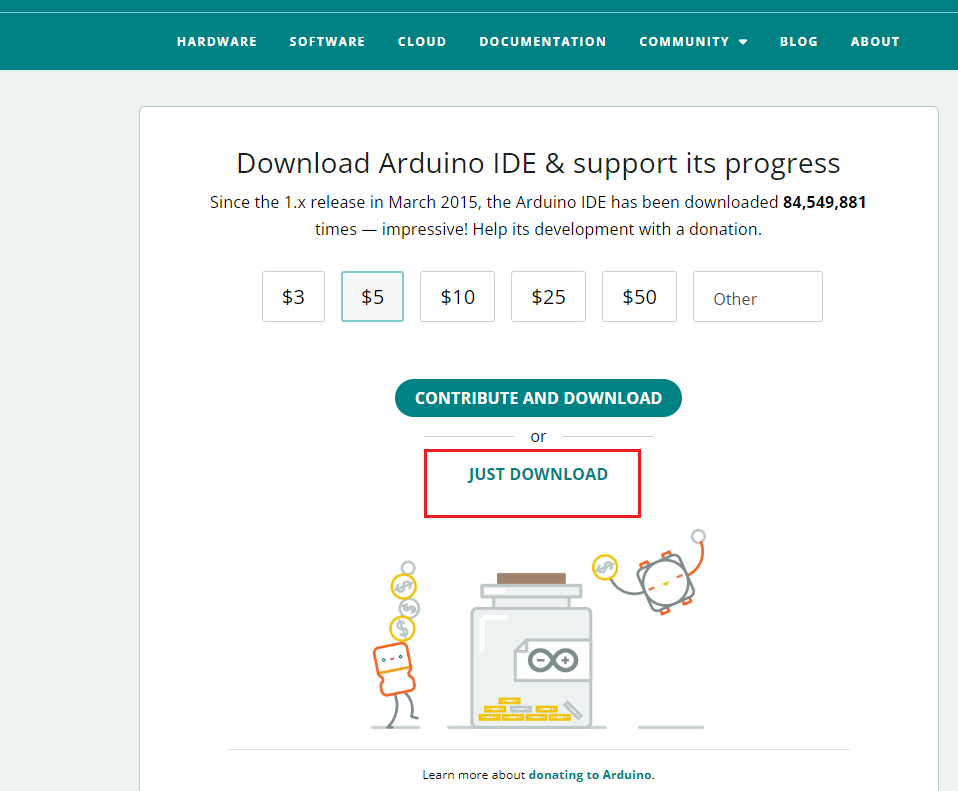
软件下载
+ 下载网站:[https://www.arduino.cc/en/software](https://www.arduino.cc/en/software) + 下载操作步骤如下: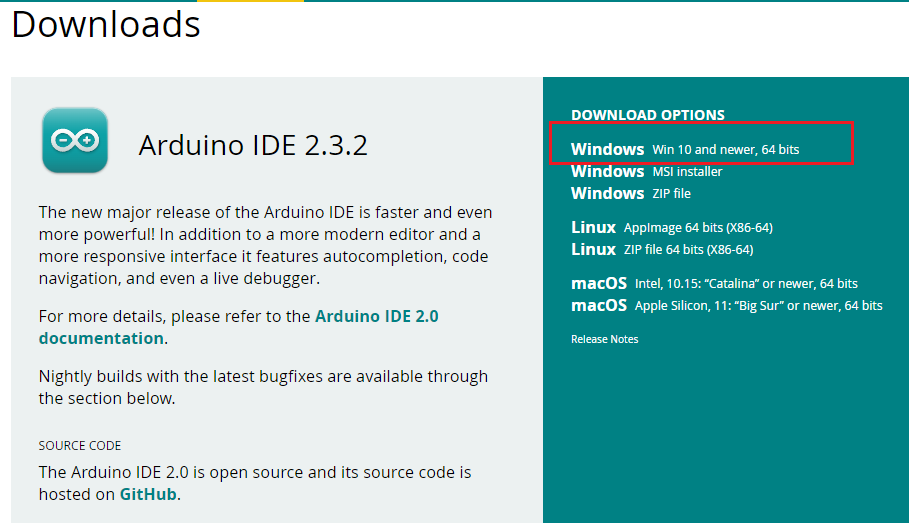

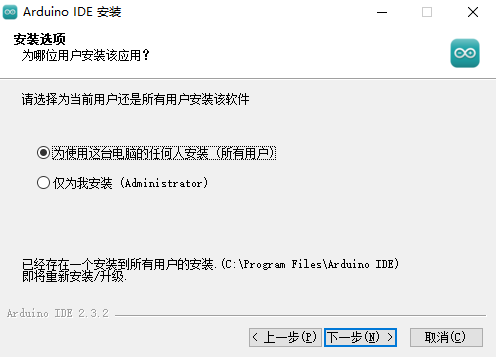
软件安装
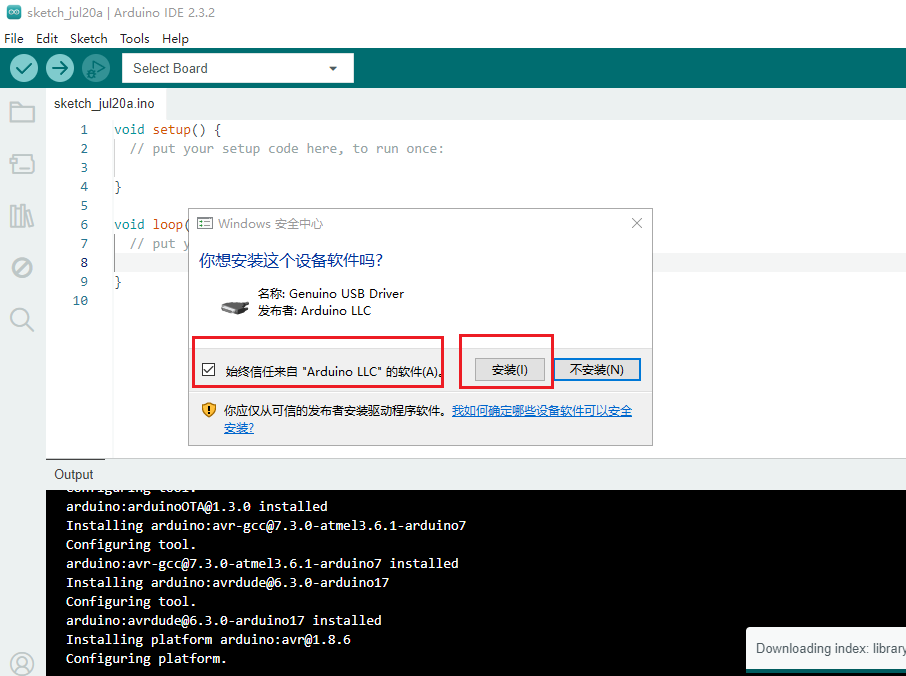
双击下载的安装软件包,按照如下图所示步骤进行安装: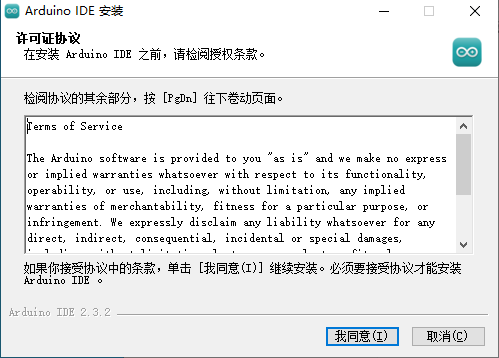
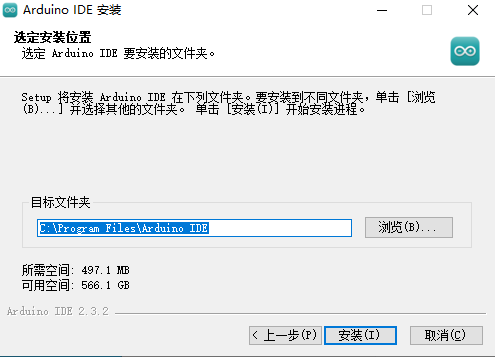
等待一会,安装完成。
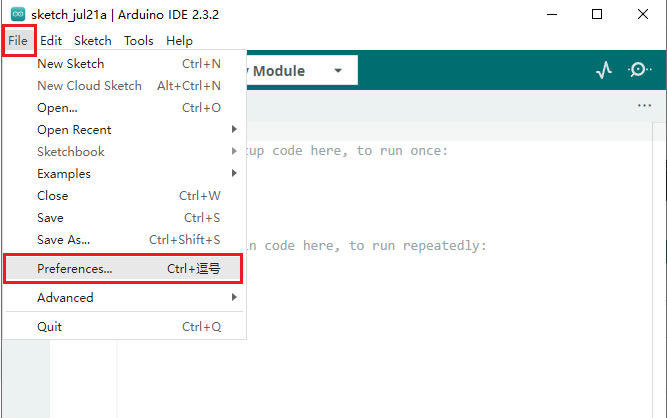
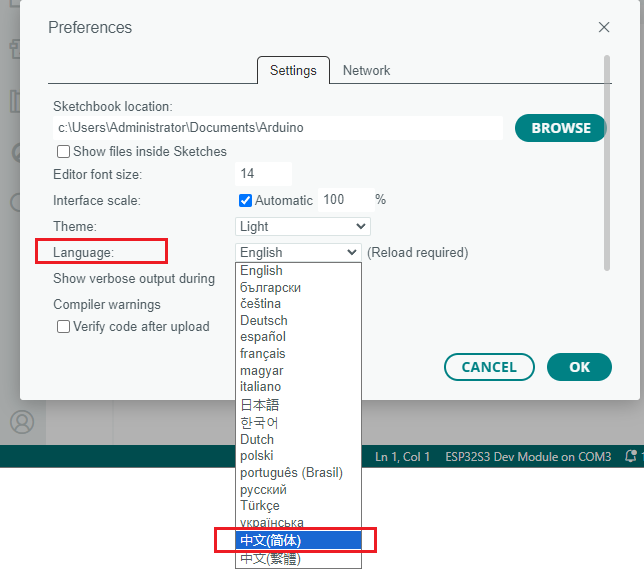
arduino字体转换为中文
ESP32芯片包安装
在线安装
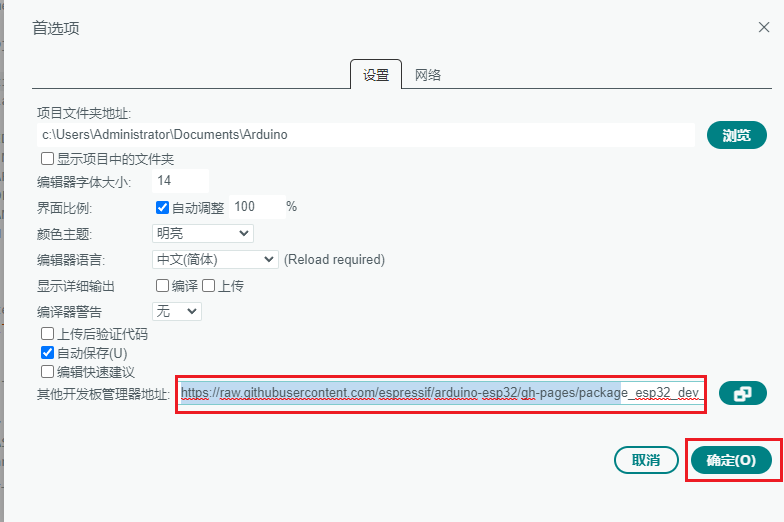
1. 打开Arduino IDE,选择 ** 文件->首选项->设置** 。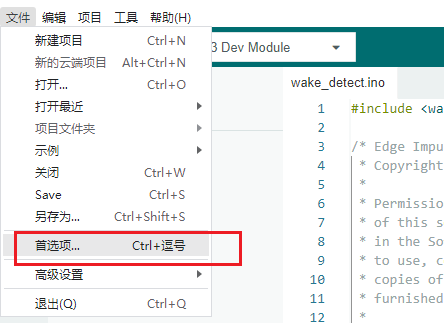
- 将以下这个链接粘贴到开发板管理器地址中:
https://raw.githubusercontent.com/espressif/arduino-esp32/gh-pages/package_esp32_dev_index.json
然后点击 确定,保存。
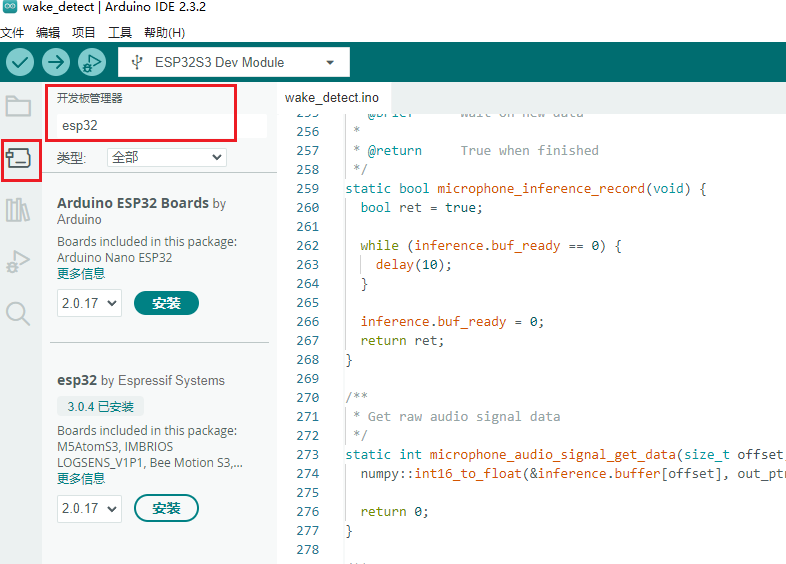
- 打开 开发板管理器,并搜索输入esp32,找到
<font style="color:rgb(77, 77, 77);"> esp32 by Espressif Systems</font>。选择版本(这里选择2.0.17,该版本测试没有问题,高版本可能会出现问题),点击安装进行安装,等待下载和安装成功。(如果失败,可以再次点击安装试一试)
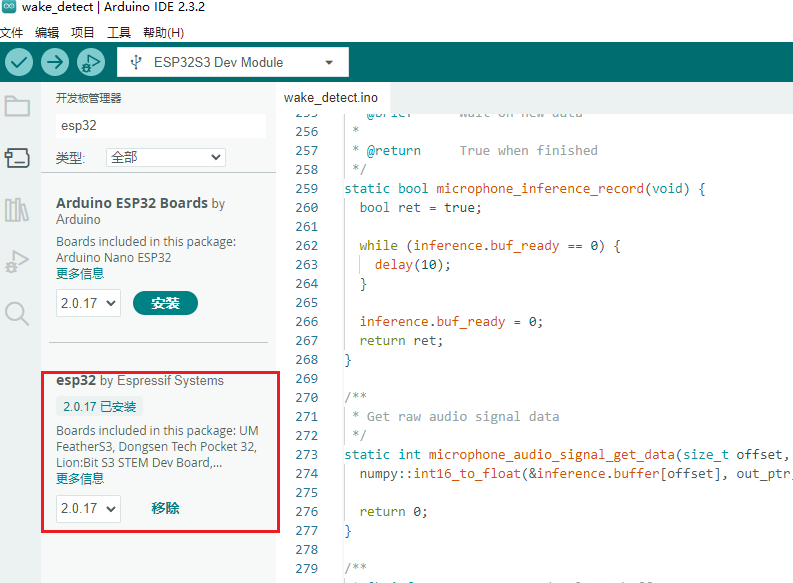
- 安装成功。
离线安装
如果一直下载失败,安装失败,则可以通过离线方式进行安装。- 直接下载安装包:
通过百度网盘分享的文件:esp32.rar
链接:https://pan.baidu.com/s/1Qruk23AAyqvJd3AS16LRrA?pwd=tz3n
提取码:tz3n
- 选择解压路径。要放在对应用户的arduino器件包目录。以下为Arduino 版本的安装路径:
C:\Users\用户名\AppData\Local\Arduino15\packages
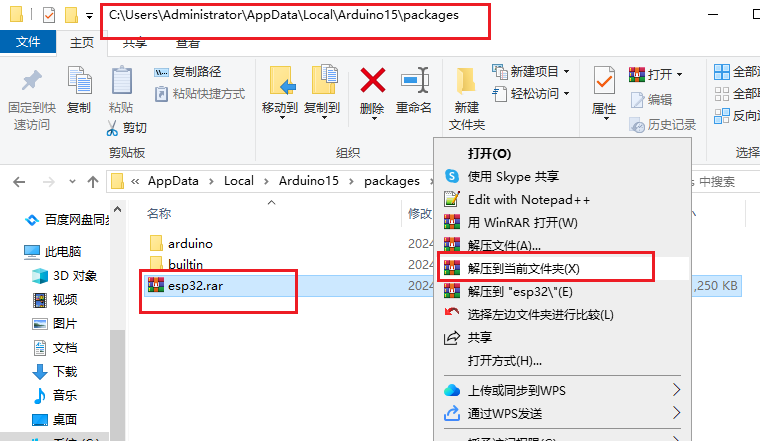
注意:AppData是个隐藏文件夹,需要配置文件夹查看选项,能够查看隐藏的文件夹。我这里的用户名Administrator。
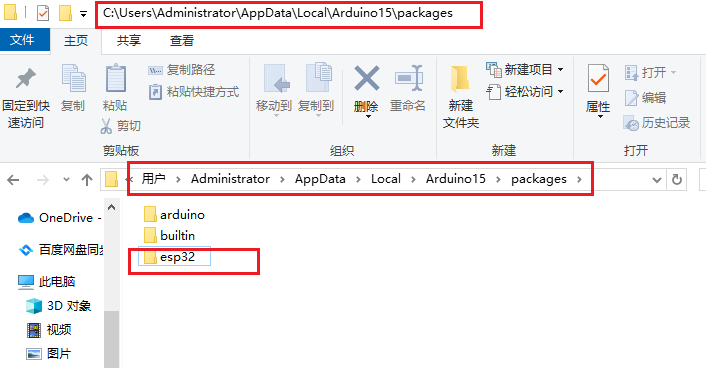
- 解压到对应文件夹完成后,关闭软件,重新打开arduino,点击开发板管理器,看到esp32-arduino已经安装完成。

- 安装完成。
软件库安装
在线库安装
arduino可以直接在库管理器中进行搜索所需的库的名字进行安装。安装步骤
1. 点击 **库管理->库名字搜索->选择对应版本**点击安装。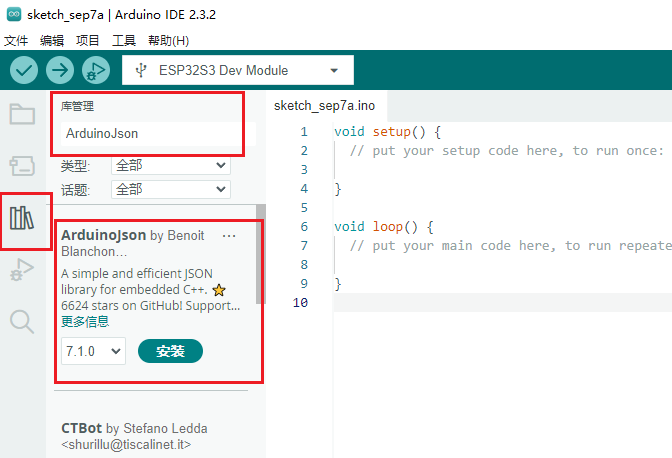
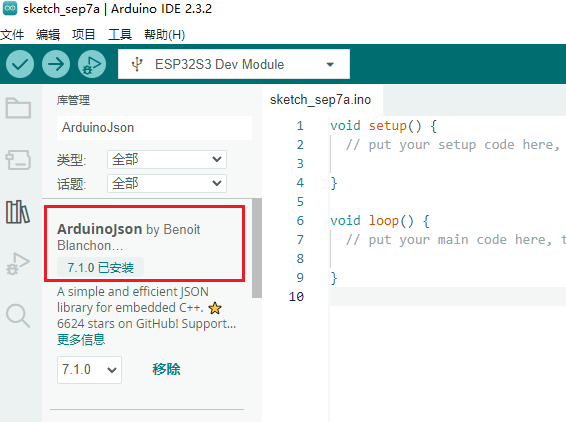
- 安装完成,如下图,显示已安装。如果想要删除,则点击移除即可。
需要安装的在线库
| 库名称 | | --- | | ArduinoJson | | base64 | | UrlEncode |离线库安装
arduino可以直接导入离线的库文件进行安装。安装步骤
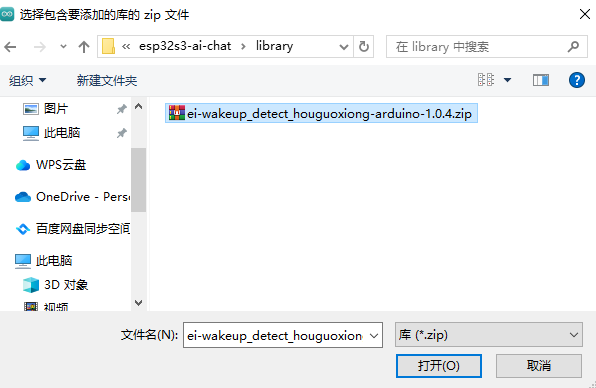
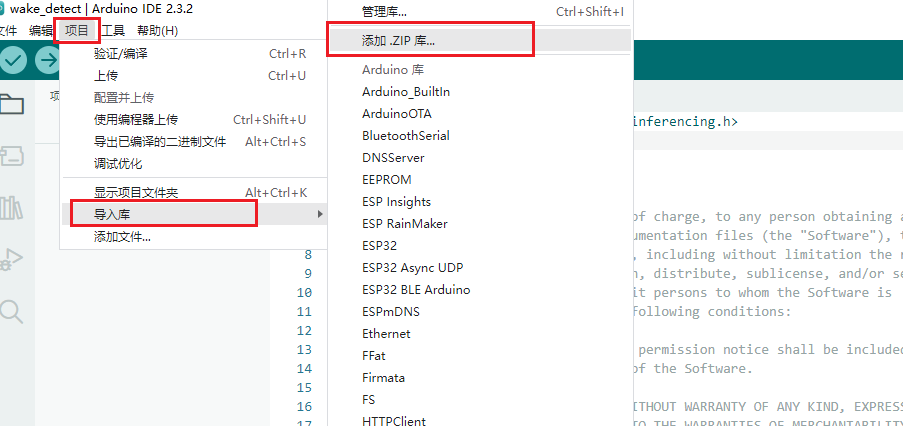
1. 点击 **项目->导入库->添加.ZIP库**,选择本地的arduino库文件。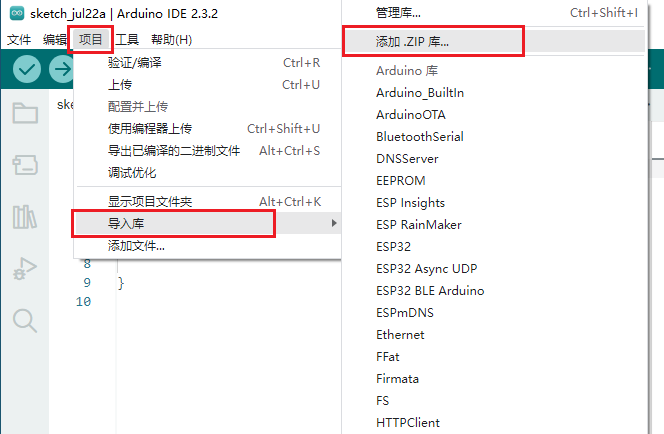
- 选择相应的库文件,点击打开。
- 查看安装的库文件,贡献库显示已经安装成功。
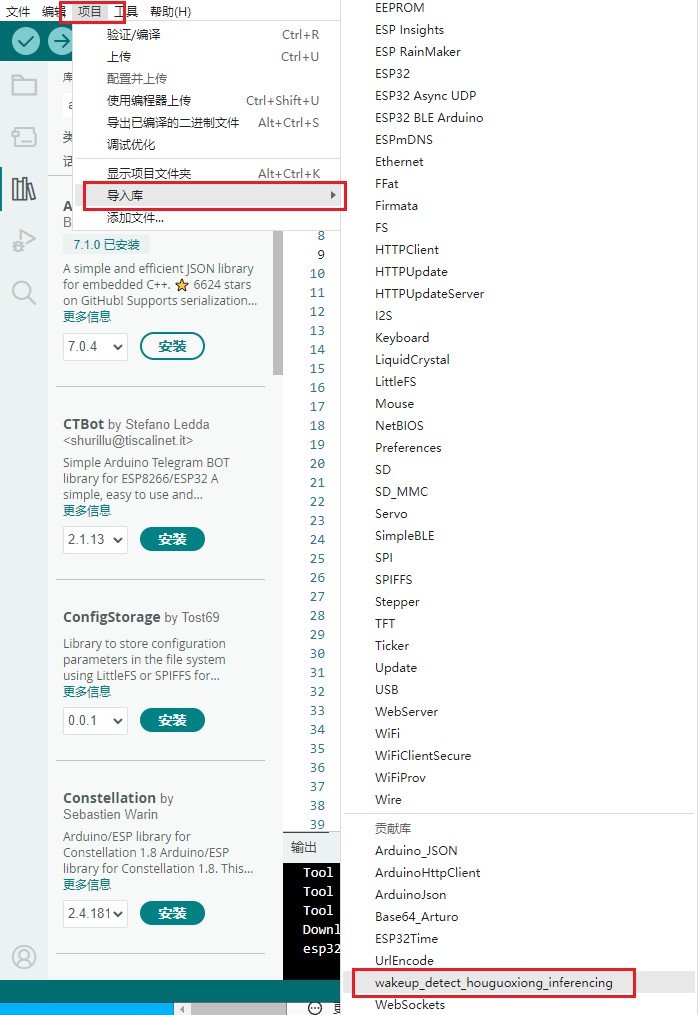
需要安装的离线库
| 库名称 | | --- | | wakeup_detect_houguoxiong_inferencing |硬件环境
硬件准备
ESP32-S3-N16R8开发板
主开发板,用来实现AI语音聊天的全部功能。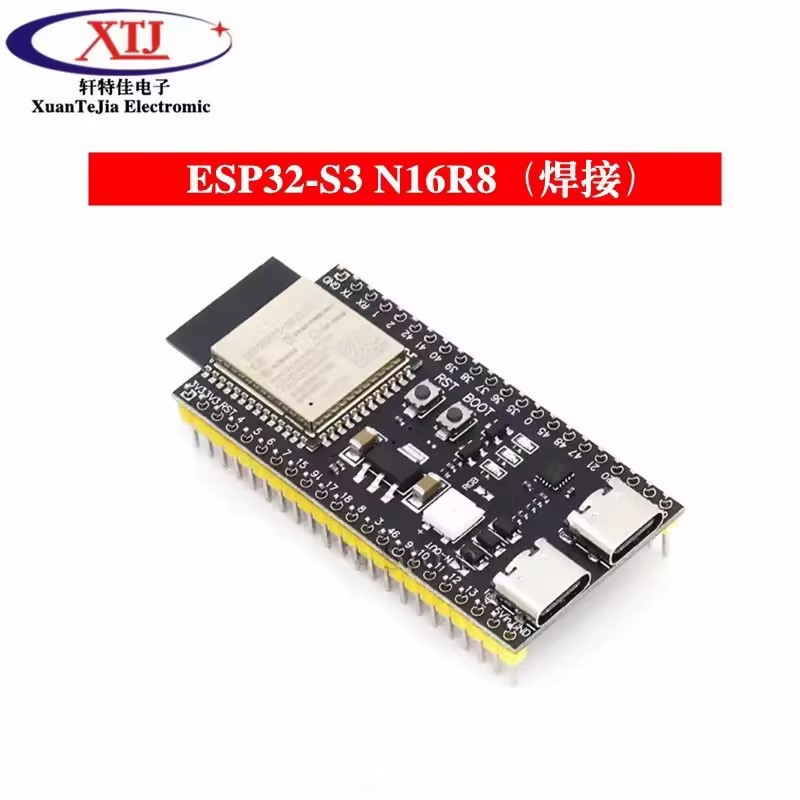
购买链接: http://e.tb.cn/h.gL1pR28HofrX9FB?tk=QjFW3T1J9y4
语音模块
+ INMP441麦克风 + MAX98357音频放大器模块 + 喇叭音频集成板:
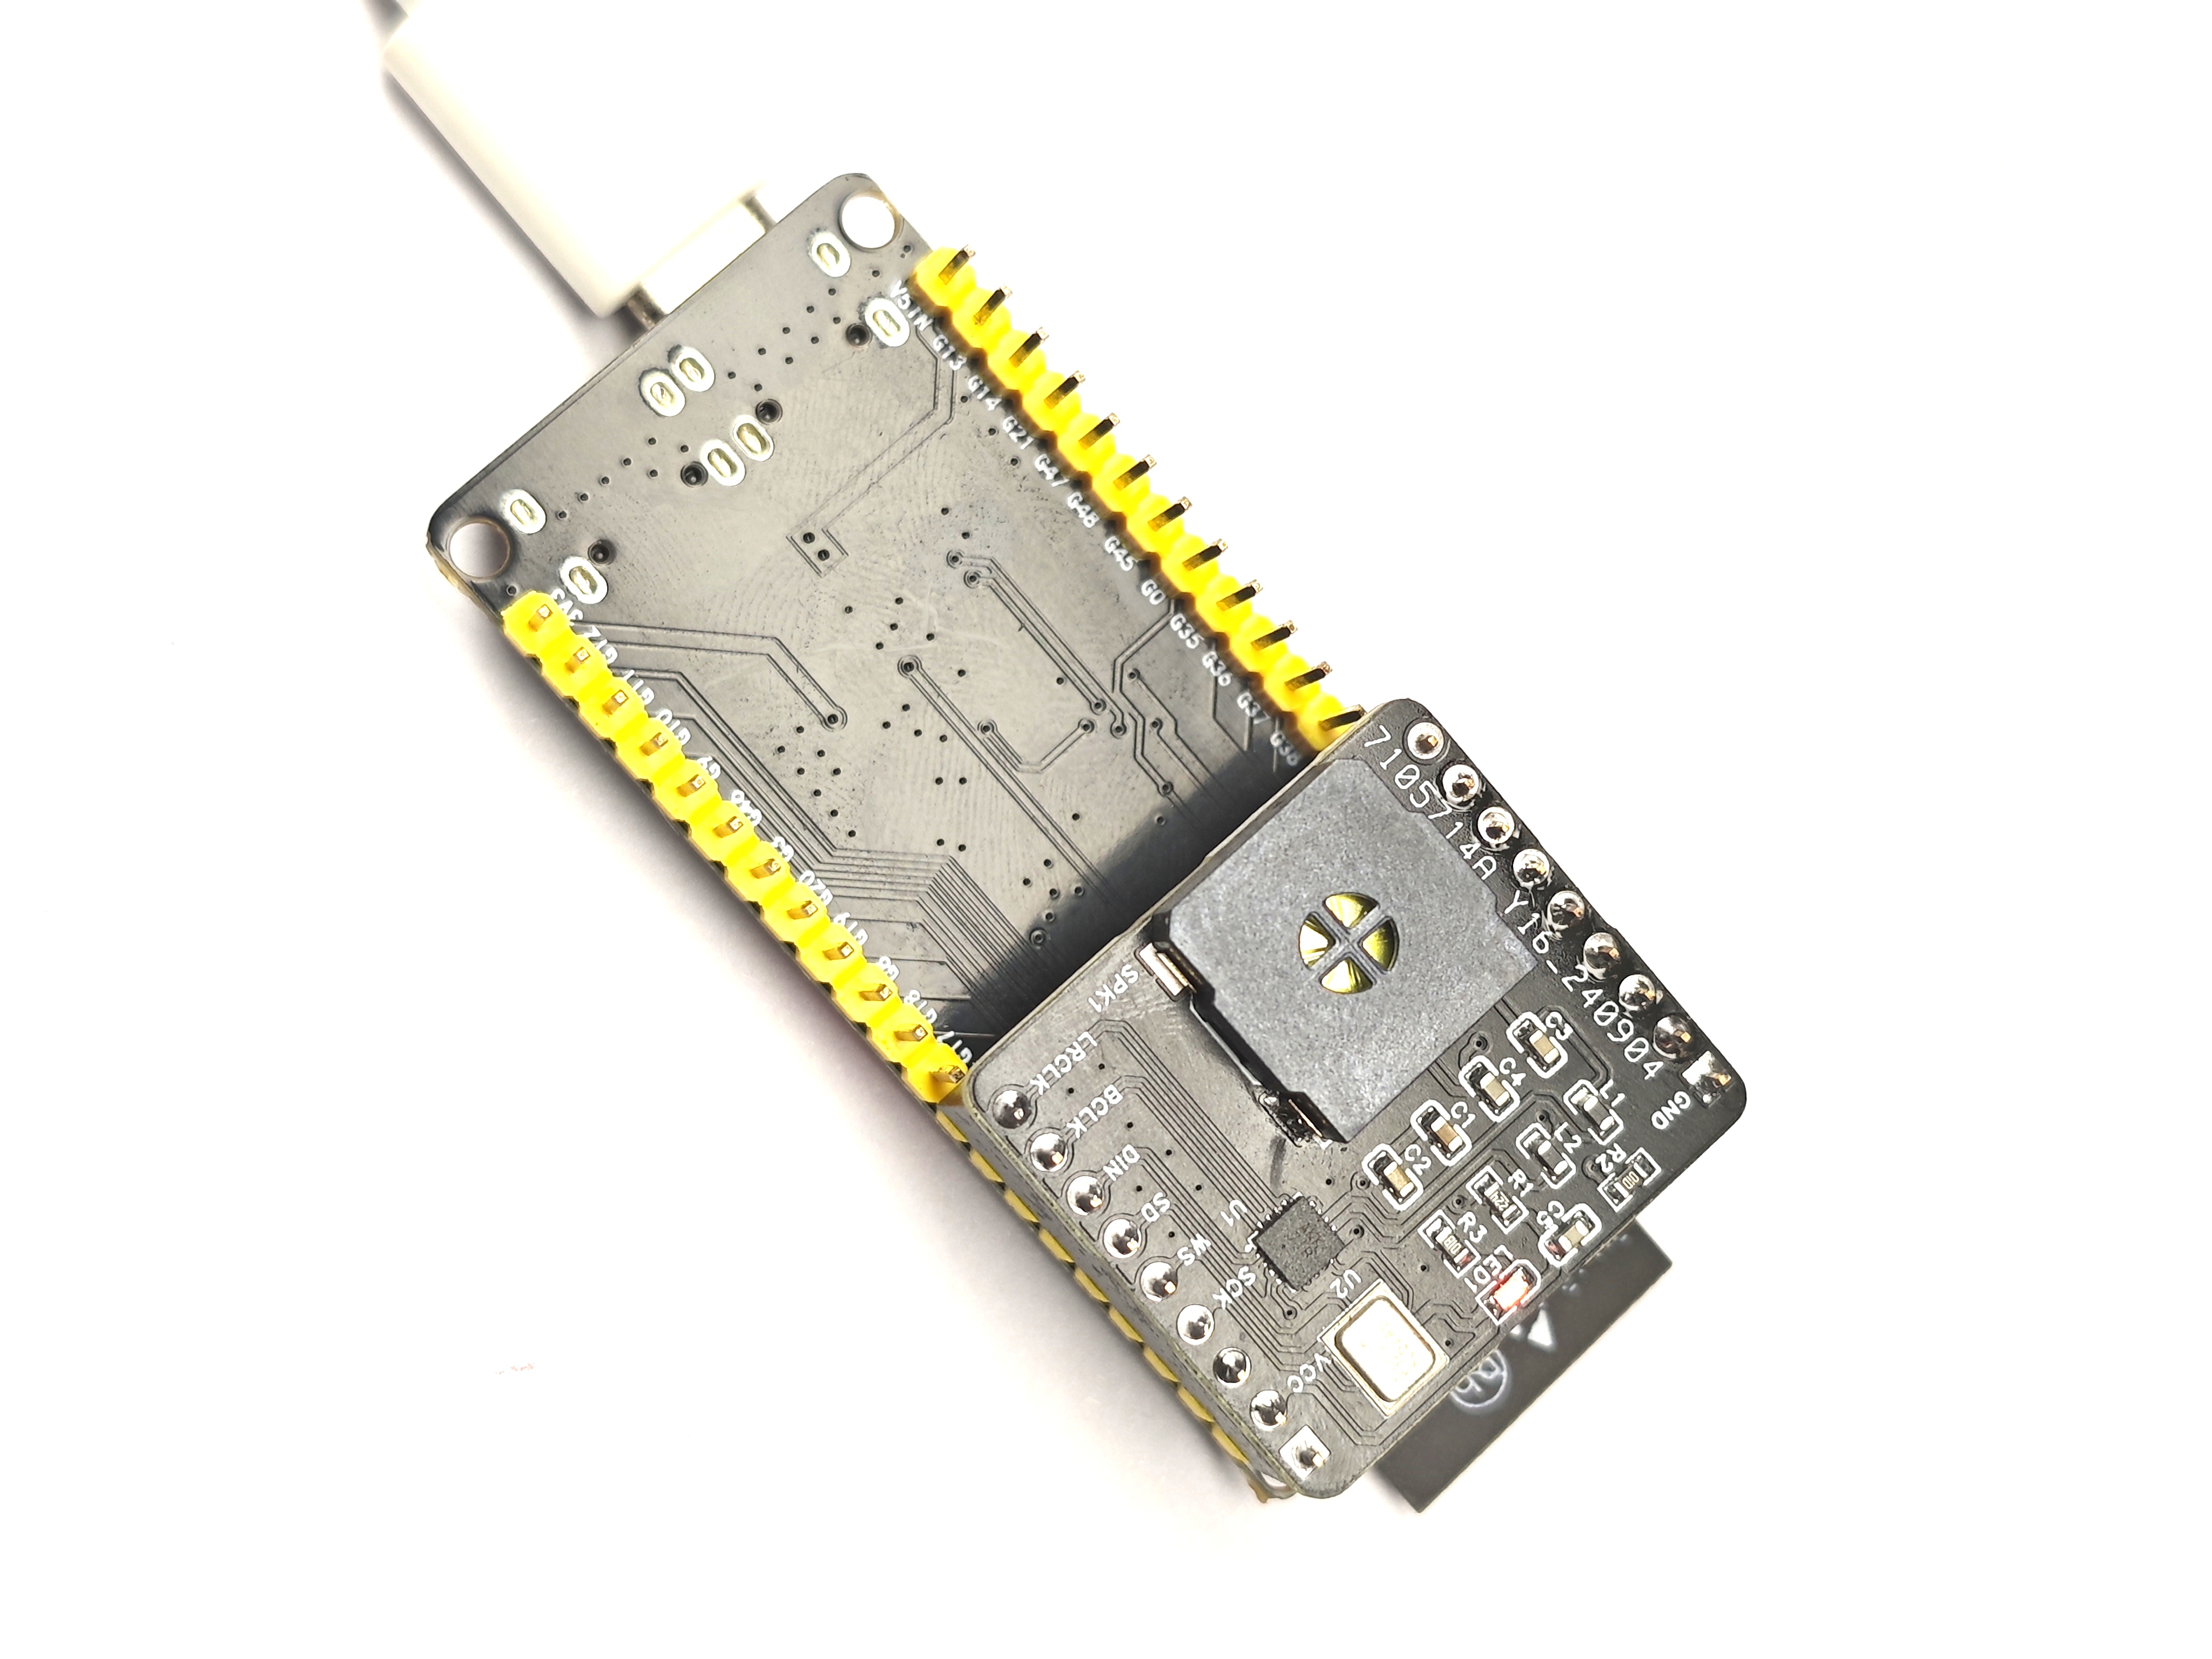
该模块集成了INMP441麦克风、MAX98357音频放大器模块、喇叭,可直接通过排母扣接在ESP32-S3-N16R8开发板上,免去了繁杂的杜邦线接线,如下图:
购买链接:https://h5.m.taobao.com/awp/core/detail.htm?ft=t&id=833542085705
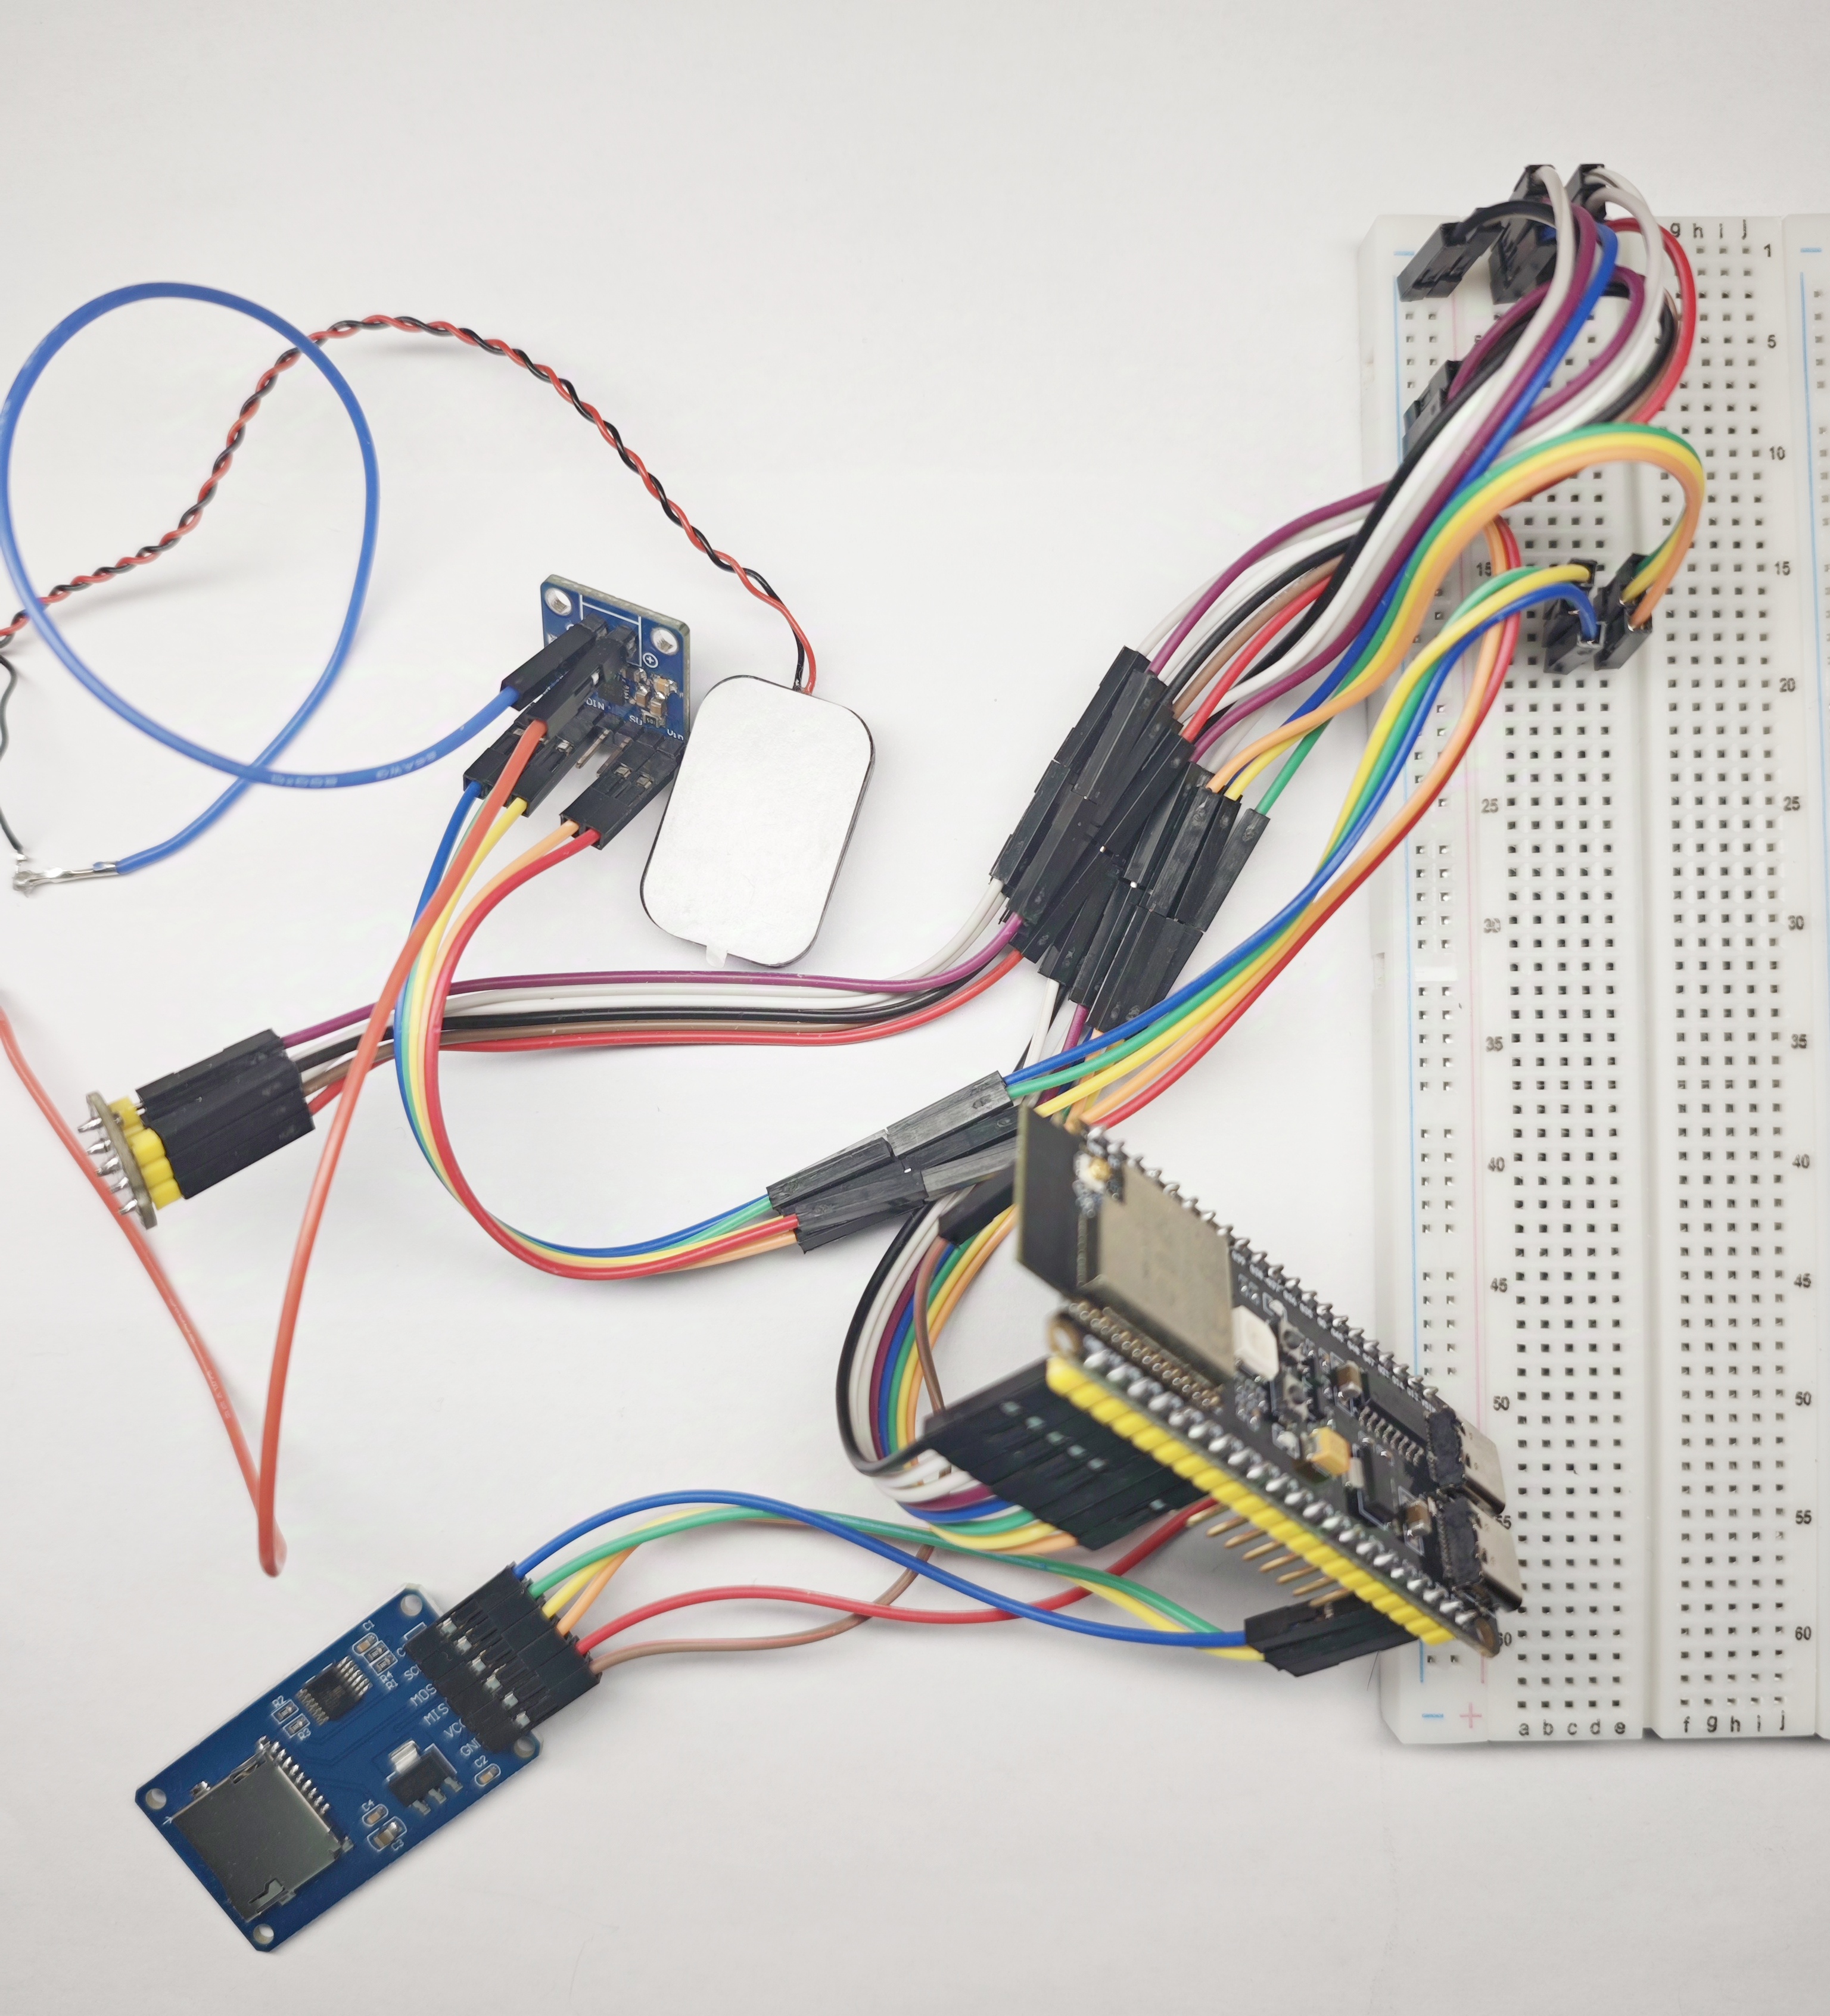
不嫌麻烦也可以分开买,那就是将INMP441麦克风、MAX98357音频放大器模块、喇叭等分别用杜邦线接上,这样连接的线比较多比较杂。如下图:
microSD卡模块(仅唤醒词训练时使用)
该模块只在训练自己的唤醒词时使用。该模块主要需要包含下面3个部分:- microSD卡
用于储存音频数据。低速卡microSD容量小于2G(128M够用),高速卡micro SDHC容量**小于32G**。

- 读卡器
用于插在电脑的USB上,通过电脑读取microSD卡的内容,以及格式化FAT32文件系统等操作,便于后续进行录制唤醒词音频的用处。
上面microSD、读卡器购买链接: http://e.tb.cn/h.go8SoCtVbZNlavY?tk=tFuS3gGpUpQ
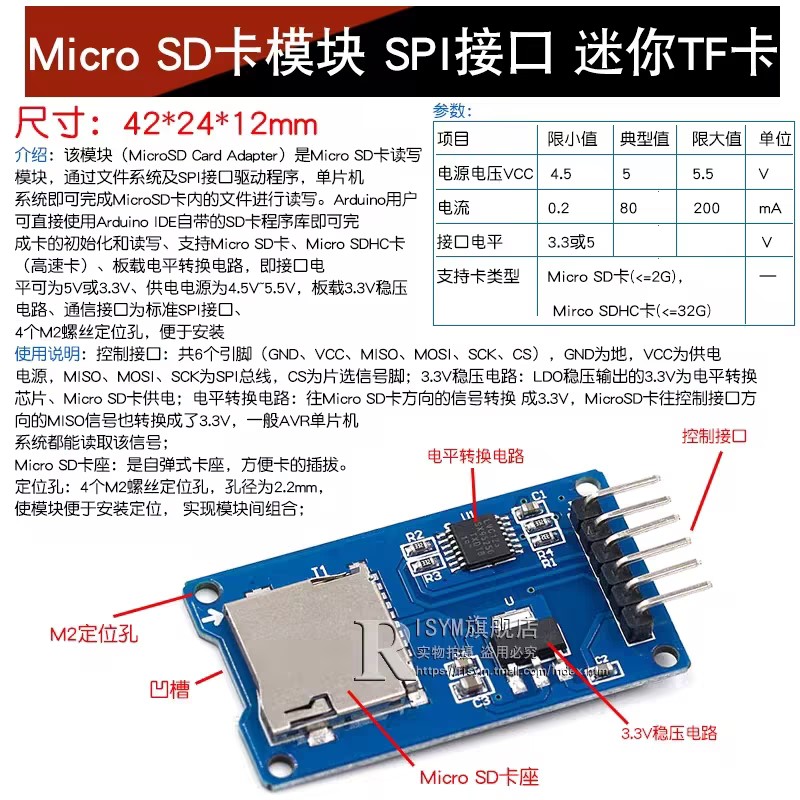
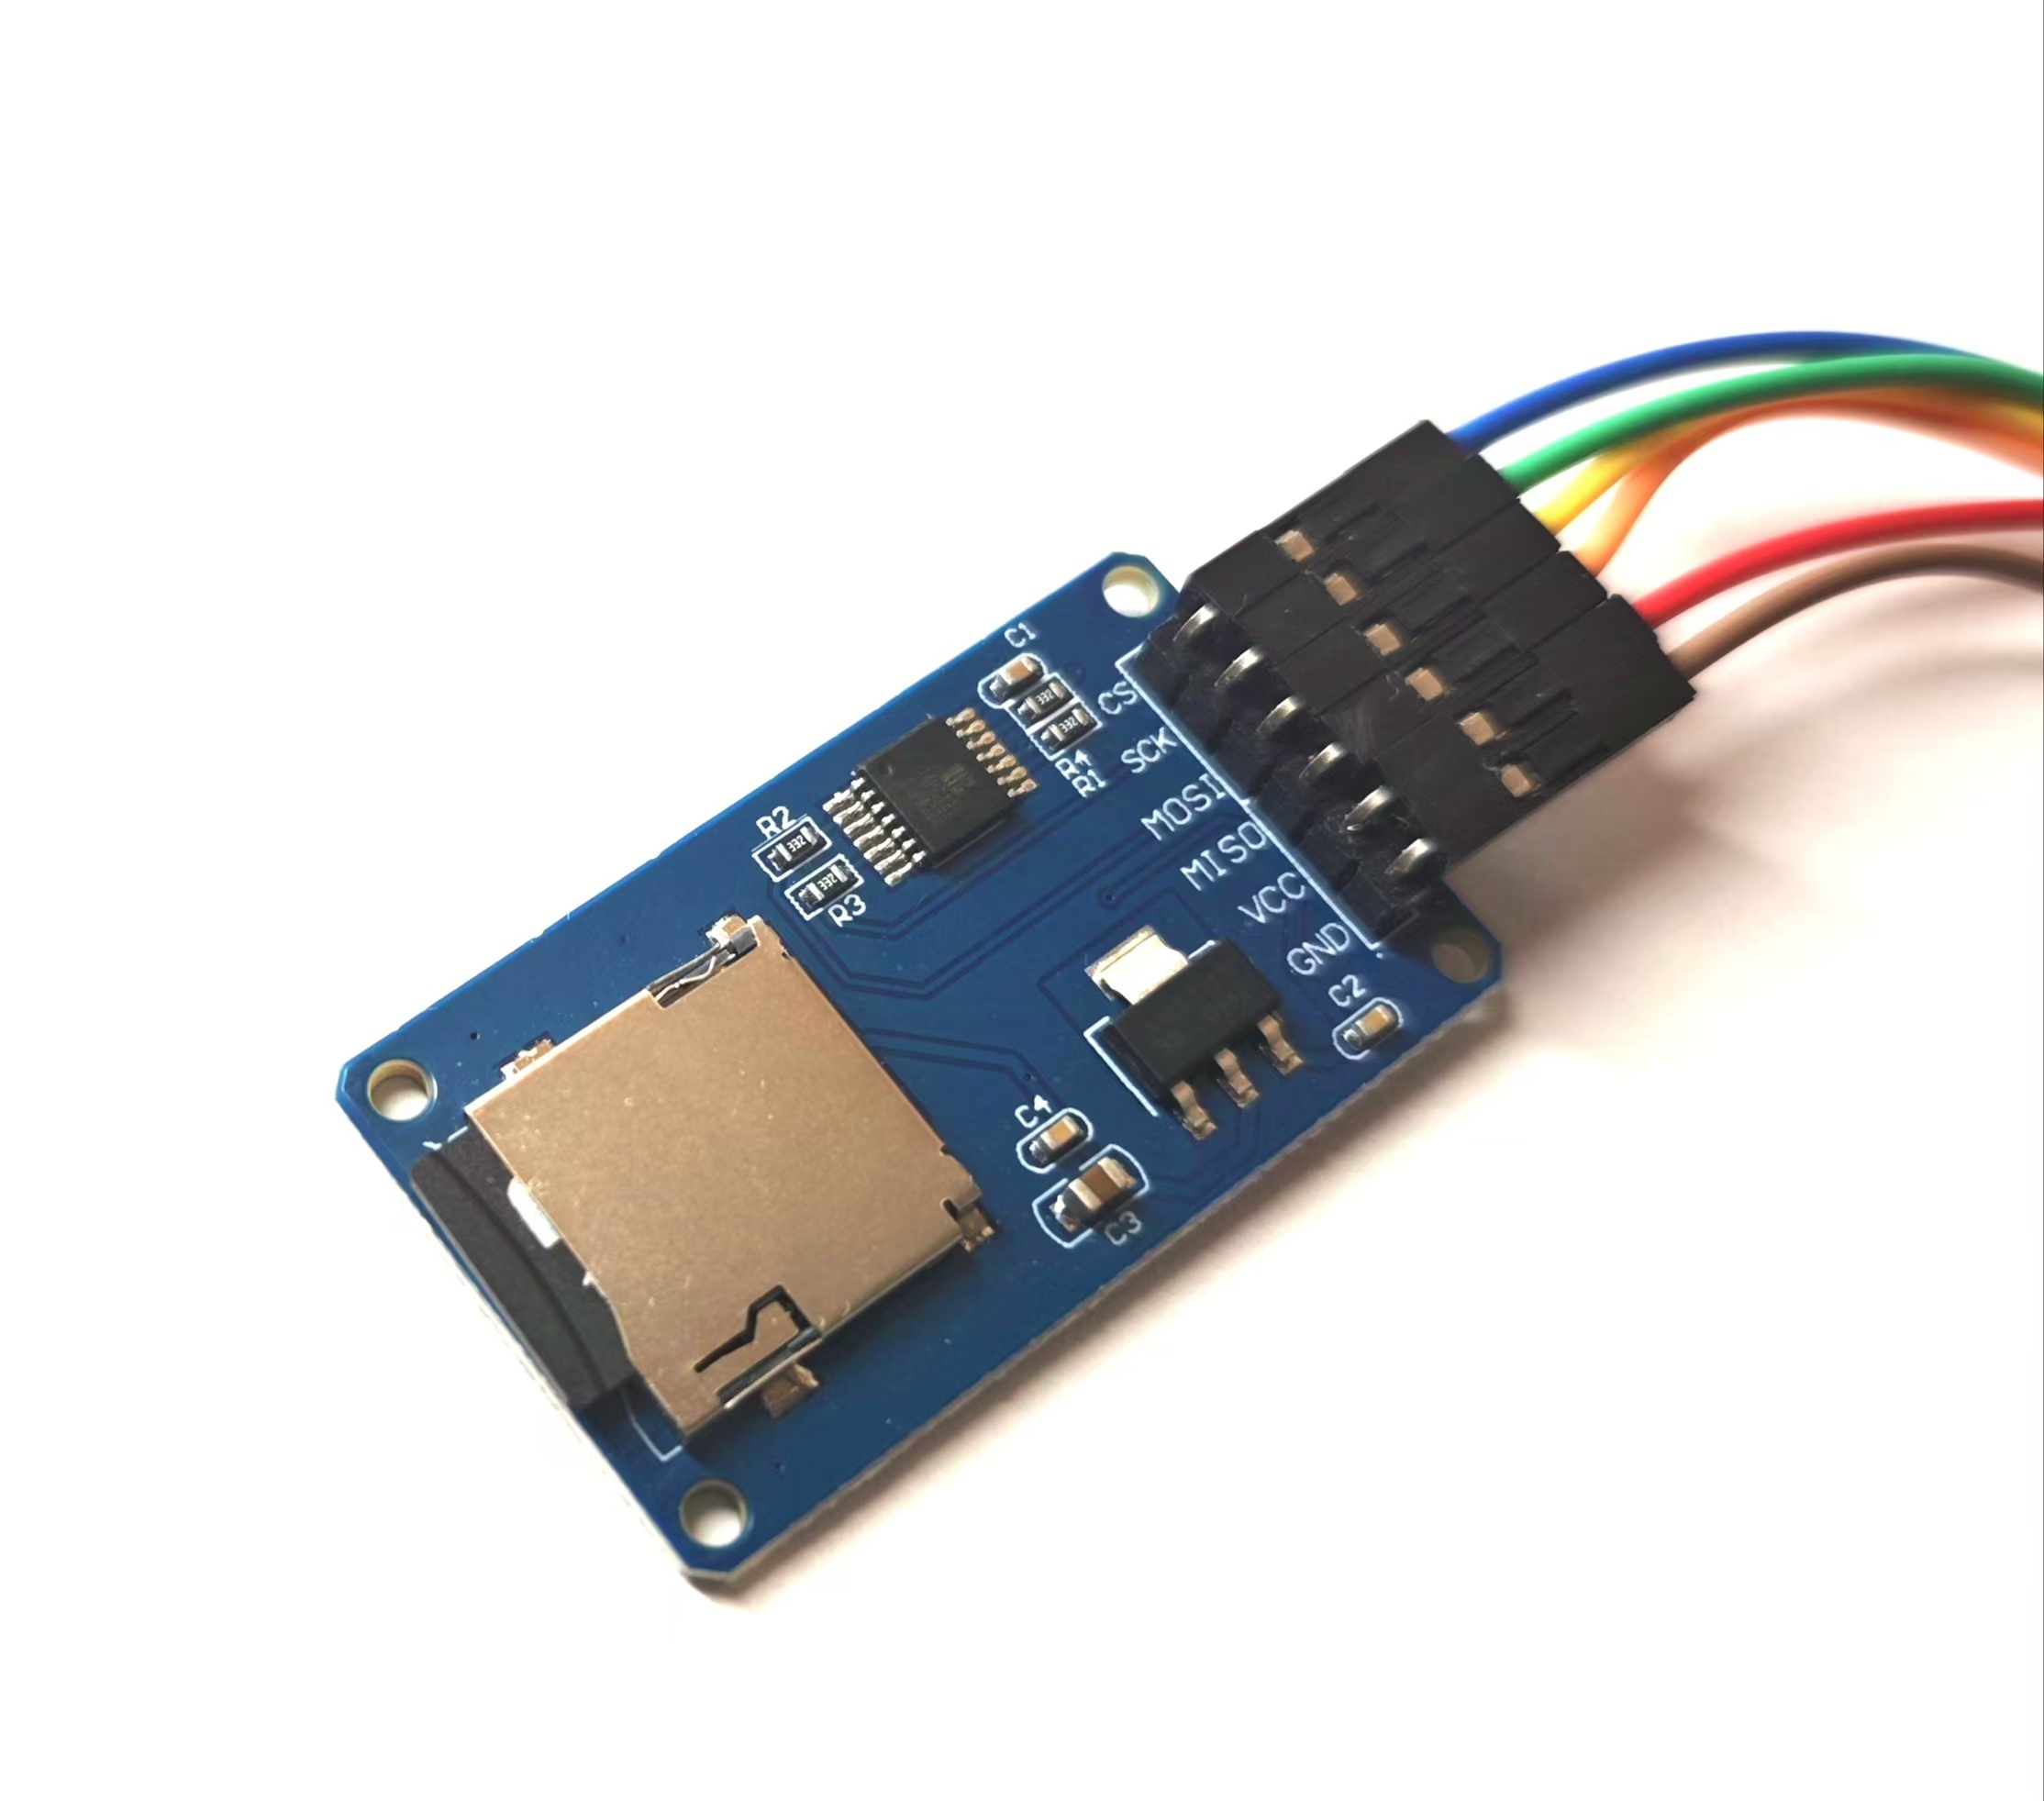
- microSD SPI接口模块
用于与ESP32-S3-N16R8开发板连接,ESP32-S3-N16R8通过SPI接口进行读写操作,便于后续进行录制唤醒词音频的用处。
购买链接: http://e.tb.cn/h.gLhmu2p4WMQOQ3B?tk=XfC83gGMPpk
硬件连接
音频模块连接
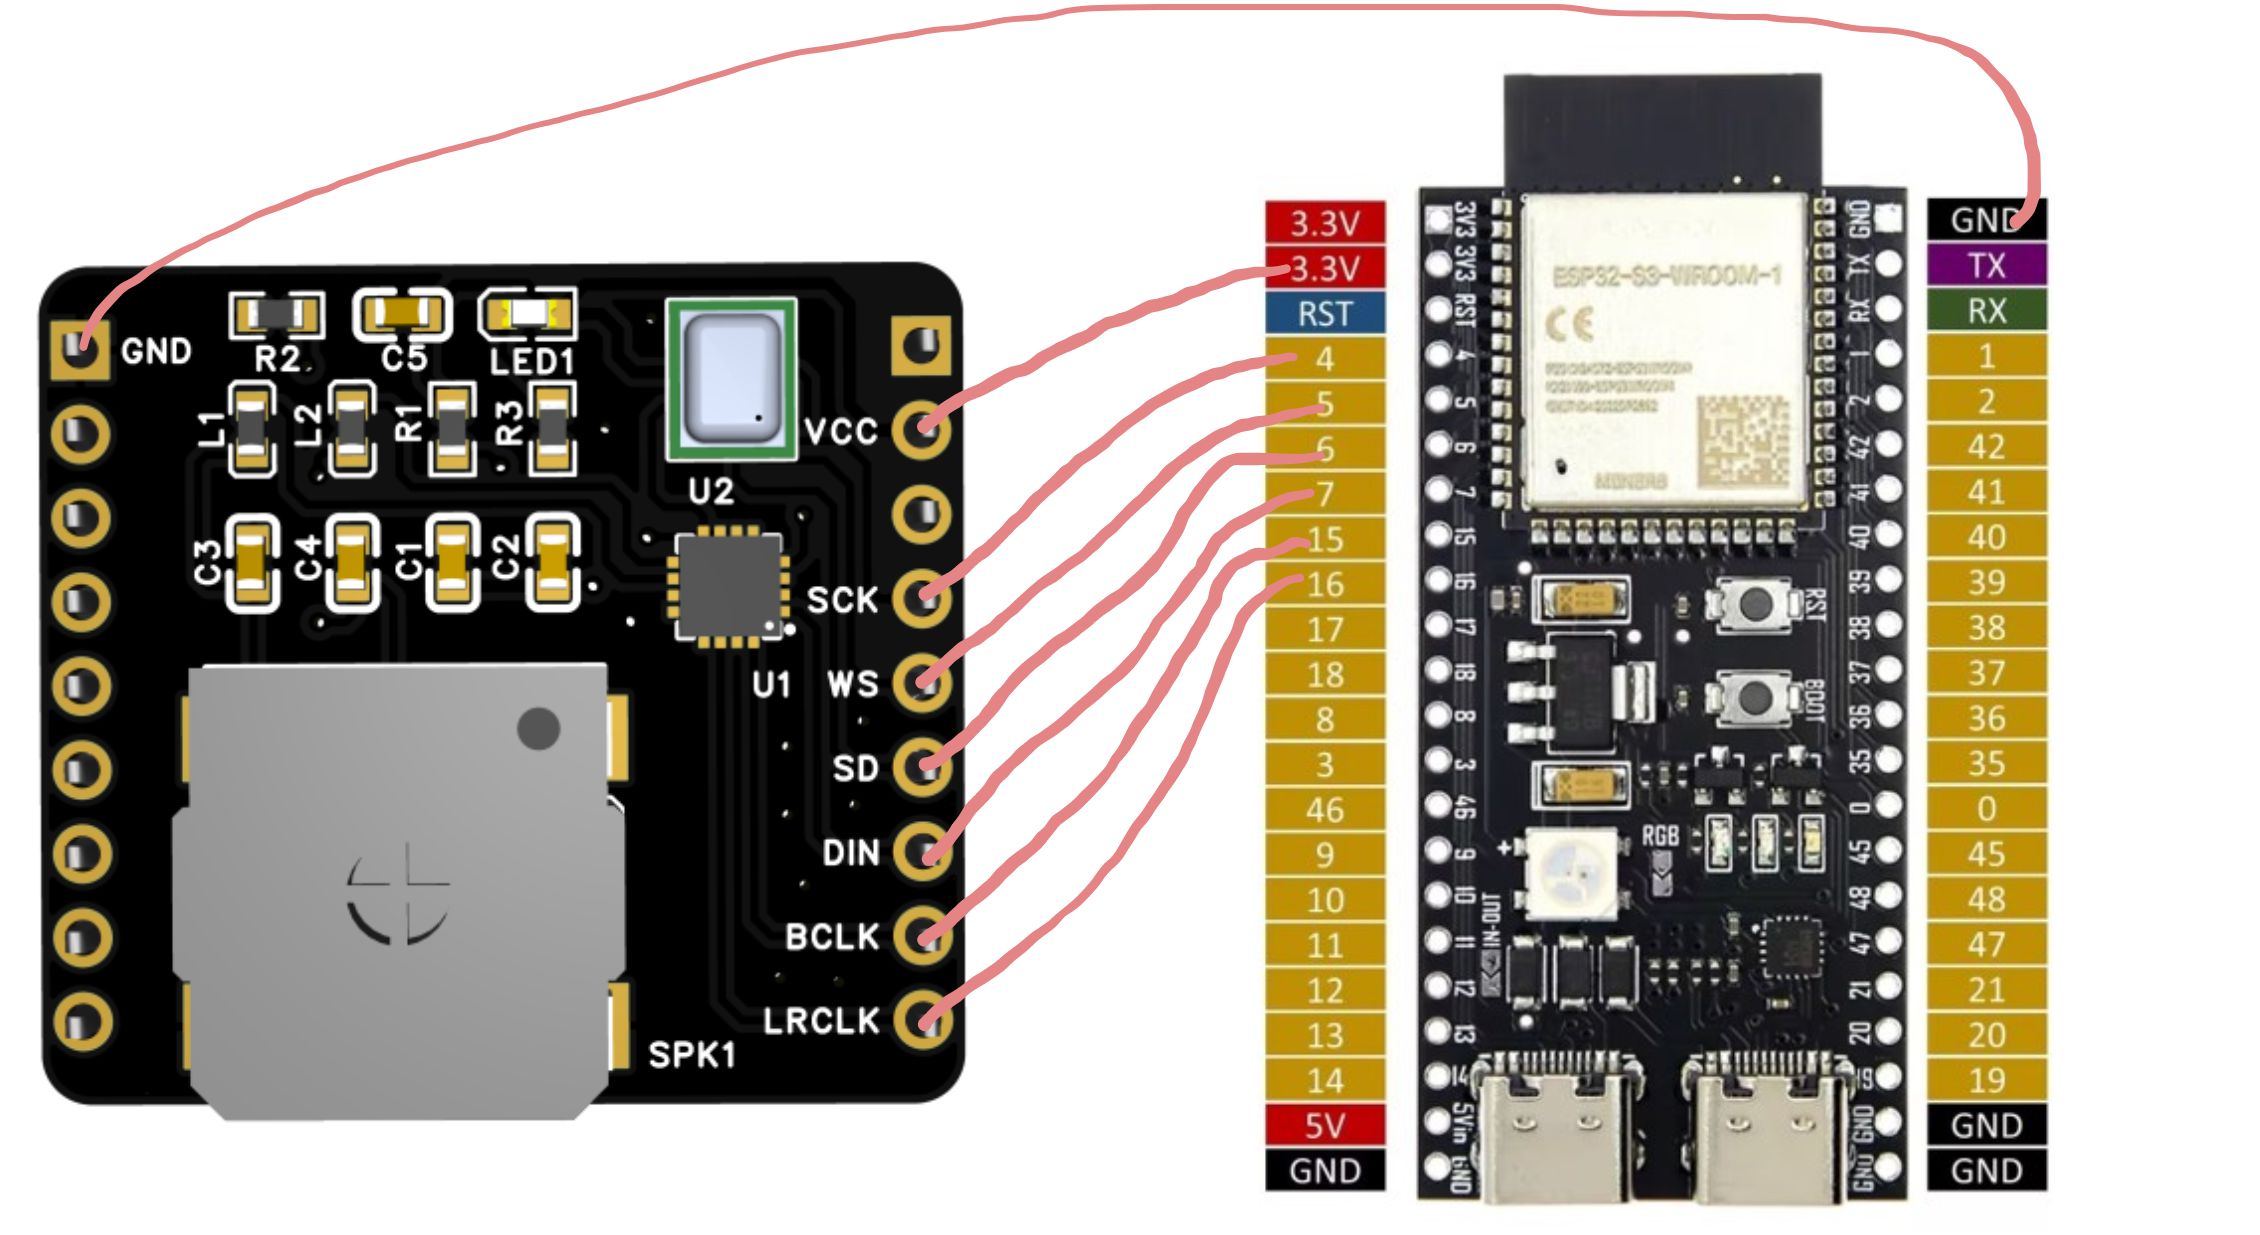
+ INMP441与ESP32-S3的连接:(pcb的引脚名对应程序中的变量命名不完全一致,括号中为软件代码中的命名,注意比对)| INMP441 | ESP32-S3 |
|---|---|
| SCK(BCLK) | GPIO4 |
| WS(LRC) | GPIO5 |
| SD(DIN) | GPIO6 |
| VCC | 3V3 |
| GND | GND |
- MAX98357与ESP32-S3的连接:
| MAX98357 | ESP32-S3 |
|---|---|
| BCLK(BCLK) | GPIO15 |
| LRCLK(LRC) | GPIO16 |
| DIN(DOUT) | GPIO7 |
| VCC | 3V3 |
| GND | GND |
注:喇叭的“+”连接到MAX98357的OUTP,喇叭的“-”连接到MAX98357的OUTN。
可以网上分别购买INMP441、MAX98357模块、喇叭进行连接,我这边直接使用音频集成模块,避免繁琐的连接,可以直接将音频集成模块扣接在ESP32-S3上。其连线方式如下图:
microSD SPI接口模块(仅唤醒词训练时使用)
| microSD | ESP32-S3 | | --- | --- | | CS | GPIO10 | | MISO | GPIO13 | | MOSI | GPIO11 | | SCK | GPIO12 | | VCC | 3V3 | | GND | GND |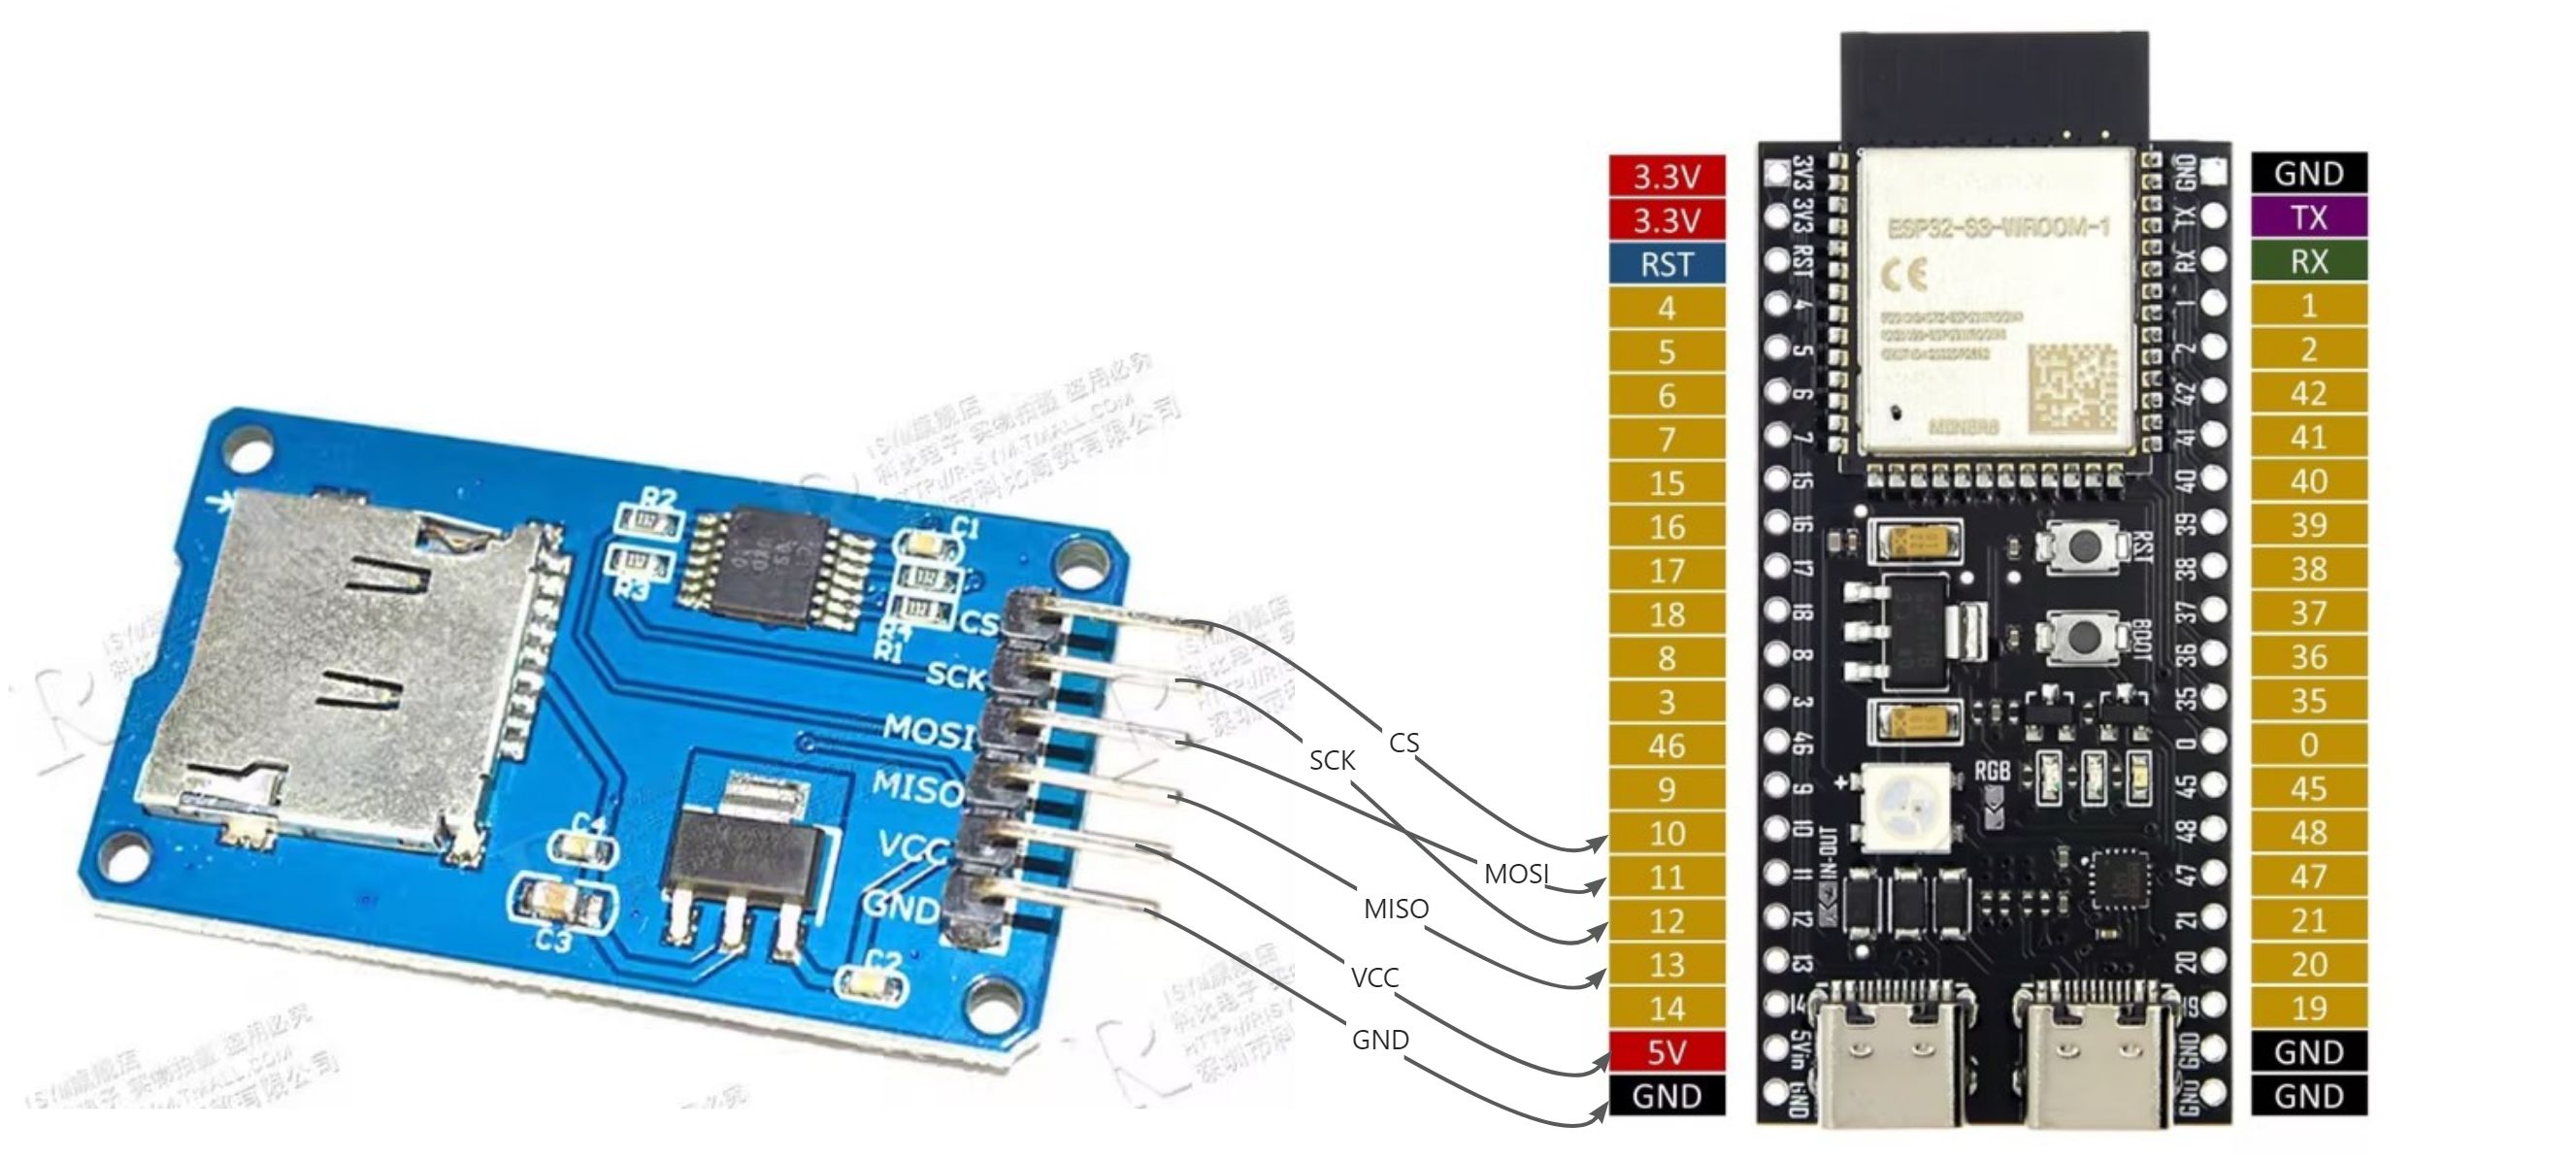
注:这里直接接5V,因为之前的测试直接接3V3总是出现SD访问失败的问题,换为接5V后就正常了。(这个microSD模块自身支持电平转换为3V3)。
快速开始
本模块主要讲述了快速上手arduino的开发流程,及本项目涉及到的相关的基础测试,用于测试硬件连接是否正常。运行第一个示例程序(零基础适用)
我们可以先通过跑一个官方的示例工程来熟悉一下arduino的开发流程。熟悉的这块的同学可以跳过,主要针对零基础、刚入门的arduino的一个新手小白教程。创建示例工程
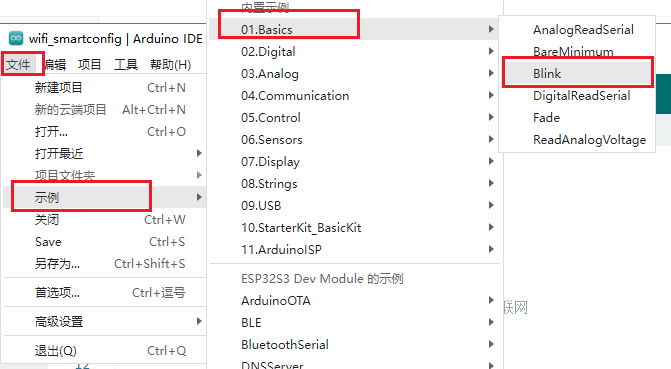
arduino中已经内置了很多示例工程,比如基础的亮灯、gpio控制、通信接口i2s、spi等,这些示例工程可以作为开发的依据。这里我们只从一个简单的示例工程开始,去熟悉下arduino的操作流程。- 打开arduino软件,点击文件->示例->Basics->Blink,打开亮灯的程序工程。
开发板端口选择
点击上方的开发板选择栏,选择开发板和端口,开发板选择 ESP32S3 Dev Module,端口选择USB typeC连接后的串口显示的对应串口(可通过设备管理器查看)。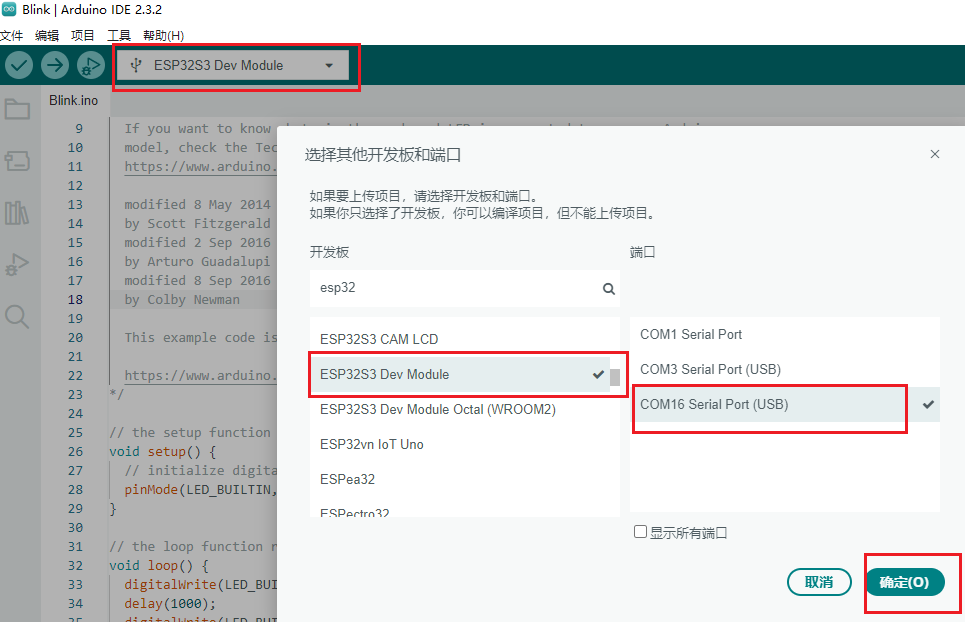
编译代码
点击左上侧的对勾图标,开始编译代码。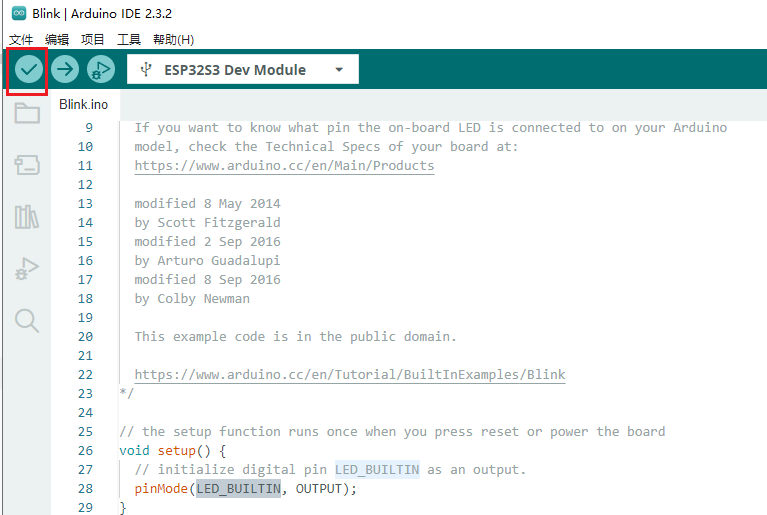
烧写
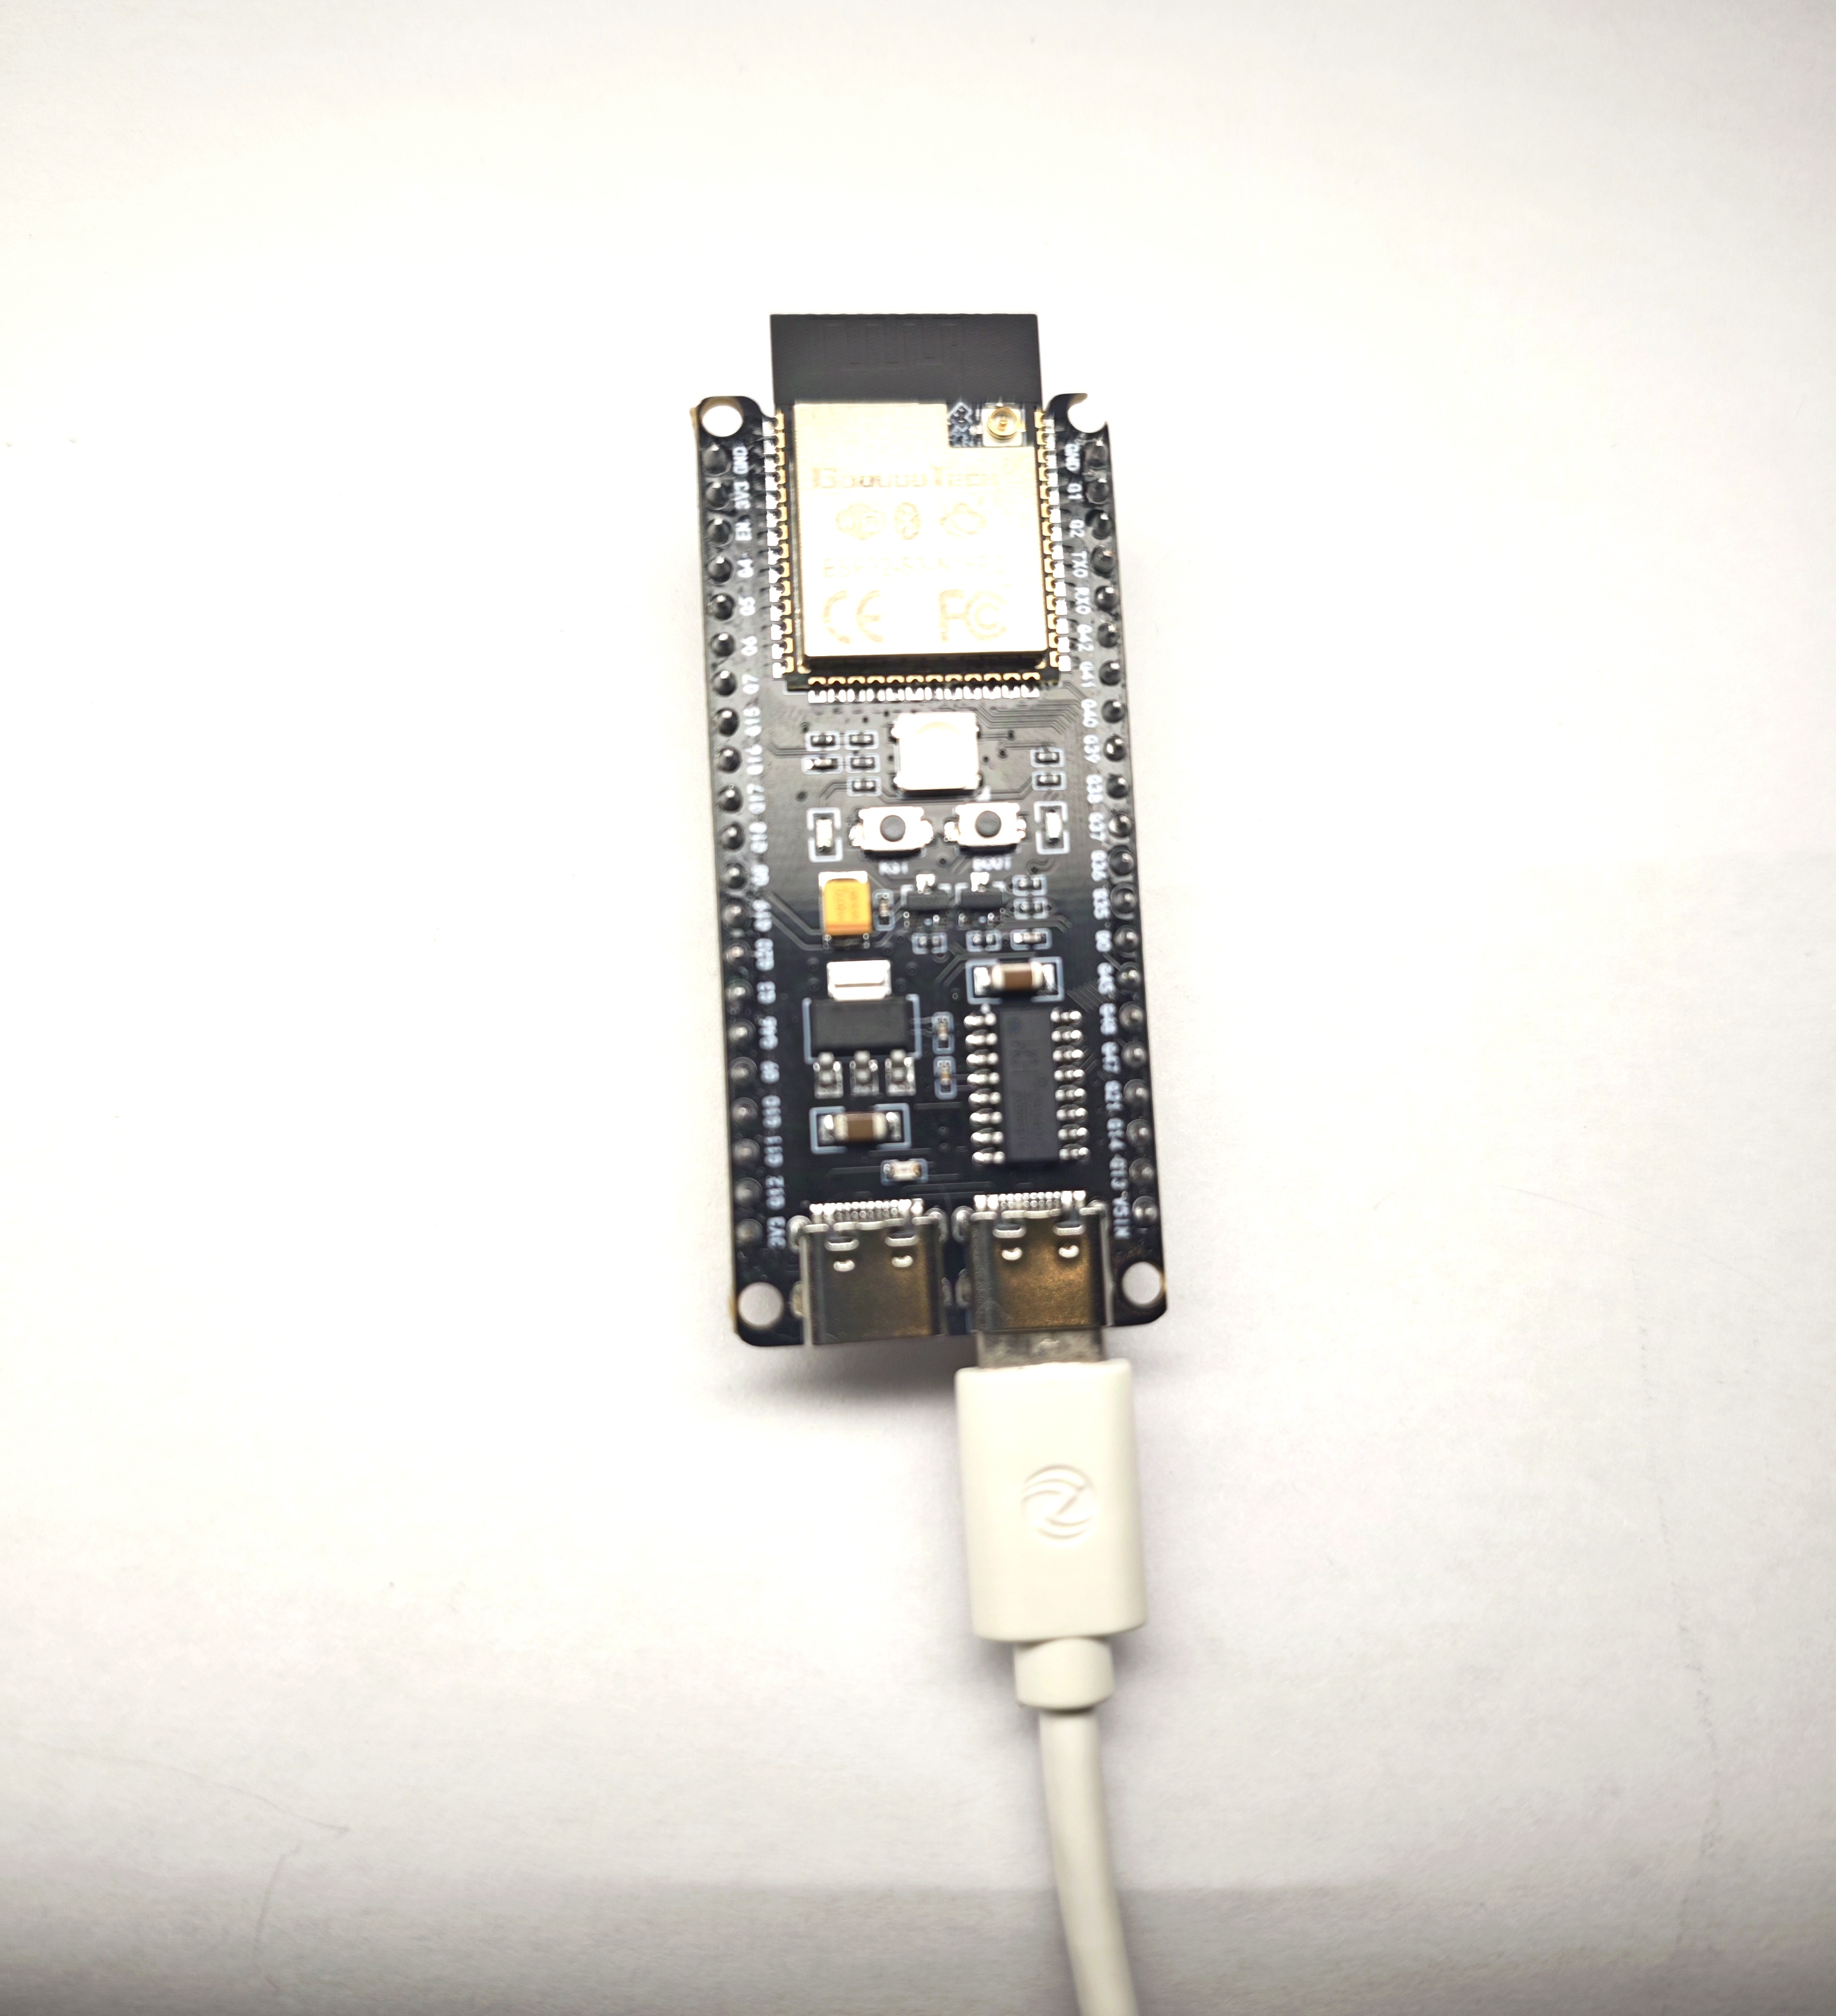
开发板上电并进入烧录模式:- 用typeC线连接ESP32-S3的USB转串口接口,如下图:
- 一只手按住BOOT键不松手。
- 然后另一只手短按一下RST键后松手,接着按住BOOT键的手松开。
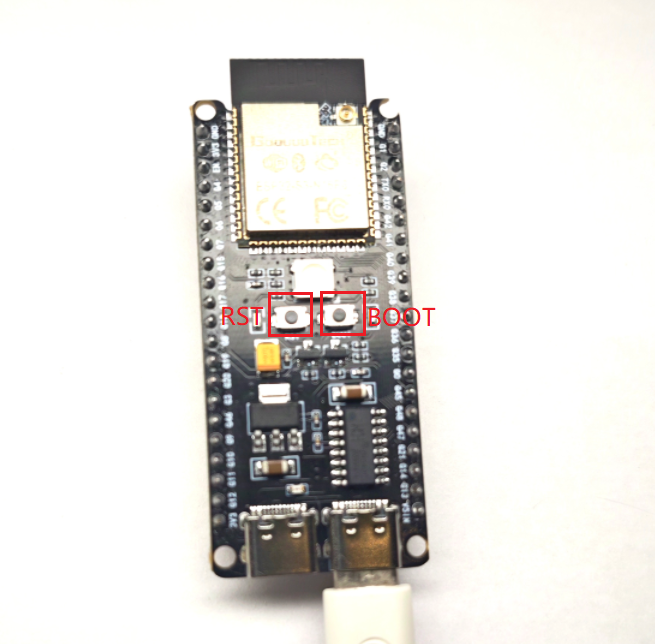
- ESP32-S3此时进入串口烧录模式,等待程序下载。
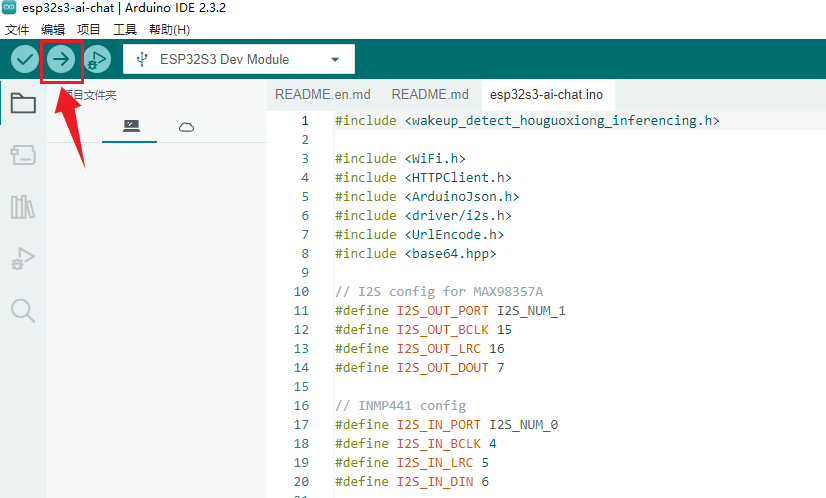
- 下载程序,点击左上侧的箭头图标,开始编译并下载程序。(此时注意不要打开其他的串口助手软件占用了串口)

初步代码编写和调试
在上面的示例程序中,我们可以添加串口打印,通过串口助手来查看我们程序的执行结果,通过这种方式进行代码的调试。void setup() {
Serial.begin(115200);
// initialize digital pin LED_BUILTIN as an output.
pinMode(LED_BUILTIN, OUTPUT);
}
// the loop function runs over and over again forever
void loop() {
digitalWrite(LED_BUILTIN, HIGH); // turn the LED on (HIGH is the voltage level)
delay(1000); // wait for a second
digitalWrite(LED_BUILTIN, LOW); // turn the LED off by making the voltage LOW
delay(1000); // wait for a second
Serial.println("blink test");
}
开源工程目录介绍
项目工程目录主要如下: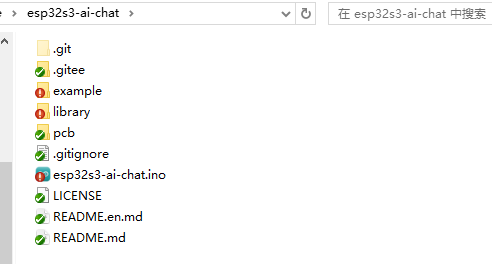
在esp32s3-ai-chat文件夹下主要包含下面几个模块:
- **example:**这个里面放的是各个功能测试模块的arduino工程,比如测试音频采集和播放的测试,wifi连接测试,sd卡的读写测试等。
- **library:**这个里面放的是arduino的库文件,主要为该项目用到的库文件。比如自己训练的唤醒词库,base64编码库等。
- **pcb:**这个里面放的是音频集成板的硬件设计文件(立创专业eda),可以根据这个设计自己打板实现。
- **esp32s3-ai-chat.ino:**主工程,这个里面实现了整个的AI语音聊天的功能。
主要功能模块调试
该模块主要对ESP32-S3与外围的一些硬件连接的测试,通过这些测试便可以知道我们的连接是否成功,完成这些测试后,才可以跑通** AI语音聊天arduino主程序**。音频录制和播放
该模块测试的工程在** esp32s3-ai-chat/example/audio_player**,主要是测试麦克风INMP441、MAX98357与ESP32-S3的硬件连接和通信是否正常,它们之间的通信接口主要为I2S通信,ESP32-S3通过I2S与INMP441通信,接收采集的音频数据,然后再通过I2S与MAX98357通信输出采集的音频数据。- 代码实现如下:
#include "Arduino.h"

#include <driver/i2s.h>

#define INMP441_WS 5
#define INMP441_SCK 4
#define INMP441_SD 6

#define MAX98357_LRC 16
#define MAX98357_BCLK 15
#define MAX98357_DIN 7

#define SAMPLE_RATE 16000

i2s_config_t i2sIn_config = {
  .mode = i2s_mode_t(I2S_MODE_MASTER | I2S_MODE_RX),
  .sample_rate = SAMPLE_RATE,
  .bits_per_sample = i2s_bits_per_sample_t(16),
  .channel_format = I2S_CHANNEL_FMT_ONLY_LEFT,
  .communication_format = i2s_comm_format_t(I2S_COMM_FORMAT_STAND_I2S),
  .intr_alloc_flags = ESP_INTR_FLAG_LEVEL1,
  .dma_buf_count = 8,
  .dma_buf_len = 1024
};

const i2s_pin_config_t i2sIn_pin_config = {
  .bck_io_num = INMP441_SCK,
  .ws_io_num = INMP441_WS,
  .data_out_num = -1,
  .data_in_num = INMP441_SD
};

i2s_config_t i2sOut_config = {
  .mode = i2s_mode_t(I2S_MODE_MASTER | I2S_MODE_TX),
  .sample_rate = SAMPLE_RATE,
  .bits_per_sample = i2s_bits_per_sample_t(16),
  .channel_format = I2S_CHANNEL_FMT_ONLY_RIGHT,
  .communication_format = i2s_comm_format_t(I2S_COMM_FORMAT_STAND_I2S),
  .intr_alloc_flags = ESP_INTR_FLAG_LEVEL1,
  .dma_buf_count = 8,
  .dma_buf_len = 1024
};

const i2s_pin_config_t i2sOut_pin_config = {
  .bck_io_num = MAX98357_BCLK,
  .ws_io_num = MAX98357_LRC,
  .data_out_num = MAX98357_DIN,
  .data_in_num = -1
};

void setup() {

  // put your setup code here, to run once:
  // 串口初始化
  Serial.begin(115200);

  // 初始化i2s
  i2s_driver_install(I2S_NUM_0, &i2sIn_config, 0, NULL);
  i2s_set_pin(I2S_NUM_0, &i2sIn_pin_config);

  i2s_driver_install(I2S_NUM_1, &i2sOut_config, 0, NULL);
  i2s_set_pin(I2S_NUM_1, &i2sOut_pin_config);
}

void loop() {

  // put your main code here, to run repeatedly:

  size_t bytes_read;
  int16_t data[512];

  // 麦克风读取数据
  esp_err_t result = i2s_read(I2S_NUM_0, &data, sizeof(data), &bytes_read, portMAX_DELAY);

  // 打印采集的数据,用于调试
  // for (int i = 0; i < bytes_read / 2; i++) {
  //   Serial.println(data[i]);
  // }

  // 扬声器输出数据
  result = i2s_write(I2S_NUM_1, &data, sizeof(data), &bytes_read, portMAX_DELAY);
}
将程序烧写到ESP32-S3开发板中,然后对着麦克风讲话,此时看喇叭会不会播放我们刚才讲话的声音,如果会则表示测试连接成功,否则,我们需要通过在程序中通过串口打印出收到的麦克风声音,然后用串口监视器查看麦克风的波形数据,去进行分析判断是否为数据问题。
- 串口监视器调试
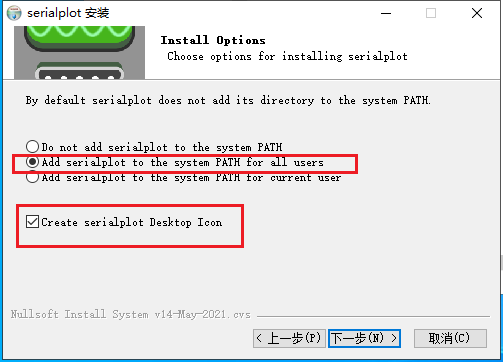
串口监视器工具下载网址:https://hackaday.io/project/5334-serialplot-realtime-plotting-software
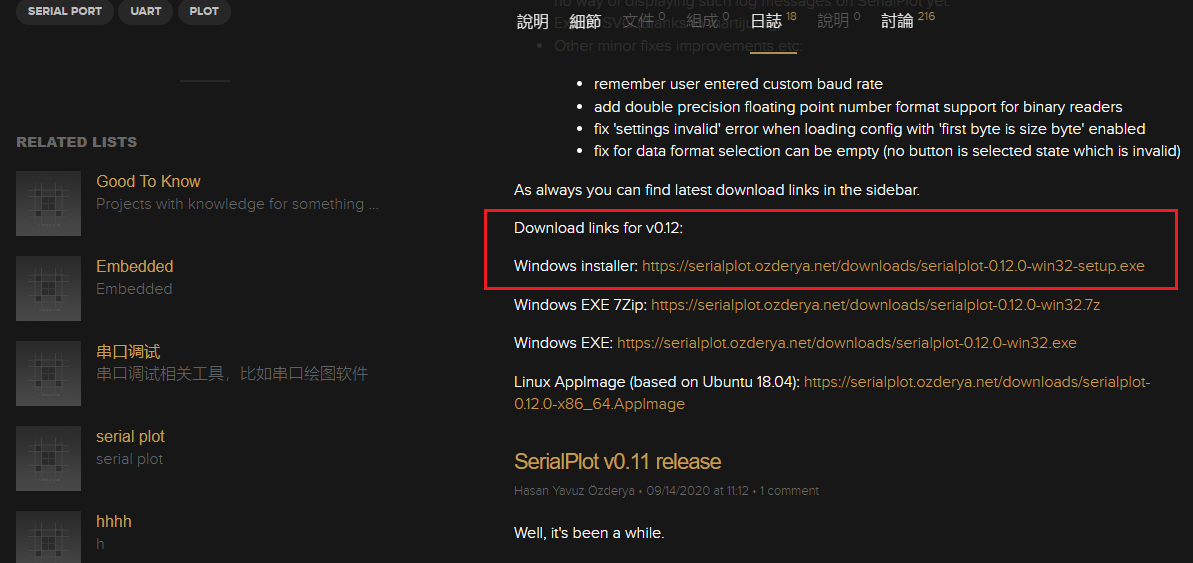
- 下载好安装包后将软件安装好,安装过程中记得勾选为所有用户安装、生成桌面快捷方式,接着下一步,将软件安装好。
- 将测试工程**esp32s3-ai-chat/example/audio_player**的串口输出调试代码取消屏蔽。
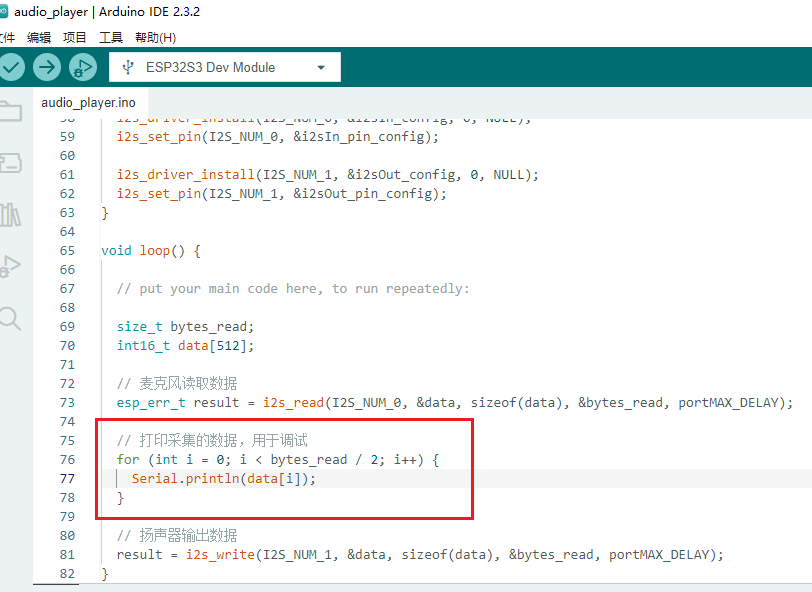
- 下载代码,烧录进ESP32-S3中。
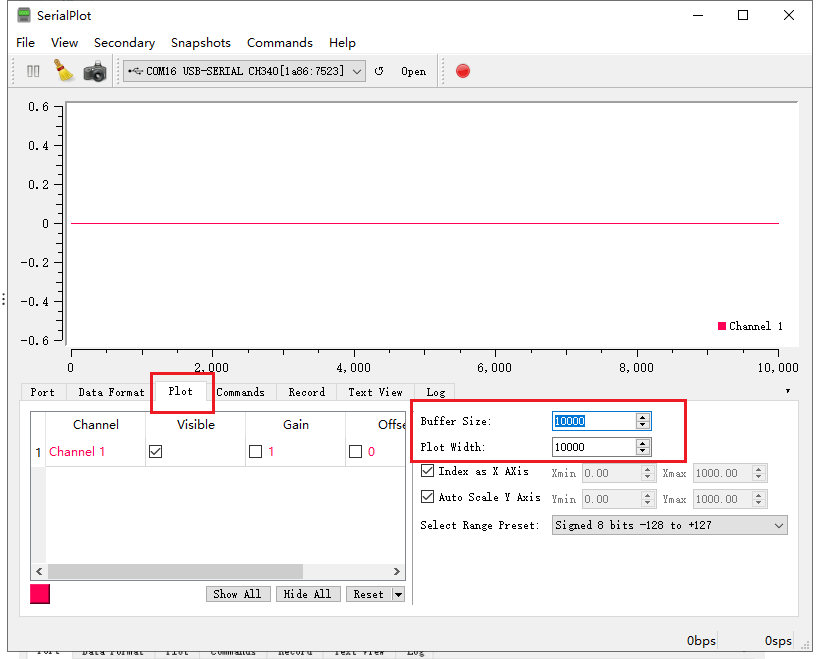
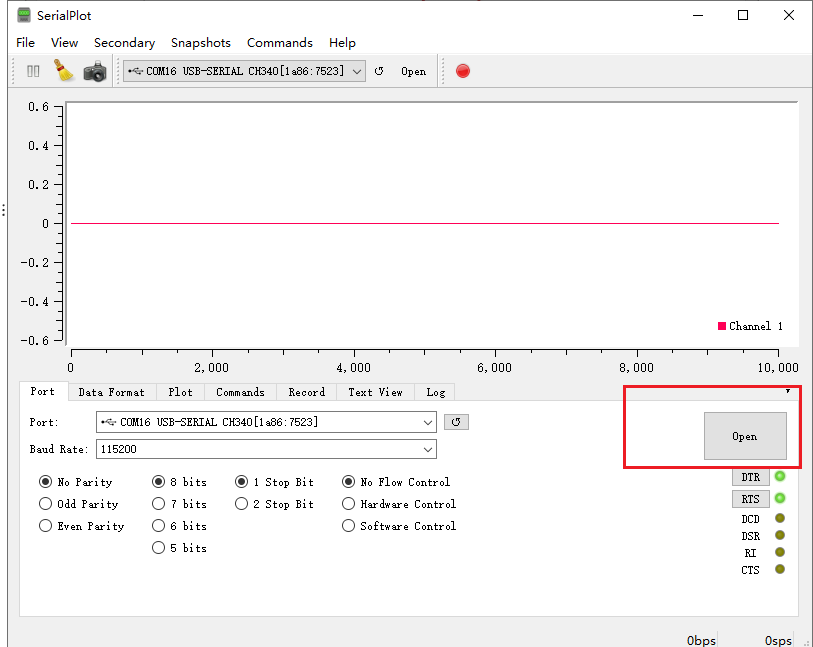
- 打开serialPlot串口调试器,然后设置一下参数,波特率、串口号、数据格式、显示大小等后点击打开串口。
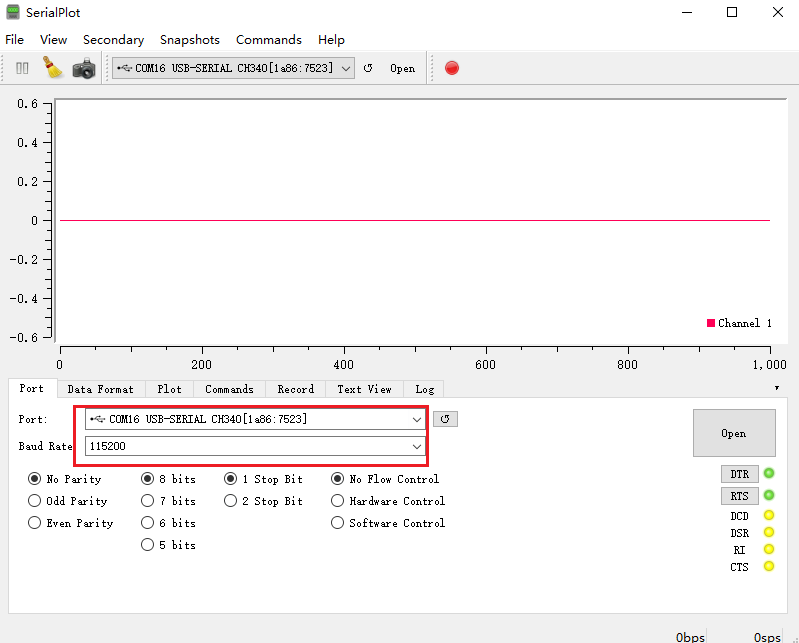

- 配置好参数后,点击open,打开串口。
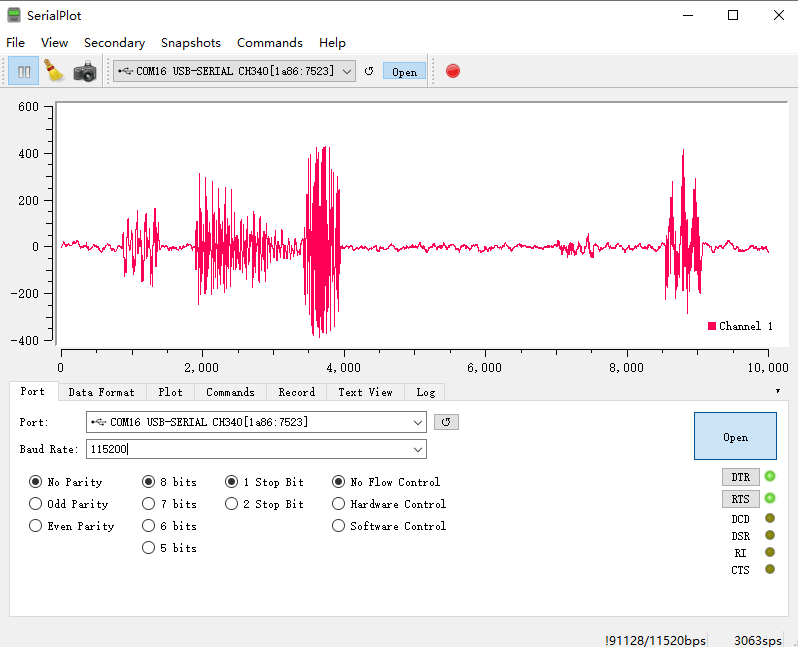
- 此时,窗口就会显示接受的串口输出的波形,正常接收到的音频数据的波形如下。波形应该是在0值上下对称的,当我们说一下话时,波形的幅值会变大。通过这样的方式我们去调试接收的音频数据是否正常。
microSD读写
该模块的测试工程在** esp32s3-ai-chat/example/SD_Test**,主要测试ESP32-S3读写micro SD卡的功能,在测试该模块时,请先将microSD卡格式化为FAT32格式,然后插入到microSD SPI接口模块中,并将ESP32-S3与micro SD SPI接口连接好,参考** 3.2.2章节**的硬件连接方式。- micro SD卡格式化

- 代码实现如下:
/*
 * pin 1 - not used          |  Micro SD card     |
 * pin 2 - CS (SS)           |                   /
 * pin 3 - DI (MOSI)         |                  |__
 * pin 4 - VDD (3.3V)        |                    |
 * pin 5 - SCK (SCLK)        | 8 7 6 5 4 3 2 1   /
 * pin 6 - VSS (GND)         | ▄ ▄ ▄ ▄ ▄ ▄ ▄ ▄  /
 * pin 7 - DO (MISO)         | ▀ ▀ █ ▀ █ ▀ ▀ ▀ |
 * pin 8 - not used          |_________________|
 *                             ║ ║ ║ ║ ║ ║ ║ ║
 *                     ╔═══════╝ ║ ║ ║ ║ ║ ║ ╚═════════╗
 *                     ║         ║ ║ ║ ║ ║ ╚══════╗    ║
 *                     ║   ╔═════╝ ║ ║ ║ ╚═════╗  ║    ║
 * Connections for     ║   ║   ╔═══╩═║═║═══╗   ║  ║    ║
 * full-sized          ║   ║   ║   ╔═╝ ║   ║   ║  ║    ║
 * SD card             ║   ║   ║   ║   ║   ║   ║  ║    ║
 * Pin name         |  -  DO  VSS SCK VDD VSS DI CS    -  |
 * SD pin number    |  8   7   6   5   4   3   2   1   9 /
 *                  |                                  █/
 *                  |__▍___▊___█___█___█___█___█___█___/
 *
 * Note:  The SPI pins can be manually configured by using `SPI.begin(sck, miso, mosi, cs).`
 *        Alternatively, you can change the CS pin and use the other default settings by using `SD.begin(cs)`.
 *
 * +--------------+---------+-------+----------+----------+----------+----------+----------+
 * | SPI Pin Name | ESP8266 | ESP32 | ESP32‑S2 | ESP32‑S3 | ESP32‑C3 | ESP32‑C6 | ESP32‑H2 |
 * +==============+=========+=======+==========+==========+==========+==========+==========+
 * | CS (SS)      | GPIO15  | GPIO5 | GPIO34   | GPIO10   | GPIO7    | GPIO18   | GPIO0    |
 * +--------------+---------+-------+----------+----------+----------+----------+----------+
 * | DI (MOSI)    | GPIO13  | GPIO23| GPIO35   | GPIO11   | GPIO6    | GPIO19   | GPIO25   |
 * +--------------+---------+-------+----------+----------+----------+----------+----------+
 * | DO (MISO)    | GPIO12  | GPIO19| GPIO37   | GPIO13   | GPIO5    | GPIO20   | GPIO11   |
 * +--------------+---------+-------+----------+----------+----------+----------+----------+
 * | SCK (SCLK)   | GPIO14  | GPIO18| GPIO36   | GPIO12   | GPIO4    | GPIO21   | GPIO10   |
 * +--------------+---------+-------+----------+----------+----------+----------+----------+
 *
 * For more info see file README.md in this library or on URL:
 * https://github.com/espressif/arduino-esp32/tree/master/libraries/SD
 */

#include "FS.h"
#include "SD.h"
#include "SPI.h"

/*
Uncomment and set up if you want to use custom pins for the SPI communication
#define REASSIGN_PINS
int sck = -1;
int miso = -1;
int mosi = -1;
int cs = -1;
*/

void listDir(fs::FS &fs, const char *dirname, uint8_t levels) {
  Serial.printf("Listing directory: %s\n", dirname);

  File root = fs.open(dirname);
  if (!root) {
    Serial.println("Failed to open directory");
    return;
  }
  if (!root.isDirectory()) {
    Serial.println("Not a directory");
    return;
  }

  File file = root.openNextFile();
  while (file) {
    if (file.isDirectory()) {
      Serial.print("  DIR : ");
      Serial.println(file.name());
      if (levels) {
        listDir(fs, file.path(), levels - 1);
      }
    } else {
      Serial.print("  FILE: ");
      Serial.print(file.name());
      Serial.print("  SIZE: ");
      Serial.println(file.size());
    }
    file = root.openNextFile();
  }
}

void createDir(fs::FS &fs, const char *path) {
  Serial.printf("Creating Dir: %s\n", path);
  if (fs.mkdir(path)) {
    Serial.println("Dir created");
  } else {
    Serial.println("mkdir failed");
  }
}

void removeDir(fs::FS &fs, const char *path) {
  Serial.printf("Removing Dir: %s\n", path);
  if (fs.rmdir(path)) {
    Serial.println("Dir removed");
  } else {
    Serial.println("rmdir failed");
  }
}

void readFile(fs::FS &fs, const char *path) {
  Serial.printf("Reading file: %s\n", path);

  File file = fs.open(path);
  if (!file) {
    Serial.println("Failed to open file for reading");
    return;
  }

  Serial.print("Read from file: ");
  while (file.available()) {
    Serial.write(file.read());
  }
  file.close();
}

void writeFile(fs::FS &fs, const char *path, const char *message) {
  Serial.printf("Writing file: %s\n", path);

  File file = fs.open(path, FILE_WRITE);
  if (!file) {
    Serial.println("Failed to open file for writing");
    return;
  }
  if (file.print(message)) {
    Serial.println("File written");
  } else {
    Serial.println("Write failed");
  }
  file.close();
}

void appendFile(fs::FS &fs, const char *path, const char *message) {
  Serial.printf("Appending to file: %s\n", path);

  File file = fs.open(path, FILE_APPEND);
  if (!file) {
    Serial.println("Failed to open file for appending");
    return;
  }
  if (file.print(message)) {
    Serial.println("Message appended");
  } else {
    Serial.println("Append failed");
  }
  file.close();
}

void renameFile(fs::FS &fs, const char *path1, const char *path2) {
  Serial.printf("Renaming file %s to %s\n", path1, path2);
  if (fs.rename(path1, path2)) {
    Serial.println("File renamed");
  } else {
    Serial.println("Rename failed");
  }
}

void deleteFile(fs::FS &fs, const char *path) {
  Serial.printf("Deleting file: %s\n", path);
  if (fs.remove(path)) {
    Serial.println("File deleted");
  } else {
    Serial.println("Delete failed");
  }
}

void testFileIO(fs::FS &fs, const char *path) {
  File file = fs.open(path);
  static uint8_t buf[512];
  size_t len = 0;
  uint32_t start = millis();
  uint32_t end = start;
  if (file) {
    len = file.size();
    size_t flen = len;
    start = millis();
    while (len) {
      size_t toRead = len;
      if (toRead > 512) {
        toRead = 512;
      }
      file.read(buf, toRead);
      len -= toRead;
    }
    end = millis() - start;
    Serial.printf("%u bytes read for %lu ms\n", flen, end);
    file.close();
  } else {
    Serial.println("Failed to open file for reading");
  }

  file = fs.open(path, FILE_WRITE);
  if (!file) {
    Serial.println("Failed to open file for writing");
    return;
  }

  size_t i;
  start = millis();
  for (i = 0; i < 2048; i++) {
    file.write(buf, 512);
  }
  end = millis() - start;
  Serial.printf("%u bytes written for %lu ms\n", 2048 * 512, end);
  file.close();
}

void setup() {
  Serial.begin(115200);
  while (!Serial) {
    delay(10);
  }

#ifdef REASSIGN_PINS
  SPI.begin(sck, miso, mosi, cs);
  if (!SD.begin(cs)) {
#else
  if (!SD.begin()) {
#endif
    Serial.println("Card Mount Failed");
    return;
  }
  uint8_t cardType = SD.cardType();

  if (cardType == CARD_NONE) {
    Serial.println("No SD card attached");
    return;
  }

  Serial.print("SD Card Type: ");
  if (cardType == CARD_MMC) {
    Serial.println("MMC");
  } else if (cardType == CARD_SD) {
    Serial.println("SDSC");
  } else if (cardType == CARD_SDHC) {
    Serial.println("SDHC");
  } else {
    Serial.println("UNKNOWN");
  }

  uint64_t cardSize = SD.cardSize() / (1024 * 1024);
  Serial.printf("SD Card Size: %lluMB\n", cardSize);

  listDir(SD, "/", 0);
  createDir(SD, "/mydir");
  listDir(SD, "/", 0);
  removeDir(SD, "/mydir");
  listDir(SD, "/", 2);
  writeFile(SD, "/hello.txt", "Hello ");
  appendFile(SD, "/hello.txt", "World!\n");
  readFile(SD, "/hello.txt");
  deleteFile(SD, "/foo.txt");
  renameFile(SD, "/hello.txt", "/foo.txt");
  readFile(SD, "/foo.txt");
  testFileIO(SD, "/test.txt");
  Serial.printf("Total space: %lluMB\n", SD.totalBytes() / (1024 * 1024));
  Serial.printf("Used space: %lluMB\n", SD.usedBytes() / (1024 * 1024));
}

void loop() {}
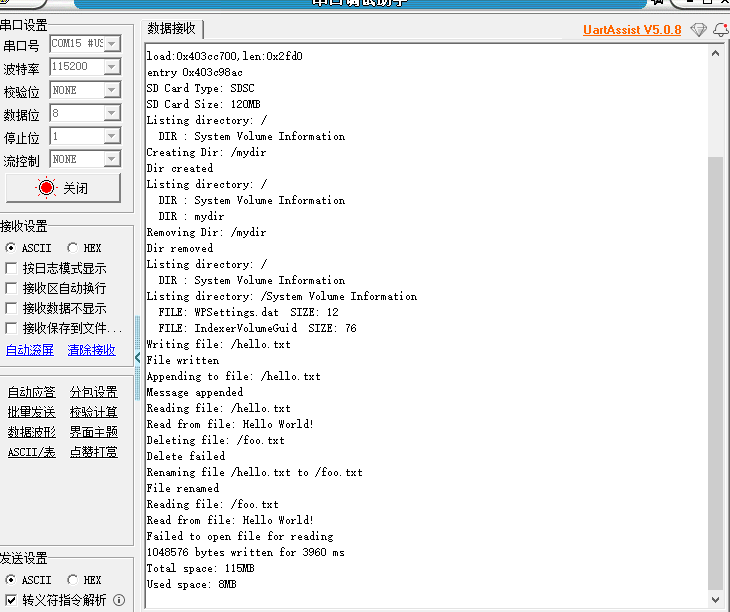
- 烧写程序到ESP32-S3开发板中,程序成功执行后,串口打印log如下:
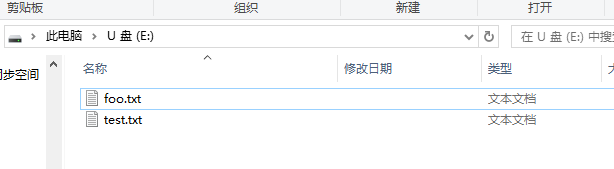
- 我们将microSD卡用读卡器插上电脑上查看保存的文件:
Wifi模块调试
Wifi 基础连接测试
wifi基础连接测试工程在** esp32s3-ai-chat/example/wifi_connect**,Wifi的连接直接可以通过下面的程序进行联网配置,在程序中我们需要修改wifi的ssid、password为当前可连接上网的wifi热点。- 代码如下:
#include <WiFi.h>
const char* ssid = "WiFi名称";
const char* password = "WiFi密码";
void setup() {
//初始化串口
Serial.begin(115200);
delay(10);
// 进行WiFi连接
Serial.println();
Serial.print("Connecting to ");
Serial.println(ssid);
//连接WIFI
WiFi.begin(ssid, password);
//等待WIFI连接成功
while (WiFi.status() != WL_CONNECTED) { //WiFi.status()函数用于获取WiFi连接的状态
//WL_CONNECTED,即连接状态
delay(500);
Serial.print(".");
}
Serial.println("");
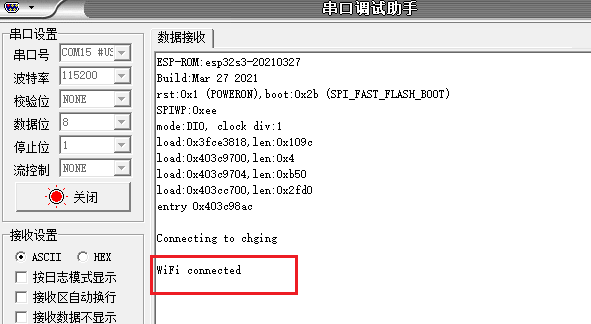
Serial.println("WiFi connected");
}
void loop() {
}
- 烧写程序到ESP32-S3开发板中后,将会看到如下串口log则表示wifi连接成功。
Wifi SmartConfig连接基础测试(小程序配网)
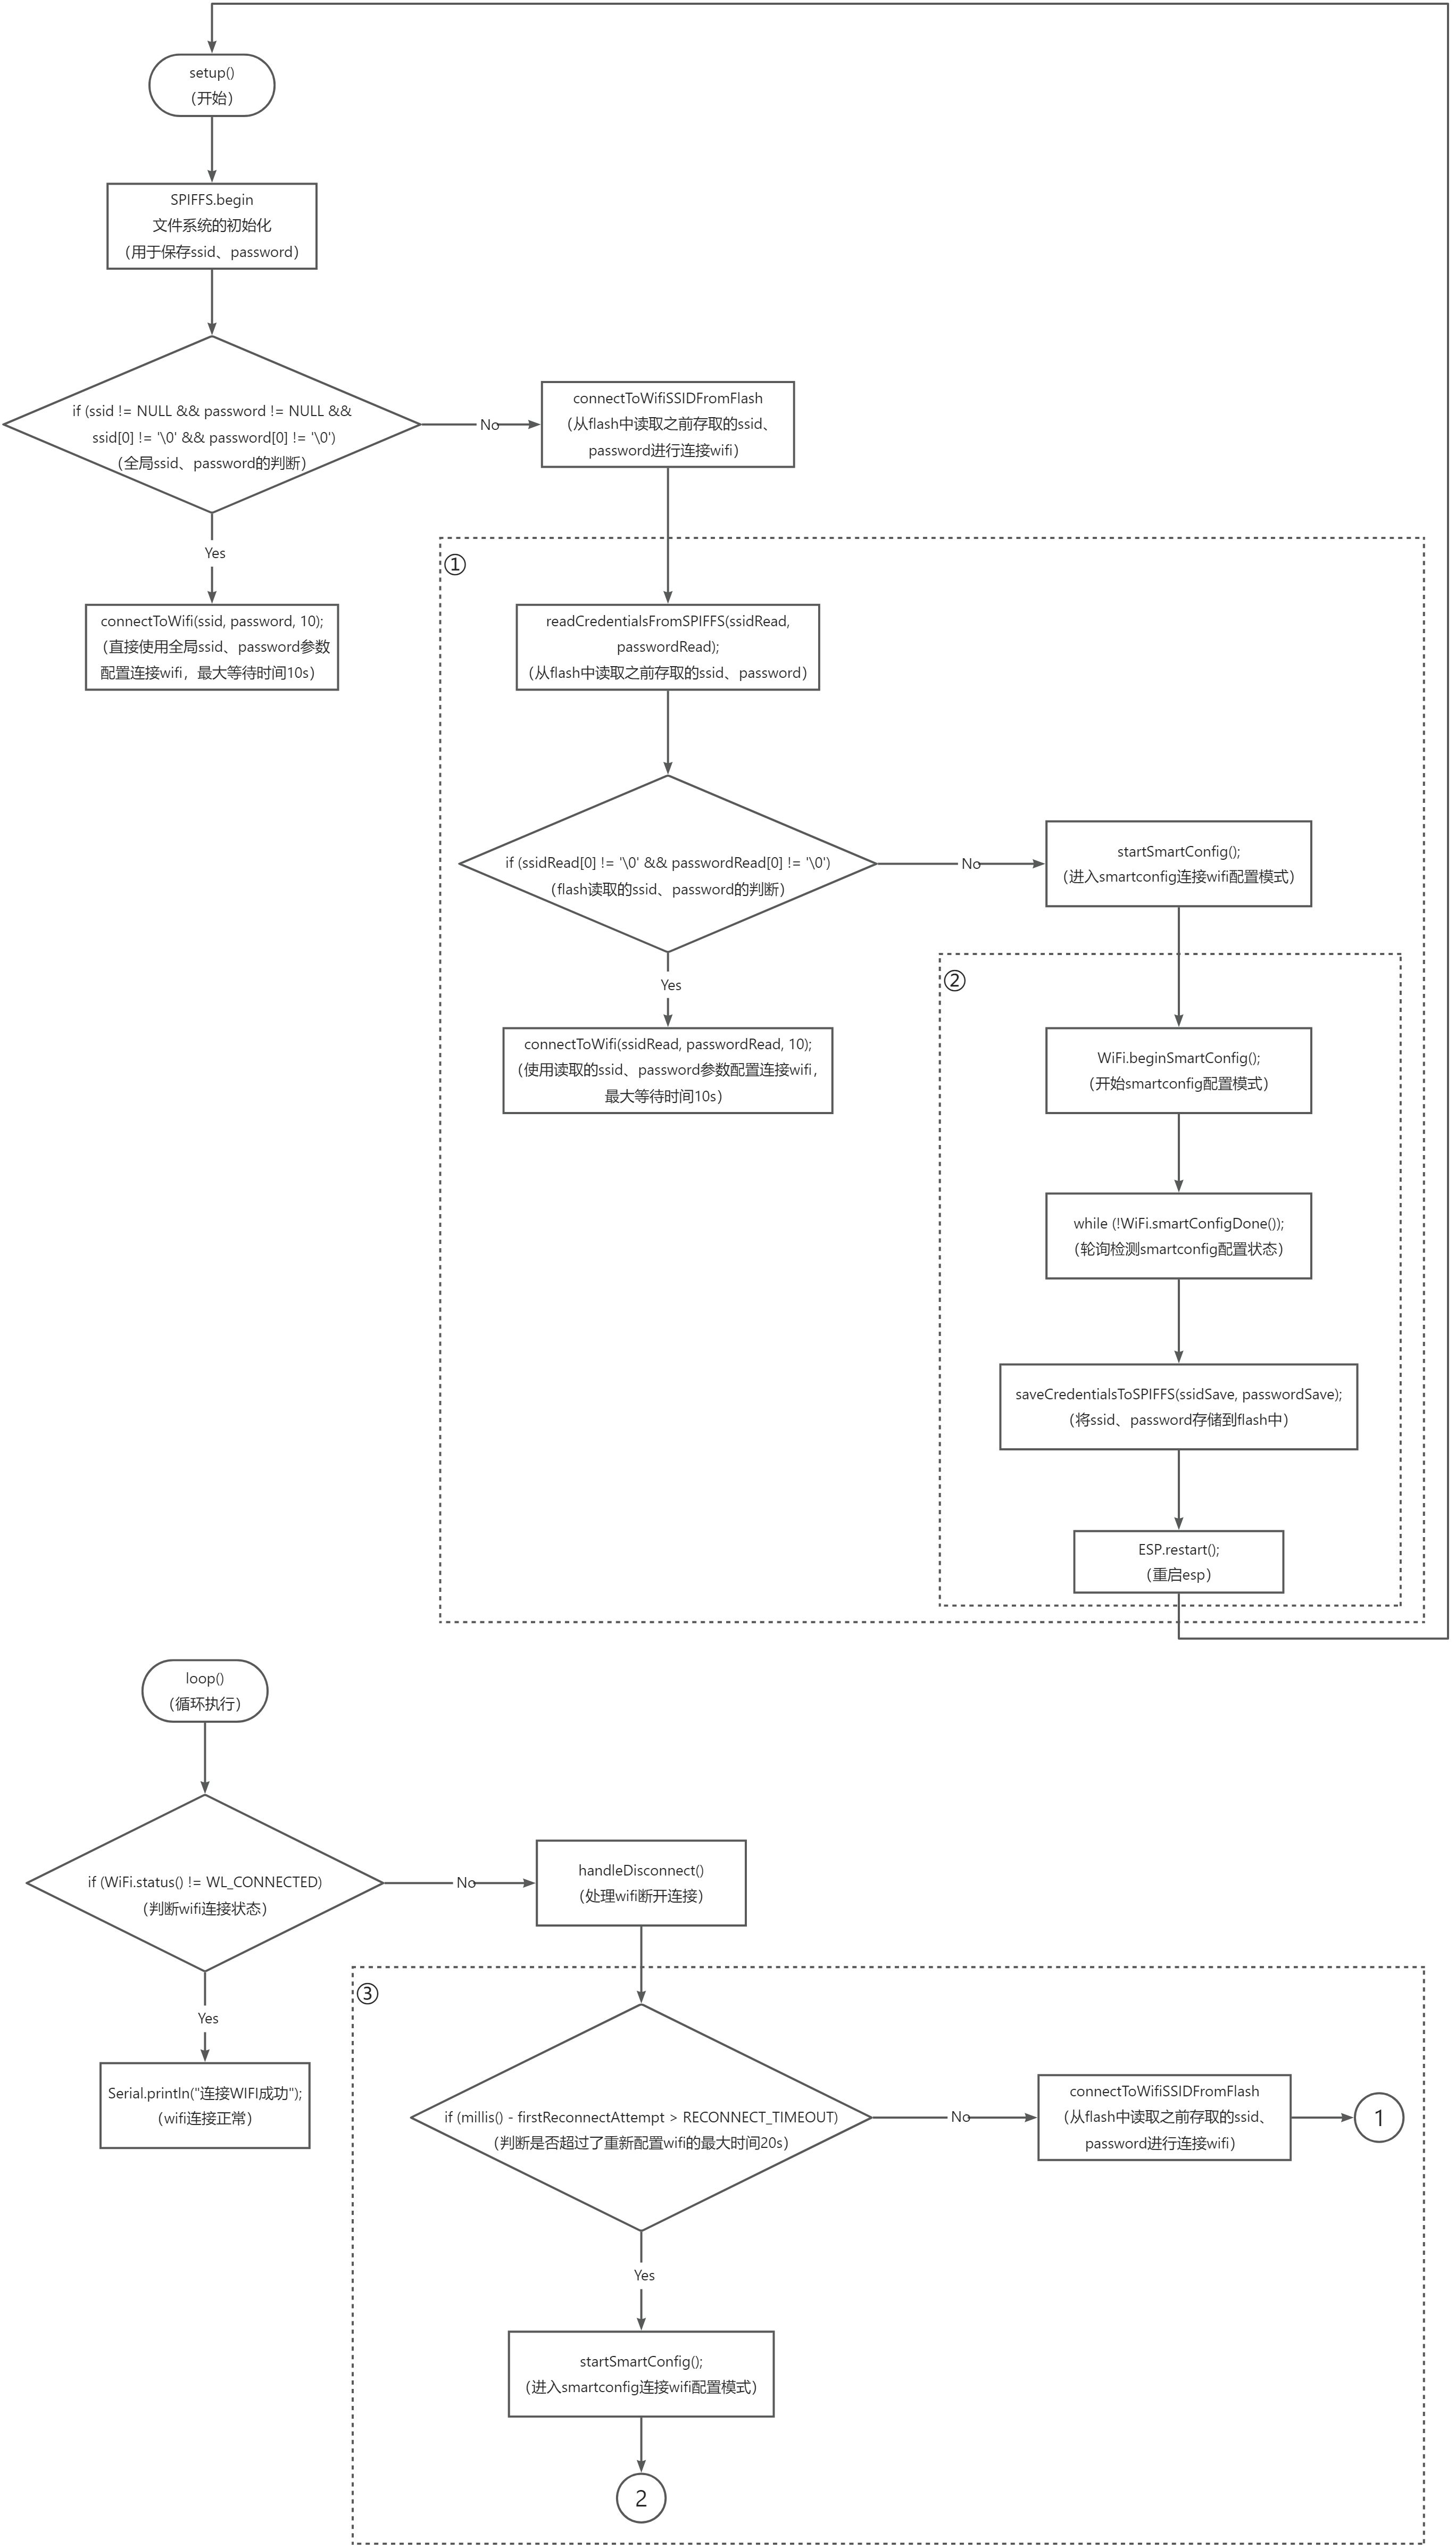
Wifi的SmartConfig配网方式是可以通过小程序、APP通过将当前的wifi的ssid、password传给ESP32-S3进行联网方式。在** esp32s3-ai-chat/example/wifi_smartconfig**工程中,实现了整体的wifi连接方案。可以通过直接在代码中修改wifi的ssid、password进行连接,也支持通过小程序方式进行配网,通过这种方式的话,程序将会把配置的ssid、password存储到flash中(spiffs方式),下次断电重启后可直接从flash中读取ssid、password实现wifi连接。
- 代码实现如下:
#include <WiFi.h>
#include <SPIFFS.h>

// 定义存储文件的文件名
const char* wifi_config_file = "/wifi_config.txt";

// 定义变量存储 WiFi 信息
// 1)不填写为空时通过smartconfig流程进行配网
// 2)填写具体WiFi信息后直接根据填写的账号密码信息进行联网
const char* ssid = "";
const char* password = "";

// 设置断网重连的时间间隔
const uint32_t RECONNECT_TIMEOUT = 20000;  // 20s

void setup() {
  Serial.begin(115200);

  // 初始化 SPIFFS 文件系统
  if (!SPIFFS.begin(true)) {
    Serial.println("SPIFFS 初始化失败");
    return;
  }

  // 如果直接代码中ssid password 配置了,则直接去连接wifi
  if (ssid != NULL && password != NULL && ssid[0] != '\0' && password[0] != '\0') {
    // 尝试连接 WiFi
    connectToWifi(ssid, password, 10);
  } else {
    // 从flash中读取ssid password 后连接WiFi
    connectToWifiSSIDFromFlash();
  }
}

void loop() {
  // 定时检查 WiFi 连接状态
  if (WiFi.status() != WL_CONNECTED) {
    handleDisconnect();
  } else {
    Serial.println("连接WIFI成功");
    delay(3000);
  }
}

void connectToWifiSSIDFromFlash(void) {
  char ssidRead[32];
  char passwordRead[64];
  // 从 SPIFFS 文件中读取 WiFi 配置信息
  readCredentialsFromSPIFFS(ssidRead, passwordRead);

  if (ssidRead[0] != '\0' && passwordRead[0] != '\0') {
    Serial.print("ssid:");
    Serial.print(ssidRead);
    Serial.print(" password:");
    Serial.println(passwordRead);

    // 尝试连接 WiFi
    connectToWifi(ssidRead, passwordRead, 10);
  } else {
    // 进入 SmartConfig 模式
    startSmartConfig();
  }
}

// 尝试连接 WiFi
void connectToWifi(const char* ssid, const char* password, uint32_t maxTimeoutSec) {
  uint8_t connected = 1;
  uint32_t waitTimeMs = 0;

  WiFi.begin(ssid, password);
  Serial.print("连接WIFI:");
  Serial.println(ssid);

  // 等待连接成功
  while (WiFi.status() != WL_CONNECTED) {
    delay(1000);
    Serial.print(".");
    waitTimeMs += 1000;

    if (waitTimeMs / 1000 > maxTimeoutSec) {
      connected = 0;
      break;
    }
  }

  if (connected) {
    // 连接成功
    Serial.println("");
    Serial.println("WIFI连接成功");
    Serial.print("IP地址:");
    Serial.println(WiFi.localIP());
  } else {
    Serial.println("WIFI连接失败");
  }
}

// 处理断网事件
void handleDisconnect() {
  // 用于记录上次重连尝试的时间
  static uint32_t firstReconnectAttempt = 0;
  // 用于记录重连的计数值
  static uint8_t reconnectCount = 0;

  Serial.println("WIFI连接断开,重新连接");

  // 检查是否需要重新进行 SmartConfig
  if (millis() - firstReconnectAttempt > RECONNECT_TIMEOUT) {
    // 置零
    reconnectCount = 0;

    Serial.println("连接失败,重新进行 SmartConfig");
    startSmartConfig();
  } else {
    if (reconnectCount++ == 1) {
      firstReconnectAttempt = millis();
    }
    connectToWifiSSIDFromFlash();
  }
}

// 从 SPIFFS 文件中读取 WiFi 配置信息
void readCredentialsFromSPIFFS(char* ssid, char* password) {
  File configFile = SPIFFS.open(wifi_config_file, "r");
  if (configFile) {
    // 读取 SSID 和密码
    configFile.readStringUntil('\n').toCharArray(ssid, 32);
    configFile.readStringUntil('\n').toCharArray(password, 64);
    configFile.close();
    Serial.println("从 SPIFFS 读取配置文件成功");
  } else {
    Serial.println("读取 SPIFFS 文件失败");
  }
}

// 将 WiFi 配置信息保存到 SPIFFS 文件
void saveCredentialsToSPIFFS(const char* ssidNew, const char* passwordNew) {
  File configFile = SPIFFS.open(wifi_config_file, "w");
  if (configFile) {
    // 写入 SSID 和密码
    configFile.print(ssidNew);
    configFile.print('\n');
    configFile.print(passwordNew);
    configFile.close();
    Serial.println("将配置信息保存到 SPIFFS 成功");
  } else {
    Serial.println("写入 SPIFFS 文件失败");
  }
}

// SmartConfig 完成处理
void smartConfigDoneHandle(void) {
  // 获取配置信息
  String ssid = WiFi.SSID();
  String password = WiFi.psk();
  char* ssidSave = (char*)&ssid[0];
  char* passwordSave = (char*)&password[0];

  Serial.println("SmartConfig 配置成功:");
  Serial.print("ssid:");
  Serial.print(ssidSave);
  Serial.print(" password:");
  Serial.println(passwordSave);

  // 保存配置信息到 SPIFFS
  saveCredentialsToSPIFFS(ssidSave, passwordSave);

  // 重新启动设备
  ESP.restart();
}

// 开始 SmartConfig 模式
void startSmartConfig() {
  // 初始化 WiFi
  WiFi.mode(WIFI_MODE_STA);
  WiFi.beginSmartConfig();

  Serial.println("请使用手机 小程序/APP 进行配置, 正在等待SmartConfig配置");

  //等待来自手机的SmartConfig数据包
  while (!WiFi.smartConfigDone()) {
    delay(500);
    Serial.print(".");
  }

  // SmartConfig配置完成后
  smartConfigDoneHandle();
}
- 软件流程图如下:
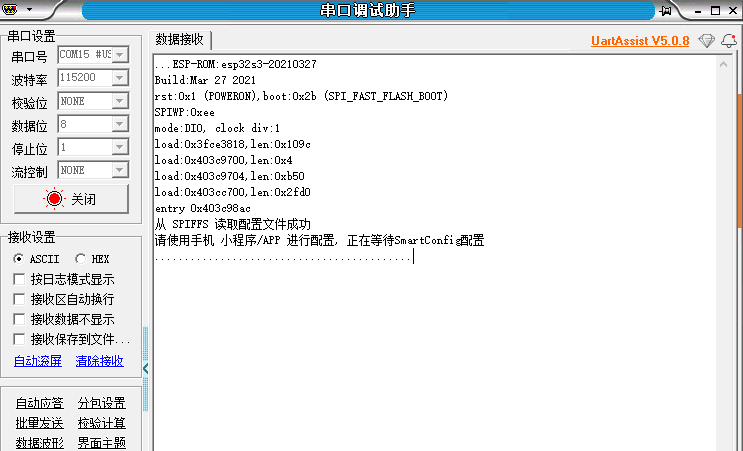
- 烧写程序到ESP32-S3开发板中,程序执行后串口打印如下:
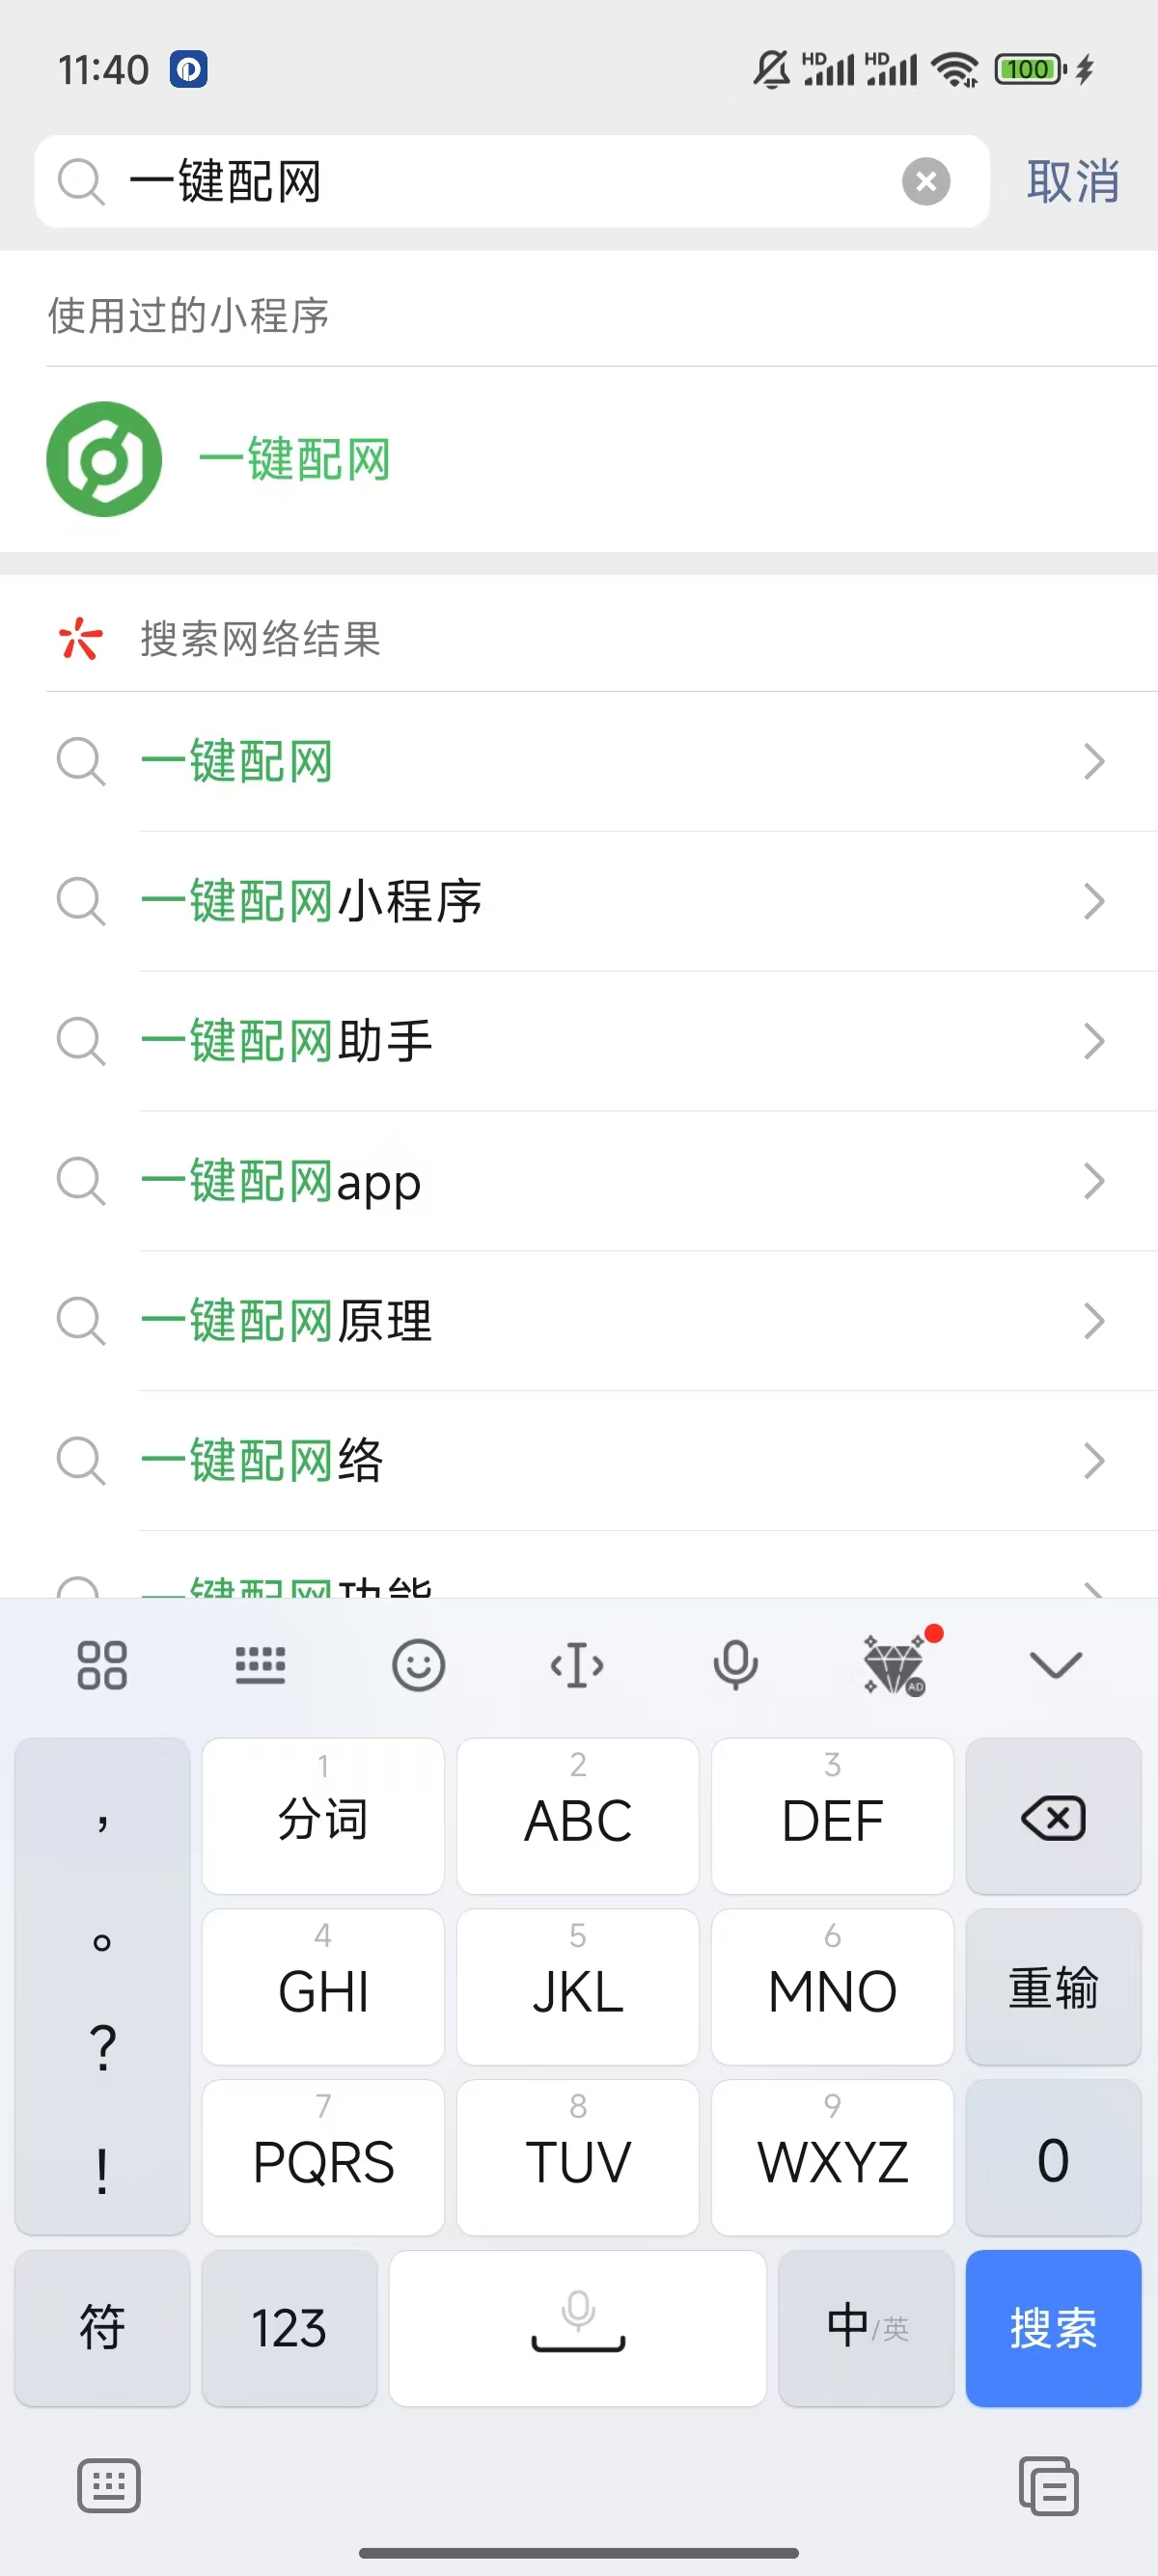
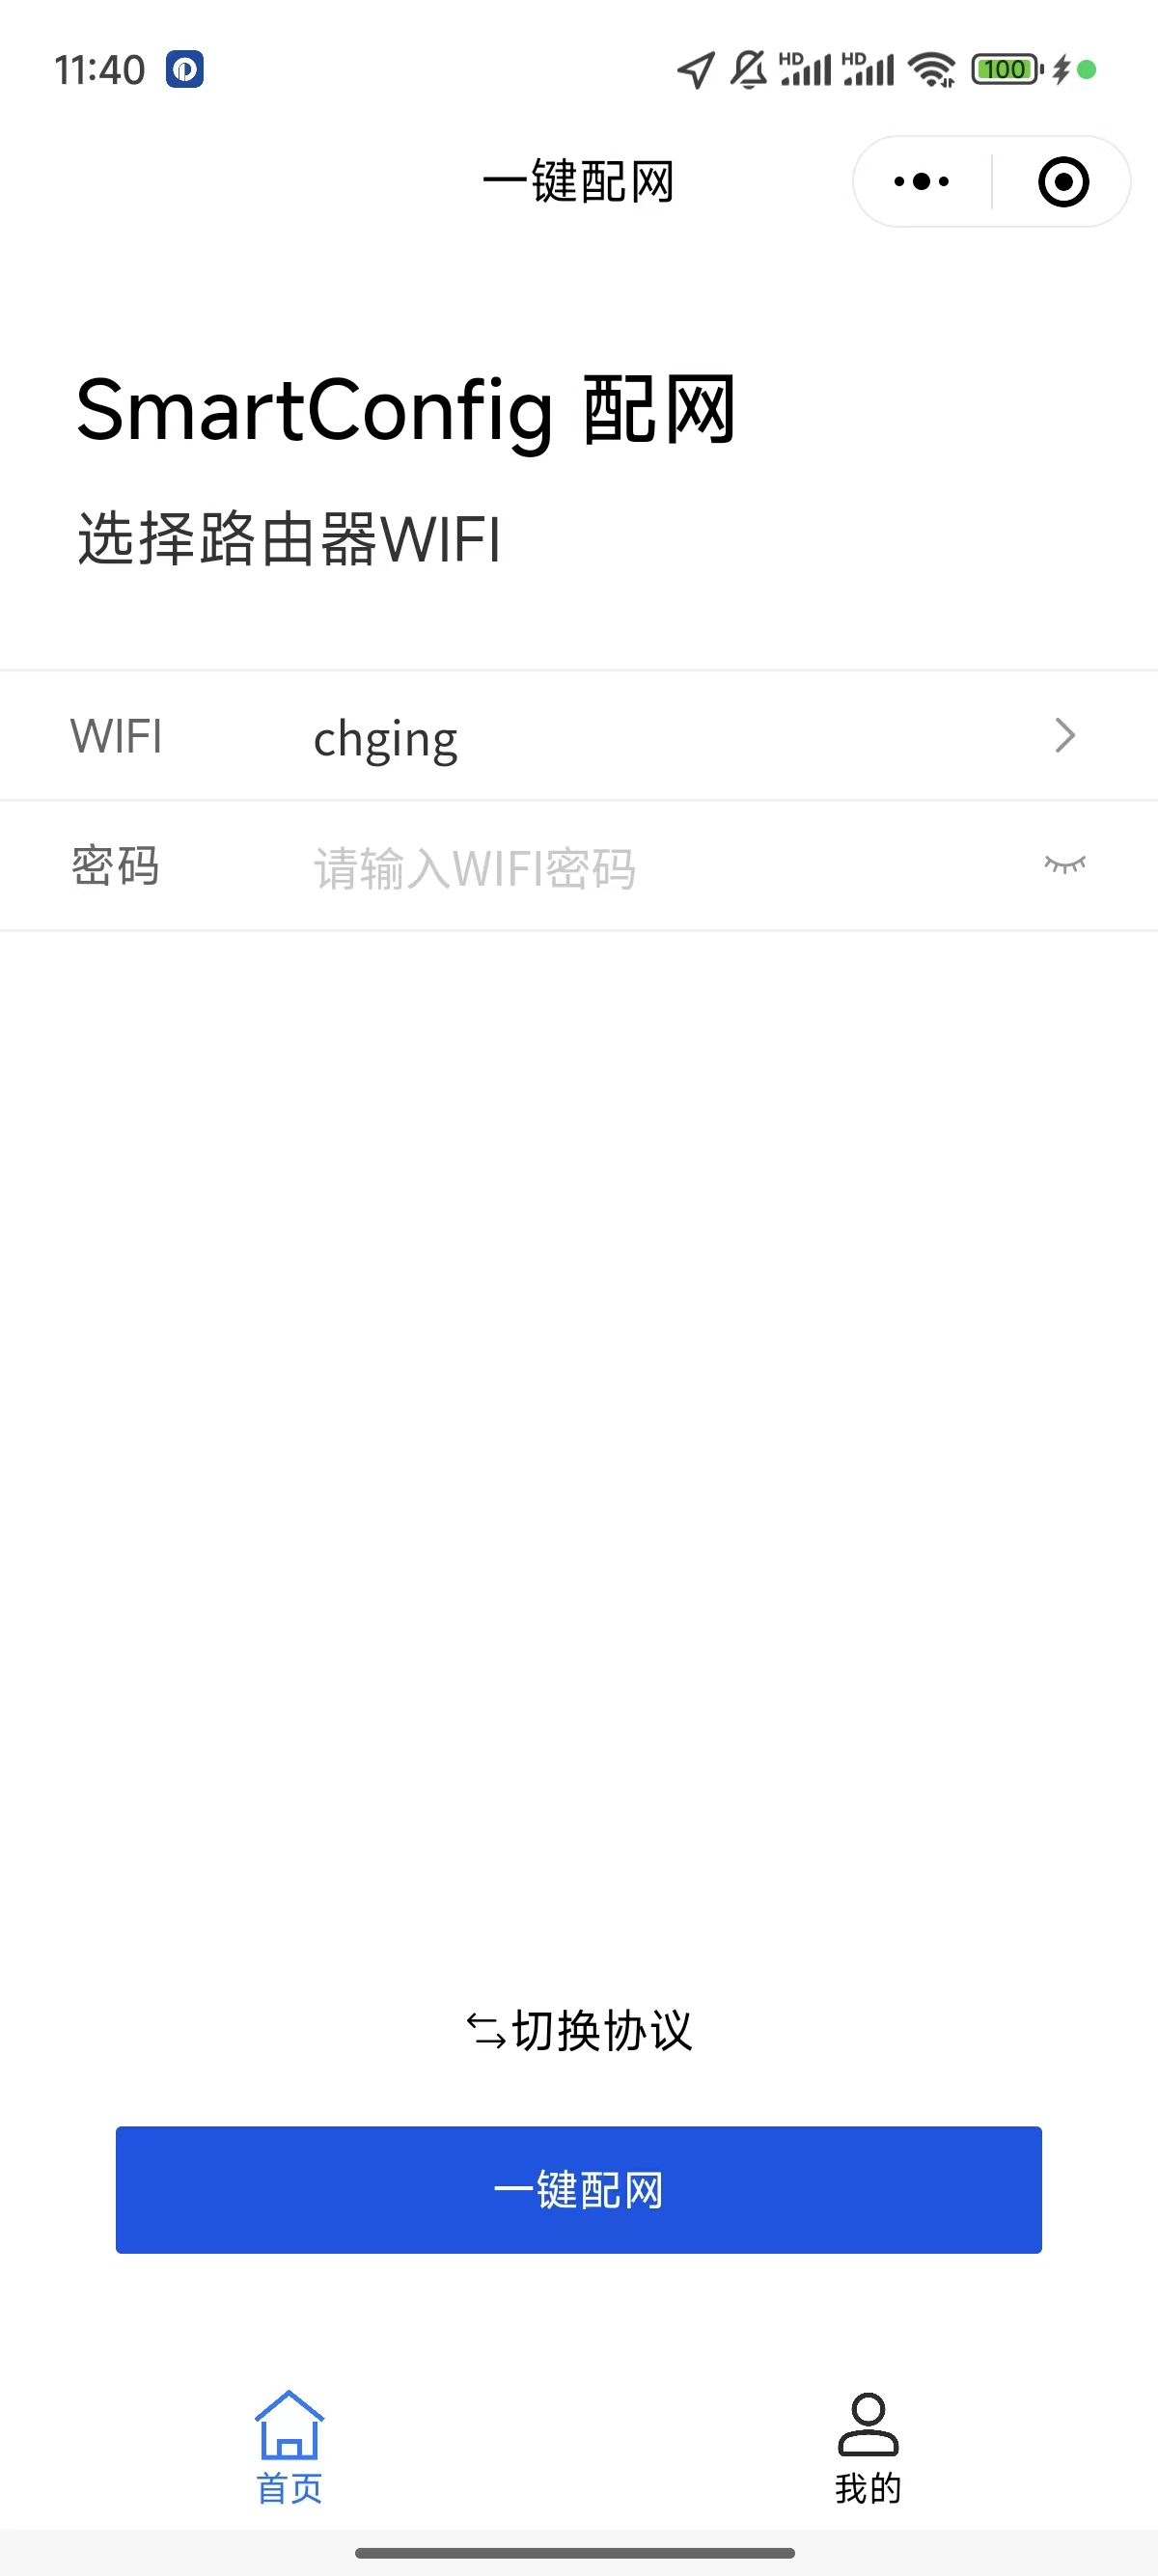
- 然后拿出手机,微信搜索小程序**一键配网**,点击进去,输入当前wifi的名称和密码,点击一键配网,此时小程序会开始与ESP32-S3进行配网连接。
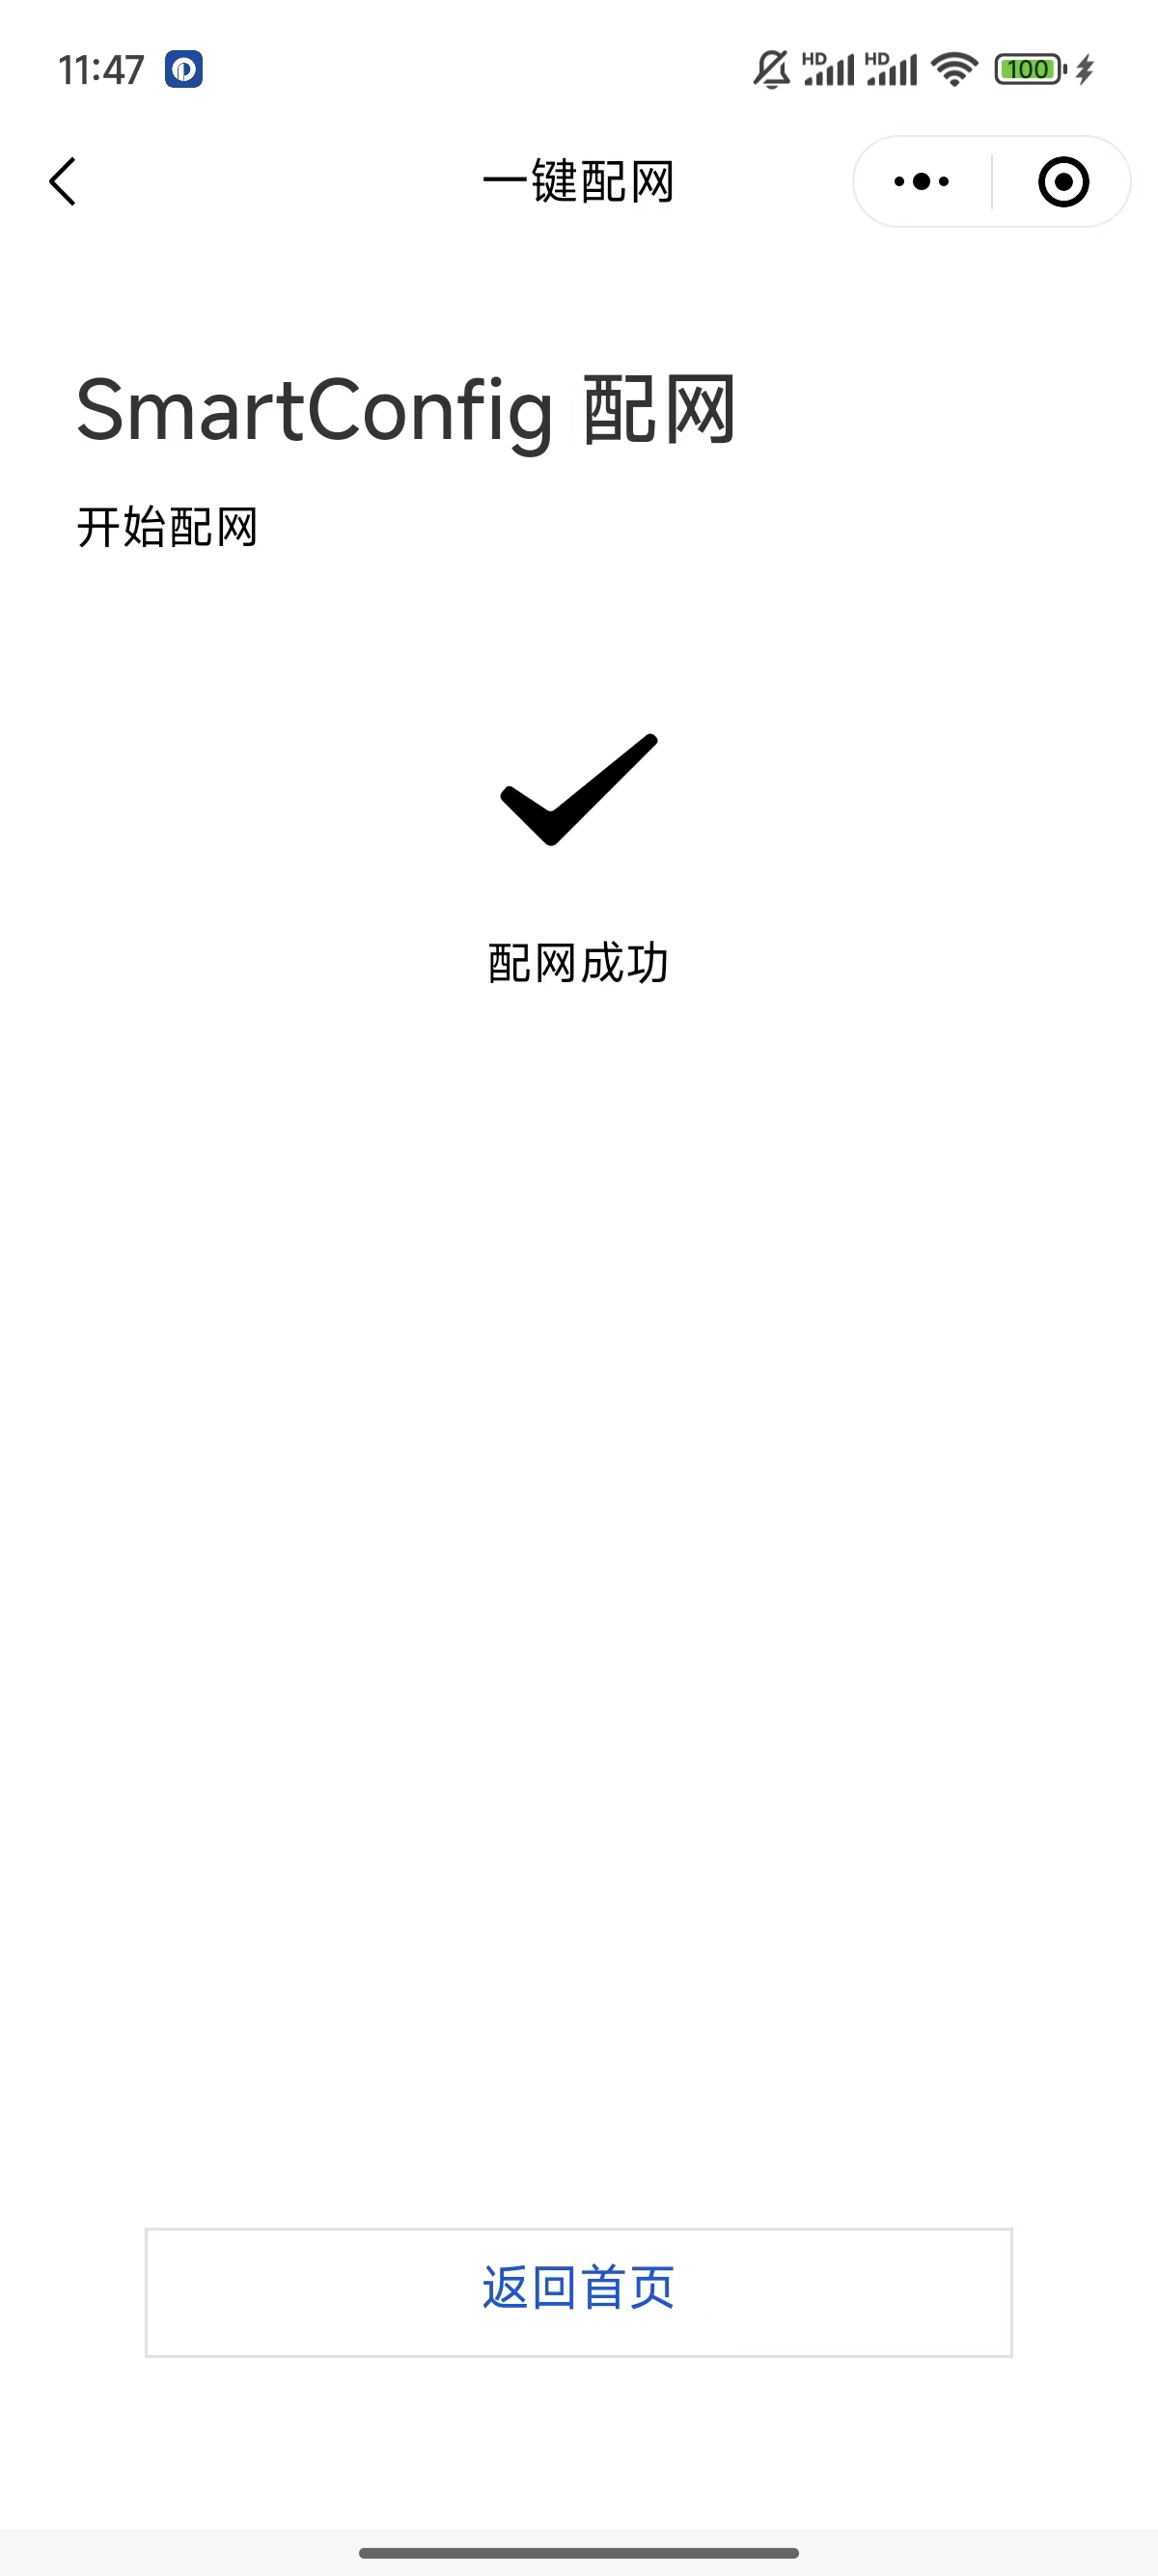
- 等待一会配网成功,如下图所示:
- ESP32-S3串口打印如下:
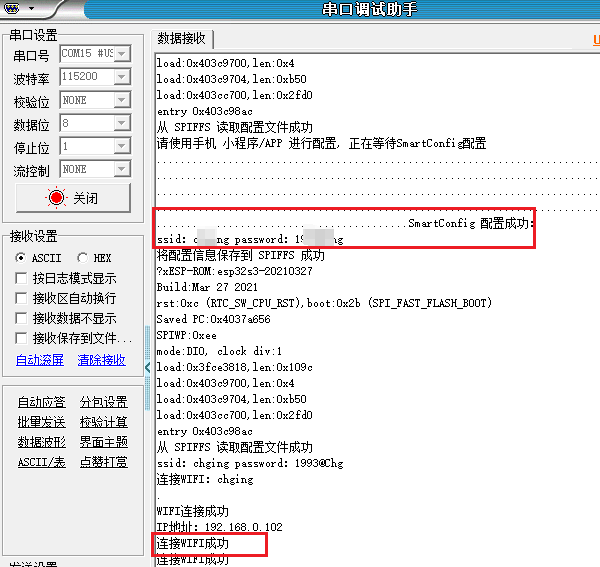
后续ESP32-S3可以直接连接该wifi,断电重启后依然可以自动连接。
百度API Key的申请和测试
API Key的申请
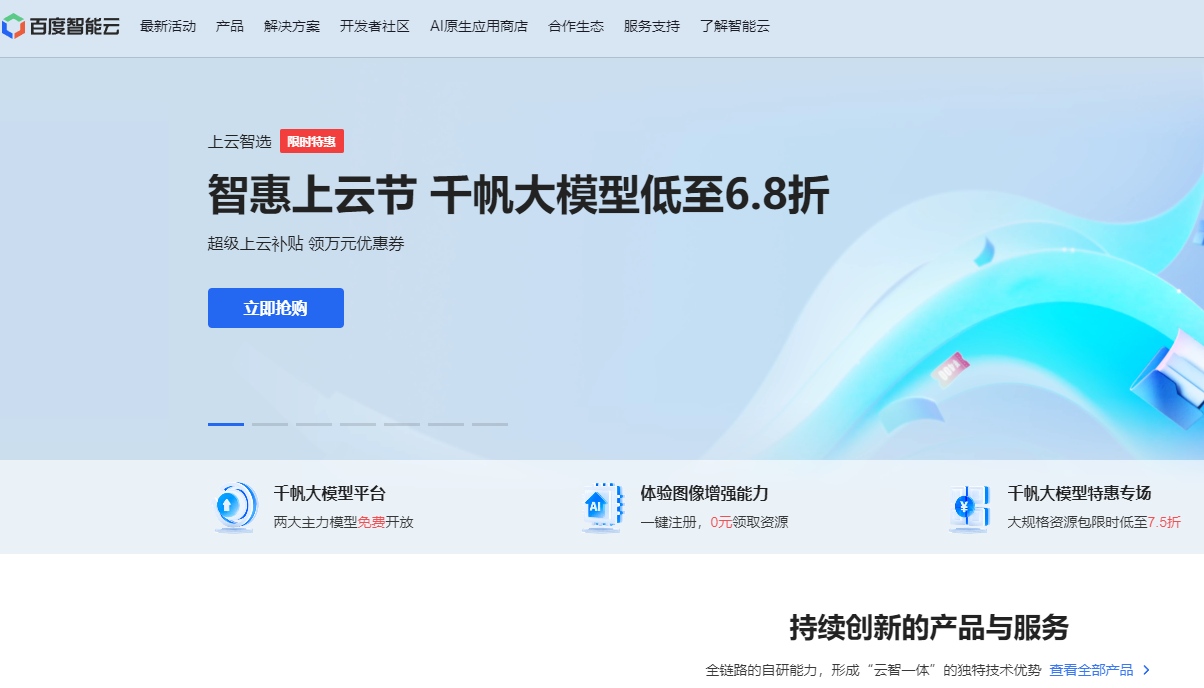
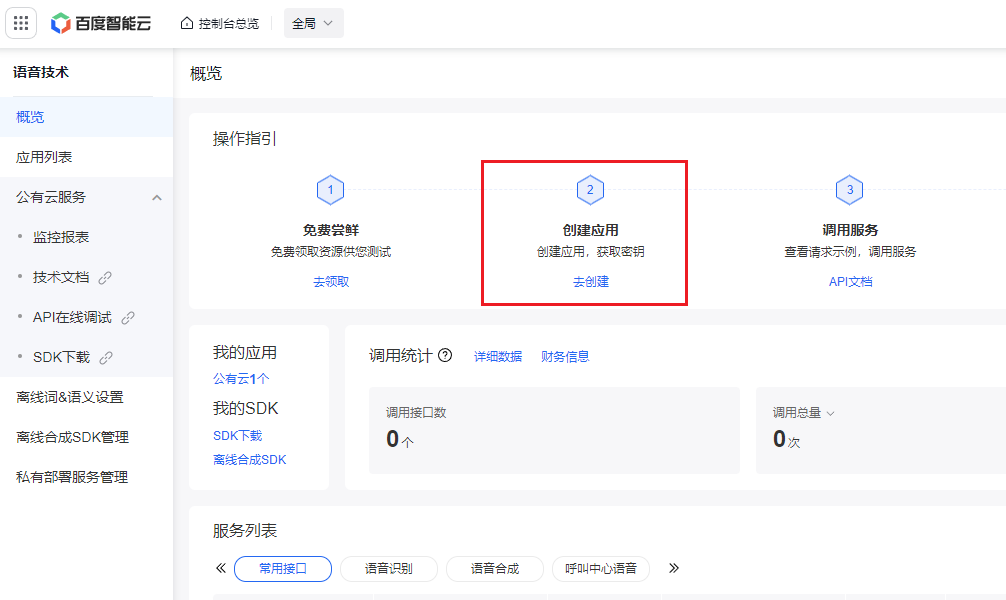
在调用百度api之前,我们需要在百度的百度智能云平台上面申请api key,申请通过后并且开通对应的api调用服务接口,才可以进行api的访问。百度智能云平台网址:https://cloud.baidu.com/
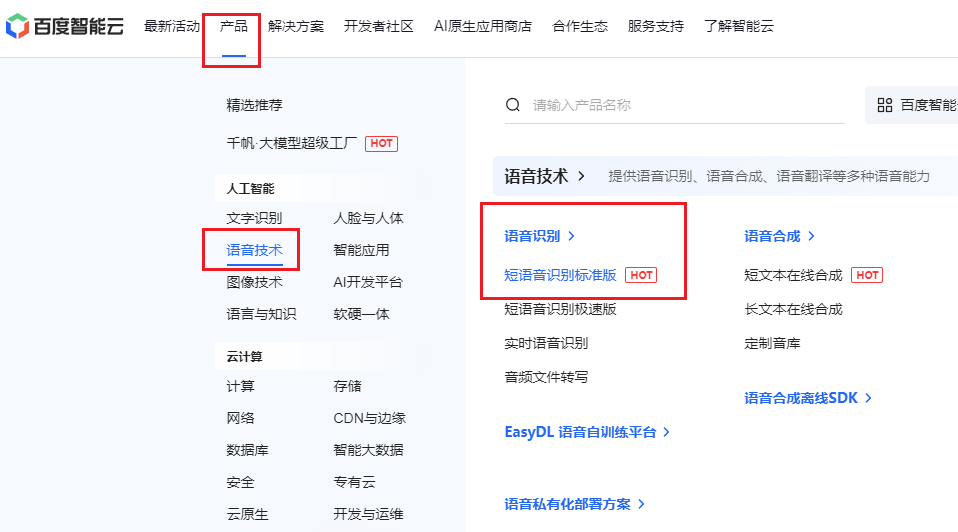
语音识别
我们首先需要创建语音识别的api key。- 点击 产品->语音技术->语音识别->短语音识别标准版。
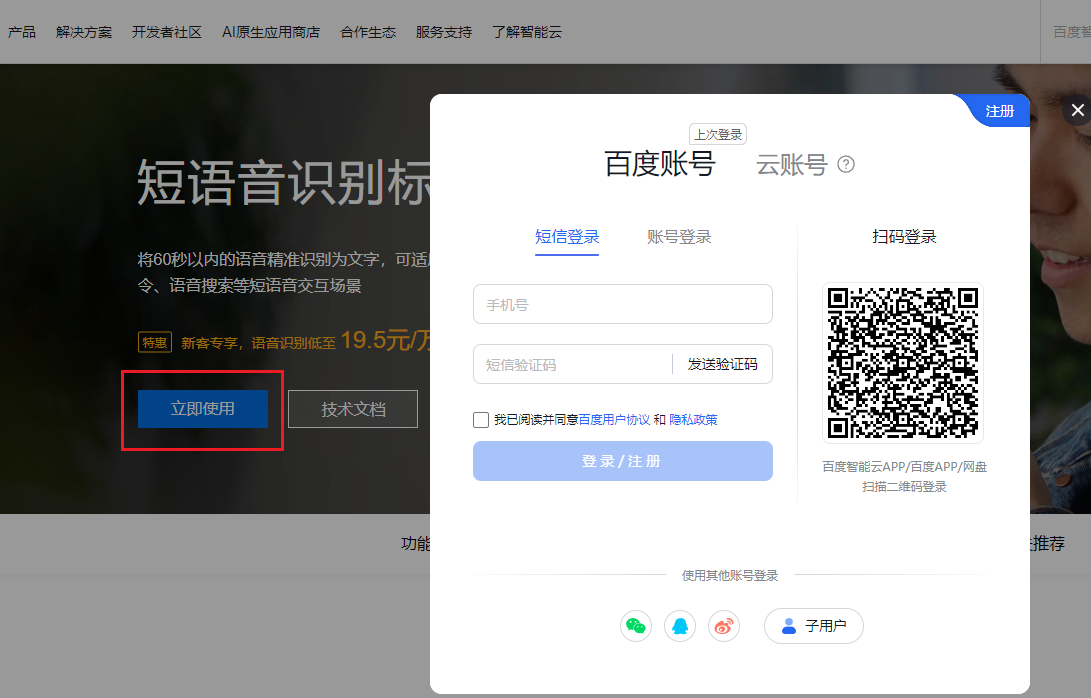
- 点击 立即使用,跳出百度账号登录界面,直接用 **手机号登录/注册 **一下。
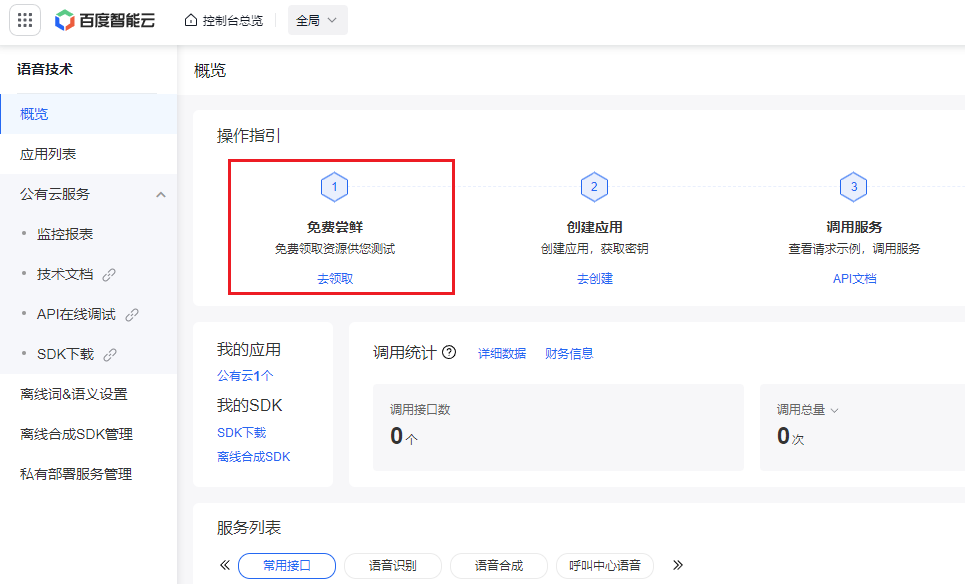
- 领取免费资源,点击 去领取。
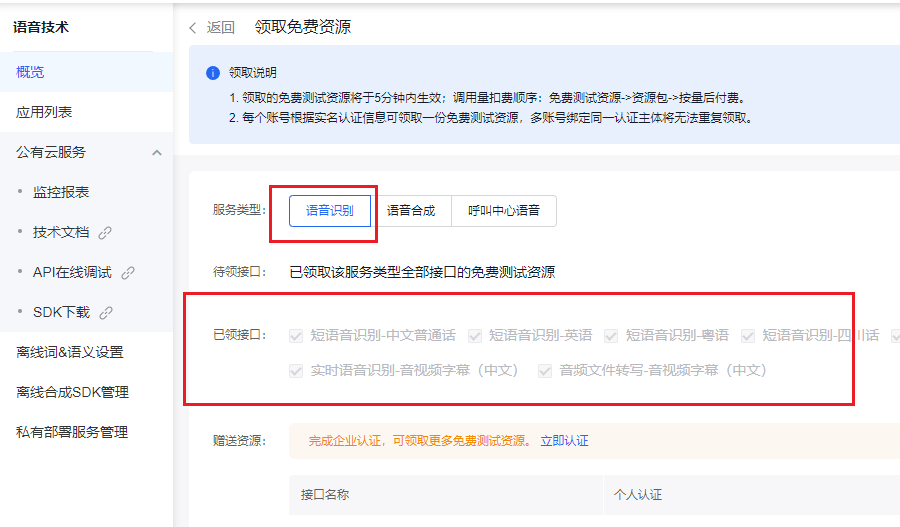
- 这里将语音识别的 待领接口 免费资源领取一下。
- 点击 创建应用。
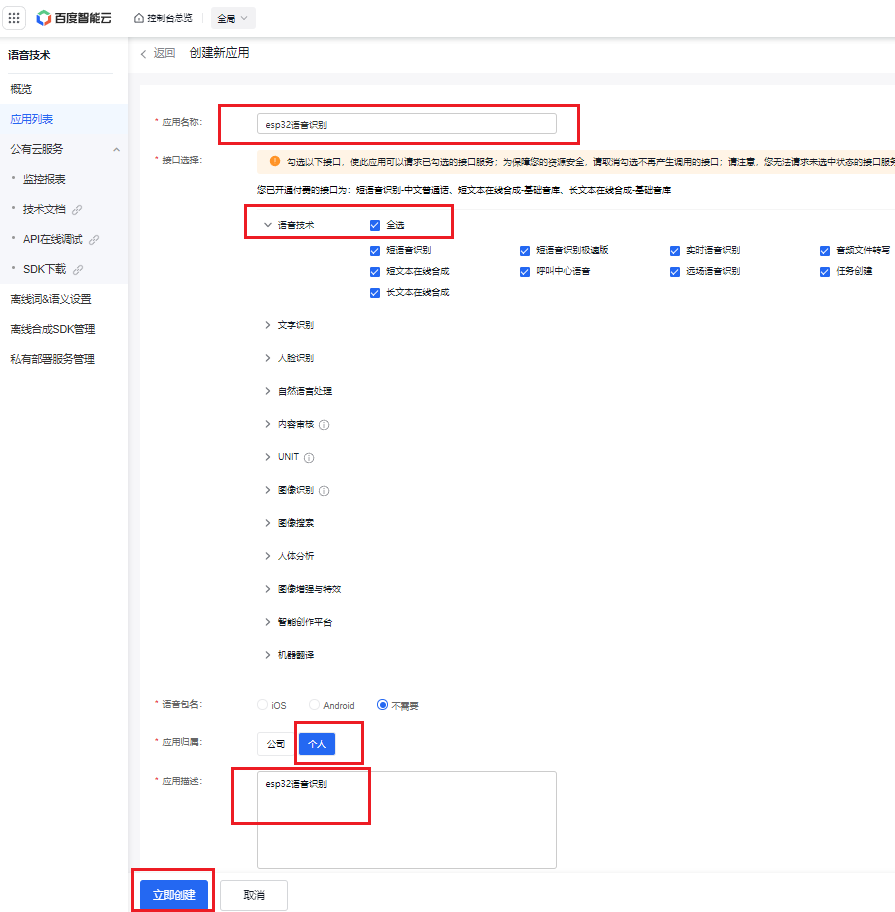
- 填写 应用名称,**接口选择 **全选,**应用归属 **个人,填写 应用描述,点击 立即创建。
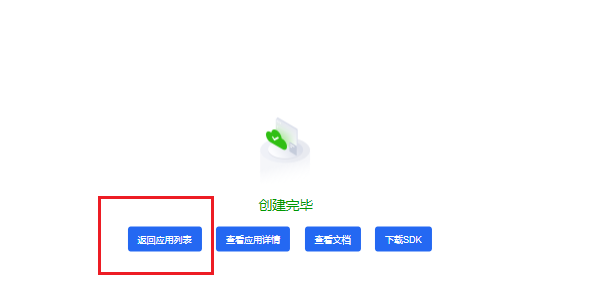
- 创建完毕,点击 返回应用列表。
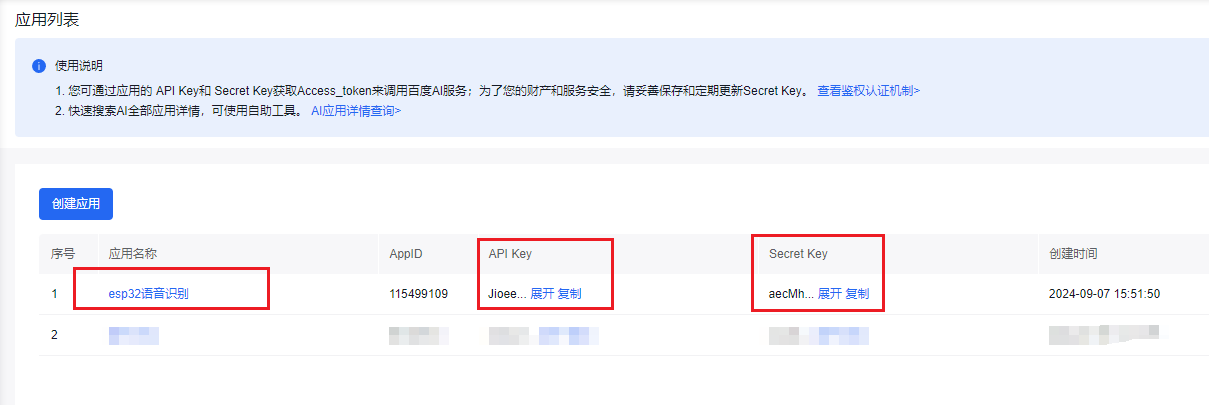
- 应用列表中,可以查看到刚才创建的应用,并且还可以查看到**API Key、Secret Key**,后面就是需要把这两个key拷贝到程序中去使用访问语音识别api。
- 接着我们需要开通语音识别的服务。点击左侧 概览->语音识别->短语音识别->开通。
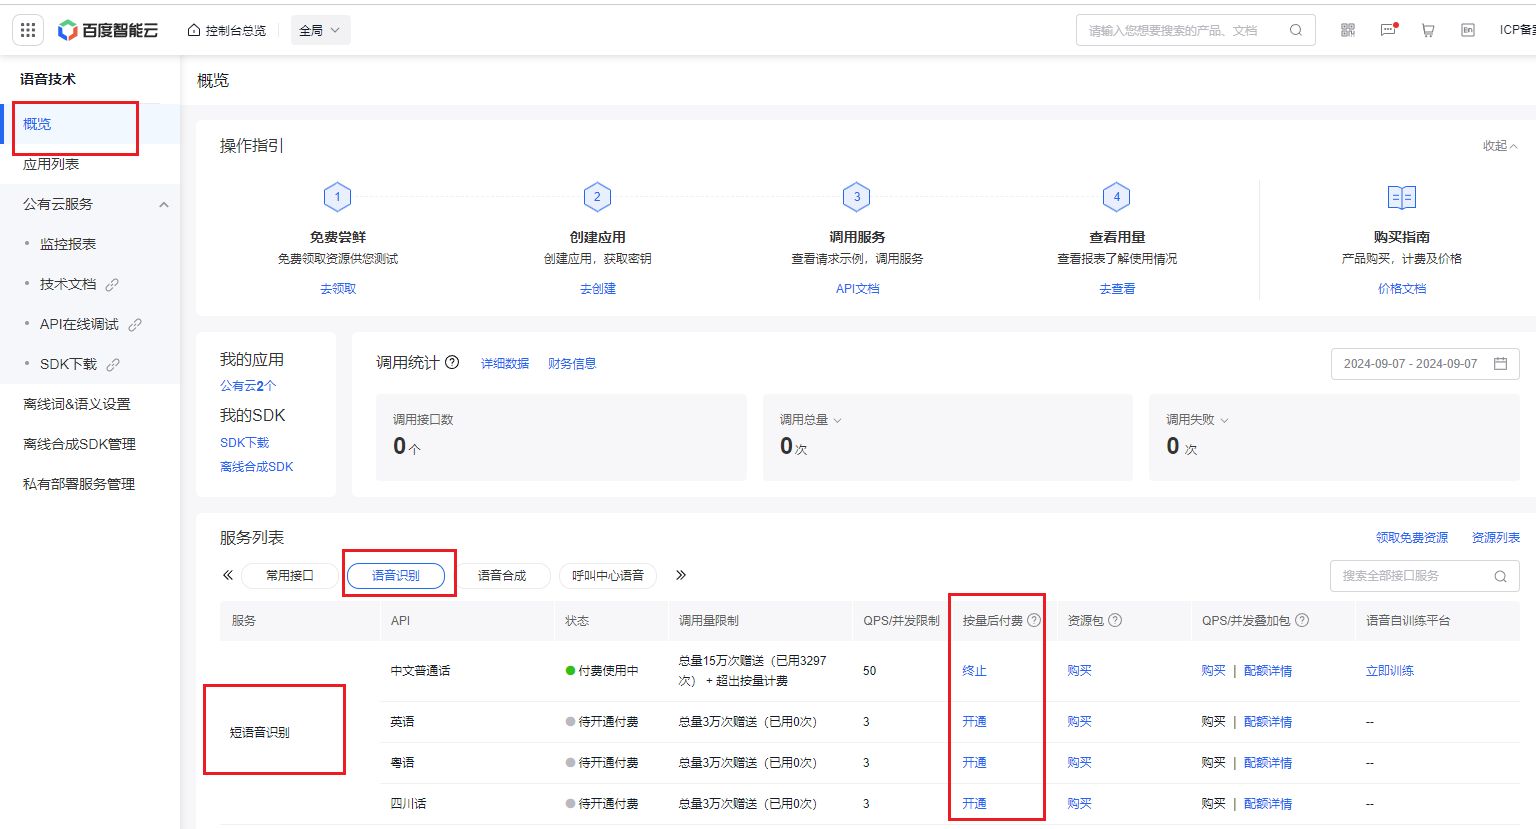
- 点击 按量后付费->语音识别->短语音识别-中文普通话->勾选服务协议->确认开通。
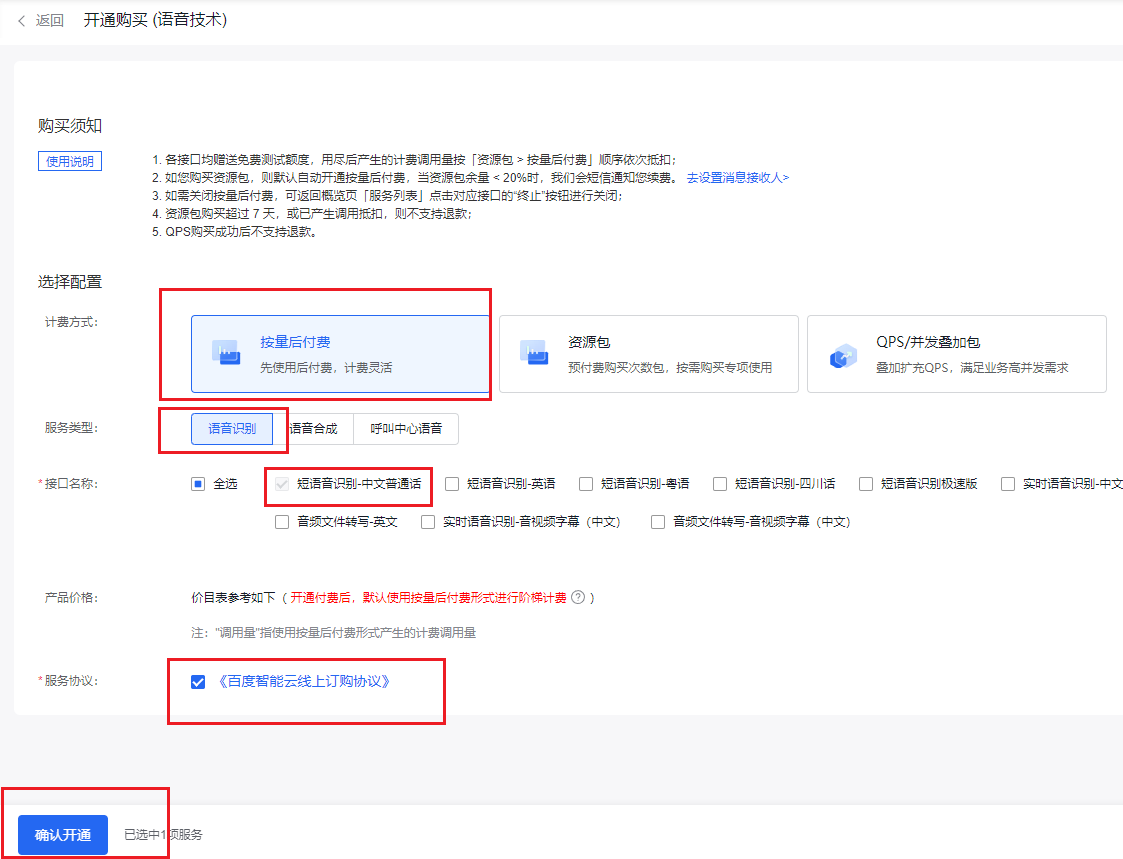
- 至此,语音识别的API key申请成功,并且服务开通成功。
语音合成
百度语音合成的api key与语音识别是同一个,所以上一节创建成功后,我们可以直接使用了。但是服务是需要另外开通。- 点击左侧 概览->语音合成->短文本在线合成->基础音库->开通。
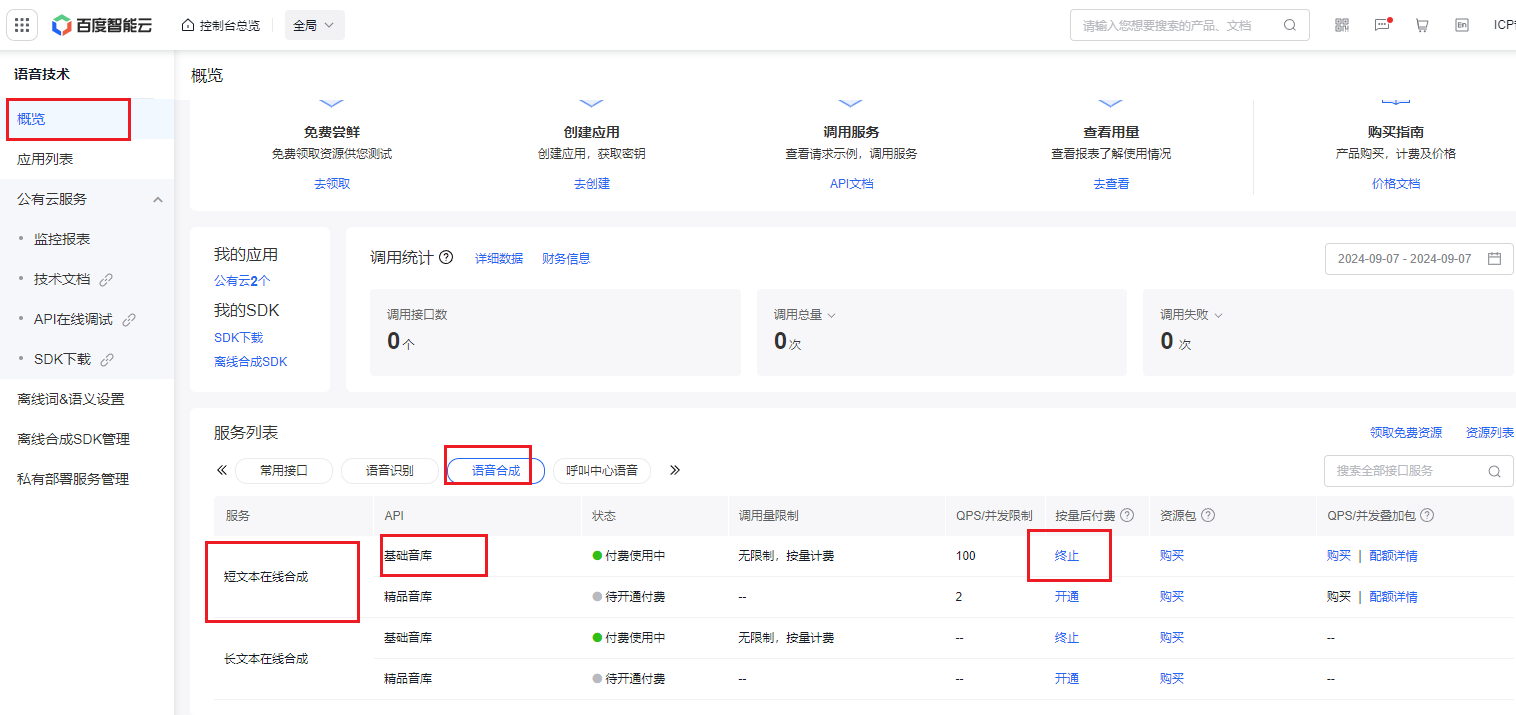
- 点击 按量后付费->语音合成->短文本在线合成-基础音库->勾选服务协议->确认开通。
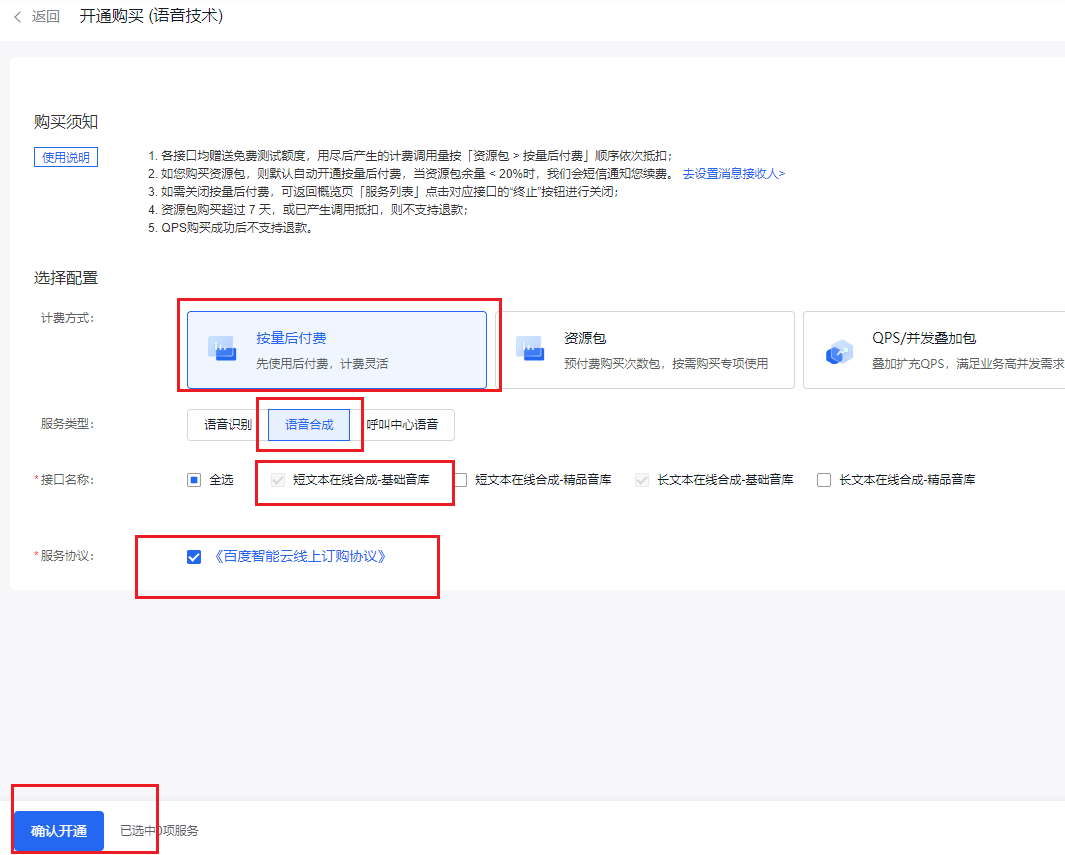
- 至此,语音合成的服务开通成功。注意,一般语音合成没有免费的资源包赠送,因此需要提前充值点费用进去。
文心一言大模型
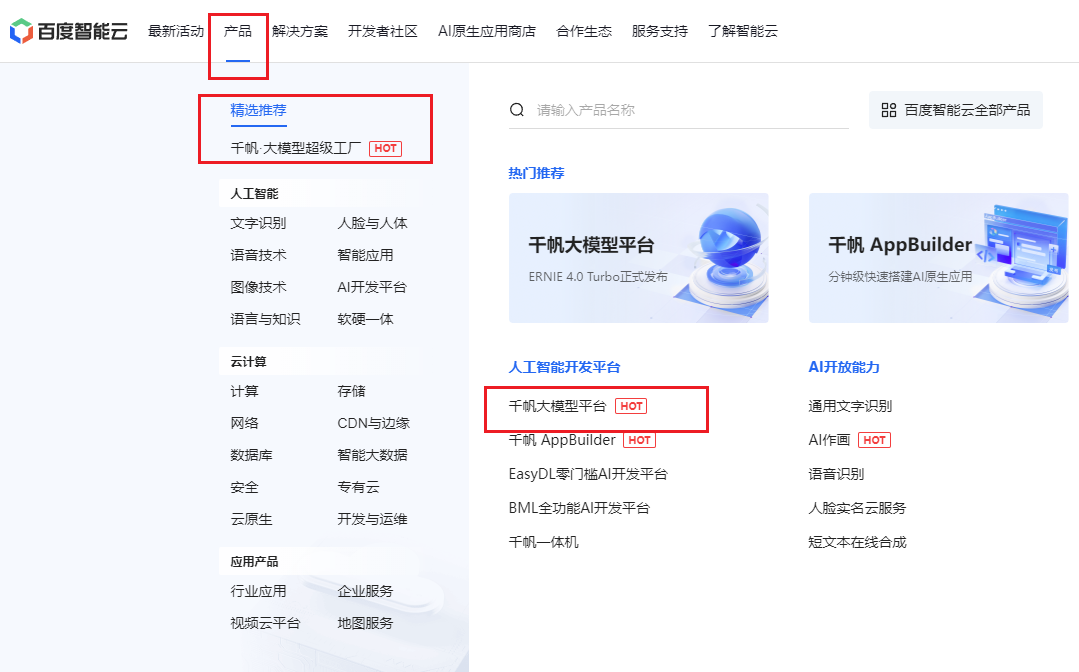
文心一言大模型api key申请同样在百度智能云平台上。- 百度智能云平台首页,点击选择 千帆大模型平台。
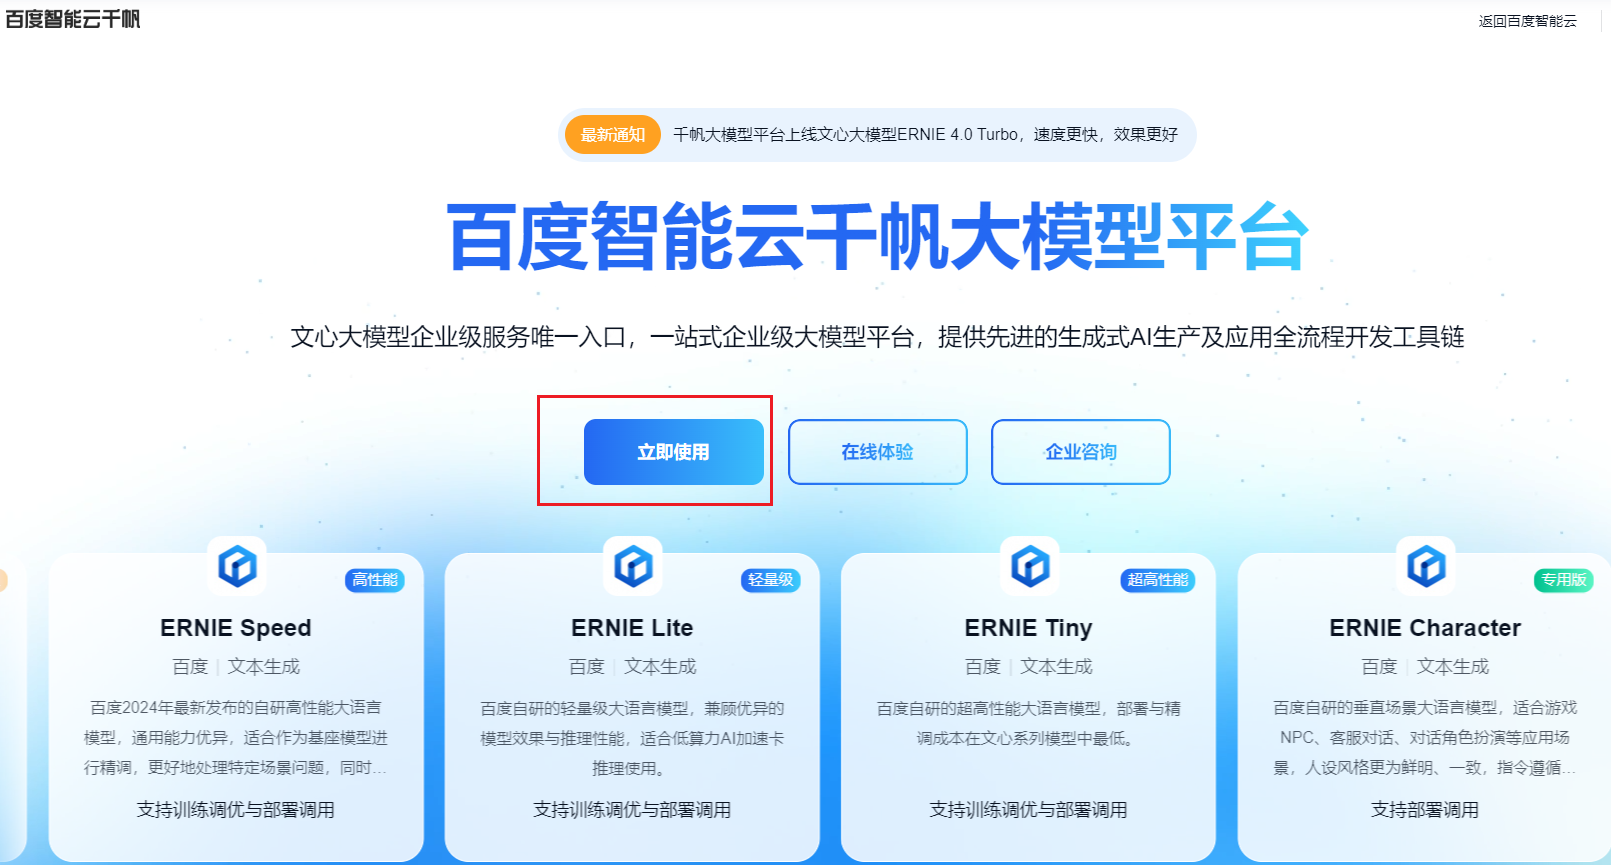
- 点击 立即使用。
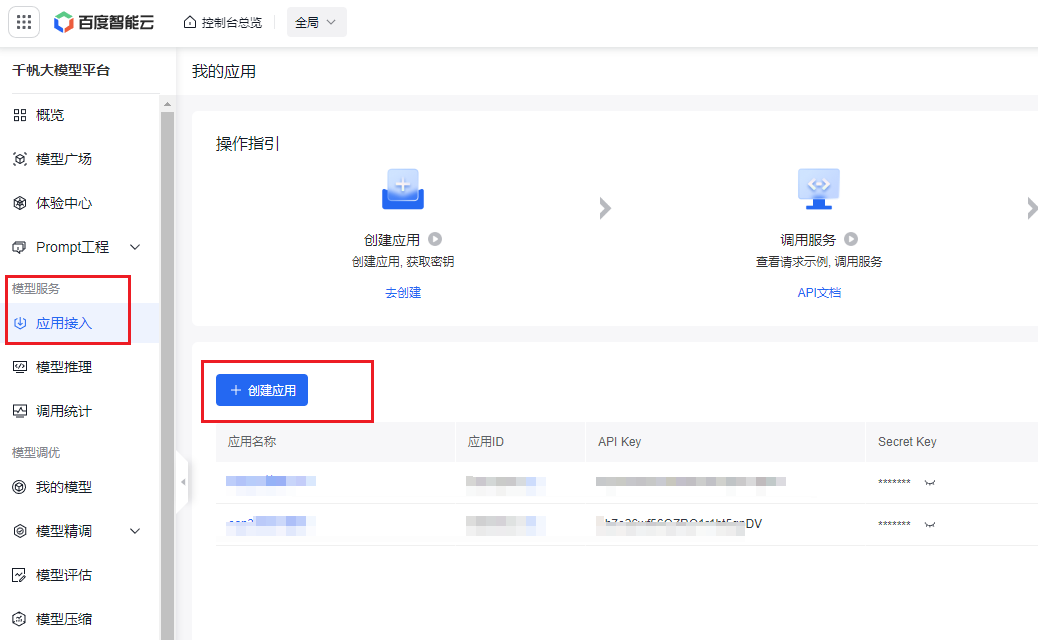
- 此时需要登录百度账号,点击登录。然后进入了千帆大模型平台。点击 应用接入->创建应用。
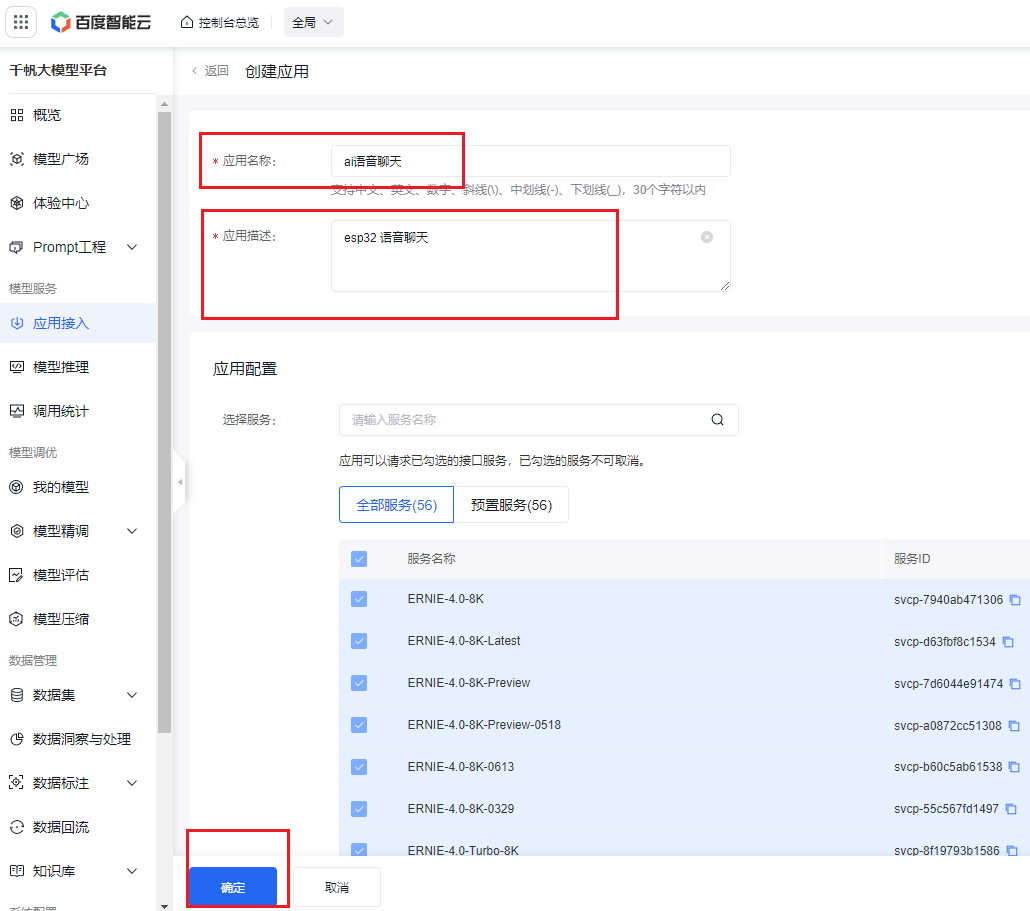
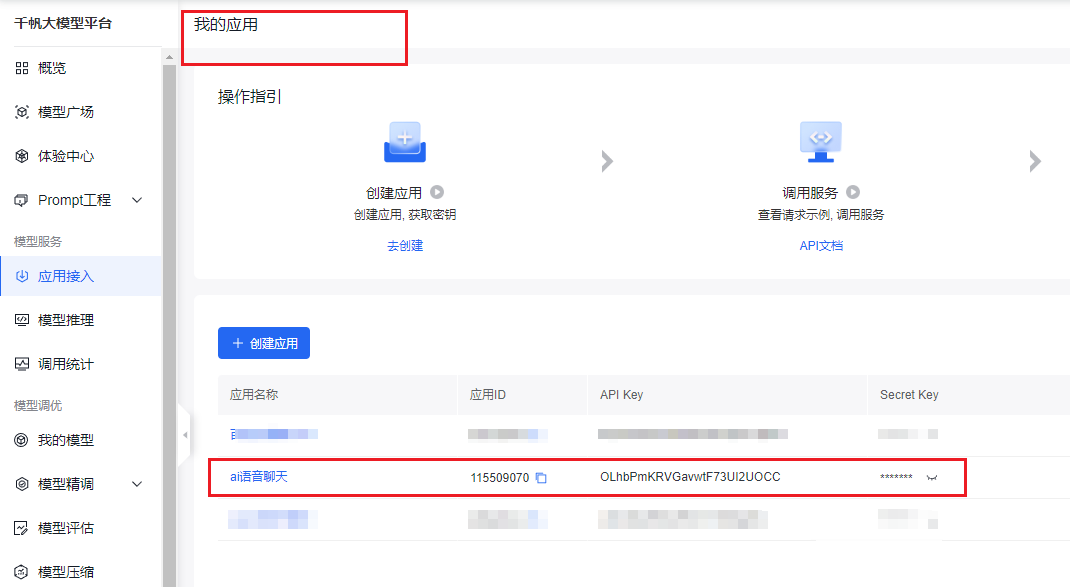
- 填写 应用名称->应用描述->确定。
- 应用创建成功,我的应用中显示刚才创建的应用,并且生成了对应的API Key,secret Key。
- 接下来,我们需要开通大模型服务。点击 计费管理->选择对应服务名称(我使用的是免费的ERNIE-Lite-8K)->免费开通。
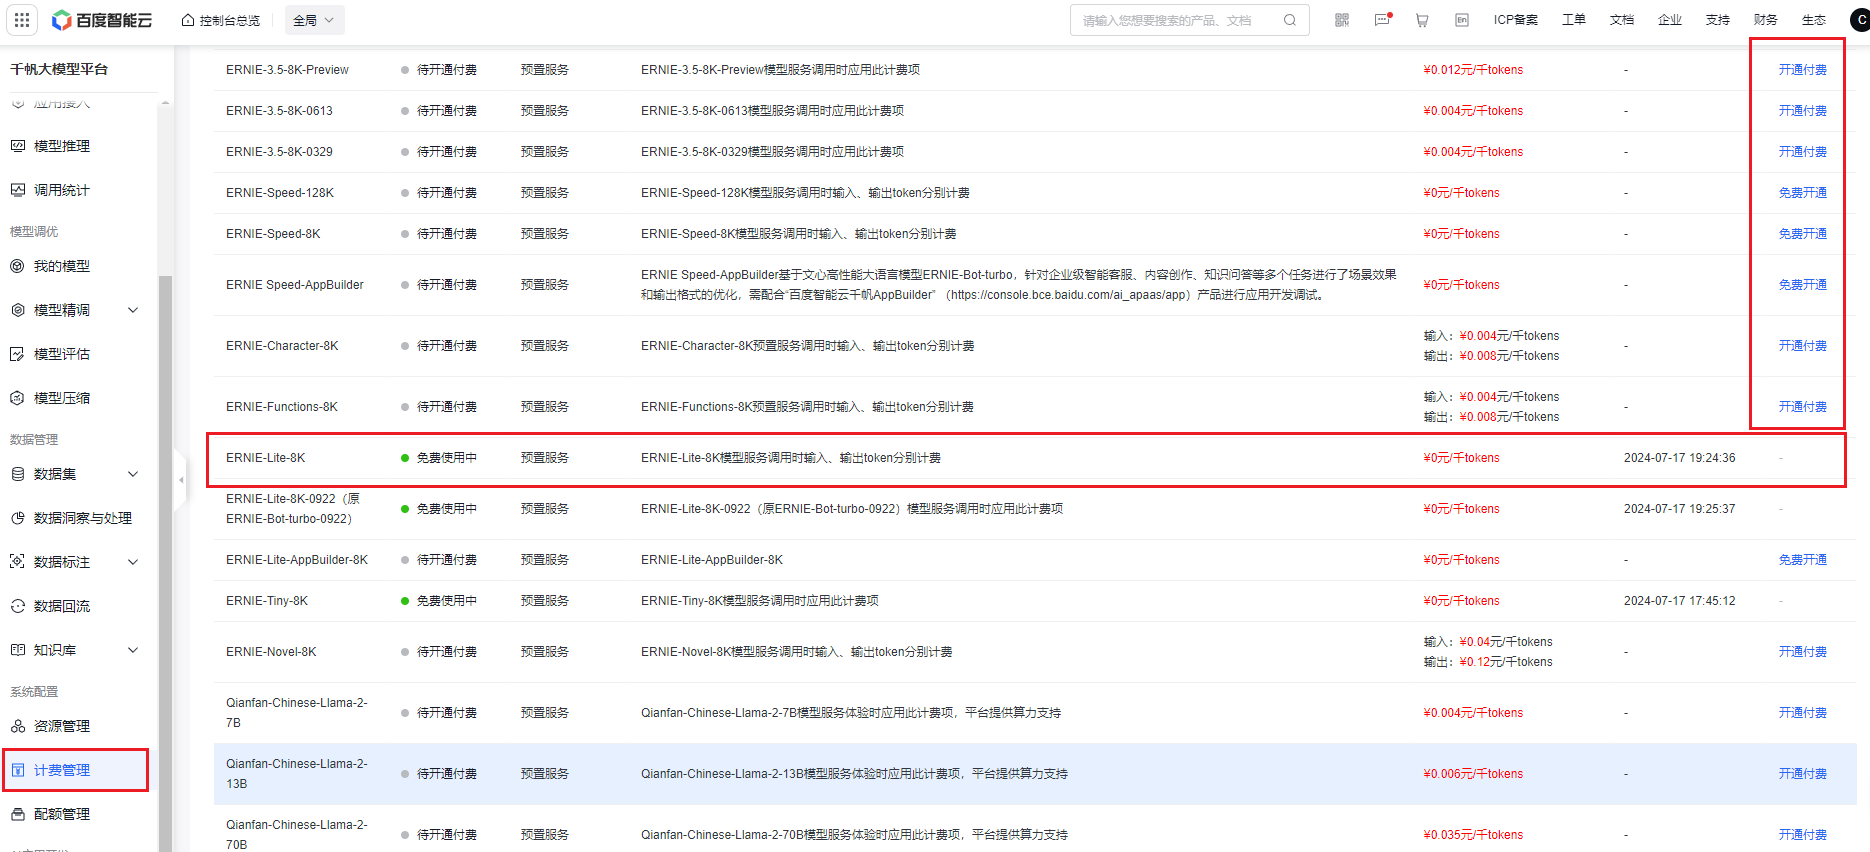
- 如果开通成功,则查看状态为显示** 免费使用中**。至此,百度文心一言大模型api服务开通成功。
API访问在线测试
在开通上面的api服务后,我们可以在线测试一下服务是否开通成功。- 百度智能云平台首页,点击** 控制台**。

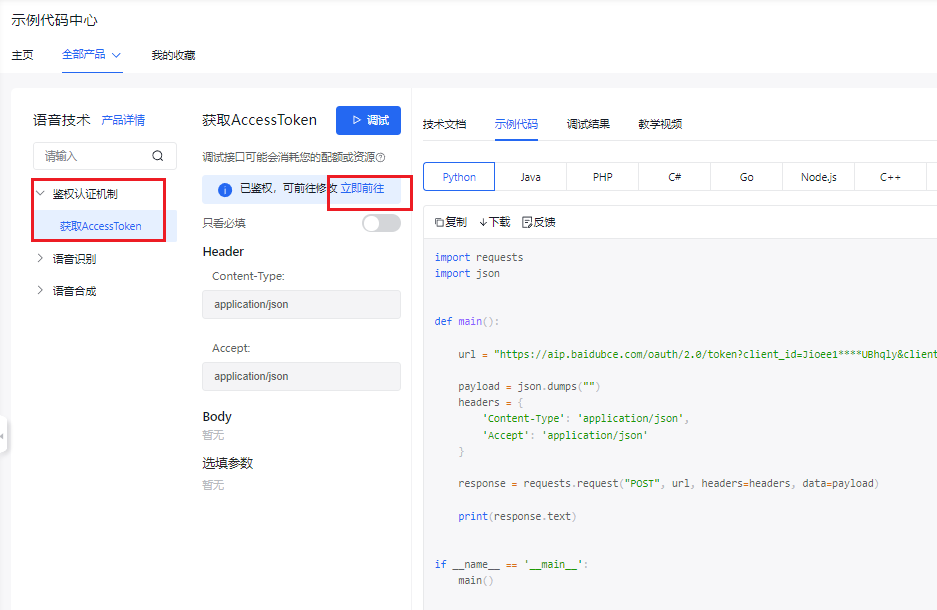
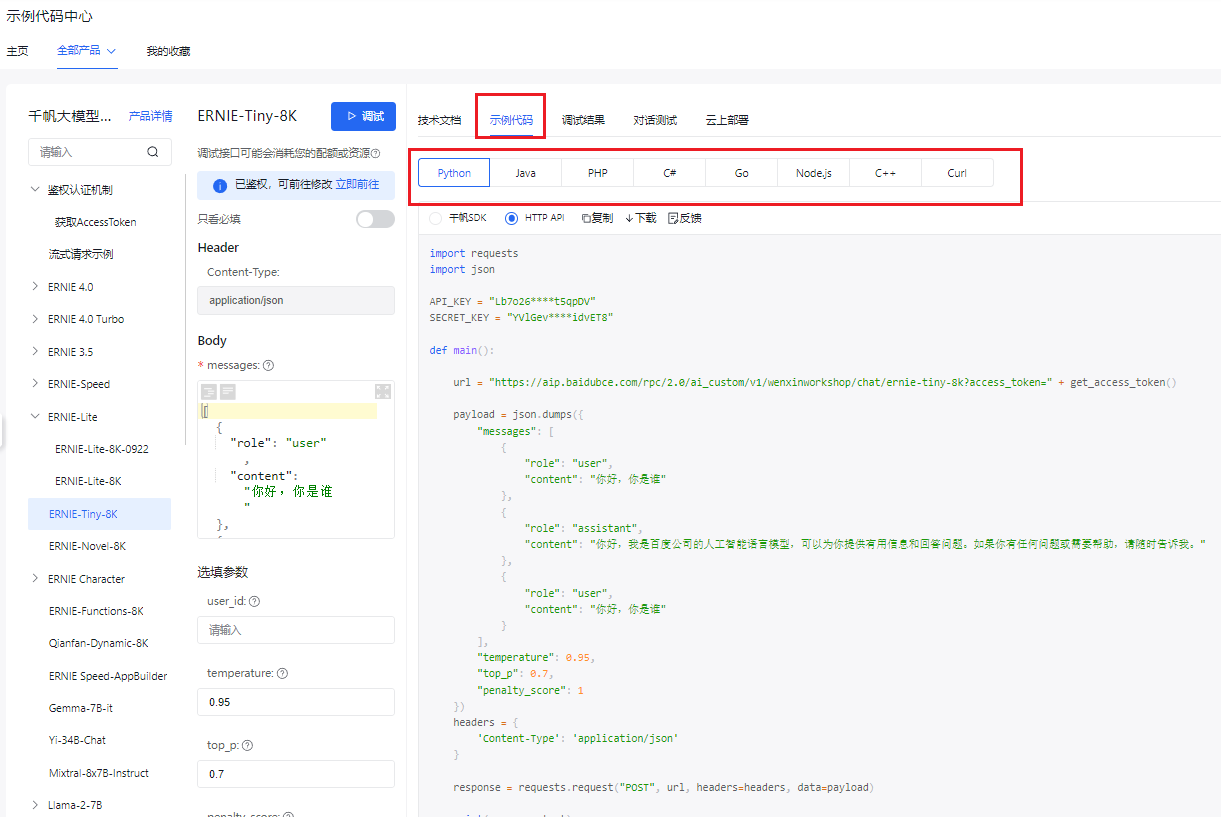
- 进入控制台后,点击 文档->示例代码。
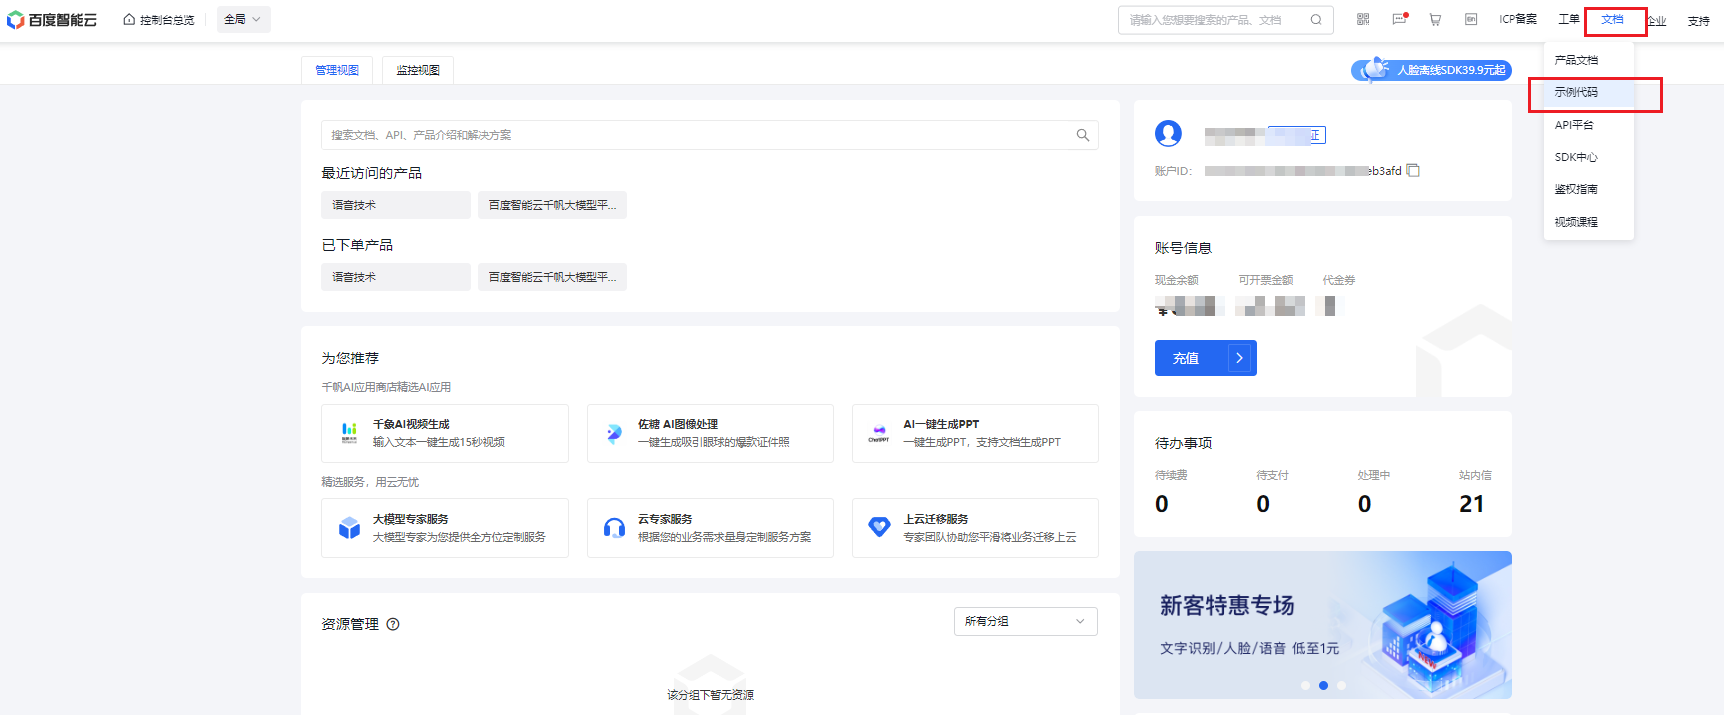
- 进入api调用的测试页面及示例代码页面,在这个页面,我们可以进行百度语音识别、语音合成、文心一言大模型的调用测试。
语音合成
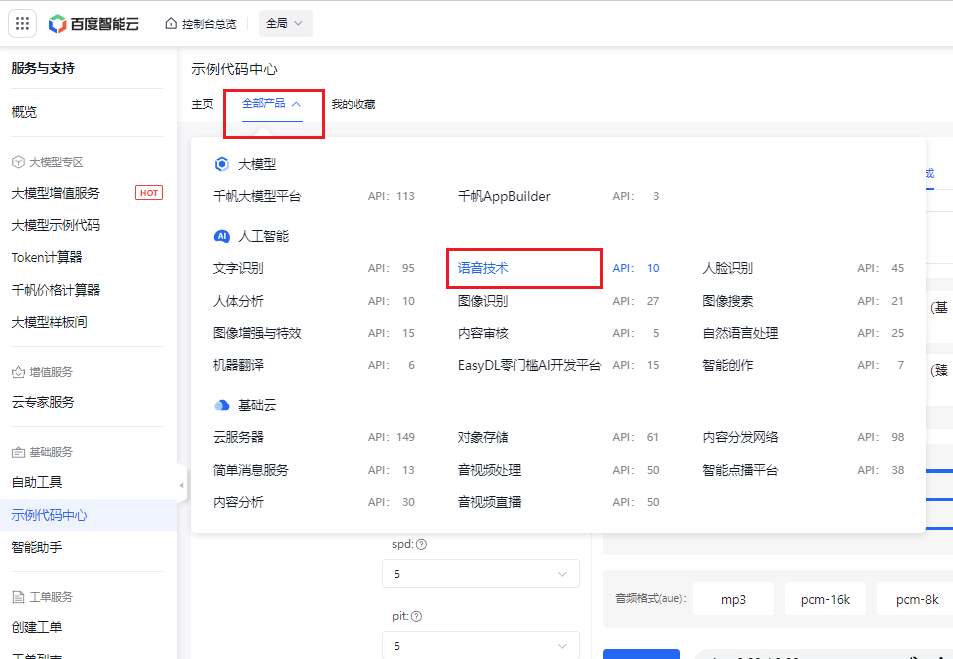
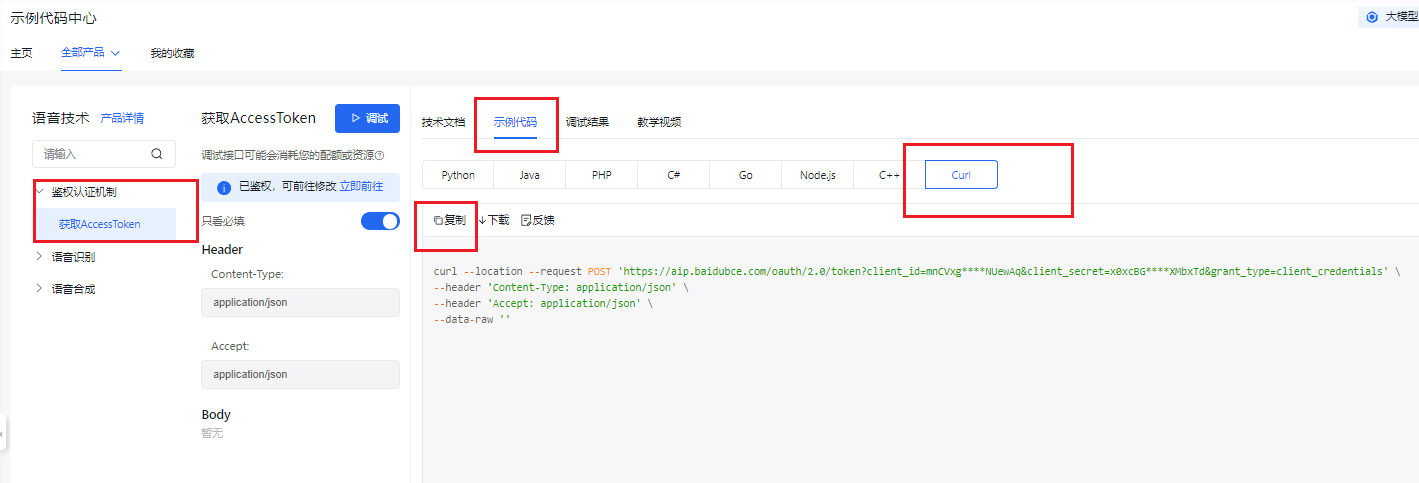
在这里我们可以首先去测试语音合成的api调用,**因为这个api的调用我们可以直接填写文本作为输入,而语音识别是需要传入音频数据作为输入**。因此这里我们先测试语音合成,在语音合成生成后的音频则可以保存下来作为接下来语音识别的输入的测试。- 点击 全部产品->语音技术,进入语音api测试界面。
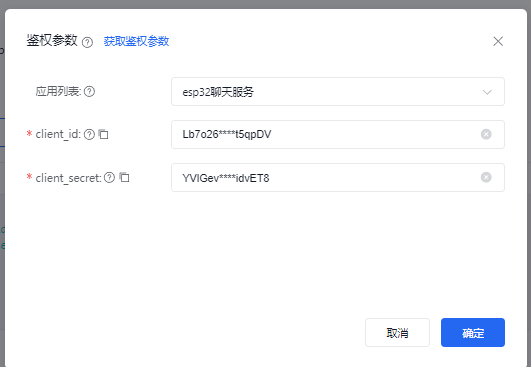
- 点击 鉴权认证机制->获取AccessToken->立即前往。
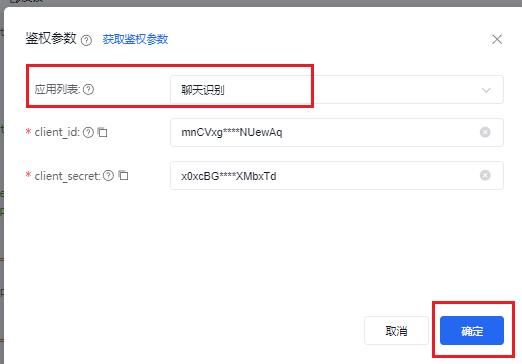
- 选择 应用列表中我们开通的应用服务,点击 确定。
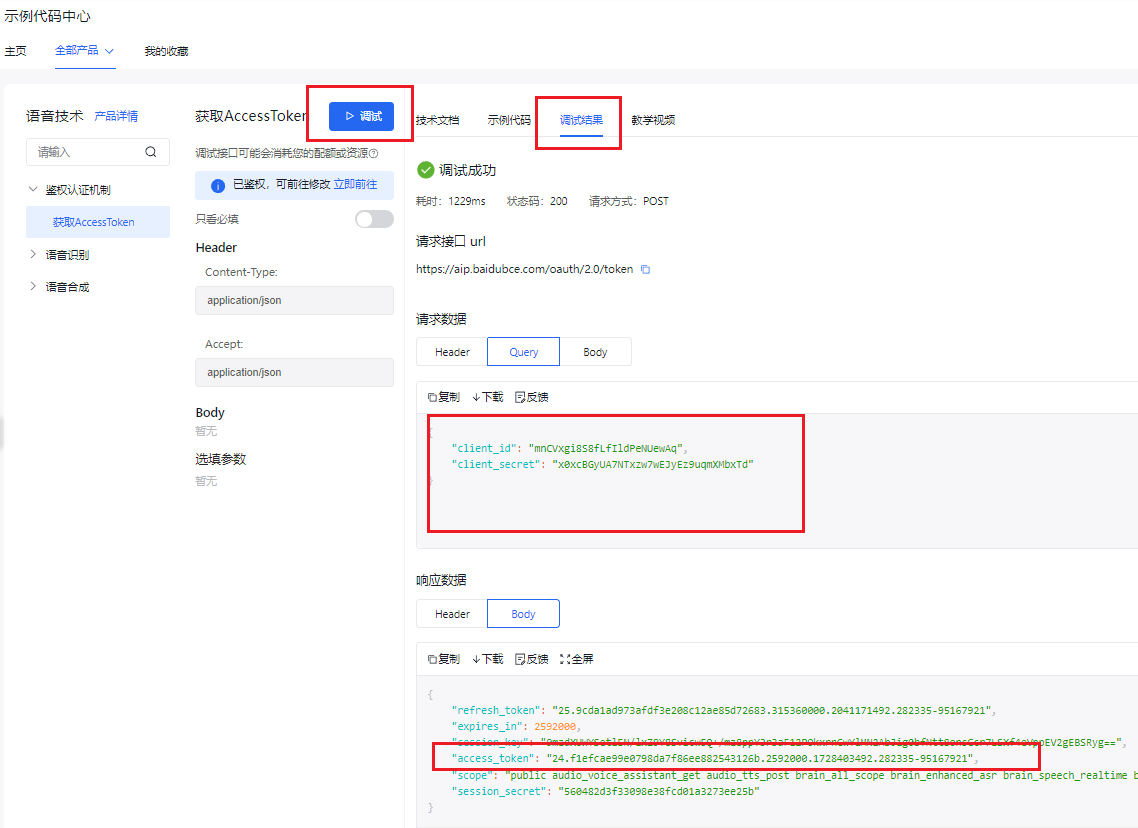
- 点击 调试,在调试结果中,我们可以查询到响应数据中的access_token。这个表面我们申请的api key可以成功响应了。
- 接着测试语音合成api服务接口是否开通成功。我们点击 语音合成->短文本在线合成,然后填写需要合成音频的文本,选择音色,调整语速、音调、音量,选择音频格式wav,点击 合成。
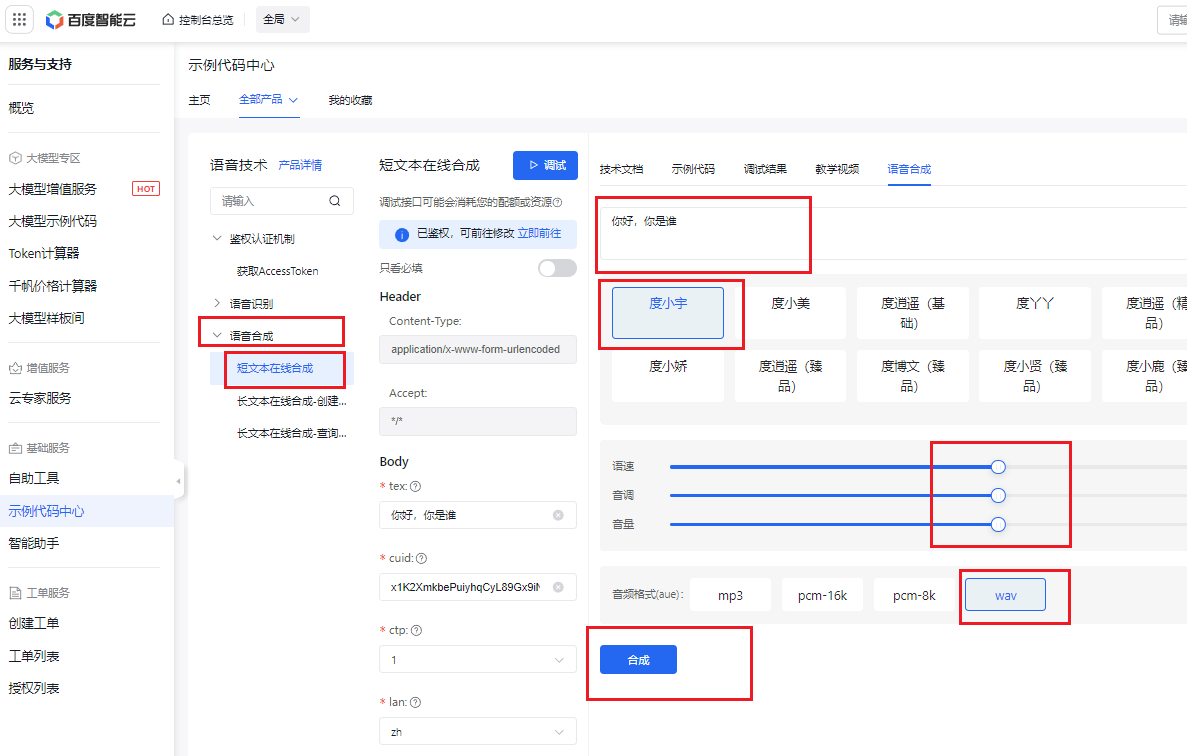
- 生成合成的音频,点击 播放按钮,可以查看生成的音频是否正确。(这里可以点击后面的3个点,将这个音频保存下来,作为后面的语音识别输入使用)
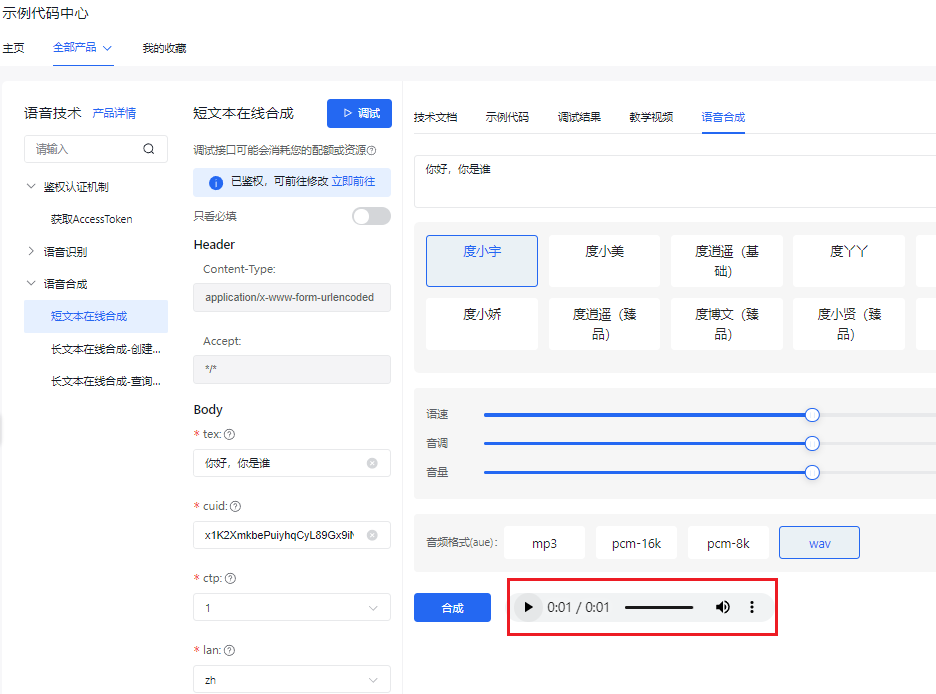
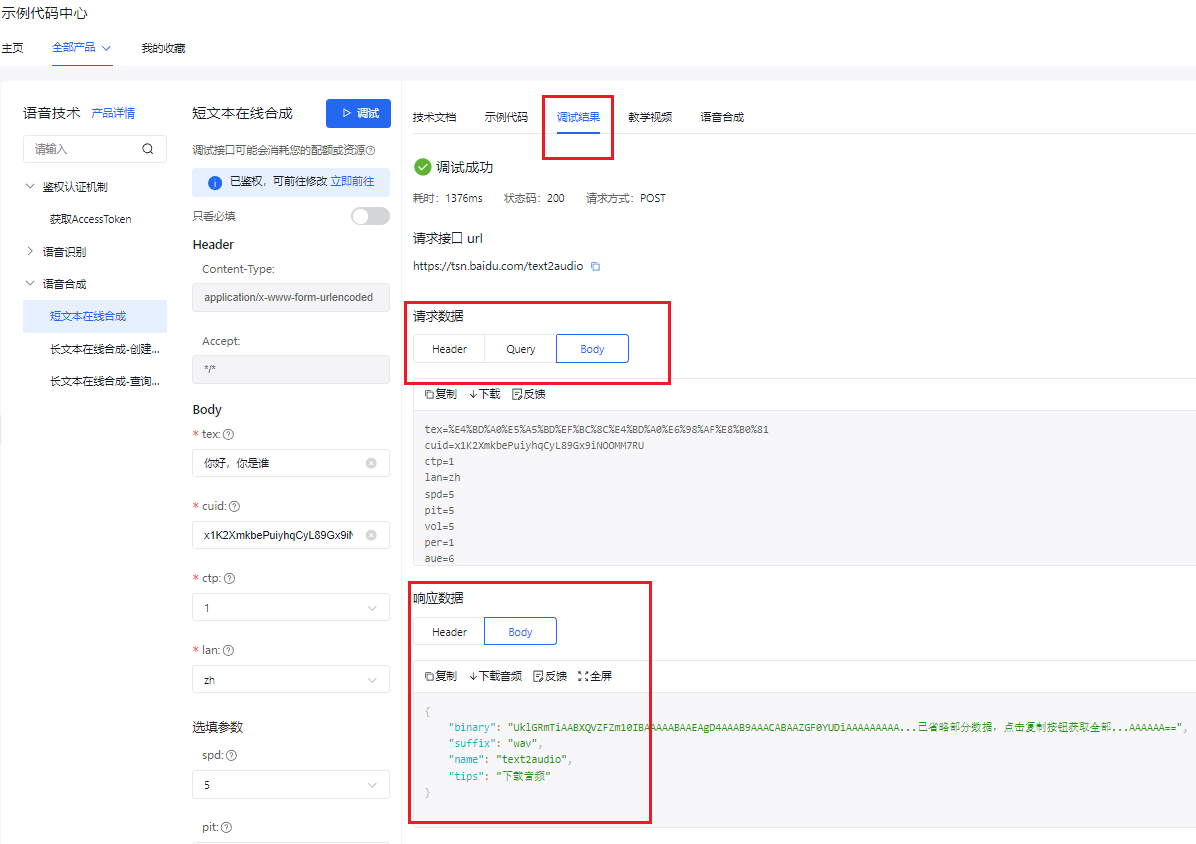
- 点击 调试结果,可以查看请求数据及响应数据包。至此,我们可以通过这样的方式去测试我们的语音合成api服务是否开通成功。
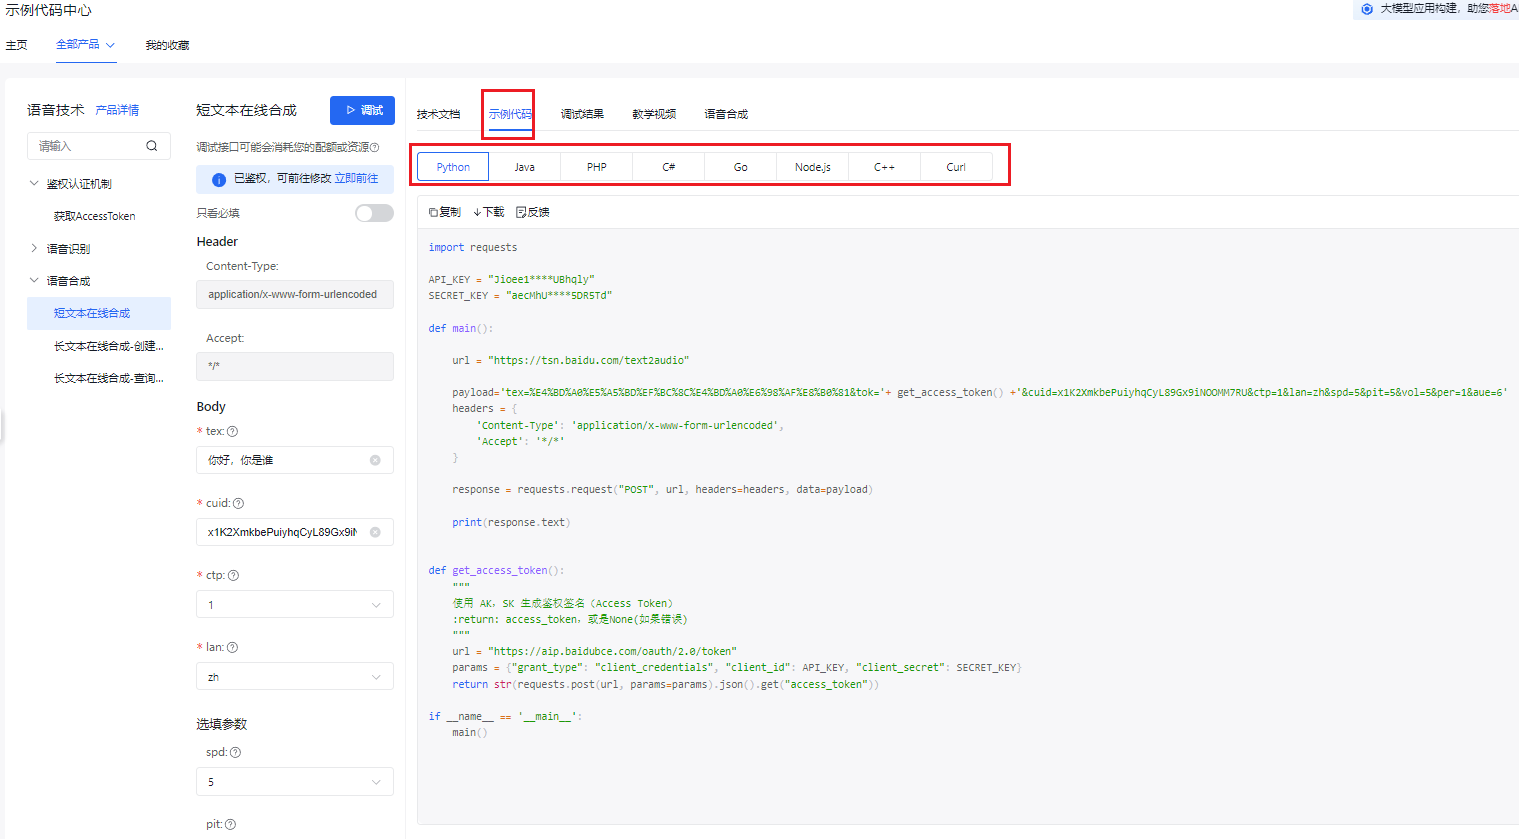
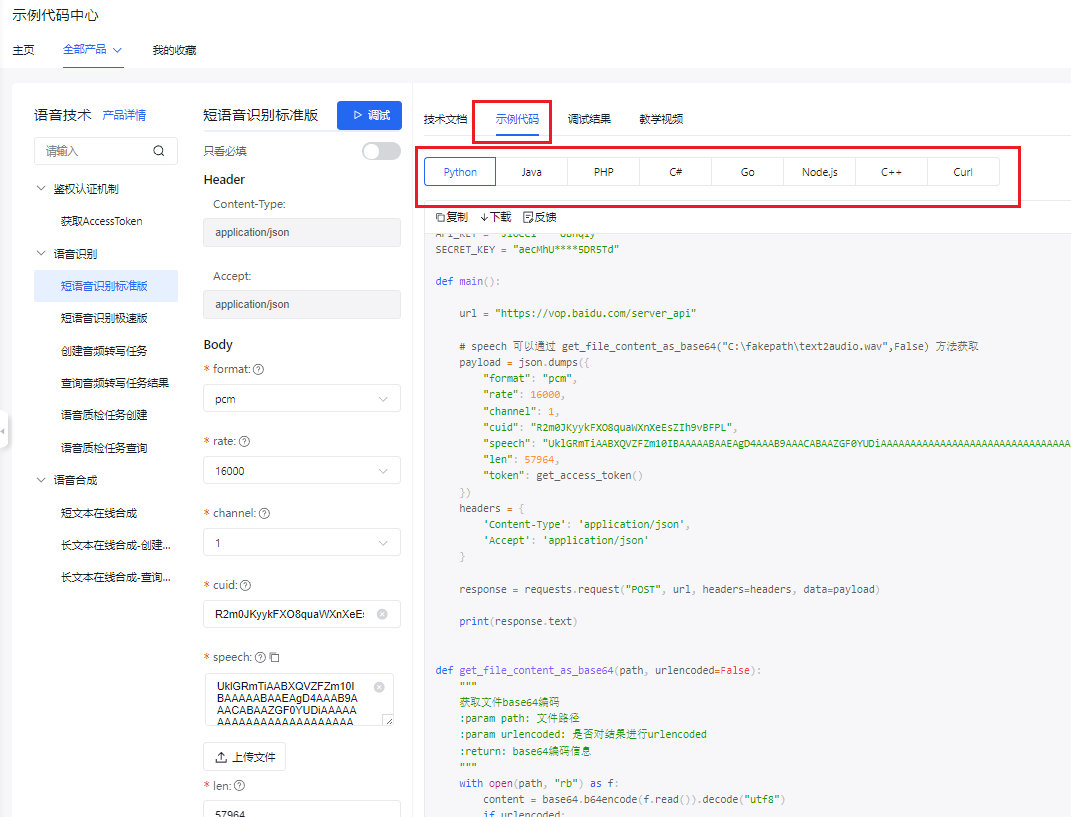
- 点击 示例代码,可以查看各种语言平台的api调用代码实现。通过这个我们就可以在其他的平台上调用百度的api服务。
语音识别
1. 点击 **语音识别->短语音识别标准版**,点击 **上传文件**,上传上一节语音合成的音频文件,其他的参数都为默认都可以。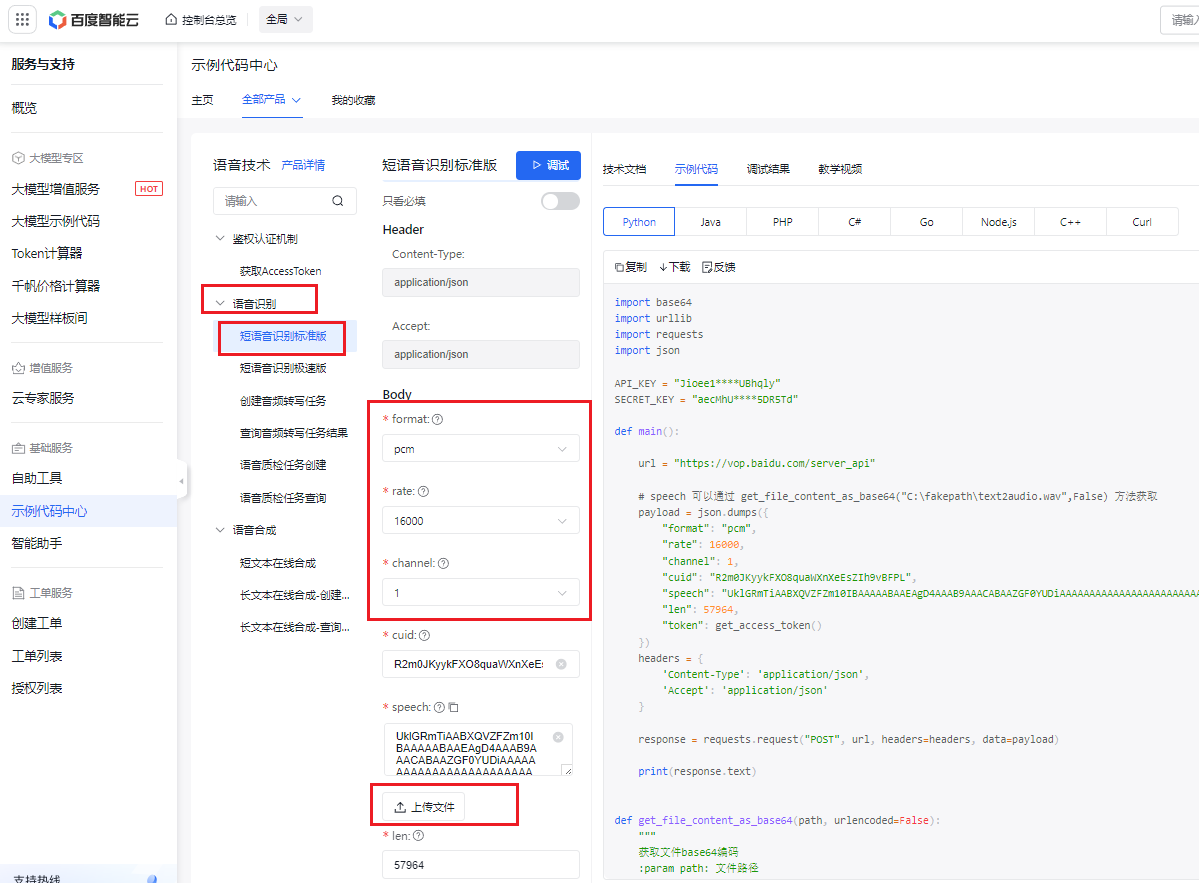
- 点击 调试,运行成功,查看 调试结果,可以从响应数据中查看语音识别是否正确。至此,我们可以通过这样的方式去测试我们的语音识别api服务是否开通成功。
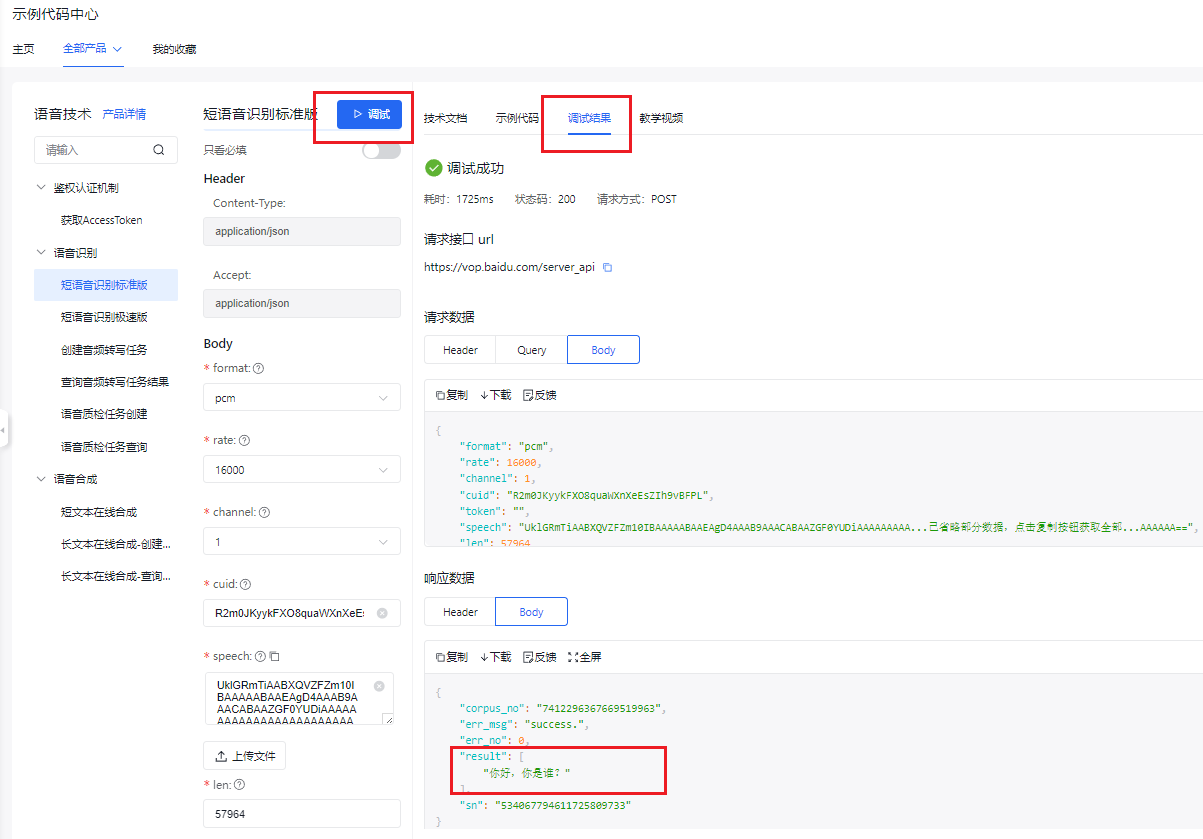
- 同样,点击 示例代码,这里有各种编程语言的api调用实现。
文心一言大模型
1. 点击 **全部产品->千帆大模型平台**,进入到大模型测试页面。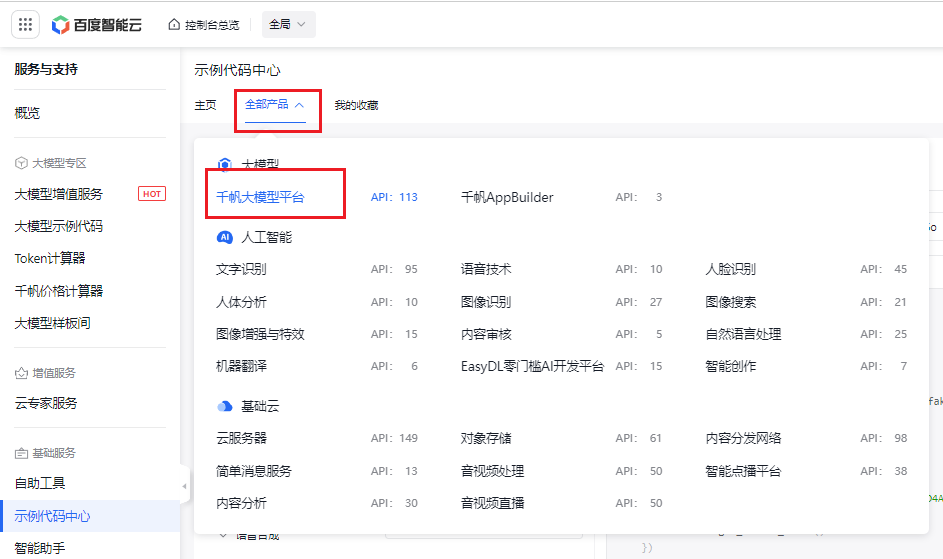
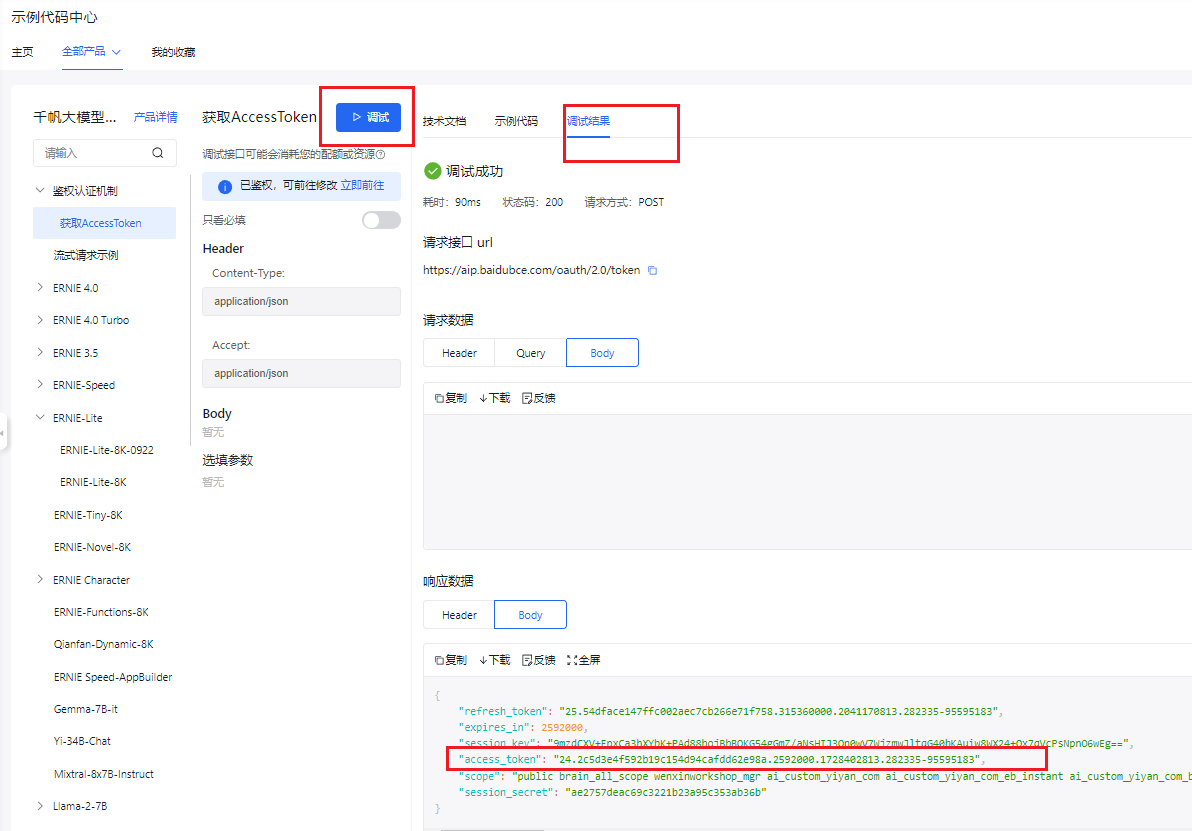
- 点击 鉴权认证机制->获取AccessToken->立即前往。
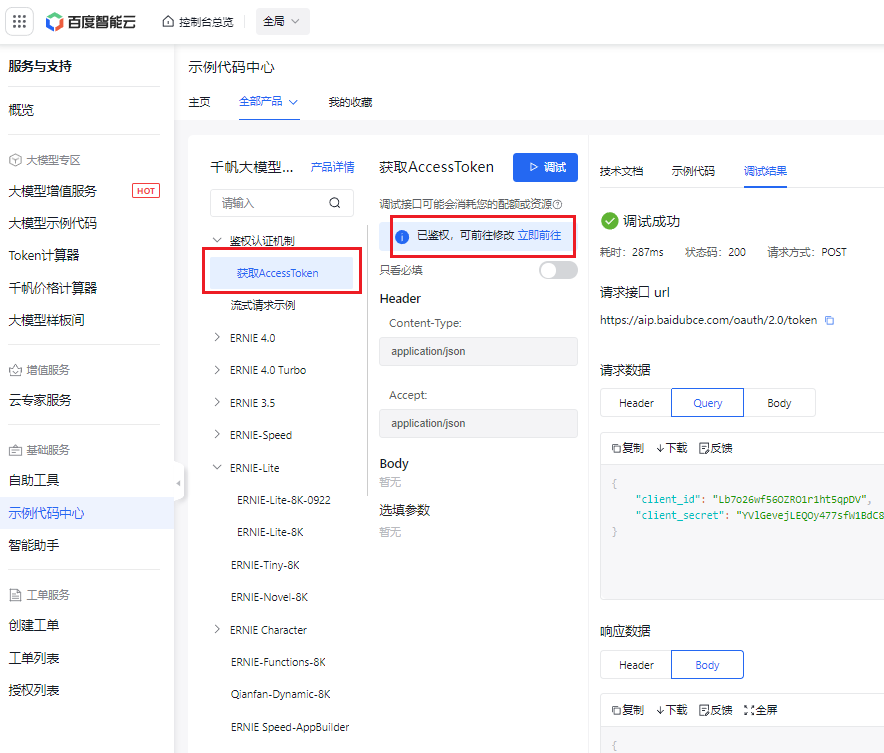
- 选择 应用列表中我们开通的应用服务,点击 确定。
- 点击 调试,在调试结果中,我们可以查询到响应数据中的access_token。这个表面我们申请的api key可以成功响应了。
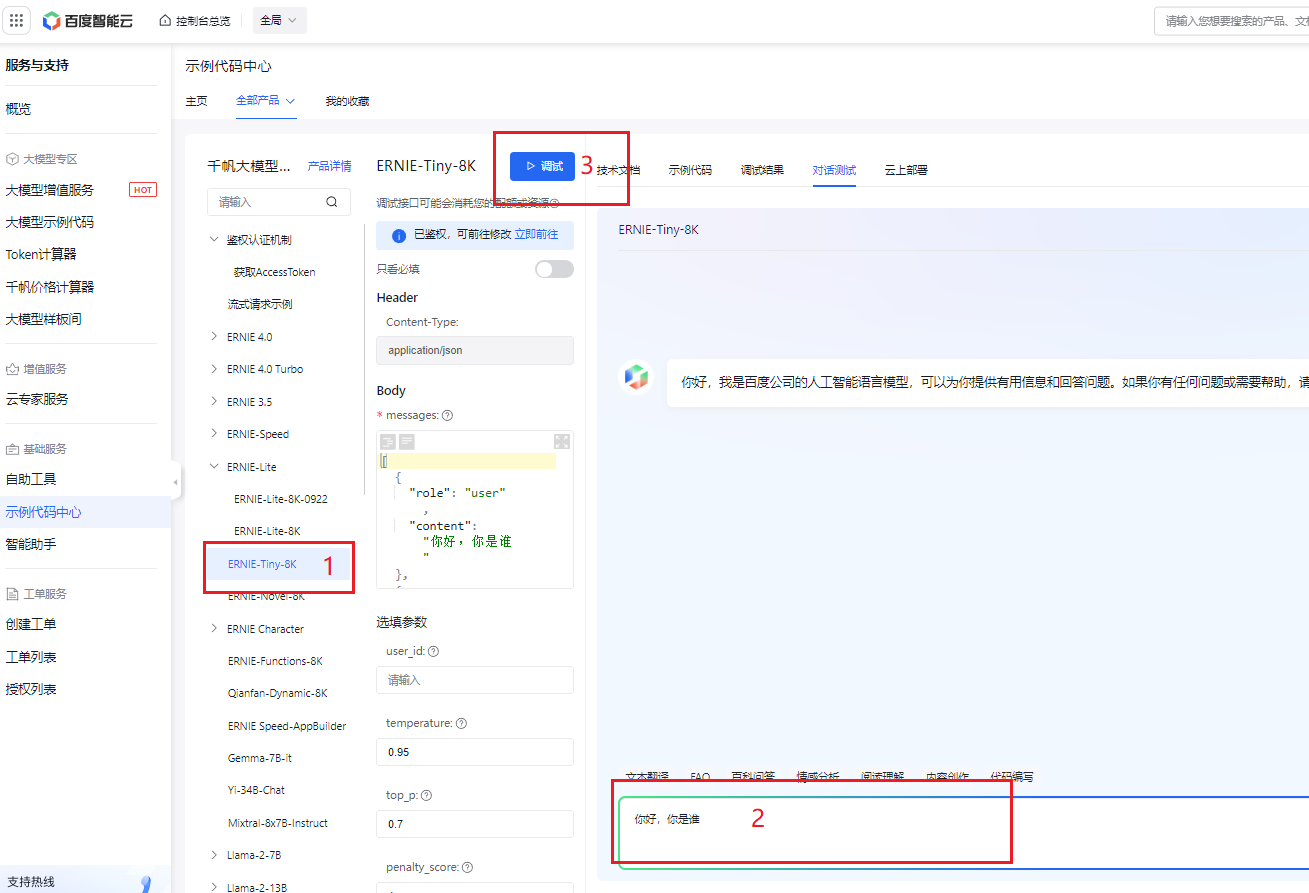
- 接着测试大模型api服务接口是否开通成功。点击 ERNIE-Lite-8K这个我们刚才开通的大模型服务api,在文本框写入提问文本,点击 调试。
- 点击 调试结果,我们可以看到大模型响应的数据。至此,我们可以通过这样的方式去测试我们的大模型api服务是否开通成功。
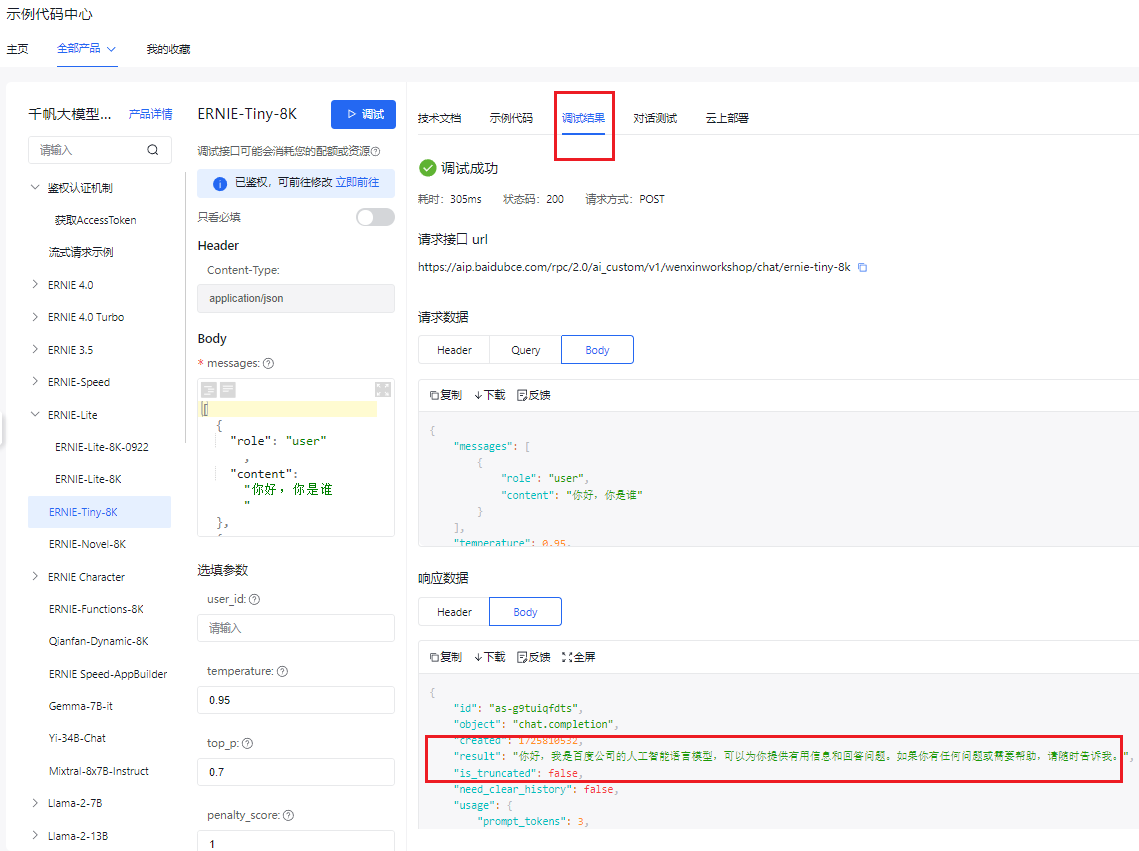
- 同样,点击 示例代码,这里有各种编程语言的api调用实现。
API访问Apipost测试(可选推荐工具)
api访问有一个通用的工具,这个工具用的比较广泛,可以专门测试api访问接口服务是否正常的。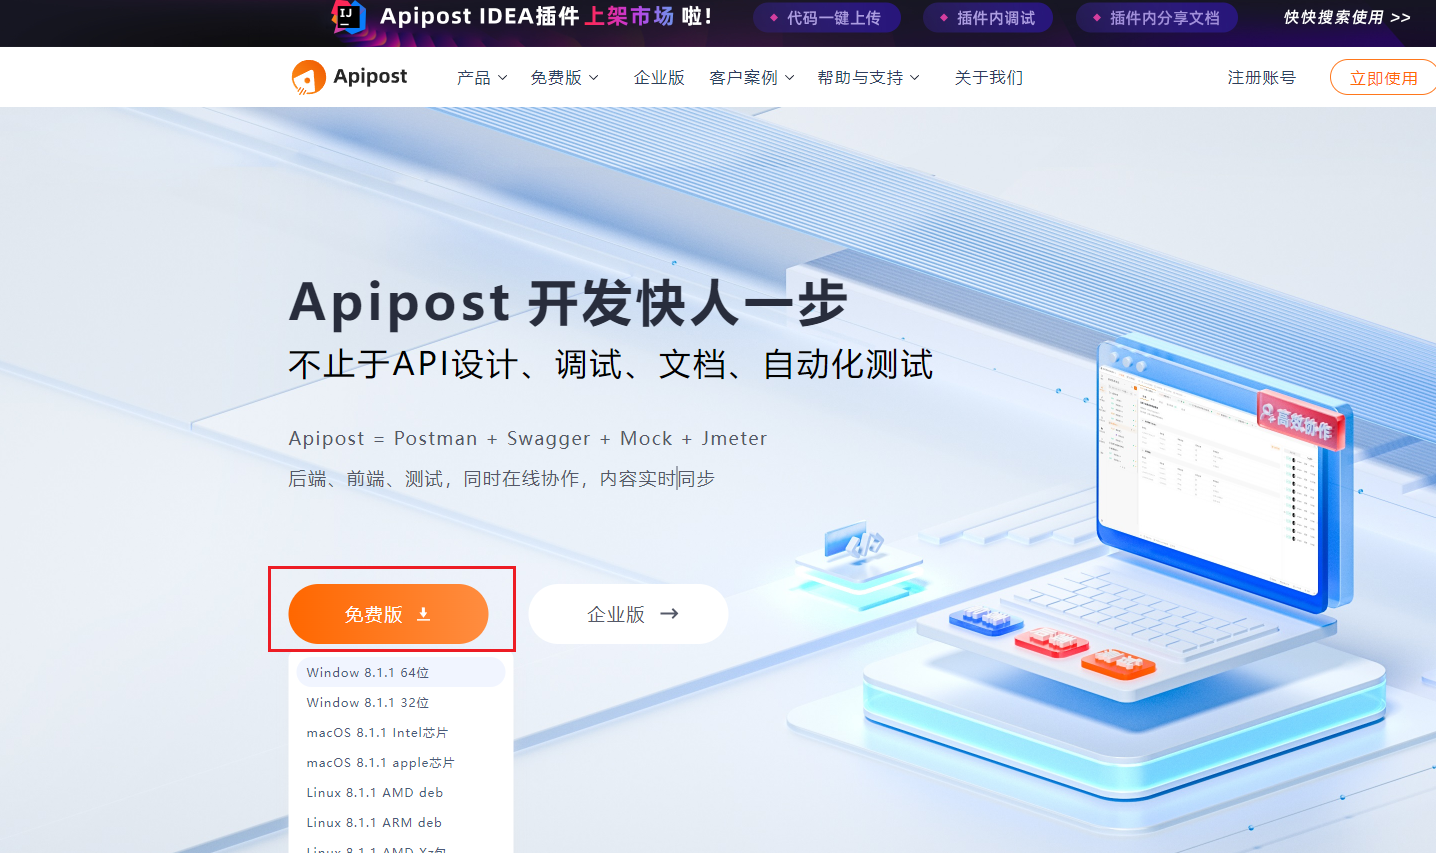
- 下载后安装成功,进入软件如下图。
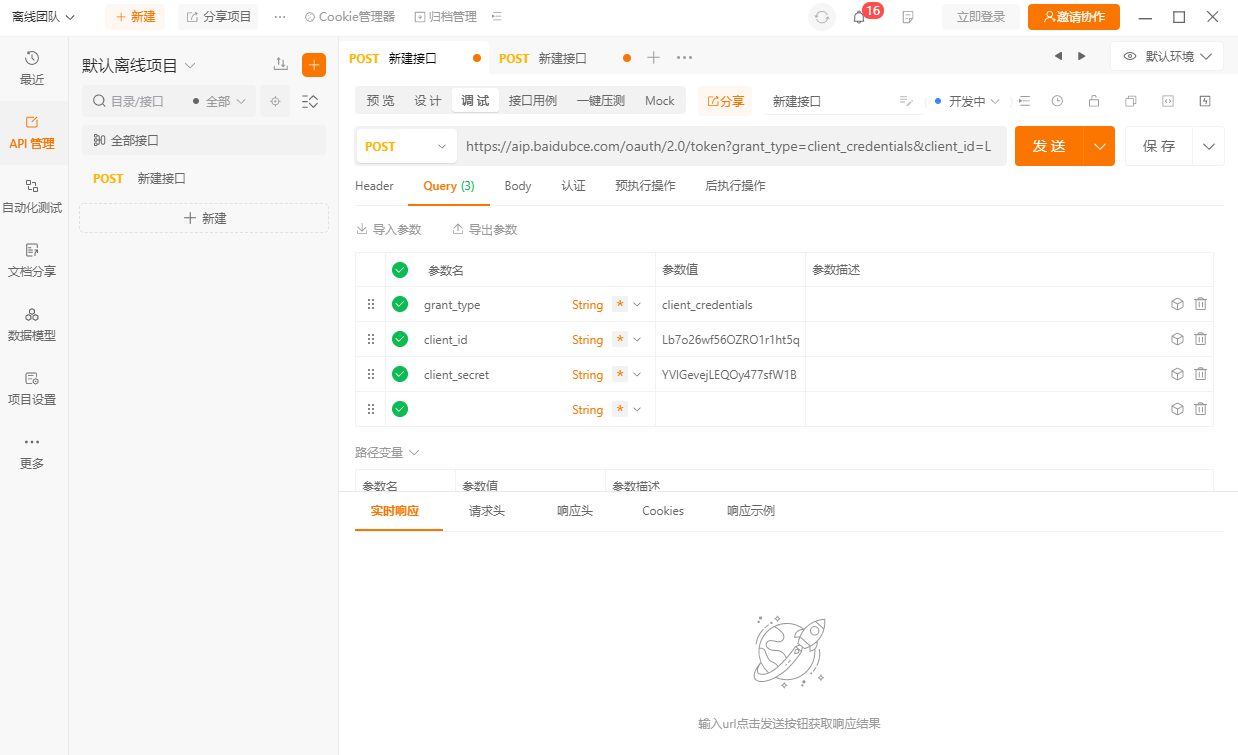
- 这里以上一节百度api鉴权访问,获取access_token为例进行说明。apipost中的配置参数的格式去参考上一节中的示例代码访问。
点击 示例代码->Curl->复制 代码。
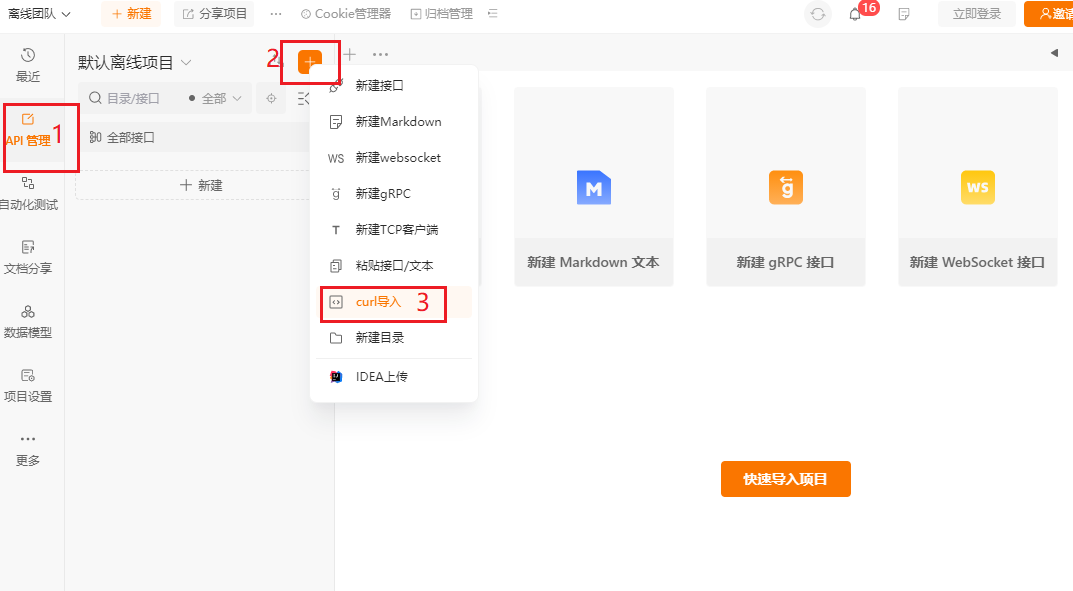
- 点击 API管理,点击“+”,curl导入。
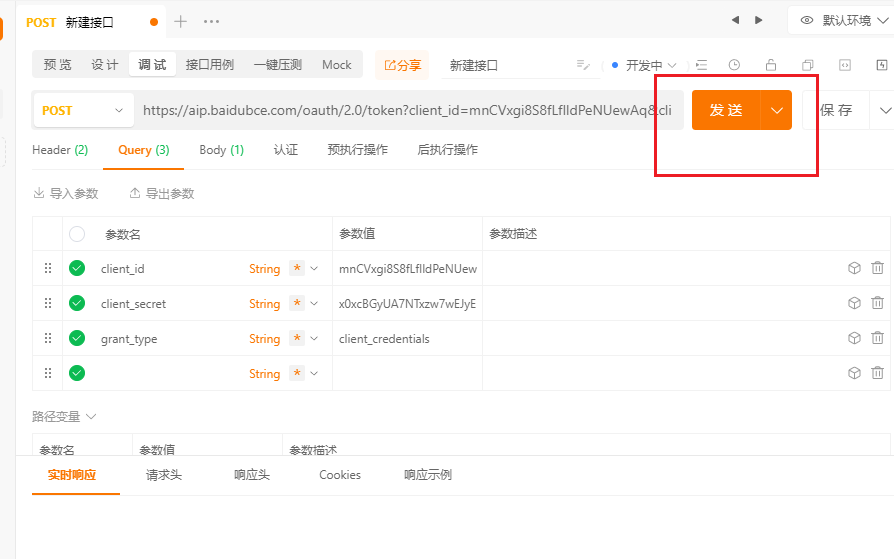
- 粘贴 复制的代码,点击 立即导入。

- 点击 发送。
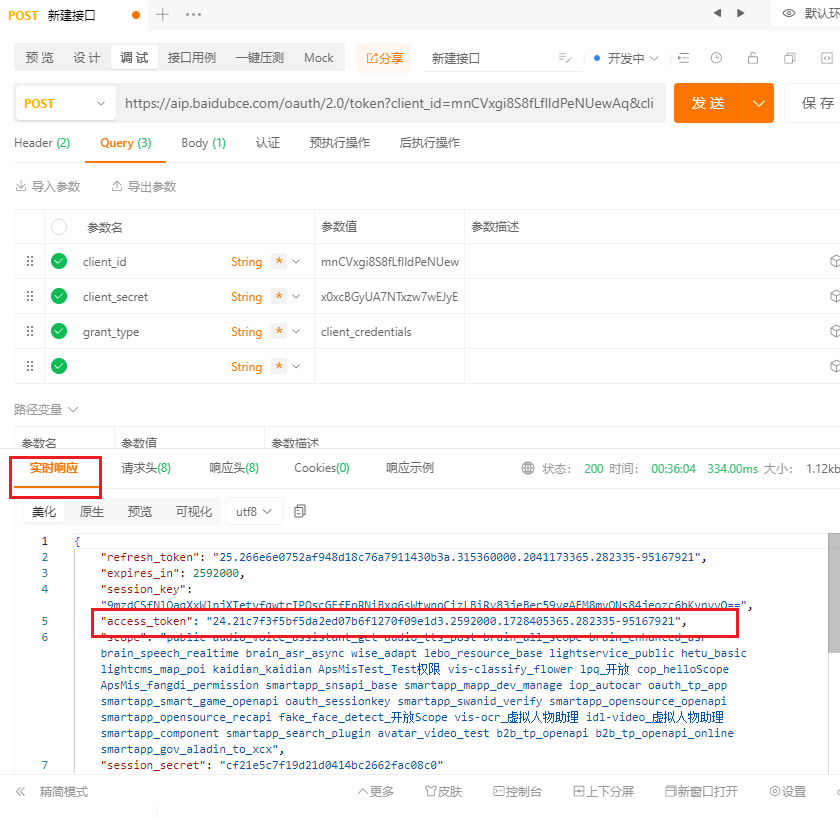
- 从 实时响应中,查看响应的结果数据。至此,我们通过apipost的方式去测试了api的访问是否成功。
跑通AI语音聊天arduino程序
AI语音聊天程序的运行
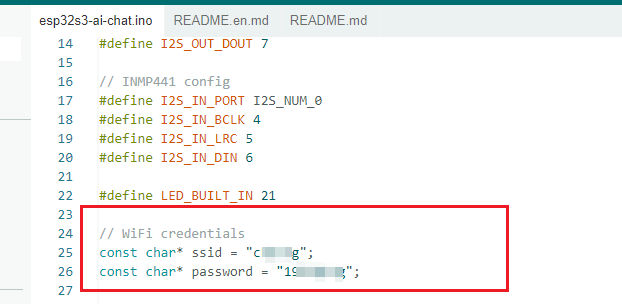
AI语音聊天程序的工程在** esp32s3-ai-chat/esp32s3-ai-chat.ino**,我们直接打开工程烧写代码进行测试。- 修改wifi名称,将当前wifi的ssid、password赋值到对应的位置。
- 填写api key。根据第5章操作获取api key。
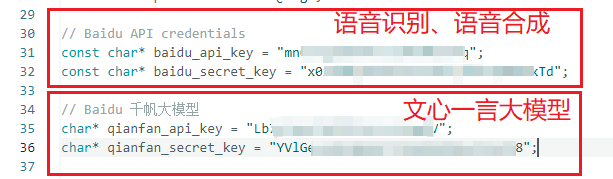
- 开启psram。

- 编译下载。
- 语音对话测试。
用 “houguoxiong” 唤醒ESP32-S3后,进行对话交流。
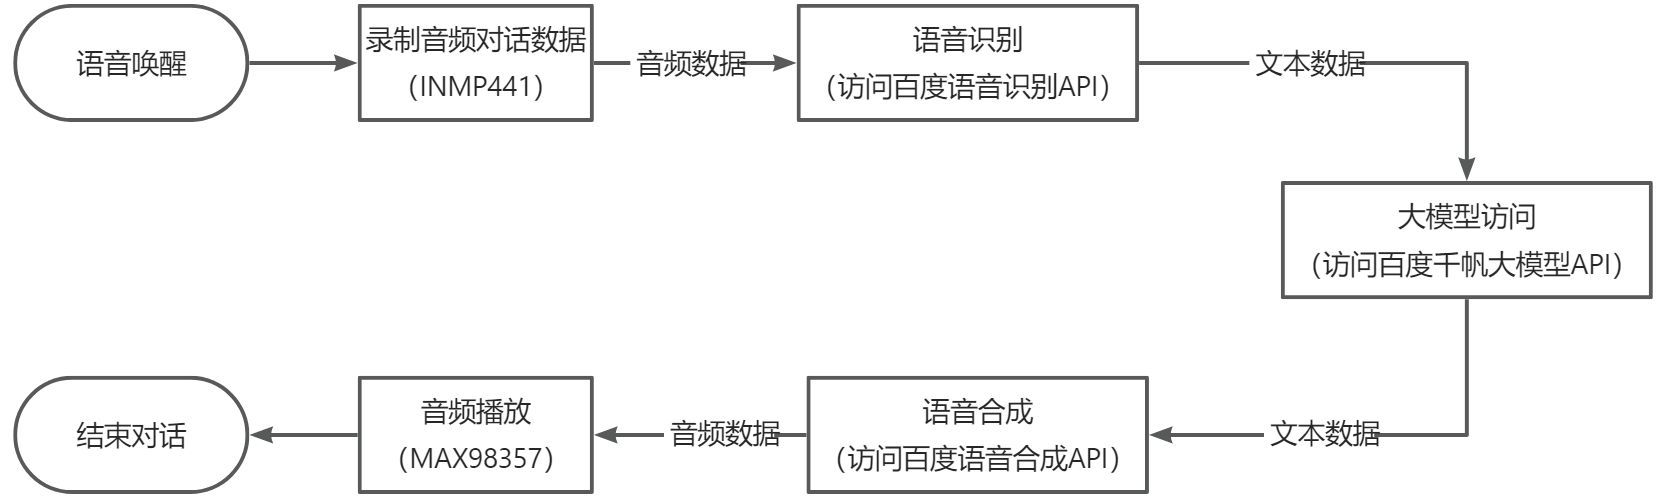
整体软件流程
主要模块的实现和代码分析
唤醒词语音唤醒
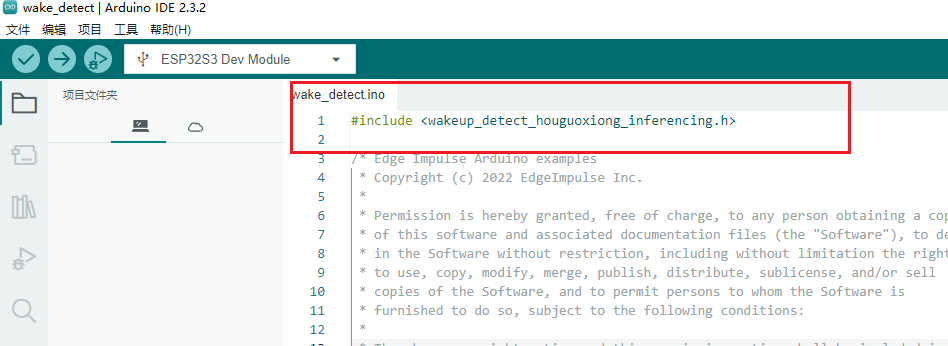
该模块主要实现自己训练的唤醒词唤醒的功能。** esp32s3-ai-chat/example/wake_detect**这个工程主要就是实现唤醒词唤醒的功能。基于这个工程,我们可以在此基础上进行AI语音聊天的开发。整体代码实现:
#include <wakeup_detect_houguoxiong_inferencing.h>
/* Edge Impulse Arduino examples
* Copyright (c) 2022 EdgeImpulse Inc.
*
* Permission is hereby granted, free of charge, to any person obtaining a copy
* of this software and associated documentation files (the "Software"), to deal
* in the Software without restriction, including without limitation the rights
* to use, copy, modify, merge, publish, distribute, sublicense, and/or sell
* copies of the Software, and to permit persons to whom the Software is
* furnished to do so, subject to the following conditions:
*
* The above copyright notice and this permission notice shall be included in
* all copies or substantial portions of the Software.
*
* THE SOFTWARE IS PROVIDED "AS IS", WITHOUT WARRANTY OF ANY KIND, EXPRESS OR
* IMPLIED, INCLUDING BUT NOT LIMITED TO THE WARRANTIES OF MERCHANTABILITY,
* FITNESS FOR A PARTICULAR PURPOSE AND NONINFRINGEMENT. IN NO EVENT SHALL THE
* AUTHORS OR COPYRIGHT HOLDERS BE LIABLE FOR ANY CLAIM, DAMAGES OR OTHER
* LIABILITY, WHETHER IN AN ACTION OF CONTRACT, TORT OR OTHERWISE, ARISING FROM,
* OUT OF OR IN CONNECTION WITH THE SOFTWARE OR THE USE OR OTHER DEALINGS IN THE
* SOFTWARE.
*/
// If your target is limited in memory remove this macro to save 10K RAM
#define EIDSP_QUANTIZE_FILTERBANK 0
/*
** NOTE: If you run into TFLite arena allocation issue.
**
** This may be due to may dynamic memory fragmentation.
** Try defining "-DEI_CLASSIFIER_ALLOCATION_STATIC" in boards.local.txt (create
** if it doesn't exist) and copy this file to
** `<ARDUINO_CORE_INSTALL_PATH>/arduino/hardware/<mbed_core>/<core_version>/`.
**
** See
** (https://support.arduino.cc/hc/en-us/articles/360012076960-Where-are-the-installed-cores-located-)
** to find where Arduino installs cores on your machine.
**
** If the problem persists then there's not enough memory for this model and application.
*/
/* Includes ---------------------------------------------------------------- */
#include <driver/i2s.h>
#define SAMPLE_RATE 16000U
#define LED_BUILT_IN 21
// INMP441 config
#define I2S_IN_PORT I2S_NUM_0
#define I2S_IN_BCLK 4
#define I2S_IN_LRC 5
#define I2S_IN_DIN 6
/** Audio buffers, pointers and selectors */
typedef struct {
int16_t *buffer;
uint8_t buf_ready;
uint32_t buf_count;
uint32_t n_samples;
} inference_t;
static inference_t inference;
static const uint32_t sample_buffer_size = 2048;
static signed short sampleBuffer[sample_buffer_size];
static bool debug_nn = false; // Set this to true to see e.g. features generated from the raw signal
static bool record_status = true;
/**
* @brief Arduino setup function
*/
void setup() {
// put your setup code here, to run once:
Serial.begin(115200);
// comment out the below line to cancel the wait for USB connection (needed for native USB)
while (!Serial)
;
Serial.println("Edge Impulse Inferencing Demo");
pinMode(LED_BUILT_IN, OUTPUT); // Set the pin as output
digitalWrite(LED_BUILT_IN, HIGH); //Turn off
// Initialize I2S for audio input
  i2s_config_t i2s_config_in = {
    .mode = (i2s_mode_t)(I2S_MODE_MASTER | I2S_MODE_RX),
    .sample_rate = SAMPLE_RATE,
    .bits_per_sample = I2S_BITS_PER_SAMPLE_16BIT,  // 注意:INMP441 输出 32 位数据
    .channel_format = I2S_CHANNEL_FMT_ONLY_LEFT,
    .communication_format = i2s_comm_format_t(I2S_COMM_FORMAT_STAND_I2S),
    .intr_alloc_flags = ESP_INTR_FLAG_LEVEL1,
    .dma_buf_count = 8,
    .dma_buf_len = 1024,
  };
  i2s_pin_config_t pin_config_in = {
    .bck_io_num = I2S_IN_BCLK,
    .ws_io_num = I2S_IN_LRC,
    .data_out_num = -1,
    .data_in_num = I2S_IN_DIN
  };
  i2s_driver_install(I2S_IN_PORT, &i2s_config_in, 0, NULL);
  i2s_set_pin(I2S_IN_PORT, &pin_config_in);
// summary of inferencing settings (from model_metadata.h)
  ei_printf("Inferencing settings:\n");
  ei_printf("\tInterval: ");
  ei_printf_float((float)EI_CLASSIFIER_INTERVAL_MS);
  ei_printf(" ms.\n");
  ei_printf("\tFrame size: %d\n", EI_CLASSIFIER_DSP_INPUT_FRAME_SIZE);
  ei_printf("\tSample length: %d ms.\n", EI_CLASSIFIER_RAW_SAMPLE_COUNT / 16);
  ei_printf("\tNo. of classes: %d\n", sizeof(ei_classifier_inferencing_categories) / sizeof(ei_classifier_inferencing_categories[0]));

  ei_printf("\nStarting continious inference in 2 seconds...\n");
  ei_sleep(2000);

  if (microphone_inference_start(EI_CLASSIFIER_RAW_SAMPLE_COUNT) == false) {
    ei_printf("ERR: Could not allocate audio buffer (size %d), this could be due to the window length of your model\r\n", EI_CLASSIFIER_RAW_SAMPLE_COUNT);
    return;
  }
ei_printf("Recording...\n");
}
/**
* @brief Arduino main function. Runs the inferencing loop.
*/
void loop() {
bool m = microphone_inference_record();
if (!m) {
ei_printf("ERR: Failed to record audio...\n");
return;
}
signal_t signal;
signal.total_length = EI_CLASSIFIER_RAW_SAMPLE_COUNT;
signal.get_data = µphone_audio_signal_get_data;
ei_impulse_result_t result = { 0 };
EI_IMPULSE_ERROR r = run_classifier(&signal, &result, debug_nn);
if (r != EI_IMPULSE_OK) {
ei_printf("ERR: Failed to run classifier (%d)\n", r);
return;
}
int pred_index = 0; // Initialize pred_index
float pred_value = 0; // Initialize pred_value
// print the predictions
ei_printf("Predictions ");
ei_printf("(DSP: %d ms., Classification: %d ms., Anomaly: %d ms.)",
result.timing.dsp, result.timing.classification, result.timing.anomaly);
ei_printf(": \n");
for (size_t ix = 0; ix < EI_CLASSIFIER_LABEL_COUNT; ix++) {
ei_printf(" %s: ", result.classification[ix].label);
ei_printf_float(result.classification[ix].value);
ei_printf("\n");
if (result.classification[ix].value > pred_value) {
pred_index = ix;
pred_value = result.classification[ix].value;
}
}
// Display inference result
if (pred_index == 3) {
digitalWrite(LED_BUILT_IN, LOW); //Turn on
} else {
digitalWrite(LED_BUILT_IN, HIGH); //Turn off
}
#if EI_CLASSIFIER_HAS_ANOMALY == 1
ei_printf(" anomaly score: ");
ei_printf_float(result.anomaly);
ei_printf("\n");
#endif
}
static void audio_inference_callback(uint32_t n_bytes) {
for (int i = 0; i < n_bytes >> 1; i++) {
inference.buffer[inference.buf_count++] = sampleBuffer[i];
if (inference.buf_count >= inference.n_samples) {
inference.buf_count = 0;
inference.buf_ready = 1;
}
}
}
static void capture_samples(void *arg) {
const int32_t i2s_bytes_to_read = (uint32_t)arg;
size_t bytes_read = i2s_bytes_to_read;
while (record_status) {
/* read data at once from i2s - Modified for XIAO ESP2S3 Sense and I2S.h library */
i2s_read(I2S_IN_PORT, (void*)sampleBuffer, i2s_bytes_to_read, &bytes_read, 100);
// esp_i2s::i2s_read(esp_i2s::I2S_NUM_0, (void *)sampleBuffer, i2s_bytes_to_read, &bytes_read, 100);
if (bytes_read <= 0) {
ei_printf("Error in I2S read : %d", bytes_read);
} else {
if (bytes_read < i2s_bytes_to_read) {
ei_printf("Partial I2S read");
}
// scale the data (otherwise the sound is too quiet)
for (int x = 0; x < i2s_bytes_to_read / 2; x++) {
sampleBuffer[x] = (int16_t)(sampleBuffer[x]) * 8;
}
if (record_status) {
audio_inference_callback(i2s_bytes_to_read);
} else {
break;
}
}
}
vTaskDelete(NULL);
}
/**
* @brief Init inferencing struct and setup/start PDM
*
* @param[in] n_samples The n samples
*
* @return { description_of_the_return_value }
*/
static bool microphone_inference_start(uint32_t n_samples) {
inference.buffer = (int16_t *)malloc(n_samples * sizeof(int16_t));
if (inference.buffer == NULL) {
return false;
}
inference.buf_count = 0;
inference.n_samples = n_samples;
inference.buf_ready = 0;
// if (i2s_init(EI_CLASSIFIER_FREQUENCY)) {
// ei_printf("Failed to start I2S!");
// }
ei_sleep(100);
record_status = true;
xTaskCreate(capture_samples, "CaptureSamples", 1024 * 32, (void *)sample_buffer_size, 10, NULL);
return true;
}
/**
* @brief Wait on new data
*
* @return True when finished
*/
static bool microphone_inference_record(void) {
bool ret = true;
while (inference.buf_ready == 0) {
delay(10);
}
inference.buf_ready = 0;
return ret;
}
/**
* Get raw audio signal data
*/
static int microphone_audio_signal_get_data(size_t offset, size_t length, float *out_ptr) {
numpy::int16_to_float(&inference.buffer[offset], out_ptr, length);
return 0;
}
/**
* @brief Stop PDM and release buffers
*/
static void microphone_inference_end(void) {
free(sampleBuffer);
ei_free(inference.buffer);
}
#if !defined(EI_CLASSIFIER_SENSOR) || EI_CLASSIFIER_SENSOR != EI_CLASSIFIER_SENSOR_MICROPHONE
#error "Invalid model for current sensor."
#endif
下面进行各模块代码的介绍:
- 这个是自己训练好的唤醒词模型库的头文件,需要引用到工程中。
#include <wakeup_detect_houguotongxue_inferencing.h>
- 初始化麦克风NMP441的i2s的配置。
// Initialize I2S for audio input
i2s_config_t i2s_config_in = {
.mode = (i2s_mode_t)(I2S_MODE_MASTER | I2S_MODE_RX),
.sample_rate = SAMPLE_RATE,
.bits_per_sample = I2S_BITS_PER_SAMPLE_16BIT, // 注意:INMP441 输出 32 位数据
.channel_format = I2S_CHANNEL_FMT_ONLY_LEFT,
.communication_format = i2s_comm_format_t(I2S_COMM_FORMAT_STAND_I2S),
.intr_alloc_flags = ESP_INTR_FLAG_LEVEL1,
.dma_buf_count = 8,
.dma_buf_len = 1024,
};
i2s_pin_config_t pin_config_in = {
.bck_io_num = I2S_IN_BCLK,
.ws_io_num = I2S_IN_LRC,
.data_out_num = -1,
.data_in_num = I2S_IN_DIN
};
i2s_driver_install(I2S_IN_PORT, &i2s_config_in, 0, NULL);
i2s_set_pin(I2S_IN_PORT, &pin_config_in);
- 这个是唤醒词识别接口的初始化。
// summary of inferencing settings (from model_metadata.h)
ei_printf("Inferencing settings:\n");
ei_printf("\tInterval: ");
ei_printf_float((float)EI_CLASSIFIER_INTERVAL_MS);
ei_printf(" ms.\n");
ei_printf("\tFrame size: %d\n", EI_CLASSIFIER_DSP_INPUT_FRAME_SIZE);
ei_printf("\tSample length: %d ms.\n", EI_CLASSIFIER_RAW_SAMPLE_COUNT / 16);
ei_printf("\tNo. of classes: %d\n", sizeof(ei_classifier_inferencing_categories) / sizeof(ei_classifier_inferencing_categories[0]));
ei_printf("\nStarting continious inference in 2 seconds...\n");
ei_sleep(2000);
if (microphone_inference_start(EI_CLASSIFIER_RAW_SAMPLE_COUNT) == false) {
ei_printf("ERR: Could not allocate audio buffer (size %d), this could be due to the window length of your model\r\n", EI_CLASSIFIER_RAW_SAMPLE_COUNT);
return;
}
- 这个初始化的函数主要就是创建了一个freeRTOS的task,task主要为实时采集音频数据。
static bool microphone_inference_start(uint32_t n_samples) {
  inference.buffer = (int16_t *)malloc(n_samples * sizeof(int16_t));

  if (inference.buffer == NULL) {
    return false;
  }

  inference.buf_count = 0;
  inference.n_samples = n_samples;
  inference.buf_ready = 0;

  ei_sleep(100);

  record_status = true;

  xTaskCreate(capture_samples, "CaptureSamples", 1024 * 32, (void *)sample_buffer_size, 10, NULL);

  return true;
}
- 实时采集音频数据的task,将采集到的数据存储到一个全局的数据变量sampleBuffer中去。
static void capture_samples(void *arg) {

  const int32_t i2s_bytes_to_read = (uint32_t)arg;
  size_t bytes_read = i2s_bytes_to_read;

  while (record_status) {

    /* read data at once from i2s - Modified for XIAO ESP2S3 Sense and I2S.h library */
    i2s_read(I2S_IN_PORT, (void*)sampleBuffer, i2s_bytes_to_read, &bytes_read, 100);
    // esp_i2s::i2s_read(esp_i2s::I2S_NUM_0, (void *)sampleBuffer, i2s_bytes_to_read, &bytes_read, 100);

    if (bytes_read <= 0) {
      ei_printf("Error in I2S read : %d", bytes_read);
    } else {
      if (bytes_read < i2s_bytes_to_read) {
        ei_printf("Partial I2S read");
      }

      // scale the data (otherwise the sound is too quiet)
      for (int x = 0; x < i2s_bytes_to_read / 2; x++) {
        sampleBuffer[x] = (int16_t)(sampleBuffer[x]) * 8;
      }

      if (record_status) {
        audio_inference_callback(i2s_bytes_to_read);
      } else {
        break;
      }
    }
  }
  vTaskDelete(NULL);
}
- 将缓存到sampleBuffer变量中的数据复制到inference数据结构体中去,这个结构体用于后面的分类函数的输入参数。到此,音频输入的数据准备的代码实现已经完成。
static void audio_inference_callback(uint32_t n_bytes) {
  for (int i = 0; i < n_bytes >> 1; i++) {
    inference.buffer[inference.buf_count++] = sampleBuffer[i];

    if (inference.buf_count >= inference.n_samples) {
      inference.buf_count = 0;
      inference.buf_ready = 1;
    }
  }
}
- 接下来看具体的分类。
void loop() {
bool m = microphone_inference_record();
if (!m) {
ei_printf("ERR: Failed to record audio...\n");
return;
}
signal_t signal;
signal.total_length = EI_CLASSIFIER_RAW_SAMPLE_COUNT;
signal.get_data = µphone_audio_signal_get_data;
ei_impulse_result_t result = { 0 };
EI_IMPULSE_ERROR r = run_classifier(&signal, &result, debug_nn);
if (r != EI_IMPULSE_OK) {
ei_printf("ERR: Failed to run classifier (%d)\n", r);
return;
}
int pred_index = 0; // Initialize pred_index
float pred_value = 0; // Initialize pred_value
// print the predictions
ei_printf("Predictions ");
ei_printf("(DSP: %d ms., Classification: %d ms., Anomaly: %d ms.)",
result.timing.dsp, result.timing.classification, result.timing.anomaly);
ei_printf(": \n");
for (size_t ix = 0; ix < EI_CLASSIFIER_LABEL_COUNT; ix++) {
ei_printf(" %s: ", result.classification[ix].label);
ei_printf_float(result.classification[ix].value);
ei_printf("\n");
if (result.classification[ix].value > pred_value) {
pred_index = ix;
pred_value = result.classification[ix].value;
}
}
// Display inference result
if (pred_index == 3) {
digitalWrite(LED_BUILT_IN, LOW); //Turn on
} else {
digitalWrite(LED_BUILT_IN, HIGH); //Turn off
}
#if EI_CLASSIFIER_HAS_ANOMALY == 1
ei_printf(" anomaly score: ");
ei_printf_float(result.anomaly);
ei_printf("\n");
#endif
}
- 在loop主循环中,主要是对采集到的音频数据进行分类预测。microphone_audio_signal_get_data获取之前存储的音频数据,然后调用run_classifier(&signal, &result, debug_nn),计算出分类的预测值。在模型训练时候,训练有几个标签的数据,这里result就会返回对应几个标签的预测结果。
- result.classification[ix].value预测值越接近1.0的标签,则表示当前识别的是相应的标签。当说出我们训练的唤醒词时,对应的唤醒词预测值也会接近1.0,从而实现唤醒。
- 我们可以进行一个阈值来与result.classification[ix].value进行比较来判断是否唤醒成功,控制这个比较的阈值大小,则可以控制识别的灵敏程度。至此,整个唤醒流程的代码实现结束。
百度API访问的access_token获取
在访问百度的语音识别、语音合成、文心一言大模型时,都需要提供access_token。在ESP32-S3中,我们通过创建http请求,根据access_token的api访问格式构建请求包,通过http发送请求,等待响应的数据,然后从响应的数据中解析出access_token。整体代码实现如下:
// Get Baidu API access token
String getAccessToken(const char* api_key, const char* secret_key) {
  String access_token = "";
  HTTPClient http;

  // 创建http请求
  http.begin("https://aip.baidubce.com/oauth/2.0/token?grant_type=client_credentials&client_id=" + String(api_key) + "&client_secret=" + String(secret_key));
  int httpCode = http.POST("");

  if (httpCode == HTTP_CODE_OK) {
    String response = http.getString();
    DynamicJsonDocument doc(1024);
    deserializeJson(doc, response);
    access_token = doc["access_token"].as<String>();

    Serial.printf("[HTTP] GET access_token: %s\n", access_token);
  } else {
    Serial.printf("[HTTP] GET... failed, error: %s\n", http.errorToString(httpCode).c_str());
  }
  http.end();

  return access_token;
}
在这里,我们需要先在百度智能云网站上申请api_key、secret_key,参考第5章节的操作方式。然后将api_key、secret_key作为输入参数,根据api访问格式,发送http.POST请求,然后从响应数据中解析出access_token。
百度语音识别API访问
在ESP32-S3通过i2s采集INMP441的音频数据后,需要将采集的音频数据流识别为文本模式,因此需要调用语音识别API实现实时的语音识别,这里我们采用了百度的语音识别API访问。主要代码实现如下:
String baiduSTT_Send(String access_token, uint8_t* audioData, int audioDataSize) {
  String recognizedText = "";

  if (access_token == "") {
    Serial.println("access_token is null");
    return recognizedText;
  }

  // audio数据包许愿哦进行Base64编码,数据量会增大1/3
  int audio_data_len = audioDataSize * sizeof(char) * 1.4;
  unsigned char* audioDataBase64 = (unsigned char*)ps_malloc(audio_data_len);
  if (!audioDataBase64) {
    Serial.println("Failed to allocate memory for audioDataBase64");
    return recognizedText;
  }

  // json包大小,由于需要将audioData数据进行Base64的编码,数据量会增大1/3
  int data_json_len = audioDataSize * sizeof(char) * 1.4;
  char* data_json = (char*)ps_malloc(data_json_len);
  if (!data_json) {
    Serial.println("Failed to allocate memory for data_json");
    return recognizedText;
  }

  // Base64 encode audio data
  encode_base64(audioData, audioDataSize, audioDataBase64);

  memset(data_json, '\0', data_json_len);
  strcat(data_json, "{");
  strcat(data_json, "\"format\":\"pcm\",");
  strcat(data_json, "\"rate\":16000,");
  strcat(data_json, "\"dev_pid\":1537,");
  strcat(data_json, "\"channel\":1,");
  strcat(data_json, "\"cuid\":\"57722200\",");
  strcat(data_json, "\"token\":\"");
  strcat(data_json, access_token.c_str());
  strcat(data_json, "\",");
  sprintf(data_json + strlen(data_json), "\"len\":%d,", audioDataSize);
  strcat(data_json, "\"speech\":\"");
  strcat(data_json, (const char*)audioDataBase64);
  strcat(data_json, "\"");
  strcat(data_json, "}");

  // 创建http请求
  HTTPClient http_client;

  http_client.begin("http://vop.baidu.com/server_api");
  http_client.addHeader("Content-Type", "application/json");
  int httpCode = http_client.POST(data_json);

  if (httpCode > 0) {
    if (httpCode == HTTP_CODE_OK) {
      // 获取返回结果
      String response = http_client.getString();
      Serial.println(response);

      // 从json中解析对应的result
      DynamicJsonDocument responseDoc(2048);
      deserializeJson(responseDoc, response);
      recognizedText = responseDoc["result"].as<String>();
    }
  } else {
    Serial.printf("[HTTP] POST failed, error: %s\n", http_client.errorToString(httpCode).c_str());
  }

  // 释放内存
  if (audioDataBase64) {
    free(audioDataBase64);
  }

  if (data_json) {
    free(data_json);
  }

  http_client.end();

  return recognizedText;
}
下面对上面代码重点地方进行分析说明:
- 这里json包的buffer创建需要为输入数据的1.4倍左右,因为需要进行base64的编码作为输入。这里分配的内存比较大,因此需要从psram中分配。
  // audio数据包许愿哦进行Base64编码,数据量会增大1/3
  int audio_data_len = audioDataSize * sizeof(char) * 1.4;
  unsigned char* audioDataBase64 = (unsigned char*)ps_malloc(audio_data_len);
  if (!audioDataBase64) {
    Serial.println("Failed to allocate memory for audioDataBase64");
    return recognizedText;
  }

  // json包大小,由于需要将audioData数据进行Base64的编码,数据量会增大1/3
  int data_json_len = audioDataSize * sizeof(char) * 1.4;
  char* data_json = (char*)ps_malloc(data_json_len);
  if (!data_json) {
    Serial.println("Failed to allocate memory for data_json");
    return recognizedText;
  }
- 这里根据api调用文档的格式进行打包,需要注意的是len为原始的数据大小,不是base64编码后的数据大小。
  // Base64 encode audio data
  encode_base64(audioData, audioDataSize, audioDataBase64);

  memset(data_json, '\0', data_json_len);
  strcat(data_json, "{");
  strcat(data_json, "\"format\":\"pcm\",");
  strcat(data_json, "\"rate\":16000,");
  strcat(data_json, "\"dev_pid\":1537,");
  strcat(data_json, "\"channel\":1,");
  strcat(data_json, "\"cuid\":\"57722200\",");
  strcat(data_json, "\"token\":\"");
  strcat(data_json, access_token.c_str());
  strcat(data_json, "\",");
  sprintf(data_json + strlen(data_json), "\"len\":%d,", audioDataSize);
  strcat(data_json, "\"speech\":\"");
  strcat(data_json, (const char*)audioDataBase64);
  strcat(data_json, "\"");
  strcat(data_json, "}");
- 这里,响应数据的json文档要足够大,够响应的返回数据的大小。
// 从json中解析对应的result
DynamicJsonDocument responseDoc(2048);
deserializeJson(responseDoc, response);
recognizedText = responseDoc["result"].as<String>();
百度文心一言大模型API访问
语音识别会以文本的格式返回识别的结果,然后我们可以用这个作为百度文心一言的api的输入。文心一言api的调用代码实现如下:String baiduErnieBot_Get(String access_token, String prompt) {
String ernieResponse = "";
if (access_token == "") {
Serial.println("access_token is null");
ernieResponse = "获取access token失败";
return ernieResponse;
}
if (prompt.length() == 0) {
ernieResponse = "识别出错了";
return ernieResponse;
}
// 角色设定
prompt += "你是一个语音助手,类似朋友的角色进行回答下面的问题,并且要求最多20个字简短的回答。";
// 创建http, 添加访问url和头信息
HTTPClient http;
// 千帆大模型API
  const char* ernie_api_url = "https://aip.baidubce.com/rpc/2.0/ai_custom/v1/wenxinworkshop/chat/ernie-lite-8k?access_token=";
http.begin(ernie_api_url + String(access_token));
http.addHeader("Content-Type", "application/json");
// 创建一个 JSON 文档
DynamicJsonDocument doc(2048);
// 创建 messages 数组
JsonArray messages = doc.createNestedArray("messages");
// 创建 message 对象并添加到 messages 数组
JsonObject message = messages.createNestedObject();
message["role"] = "user";
message["content"] = prompt;
// 添加其他字段
doc["disable_search"] = false;
doc["enable_citation"] = false;
// 将 JSON 数据序列化为字符串
String requestBody;
serializeJson(doc, requestBody);
// 发送http访问请求
int httpCode = http.POST(requestBody);
// 访问结果的判断
if (httpCode == HTTP_CODE_OK) {
// 获取返回结果并解析
String response = http.getString();
Serial.println(response);
DynamicJsonDocument responseDoc(2048);
deserializeJson(responseDoc, response);
ernieResponse = responseDoc["result"].as<String>();
} else {
Serial.printf("[HTTP] POST... failed, error: %s\n", http.errorToString(httpCode).c_str());
}
// 结束http访问
http.end();
// 返回响应数据
return ernieResponse;
}
下面对上面代码重点地方进行分析说明:
- 特别注意http的访问包的url的实现,需要根据你开通的哪个接口服务填写对应的名字(我这里是ernie-lite-8k)。
// 千帆大模型API
const char* ernie_api_url = "https://aip.baidubce.com/rpc/2.0/ai_custom/v1/wenxinworkshop/chat/ernie-lite-8k?access_token=";
- 这里可以做一些角色设定的提示词。
// 角色设定
  prompt += "你是一个语音助手,类似朋友的角色进行回答下面的问题,并且要求最多20个字简短的回答。";
- 创建json文档的大小需要够大,够覆盖输入的text大小。
// 创建一个 JSON 文档
  DynamicJsonDocument doc(2048);

  // 创建 messages 数组
  JsonArray messages = doc.createNestedArray("messages");
- 同理,响应数据的json文档也要足够大,够响应的返回数据的大小。
DynamicJsonDocument responseDoc(2048);
    deserializeJson(responseDoc, response);
百度语音合成API访问
从百度文心一言api返回的文本数据,我们需要通过扬声器播放出来,因此需要将文本数据转化为音频数据输出。这里我们通过调用百度语音合成api接口,实现文本转音频的功能。主要代码实现如下:void baiduTTS_Send(String access_token, String text) {
if (access_token == "") {
Serial.println("access_token is null");
return;
}
if (text.length() == 0) {
Serial.println("text is null");
return;
}
const int per = 1;
const int spd = 5;
const int pit = 5;
const int vol = 10;
const int aue = 6;
// 进行 URL 编码
  String encodedText = urlEncode(urlEncode(text));
// URL http请求数据封装
  String url = "https://tsn.baidu.com/text2audio";

  const char* header[] = { "Content-Type", "Content-Length" };

  url += "?tok=" + access_token;
  url += "&tex=" + encodedText;
  url += "&per=" + String(per);
  url += "&spd=" + String(spd);
  url += "&pit=" + String(pit);
  url += "&vol=" + String(vol);
  url += "&aue=" + String(aue);
  url += "&cuid=esp32s3";
  url += "&lan=zh";
  url += "&ctp=1";

  // http请求创建
  HTTPClient http;

  http.begin(url);
  http.collectHeaders(header, 2);
// http请求
int httpResponseCode = http.GET();
if (httpResponseCode > 0) {
if (httpResponseCode == HTTP_CODE_OK) {
String contentType = http.header("Content-Type");
Serial.println(contentType);
if (contentType.startsWith("audio")) {
Serial.println("合成成功");
// 获取返回的音频数据流
Stream* stream = http.getStreamPtr();
uint8_t buffer[512];
size_t bytesRead = 0;
// 设置timeout为200ms 避免最后出现杂音
stream->setTimeout(200);
while (http.connected() && (bytesRead = stream->readBytes(buffer, sizeof(buffer))) > 0) {
  // 音频输出
  playAudio(buffer, bytesRead);
  delay(1);
}
// 清空I2S DMA缓冲区
clearAudio();
} else if (contentType.equals("application/json")) {
Serial.println("合成出现错误");
} else {
Serial.println("未知的Content-Type");
}
} else {
Serial.println("Failed to receive audio file");
}
} else {
Serial.print("Error code: ");
Serial.println(httpResponseCode);
}
http.end();
}
// Play audio data using MAX98357A
void playAudio(uint8_t* audioData, size_t audioDataSize) {
if (audioDataSize > 0) {
// 发送
size_t bytes_written = 0;
i2s_write(I2S_OUT_PORT, (int16_t*)audioData, audioDataSize, &bytes_written, portMAX_DELAY);
}
}
void clearAudio(void) {
  // 清空I2S DMA缓冲区
  i2s_zero_dma_buffer(I2S_OUT_PORT);
  Serial.print("clearAudio");
}
下面对上面代码重点地方进行分析说明:
- 这里是进行两次的url编码,参考的官网api调用文档说明的推荐方式。
// 进行 URL 编码
String encodedText = urlEncode(urlEncode(text));
- http的请求包封装,根据api调用格式进行参数设置
// URL http请求数据封装
String url = "https://tsn.baidu.com/text2audio";
const char* header[] = { "Content-Type", "Content-Length" };
url += "?tok=" + access_token;
url += "&tex=" + encodedText;
url += "&per=" + String(per);
url += "&spd=" + String(spd);
url += "&pit=" + String(pit);
url += "&vol=" + String(vol);
url += "&aue=" + String(aue);
url += "&cuid=esp32s3";
url += "&lan=zh";
url += "&ctp=1";
// http请求创建
HTTPClient http;
http.begin(url);
http.collectHeaders(header, 2);
- 这里是对http api请求的最大超时时间的设置,系统库默认为1s,但是在喇叭播报的最后会出现颤音现象,因此需要在这里将超时时间减小。
// 设置timeout为200ms 避免最后出现杂音
stream->setTimeout(200);
- 这里是获取http音频流数据,在while中需要加入delay的处理,不然这里会占用系统,其他的task运行不了,比如音频录制、唤醒任务都不能运行,导致在音频输出时唤醒不了,因此这里我们做一个释放cpu的处理。
while (http.connected() && (bytesRead = stream->readBytes(buffer, sizeof(buffer))) > 0) {
// 音频输出
playAudio(buffer, bytesRead);
delay(1);
}
- 这个是清除i2s dma的缓冲区数据,消除杂音的作用。
void clearAudio(void) {
// 清空I2S DMA缓冲区
i2s_zero_dma_buffer(I2S_OUT_PORT);
Serial.print("clearAudio");
}
训练自己的唤醒词(进阶)
音频录制
硬件准备
需要准备以下硬件:- ESP32-S3-N16R8开发板
- microSD卡(不大于32GB)
- microSD读卡器
- microSD SPI接口模块
首先将硬件连接起来,ESP32-S3-N16R8开发板与micro SD SPI接口模块连接起来,连接方式参考**3.2.2 microSD SPI接口模块连接**。
microSD卡格式化
1. 将microSD卡装进读卡器中,并连接至电脑,将microSD卡** 格式化为FAT32格式**。如下图: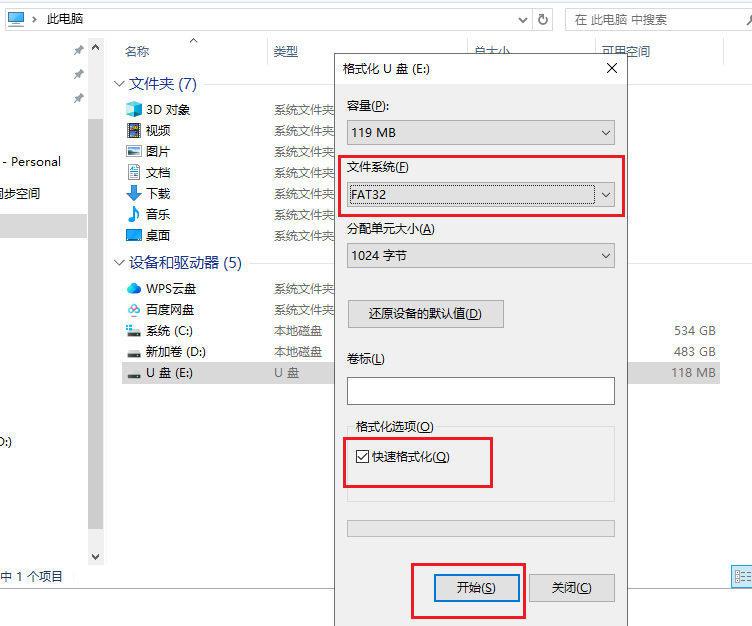
- 格式化完成后,将microSD卡装到microSD SPI接口模块的卡槽中去。如下图:
开始录制音频数据
我们通过烧写录制音频软件到ESP32-S3中进行录制音频数据,录制的音频数据会保存到microSD卡中,然后我们可以通过电脑去读取出来。烧写录制音频软件到ESP32-S3
音频录制软件工程在** esp32s3-ai-chat/example/capture_audio_data** 下。打开工程文件,在工程编译前,我们使用到了psram,因此需要** 打开psram启动开关**,如下图所示,设置好后编译并且烧录到ESP32-S3中去。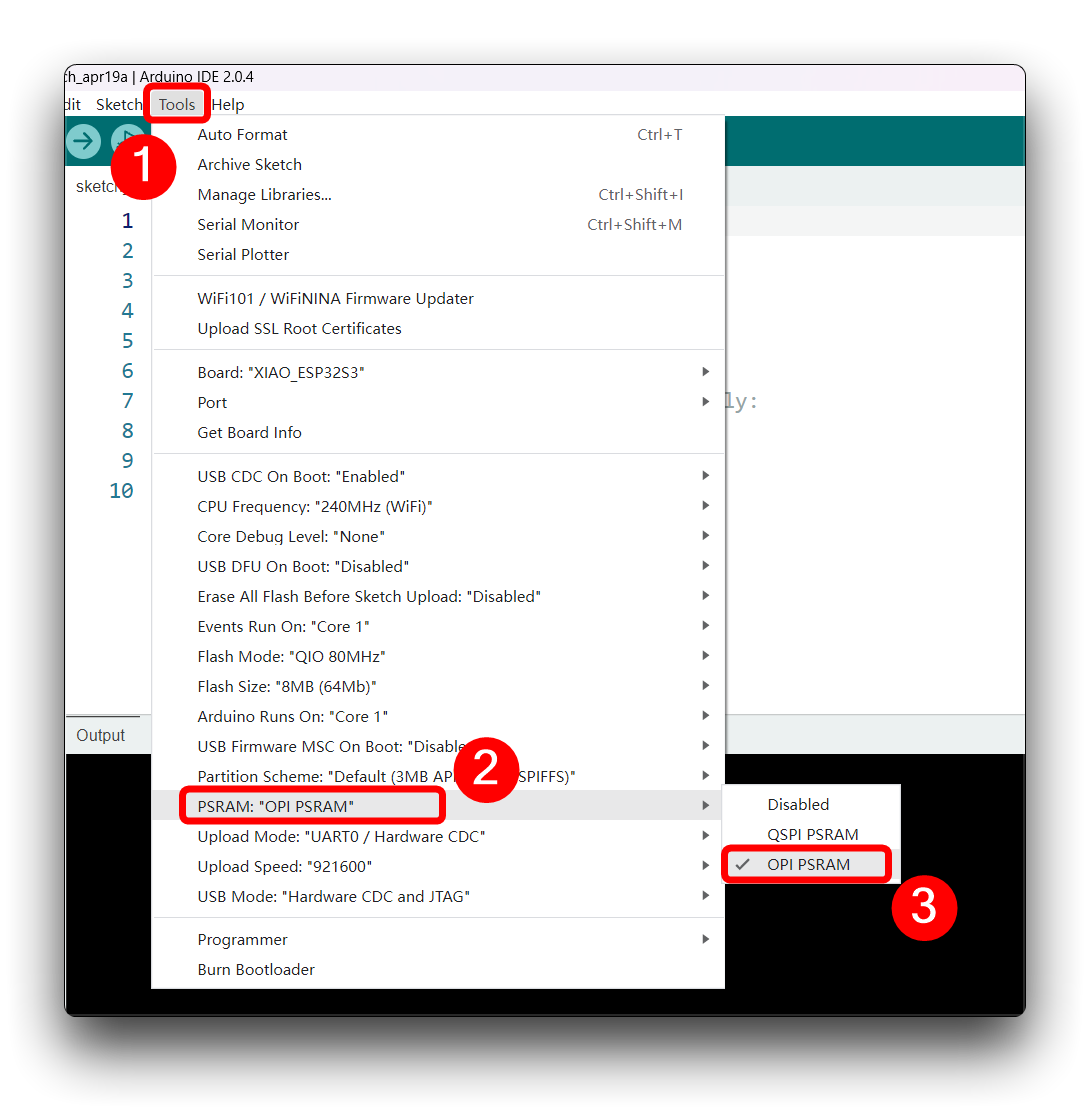
串口发送标签进行录制音频
1. 程序运行之后,正常运行的串口日志如下图。如果出现提示SD卡打开失败等问题,则一般为硬件连线错误,或者是microSD SPI接口模块接的VCC电压不稳定** (可以直接接上5V)****。**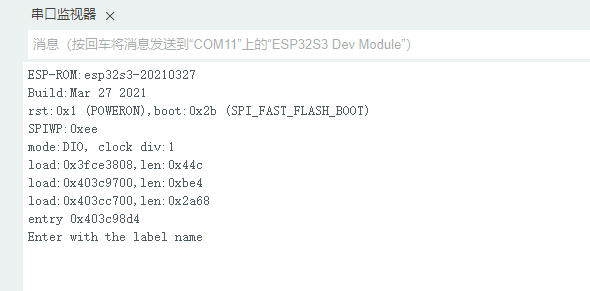
- 程序运行正常后,我们就可以开始打开串口助手工具,发送相应的控制指令进行音频录制。发送“hgx”标签。
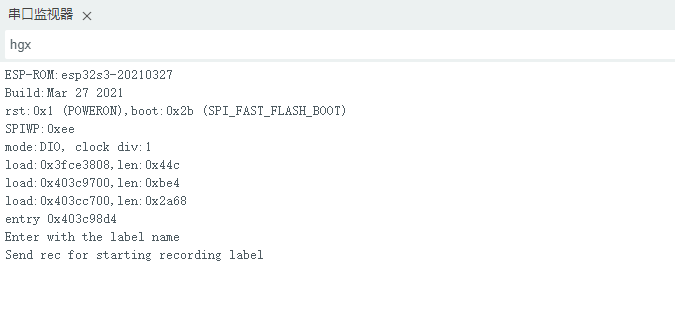
- 发送“rec”录制指令,开始录制一次。
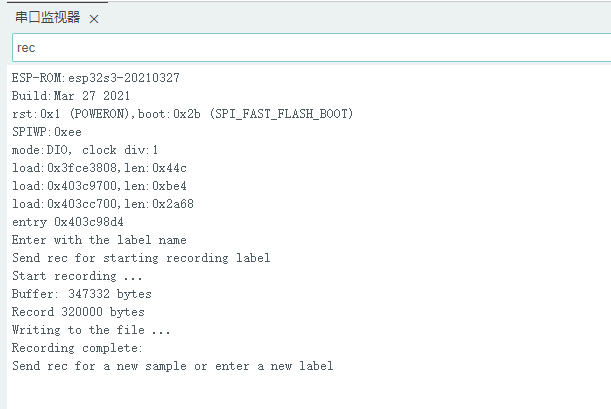
- 发送**标签(例如:hgx)后,程序将等待另一个命令rec,每次发送命令rec**时,程序就会开始记录新的样本(持续录制10秒钟后自动结束),文件将保存为hgx.1.wav、hgx.2.wav、hgx.3.wav等。
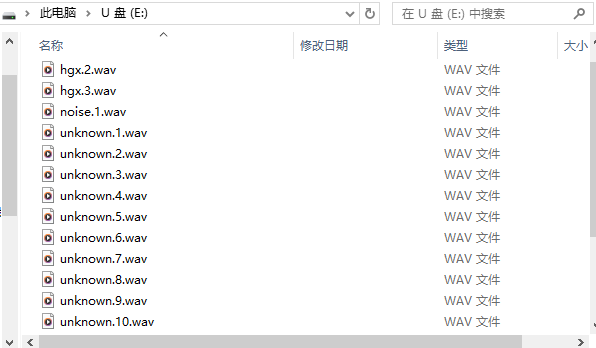
- 直到发送一个新标签(例如:noise),在这种情况下,程序开始记录一个新标签样本,当你同样为每个新标签样本发送命令rec时,它将开始录音并被保存为noise.1.wav、noise.2.wav、noise.3.wav等。
- 最终,我们将得到保存在SD卡上的所有录制的标签样本文件,可以在电脑上通过读卡器读取到SD卡上的所有音频数据。如下图所示:
各标签样本的音频录制方法
至少录制** 3个标签**的样本数据,唤醒词标签样本、噪音标签样本、未知标签样本,每个标签样本数据各自** 最少录制10组**,数据越多,训练后的模型识别能力越好。- 唤醒词标签样本:在录制的10秒钟内,对着麦克风不断重复的说出唤醒词,可以每次说出的语速、音调不同等,样本越丰富,识别的泛化能力越强。
- 噪音标签样本:直接录制环境声音,可以不对着麦克风讲话。
- 未知标签样本:在录制的10秒钟内,可以对着麦克风说一些其他的非唤醒词的话。
训练录制的音频数据
Edge Impulse上创建工程
登录Edge Impulse,[https://edgeimpulse.com/](https://edgeimpulse.com/),注册账号,并创建工程。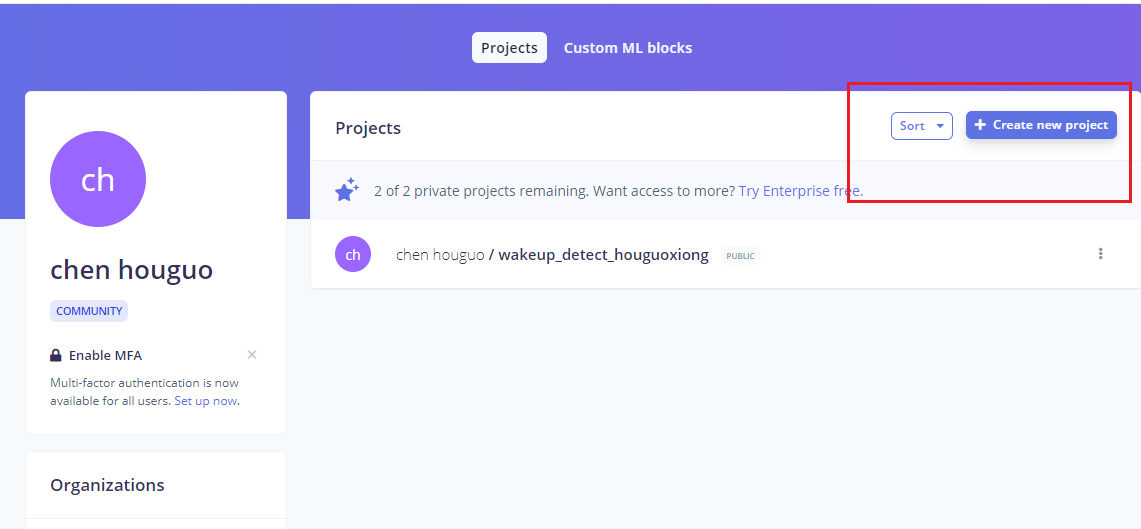
上传录制的音频数据
创建项目后,在Data Acquisition部分选择Upload Existing Data工具。选择要上传的文件。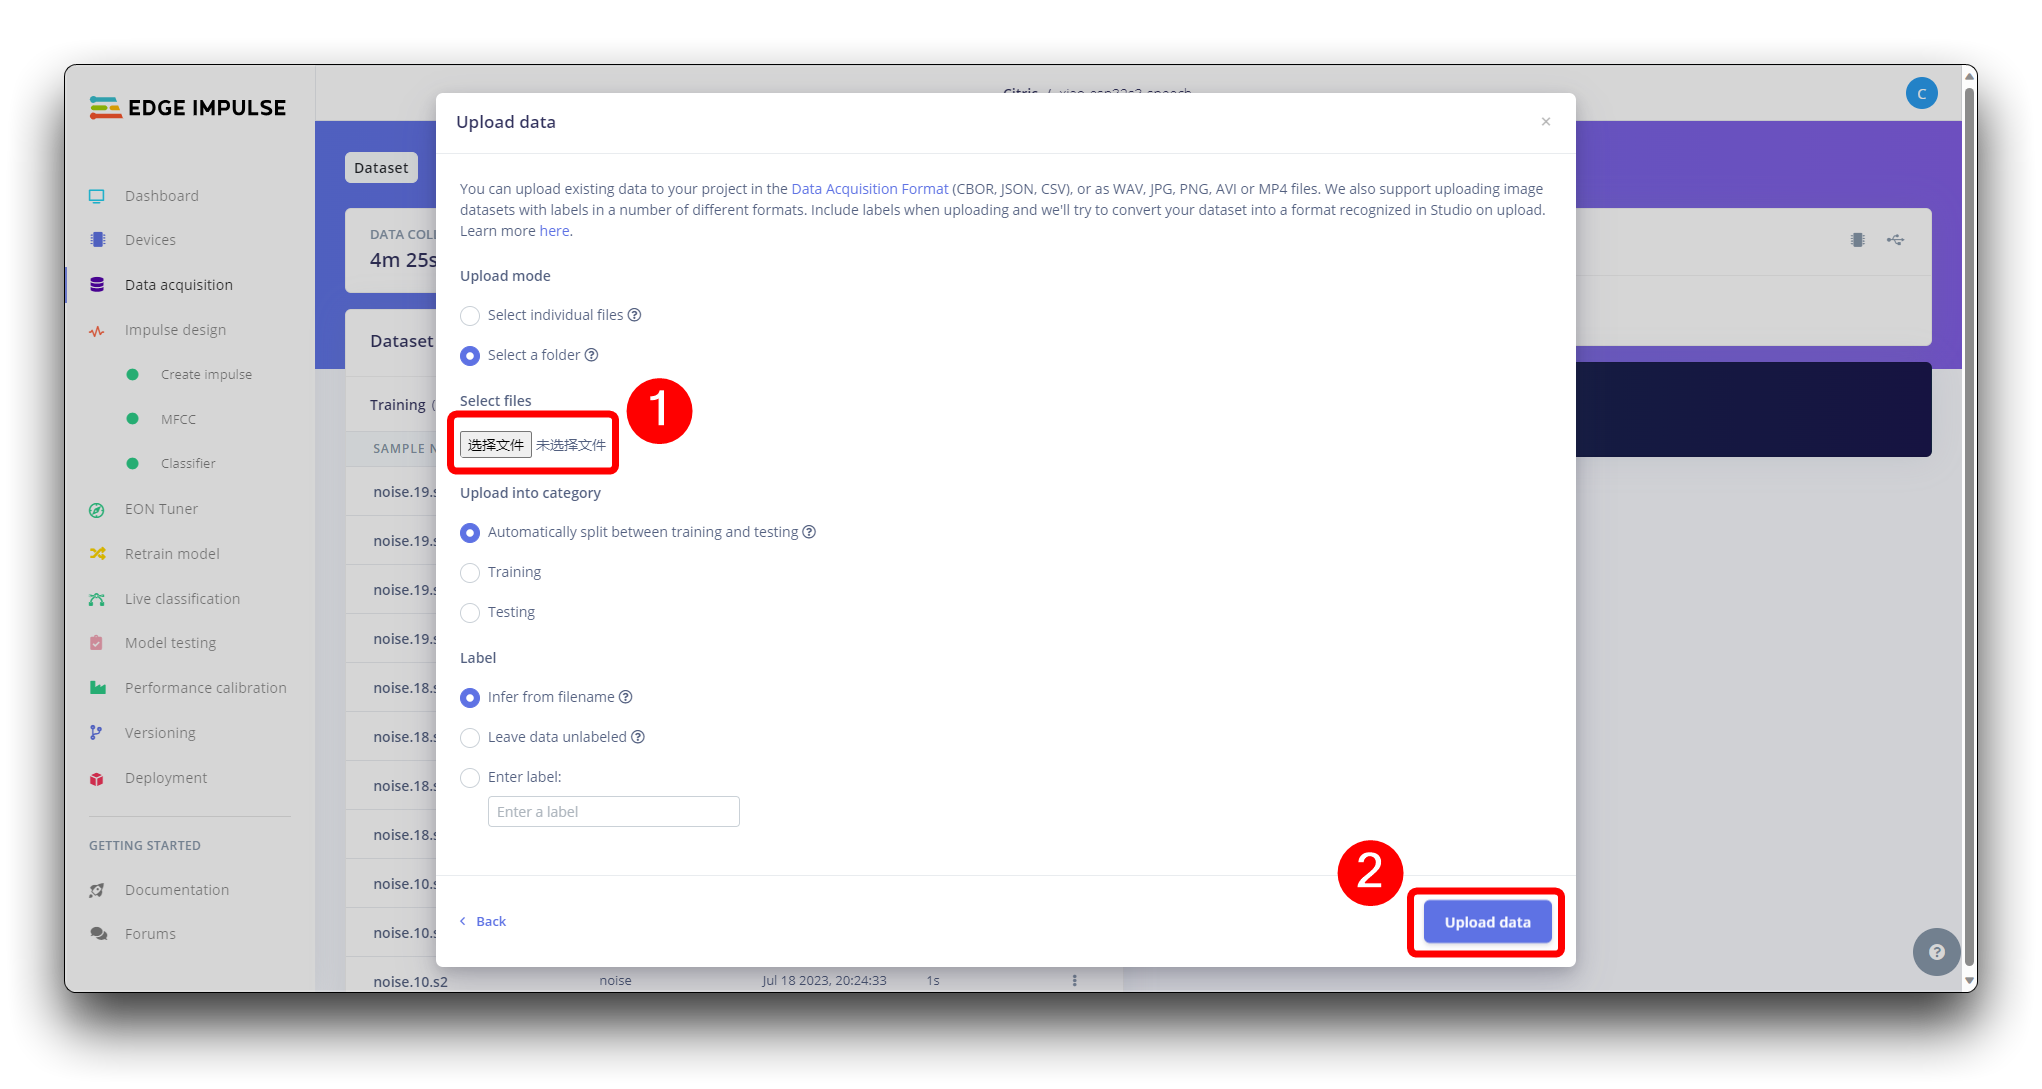
数据上传完成后,系统会自动将它们分为Training、Test集(按照80% 20%的比例)。
分割数据集
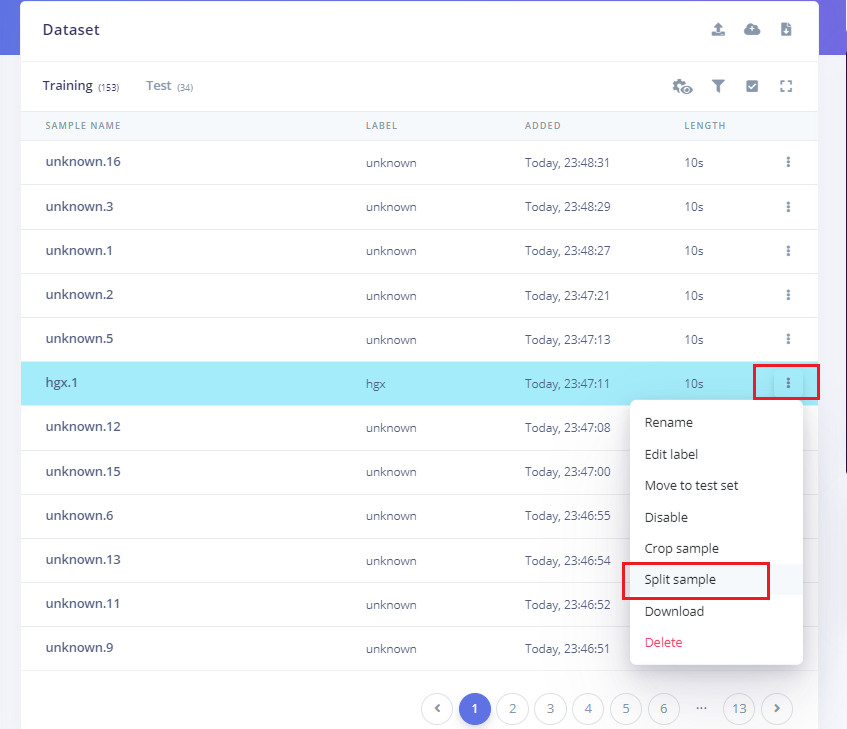
系统进行训练的数据集要求所有数据长度都是1秒,但上一节中上传的记录样本长度为10秒,必须将其拆分为1秒的样本才能兼容,因此需要对每个样本数据进行分割的操作。如下图所示:- 点击样本名称后的三个点,并选择Split sample。
- 一旦进入该工具,将数据拆分为1秒的样本数据记录。每个矩形框就是拆分提取的一个子模块,如有必要,可以调整矩形的位置,让其完全覆盖住我们的唤醒词音频区,或者也可以做一些添加或删除片段的操作。
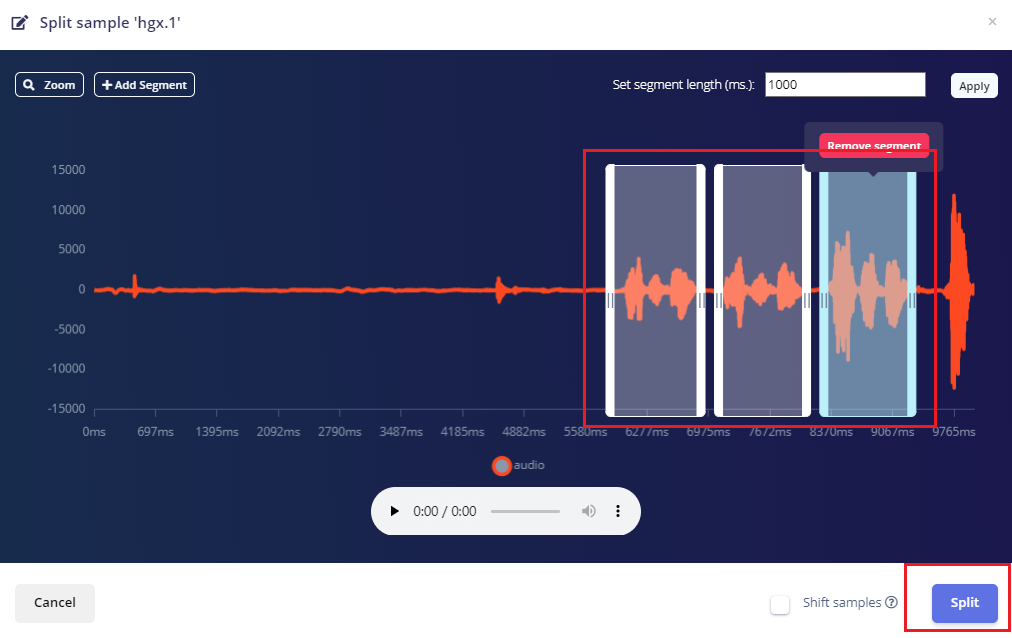
- 裁剪后的音频数据如下:
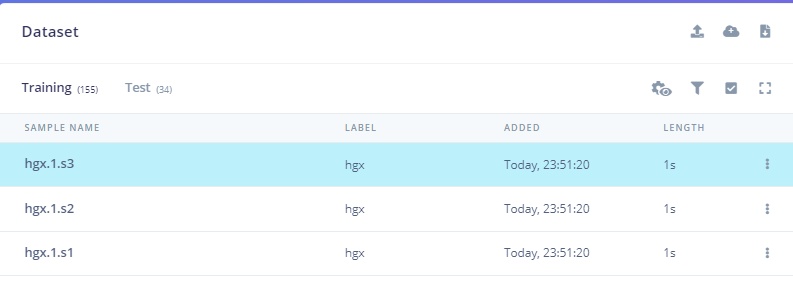
- 所有样本数据都应重复此操作,直到所有样本数据**(Training、Test)**都为1s长度的音频数据。
创造脉冲信号(预处理/模型定义)
创建脉冲信号,进行数据预处理和模型的选择,如下图所示: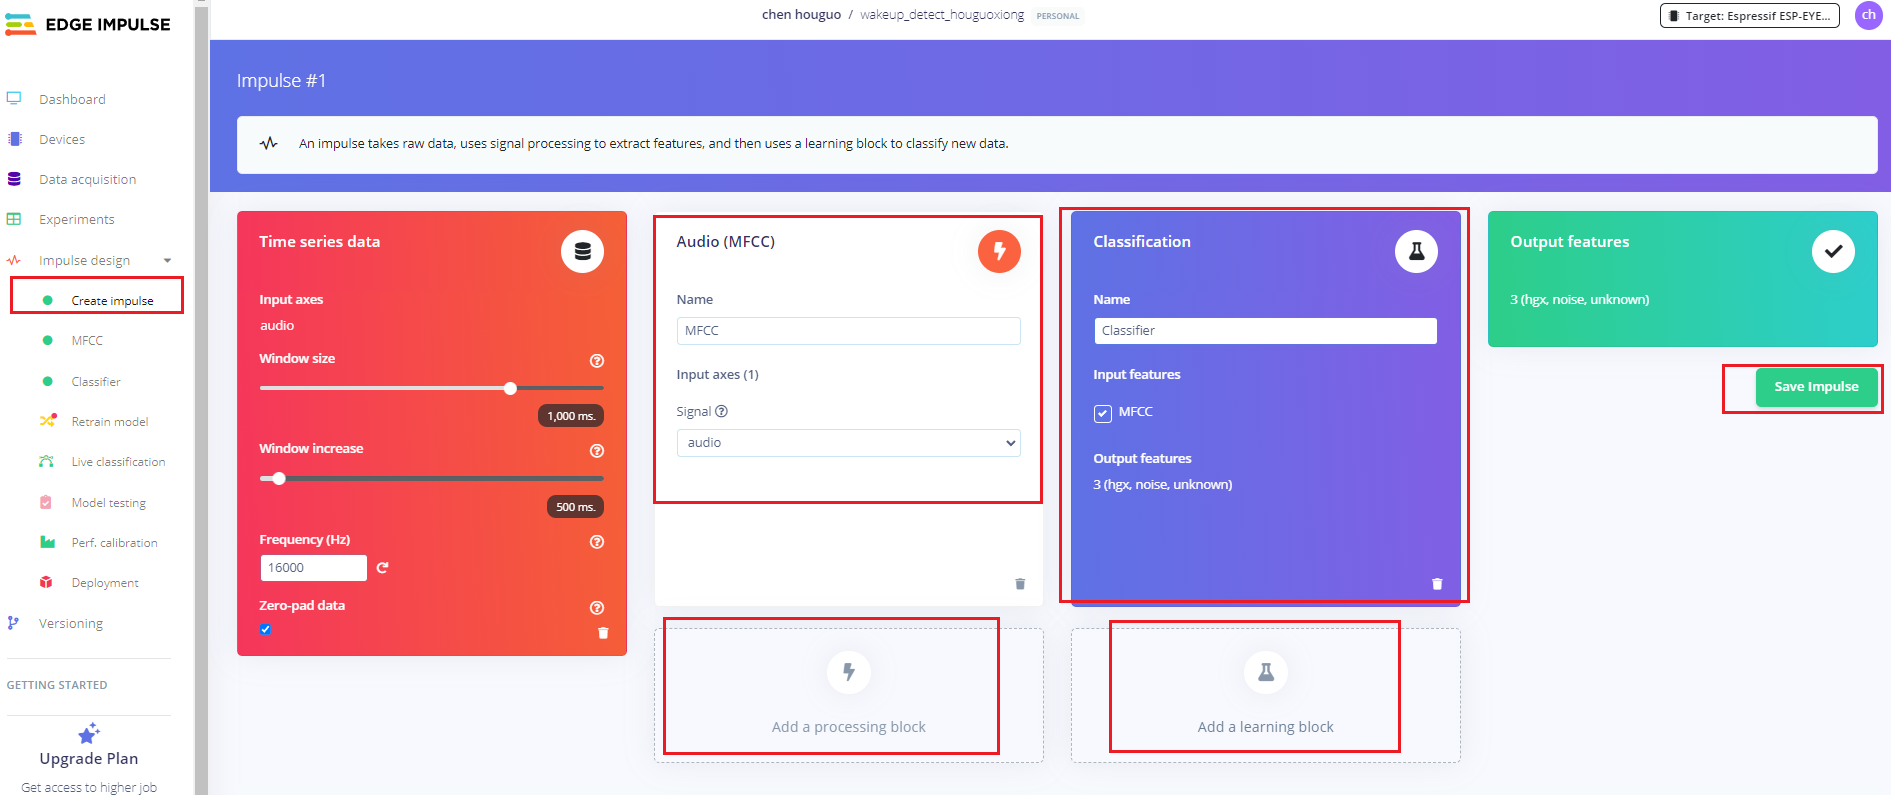
操作步骤如下:
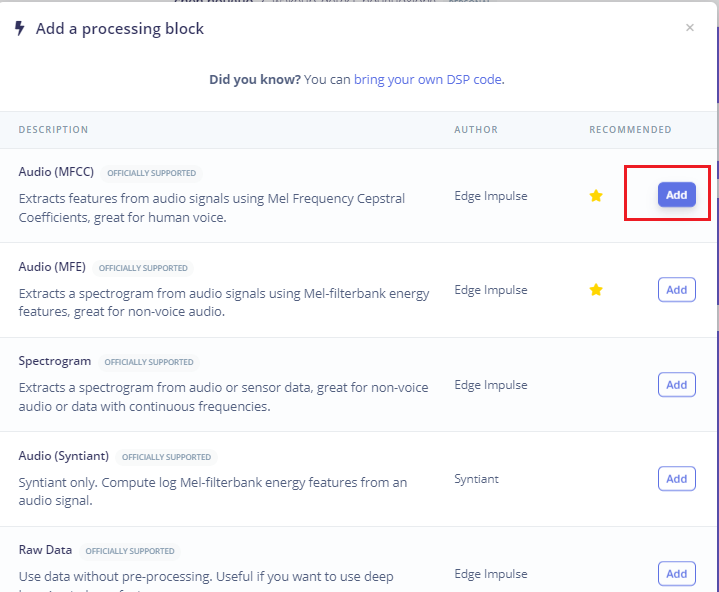
- 点击左侧Create impulse,然后点击Add a processing block添加Audio(MFCC),使用MFCC,它使用梅尔频率倒谱系数从音频信号中提取特征,这对人类声音非常有用。
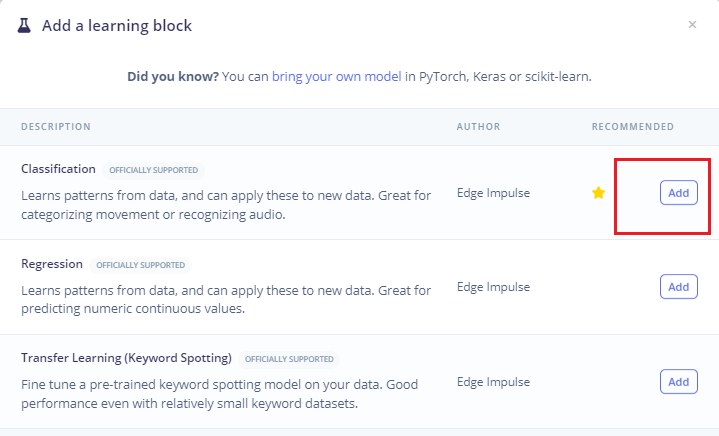
- 然后点击Add a learning block添加Classification模块,它通过使用卷积神经网络进行图像分类从头开始构建我们的模型。
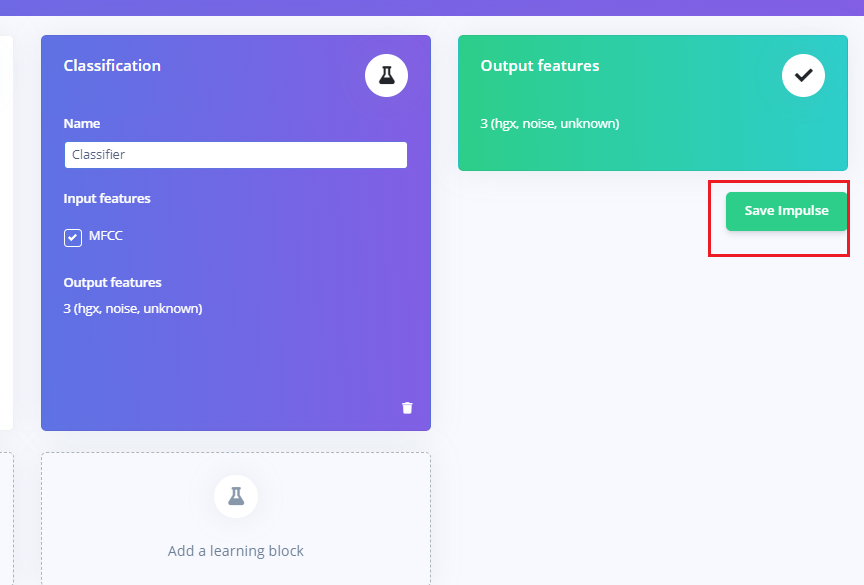
- 最后点击save impulse,保存配置。
预处理(MFCC)
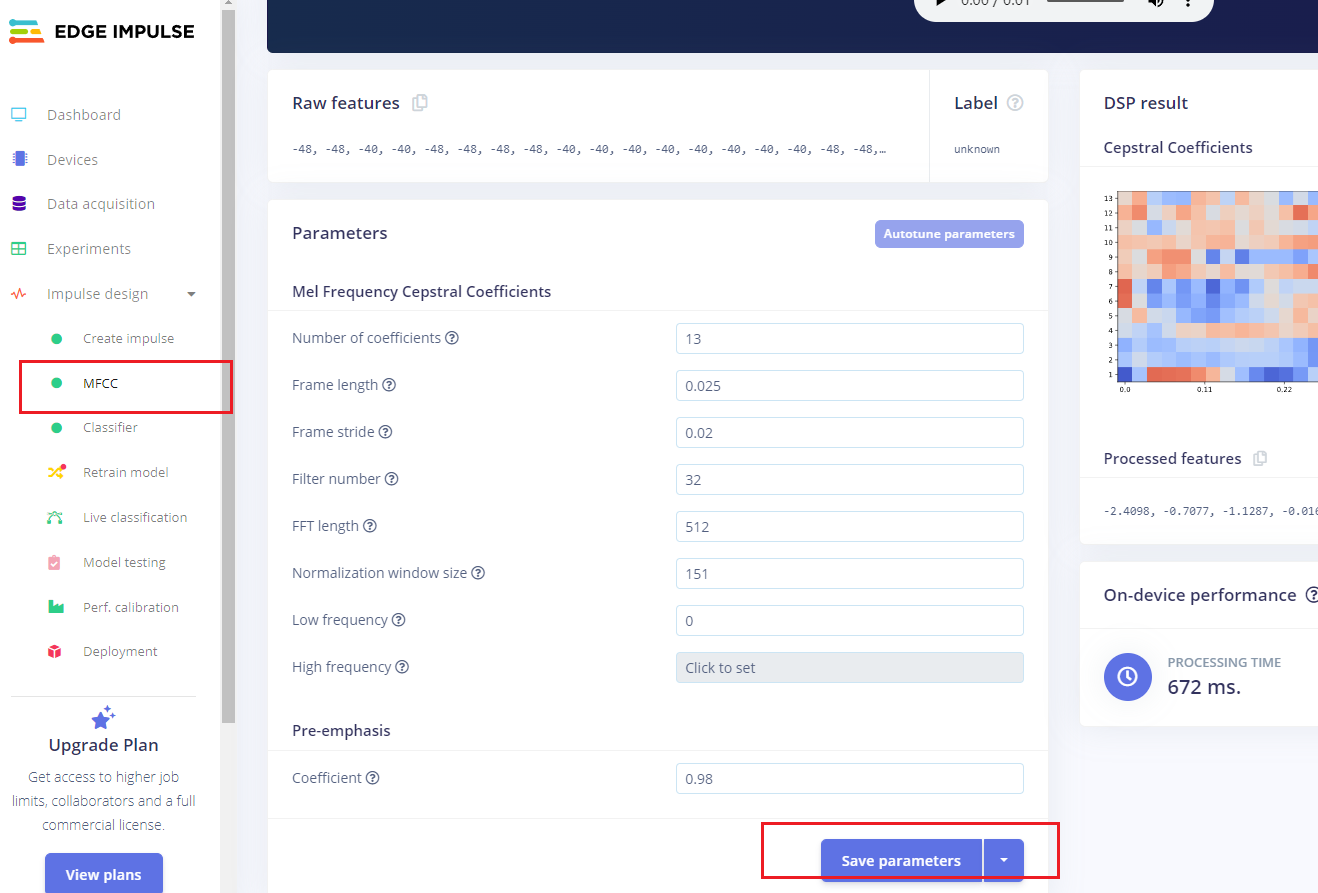
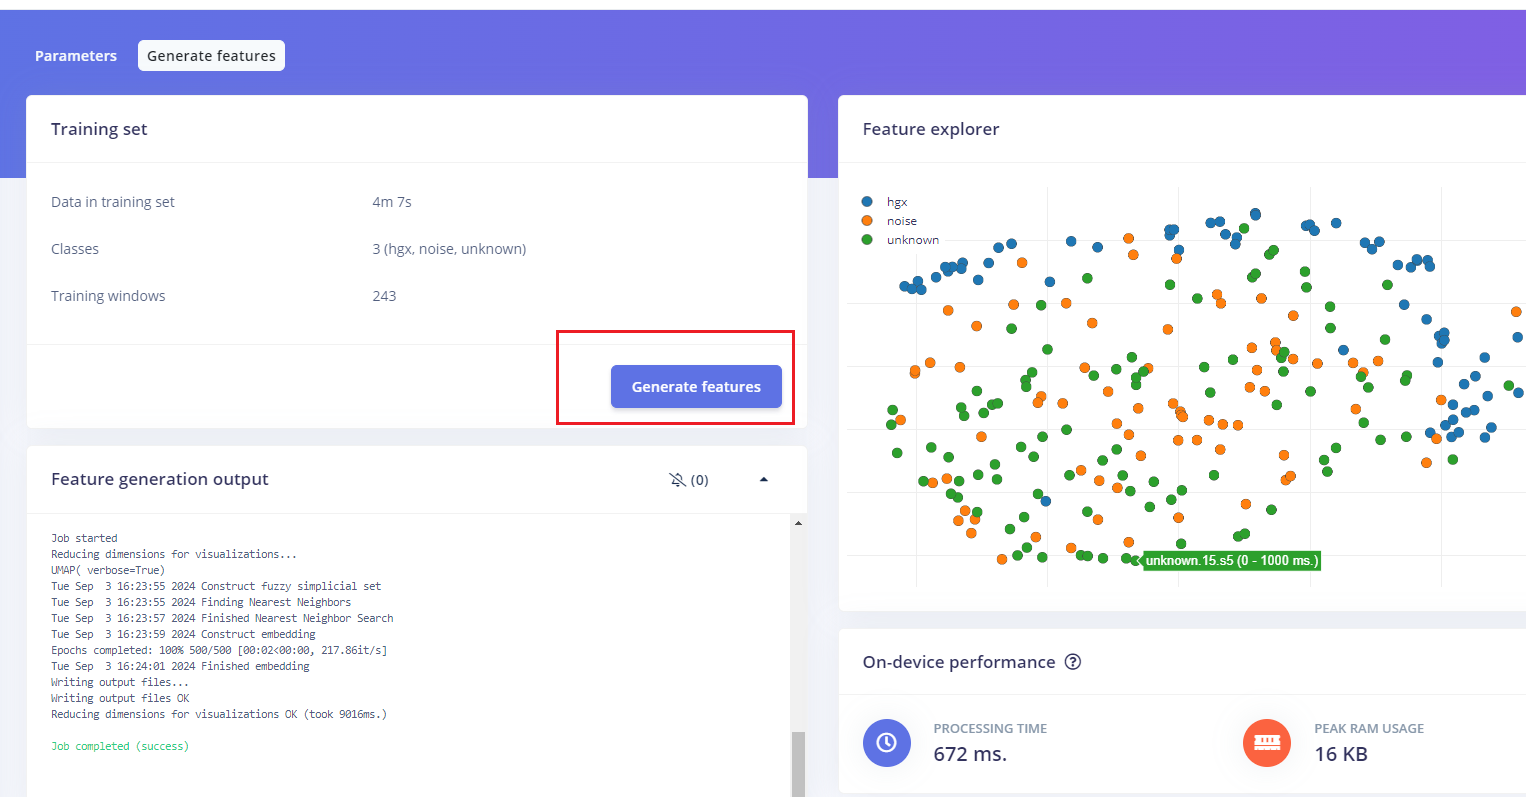
下一步是创建下一阶段要训练的图像。- 点击MFCC,我们可以保留默认参数值,直接点击Save parameters。
- 点击Generate features,生成3个标签数据的特征。
模型设计与训练(Classifier)
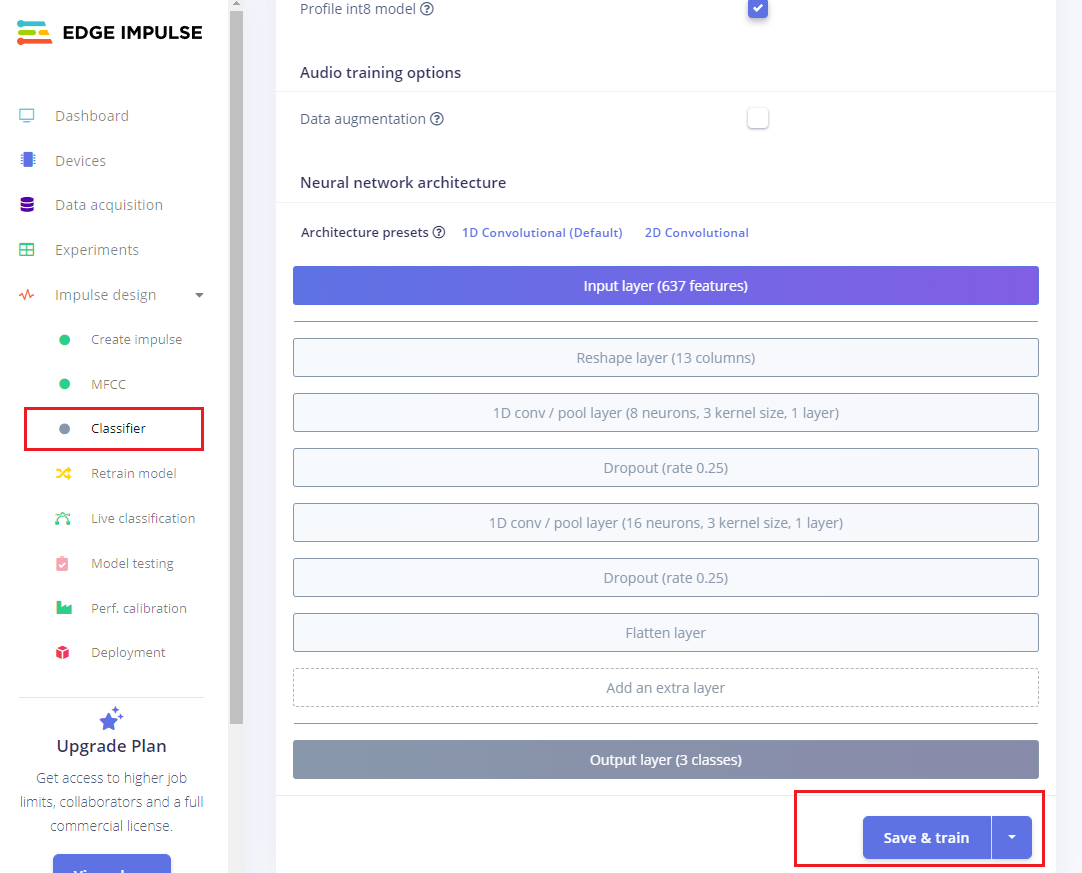
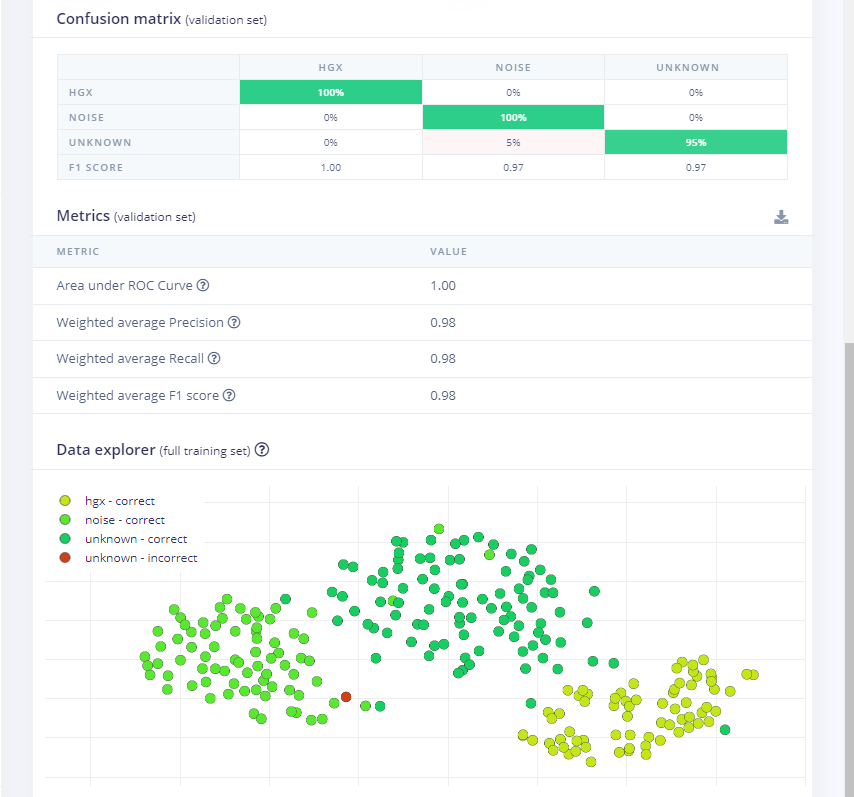
接着,我们需要对模型的结构进行设计和开始训练,步骤如下:- 点击左侧 Classifier,整个模型的结构设计已经配置好,然后点击 save&train,开始训练模型。
- 训练完成后,会出现如上图所示的分类结果。
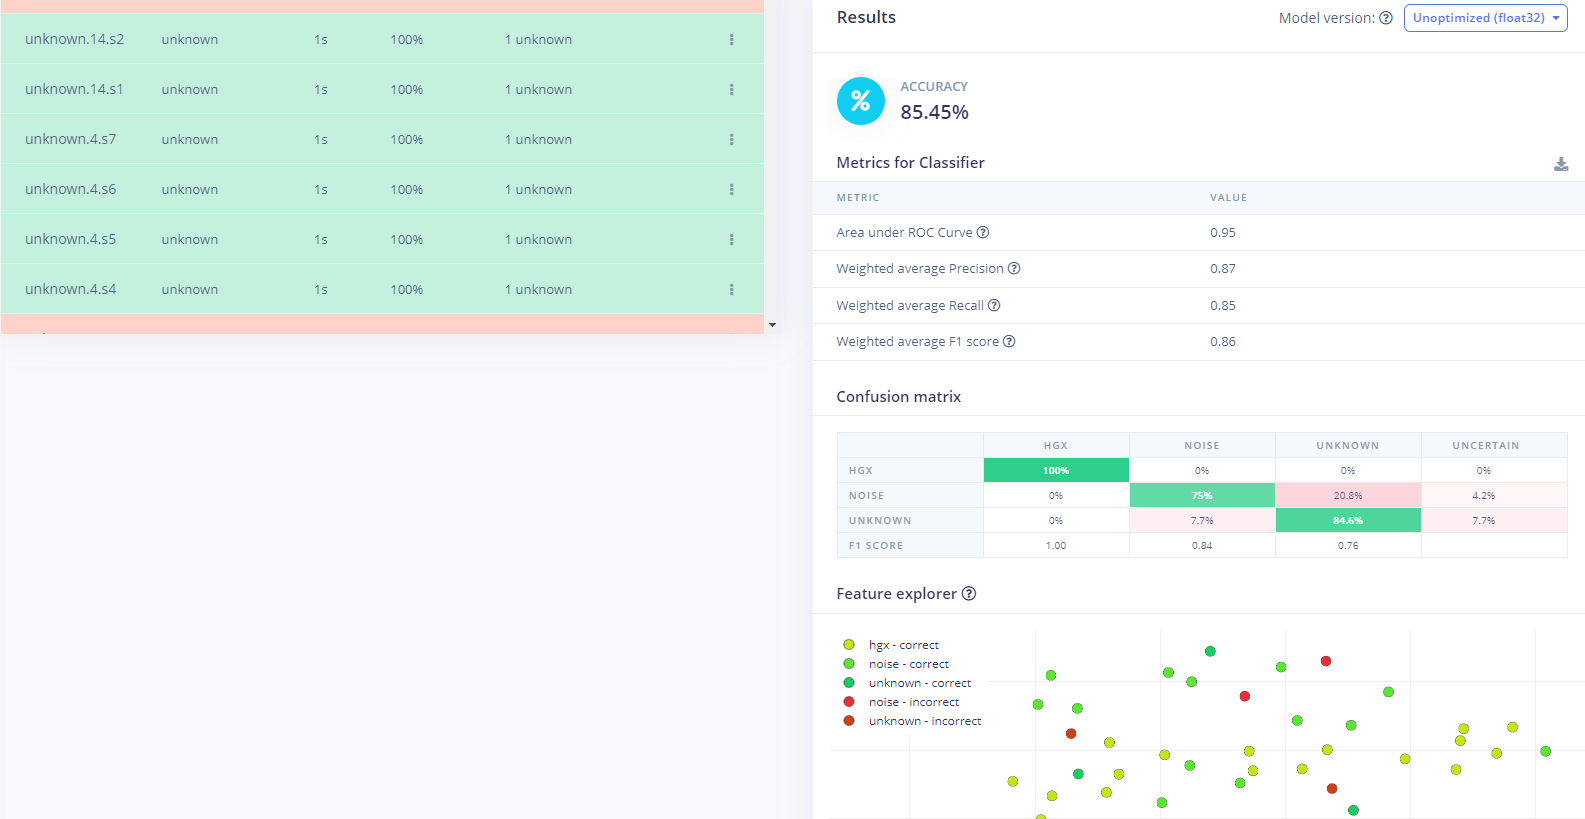
模型测试
在模型训练好后,我们可以用测试集数据测试一下训练好的模型的准确率。- 点击左侧的Model testing,然后点击Classify all,开始分类所有的测试集数据。
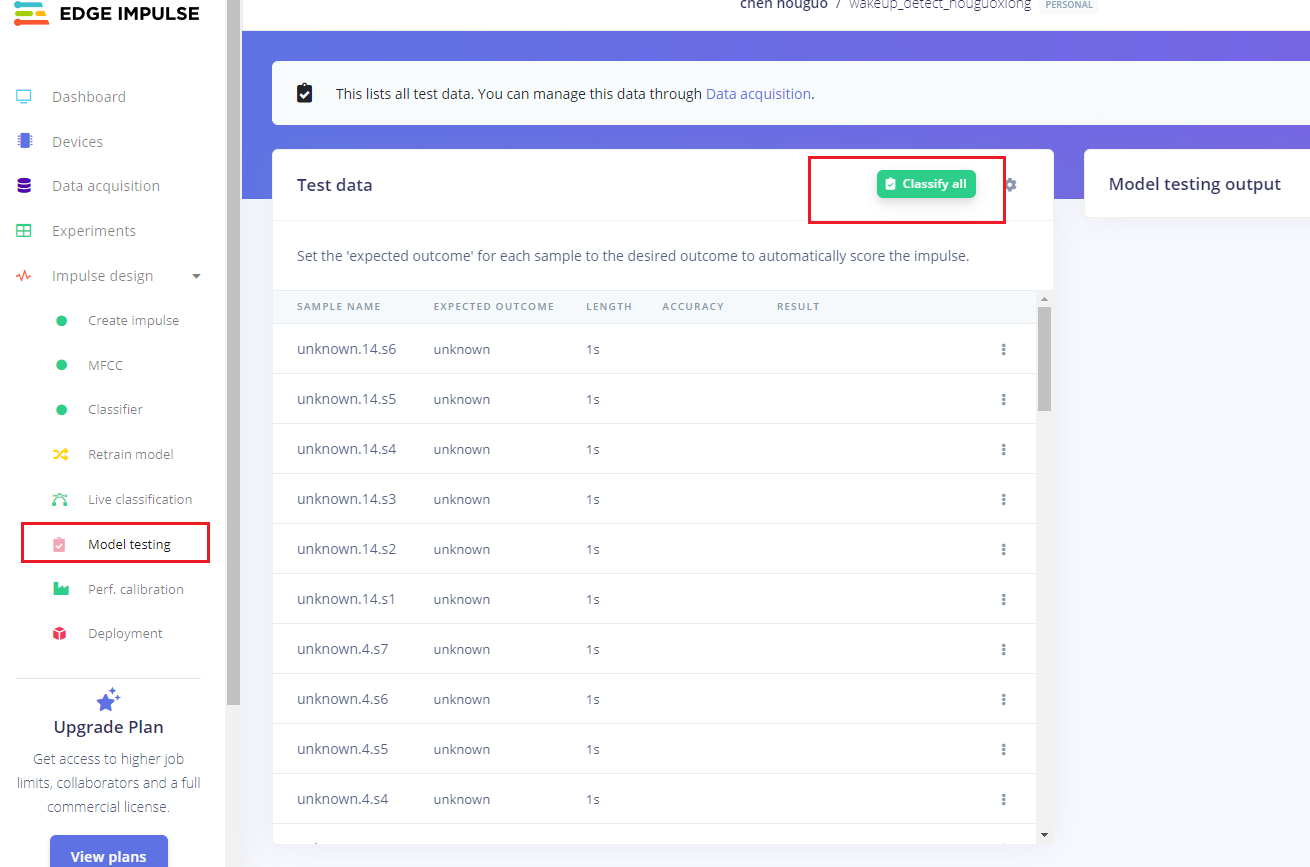
- 等待一会,所有的测试集数据分类结果将会计算出来,如上图。根据这个结果可以基本判断我们训练的唤醒词模型的识别准确率是否满足要求。
部署模型到ESP32-S3
生成模型库文件
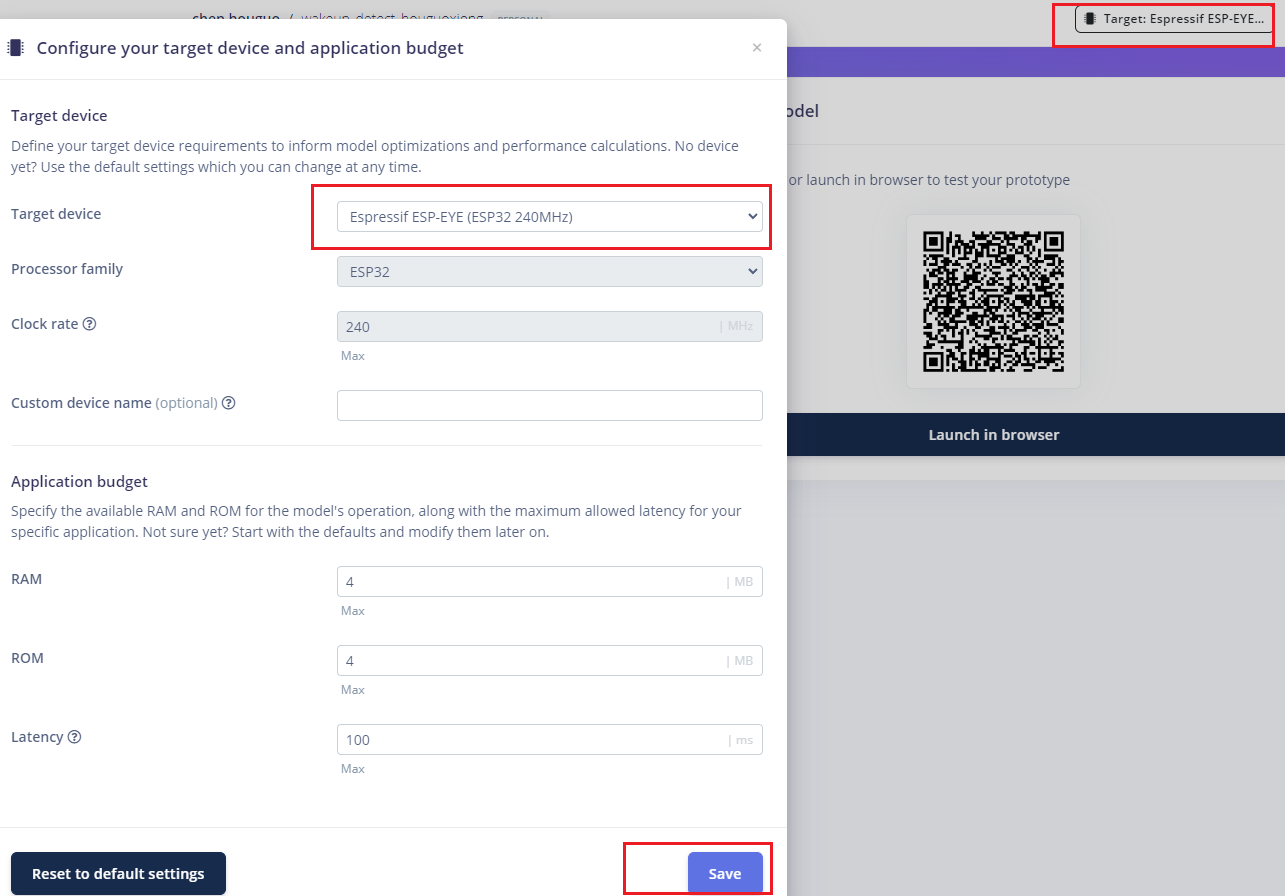
模型训练完成后,我们需要生成在arduino esp32平台上运行的库文件。- 在生成库文件之前,我们先设置一下我们的硬件平台,点击右侧的 Target,选择Target device为ESP-EYE,然后点击 Save。
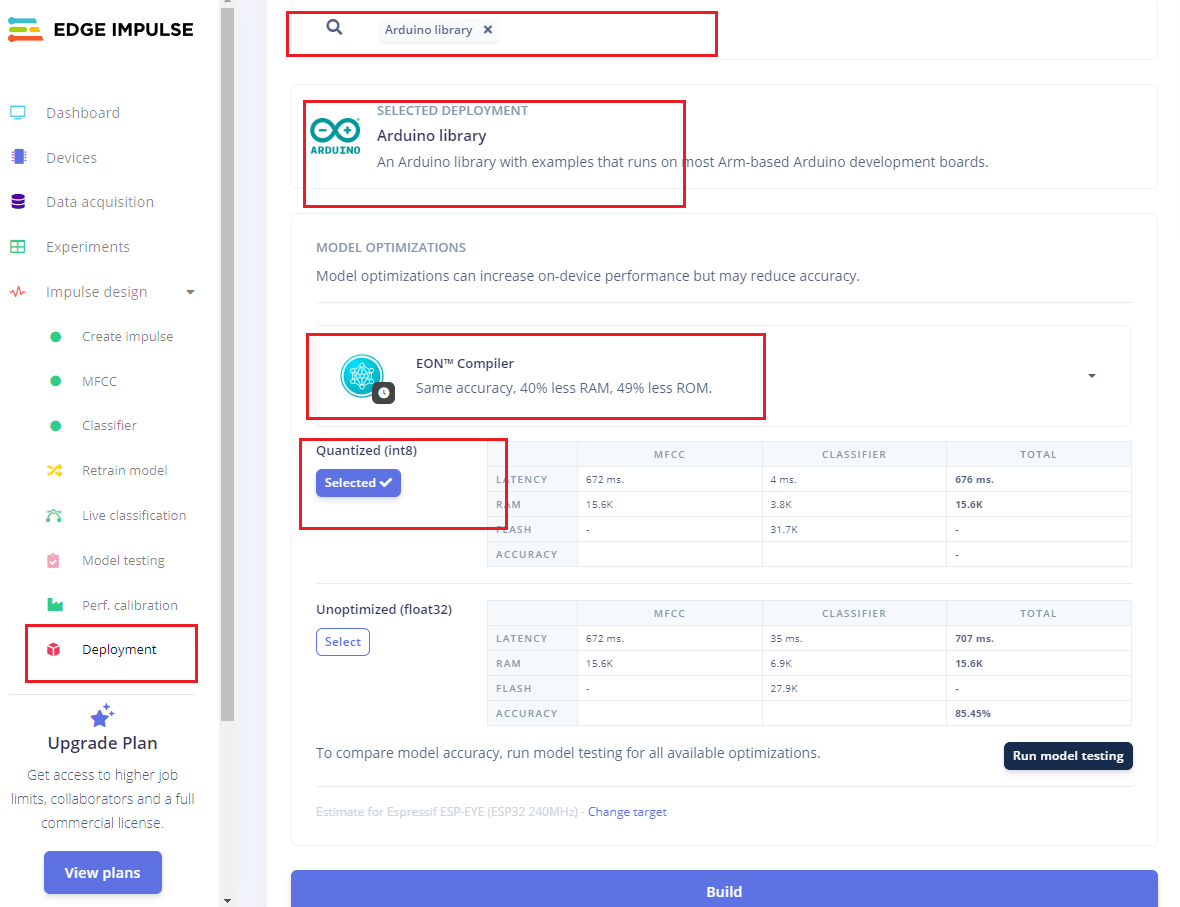
- 点击左侧的 Deployment部署,依次按照上图的选项配置,点击 Build,开始生成库文件。
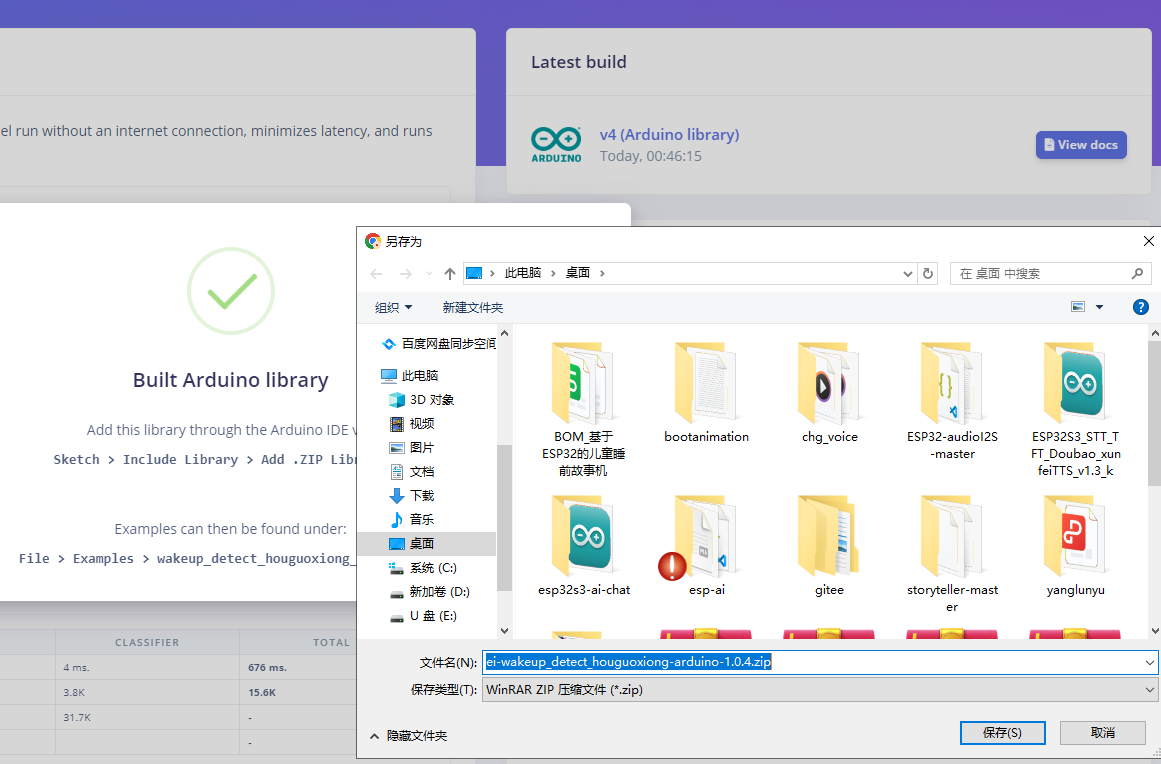
- 生成完成后,我们将库文件.zip保存到我们的工程目录下。
ESP32-S3唤醒词测试
训练好唤醒词库文件后,我们需要在ESP32-S3上测试一下唤醒词功能。打开工程目录下的**esp32s3-ai-chat/example/wake_detect**工程,进行唤醒功能测试。
- 选择项目,导入库,添加.ZIP库文件,选择我们训练好的唤醒词库文件。
- 导入成功后,我们需要引用该库文件,因此再次点击项目,导入库,点击选择刚才导入的库文件。
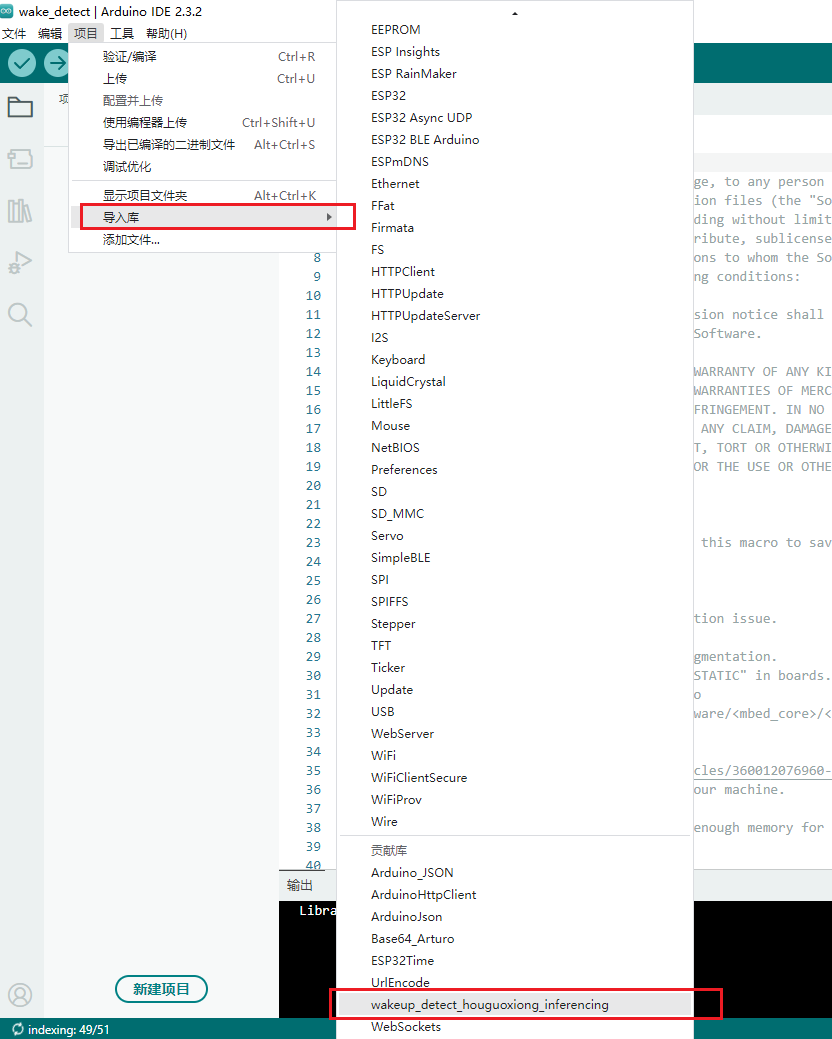
- 导入后,头文件会被引用进去,这样我们自己训练的唤醒词模型就引用成功了。
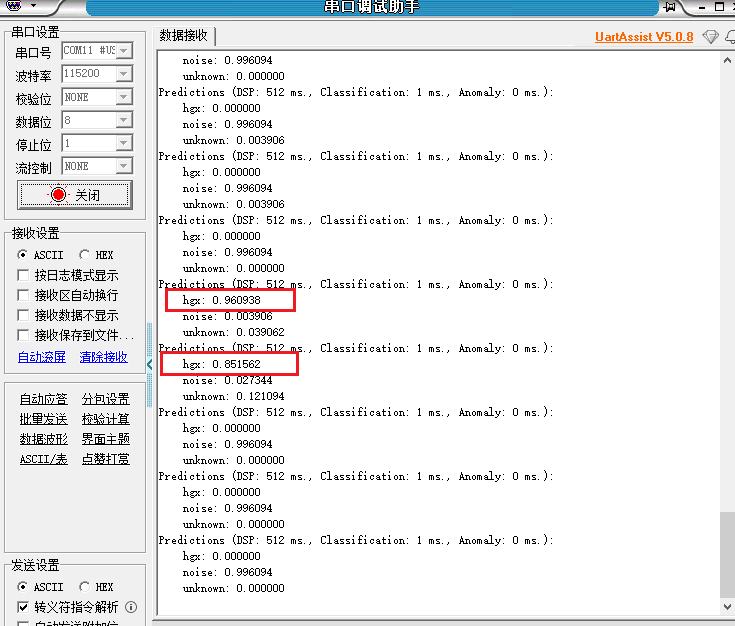
- 编译工程,烧录程序到ESP32-S3开发板中,程序运行后会实时的进行唤醒词监控,并且给出之前训练的3个标签的分类预测值,标签的预测值越接近1.0,则表示当前识别的可信结果为这个标签。
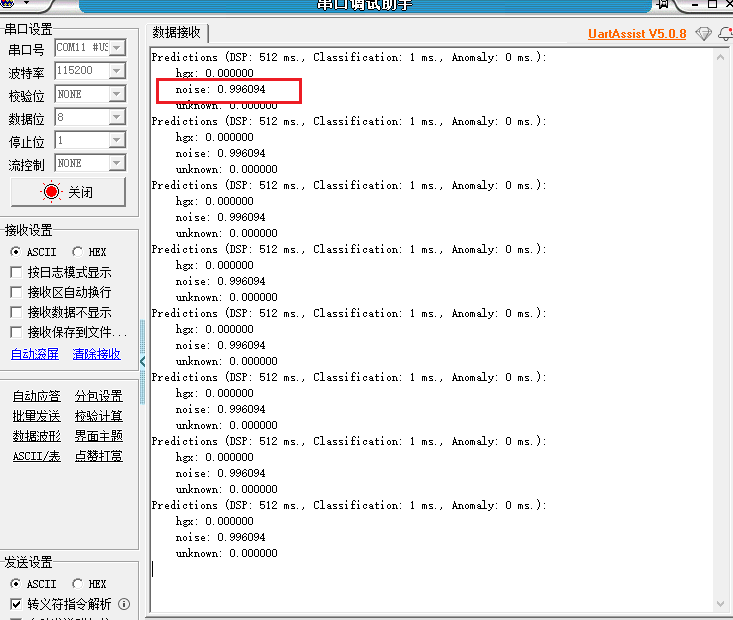
- 当我说出“houguoxiong”时,“hgx”这个标签的预测值直接快接近1.0了,证明我们的唤醒成功。
唤醒词模型的替换
当在arduino工程中需要替换新训练的唤醒词模型时,我们可以删除掉之前导入的模型库文件,然后删掉工程中之前引用的头文件,最后重新按照之前**7.3.2章节**导入模型库并引用的方式操作一遍即可。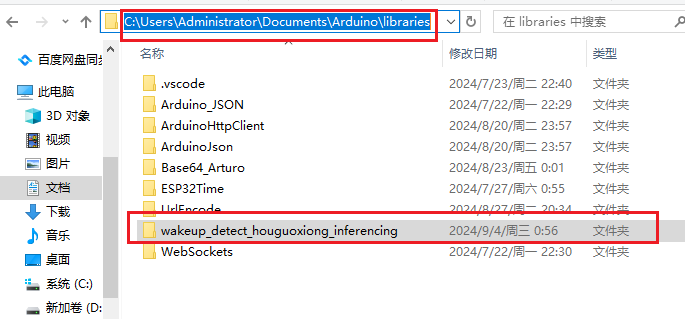
删除库文件在该目录下直接删除导入的库文件夹,然后关闭arduino软件,重新打开arduino工程就可以。


 6845
6845

 被折叠的 条评论
为什么被折叠?
被折叠的 条评论
为什么被折叠?
 到【灌水乐园】发言


