


 本文介绍一种基于鼠标控制的3D场景Camera旋转方法,通过将鼠标移动映射到三维球面上,计算旋转轴和角度,实现Camera的自由旋转。提供具体的实现代码。
【本人初学,一点感悟,如有不当,请不吝指教】
很多人想达到3D场景中,基于鼠标控制的Camera任意角度旋转,其实不难,分为其下两步:
一、 基于鼠标移动过程的建模
这一步,在于你是如何理解mouse在一个二维平面从previousposition到currentpositon所表示的意图,网络上有一种很通用的方法“virtual trackball”。本人目前也是采用的这种方法,故而在这里简单介绍一下:
1. 直观感觉(Daniel Lehenbauer 主页)
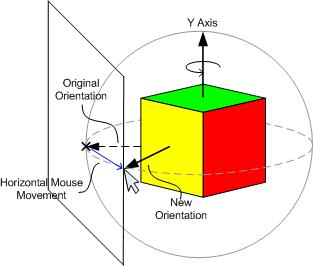
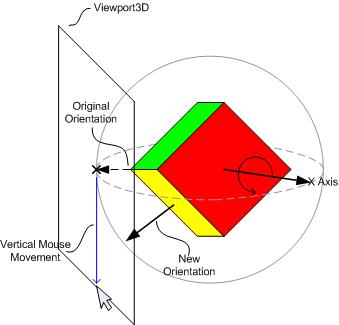
Figure 1 Moving with mouse
2. 理解
把整个空间的场景先归一化到一个单位立方体,视野里的平面即为一个中心切面,鼠标在平面(2维空间)的坐标可以映射到一个三维球面上(注意:这里是映射到3维球面上,如果你有更好的模型,完全可以映射到更好的三维空间中),这样就理解成球面上的移动,进而产生旋转的效果。
这是2维平面点映射到3维球面点的方法:
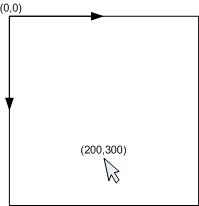
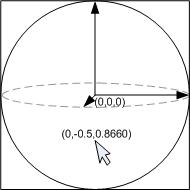
private Vector3D TransTo3DPoint(Double width, Double height, Point point)
{
Double x = point.X / (width / 2); // Scale so bounds map to [0,0] - [2,2]
Double y = point.Y / (height / 2);
x = x - 1; // Translate 0,0 to the center
y = 1 - y; //Flip so y is up instead of down
Double ztemp = 1 - x * x - y * y; // z^2 + x^2 - y^2 = 1
Double z = ztemp > 0 ? Math.Sqrt(ztemp) : 0;
return new Vector3D(x, y, z);
}
3. 根据模型球面上初始点和当前点,得到旋转轴和旋转角度,调用旋转Camera的方法,即可实现空间中的所有场景的自由旋转。
private void Rotate(Point currentPosition)
{
// Call the TransTo3DPoint to get the currentPosition3D
Vector3D currentPosition3D = TransTo3DPoint(GoWindow.ActualWidth, GoWindow.ActualHeight, currentPosition);
// Call Vector3D.CrossProduct to realize the 叉乘
Vector3D axis = Vector3D.CrossProduct(previousPosition3D, currentPosition3D);
// Call Vector3D.AngleBetween to achieve the angle between two vectors
Double angle = Vector3D.AngleBetween(previousPosition3D, currentPosition3D);
// rotate the camera
RotateCamera(axis, angle);
// erery time we should reset the previousPosition
previousPosition3D = currentPosition3D;
}
二、 基于旋转向量和旋转角度的Camera旋转
首先需要定义Camera的旋转方式(我之前找这个无果,想到了用旋转矩阵这种方法,套用了一堆3维空间的坐标系旋转公式,效果并不理想):
<PerspectiveCamera.Transform>
<Transform3DGroup>
<RotateTransform3D x:Name="axisYRTransform">
<RotateTransform3D.Rotation>
<AxisAngleRotation3D x:Name="axisYRotation" Angle="0" Axis="0 1 0" />
</RotateTransform3D.Rotation>
</RotateTransform3D>
</Transform3DGroup>
</PerspectiveCamera.Transform>
那么接下来要做的就是写上一个小小的函数用来旋转特定的Camera了:
private void RotateCamera(Vector3D axis, Double angle)
{
Vector3D vecZero = new Vector3D(0.0,0.0,0.0);
if (vecZero == axis || 0 == angle)
return;
Quaternion delta = new Quaternion(axis, angle);
// axisYRotation is the name of camera AxisAngleRotation3D
Quaternion q = new Quaternion(axisYRotation.Axis, axisYRotation.Angle);
q *= delta;
if (Vector3D.Equals(q.Axis, vecZero))
return;
axisYRotation.Axis = q.Axis;
axisYRotation.Angle = q.Angle;
}
好,现在大功告成,其实真不难,哎,折腾了1天多,希望对大家有用,如果有更好的模型或者更好的实现方法,我希望能得到你的指点,我的邮箱:v-xyang@microsoft.com,谢谢你。


 1453
1453

 被折叠的 条评论
为什么被折叠?
被折叠的 条评论
为什么被折叠?
 到【灌水乐园】发言


