


重力传感器 测重力代码
This tutorial will outline how to use the Gravity Forms plugin combined with the Gravity Forms – PayPal Payments Standard Add-On plugin to create custom forms that handle payments in your WordPress website.
本教程将概述如何结合使用Gravity Forms插件和Gravity Forms – PayPal Payments标准附加插件来创建自定义表单来处理WordPress网站中的付款。
We will briefly look at how Gravity Forms works, and how using its additional payment add-on can let you take payments and capture information at the same time. We will not be focusing on the design of the forms or how feature rich they are. What I intend to showcase is how to use this plugin to create quick and simple forms to capture data for manipulation (leaving the plugin to do the heavy lifting of payment processing).
我们将简要介绍一下Gravity Forms的工作原理,以及如何使用其附加的付款附件使您可以同时付款和获取信息。 我们将不关注表单的设计或表单的功能丰富程度。 我打算展示的是如何使用此插件来创建快速简单的表单来捕获数据以进行操作(让该插件完成付款处理的繁重工作)。
警告–这些不是免费插件 (Warning – These Are Not Free Plugins)
Please note that Gravity Forms (and its associated PayPal plugin that will be used) are not free plugins.
请注意,Gravity Forms(及其相关的PayPal插件将被使用)不是免费的插件。
Gravity Forms has a subscription based model where you are either a ‘Personal’, ‘Business’ or ‘Developer’ user, and you purchase access to the plugin. To use the PayPal payments functionality you need to have the ‘Developer’ license to download the required add-on. This tutorial will require the use of these plugins.
Gravity Forms具有基于订阅的模型,您是“个人” , “业务”或“开发人员”用户,并且您可以购买对插件的访问权限。 要使用PayPal付款功能,您需要拥有“开发者”许可才能下载所需的附件。 本教程将要求使用这些插件。
什么是重力形式? (What Is Gravity Forms?)
Gravity Forms is a form building plugin that allows you to quickly and easily create customised forms using a click and drag interface. You can create a wide variety of forms using this plugin, ranging from simple contact inquiries to advanced, conditionally built forms.
Gravity Forms是一个表单构建插件,可让您使用单击和拖动界面快速轻松地创建自定义表单。 您可以使用此插件创建各种各样的表单,从简单的联系查询到有条件的高级表单。
With Gravity Forms you can create forms with all the standard form elements you expect; text fields, select lists, check-boxes, and radio boxes. In addition, it also comes with several useful elements such as date selectors, phone numbers, CAPTURE and lists.
借助Gravity Forms,您可以使用期望的所有标准表单元素创建表单; 文本字段,选择列表,复选框和单选框。 此外,它还带有一些有用的元素,例如日期选择器,电话号码,捕获和列表。
Using this plugin you can easily put together a form that you can then output on your chosen page or post (using their shortcode).
使用此插件,您可以轻松地组合一个表单,然后可以将其输出到您选择的页面上或发布(使用其短代码)。
重力式附加件和付款 (Gravity Forms Add-ons and Payments)
While Gravity Forms does a great job of creating forms, sometimes your forms need to do additional processing or logic, or link to third party services. This is where the add-ons for Gravity Forms comes in play.
尽管Gravity Forms在创建表单方面做得很出色,但是有时您的表单需要执行其他处理或逻辑,或链接到第三方服务。 这是重力形式的附加组件发挥作用的地方。
These additional add-ons/plugins can be viewed and downloaded from their online repository, and once downloaded, they can be uploaded to your website and activated like a regular plugin.
可以从其在线存储库中查看和下载这些其他加载项/插件,下载后,它们可以像常规插件一样上传到您的网站并激活。
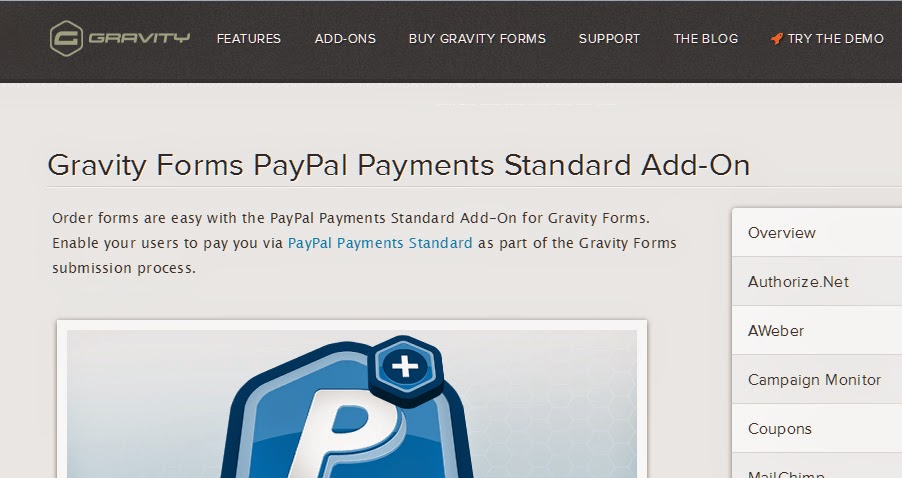
Since this tutorial is discussing payments with PayPal, we will be using the PayPal Payments Standard Add-On. This will allow us to connect our custom forms to a PayPal account and take payments.
由于本教程讨论的是与PayPal的付款,因此我们将使用PayPal付款标准附加组件。 这将使我们能够将自定义表单连接到PayPal帐户并进行付款。
There are a number of other PayPal add-ons for Gravity Forms; however these are generally offered for legacy PayPal accounts (or accounts that require special functions). For almost all current accounts (and new PayPal accounts), this will be the right plugin to choose.
Gravity Forms还有许多其他的PayPal附加程序; 但是,这些通常是为旧的PayPal帐户(或需要特殊功能的帐户)提供的。 对于几乎所有当前帐户(和新的PayPal帐户),这都是选择的正确插件。
方案–成员身份表 (The Scenario – a Membership Form)
To showcase how this plugin can be useful, we will use it to create a membership form that takes applications for membership to an online community.
为了展示此插件的有用性,我们将使用它创建一个成员资格表,该表单将具有成员资格的应用程序带到在线社区。
In our scenario, we want to capture information about an individual and then process their payment. We will be collecting all of the standard information you would expect such as name, email, phone number and so on.
在我们的方案中,我们想要捕获有关个人的信息,然后处理他们的付款。 我们将收集您期望的所有标准信息,例如姓名,电子邮件,电话号码等。
Once they have completed their payment, we will then email an address with all of the information.
他们完成付款后,我们将通过电子邮件将所有信息发送给您。
The purpose of this scenario is to get you to a point where you have access to all of your form data and information from a successful transaction. Once you are at this point, you can use the information to create a membership profile, create some automated emails or manipulate the data however you want.
该方案的目的是使您到达一个可以访问成功交易中所有表单数据和信息的地步。 至此,您可以使用该信息来创建成员资格配置文件,创建一些自动电子邮件或根据需要操作数据。
入门 (Getting Started)
First things first, you will need to have the following elements so you can proceed with this tutorial:
首先,您需要具备以下要素,以便您可以继续本教程:
- Gravity Forms Plugin 重力表格插件
- Gravity Forms PayPal Payments Standard Add-On 重力形式的贝宝付款标准附加组件
- A WordPress instance set up using the latest version (I have tested this to work from WP 3.7+) 使用最新版本设置的WordPress实例(我已经对其进行了测试,可以在WP 3.7+中运行)
- FTP Access (we will be using Gravity Form’s hooks/filters so you need to have access to your functions.php or similar) FTP访问(我们将使用Gravity Form的钩子/过滤器,因此您需要访问functions.php或类似文件)
As stated before, Gravity Forms is not a free plugin and you must purchase a subscription to use it. Once you have a subscription, you can download the plugins you require (for the PayPal integration you will need the developer level license).
如前所述,Gravity Forms不是免费的插件,您必须购买订阅才能使用它。 订阅后,您可以下载所需的插件(对于PayPal集成,您将需要开发人员级别的许可证)。
Once you have all of these elements sorted, we will get straight into creating a forms for taking payments.
将所有这些元素排序后,我们将直接创建一种用于付款的表格。
步骤1 –将重力形式连接到PayPal (Step 1 – Connecting Gravity Forms to PayPal)
Because Gravity Forms is handling payments and transitions along with PayPal, PayPal will need to be configured so that when it processes payments it notifies Gravity Forms (which it will use to update its transaction information; for example marking an order as completed).
由于Gravity Forms与PayPal一起处理付款和转帐,因此需要配置PayPal,以便在处理付款时通知Payval Forms(它将用于更新其交易信息;例如将订单标记为已完成)。
Navigate to the back-end of your website and go to the ‘Forms’ menu and look for the ‘Settings’ tab. From the Settings tab, you’ll need to look for the sub-menu called ‘PayPal’. Once you’ve clicked on the ‘PayPal’ sub-menu, you should see the following screen.
导航到网站的后端,然后转到“表单”菜单,然后查找“设置”标签。 在“设置”标签中,您需要查找名为“ PayPal”的子菜单。 单击“ PayPal”子菜单后,应该会看到以下屏幕。

What you need to do is copy the URL provided on this page and go to your PayPal account. You will need to log into the account that you intend to take payments with, and enable IPN processing. You will see a similar screen to the one below.
您需要做的是复制此页面上提供的URL,然后转到您的PayPal帐户。 您将需要登录要使用其付款的帐户,并启用IPN处理。 您将看到与以下屏幕类似的屏幕。
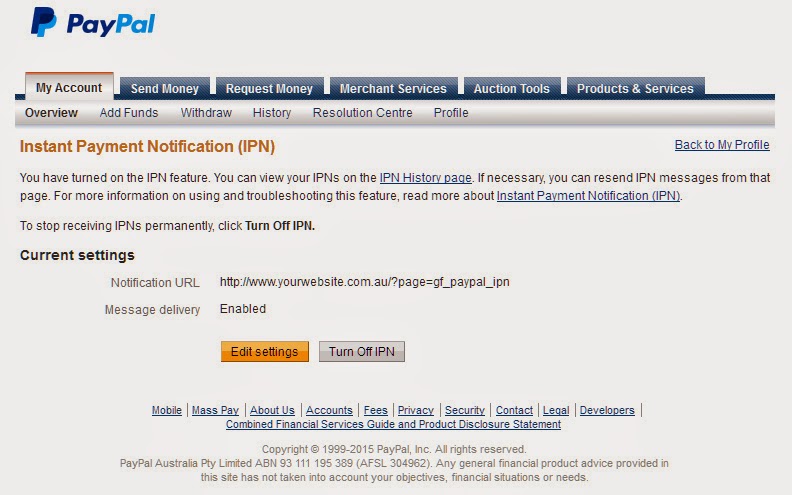
Once you update your IPN settings on PayPal, return to to your Settings page on your website and enable the check-box, confirming that your IPN has been correctly set up.
在贝宝(PayPal)上更新IPN设置后,请返回网站上的“设置”页面并启用此复选框,确认已正确设置IPN。
Note: If you do not do this step, various hooks and filters will never fire and you will be left wondering why nothing seems to work.
注意:如果您不执行此步骤,则各种钩子和过滤器将永远不会触发,您将不知道为什么似乎没有任何效果。
步骤2 –建立您的会员表格 (Step 2 – Creating Your Membership Form)
Navigate over to the WordPress back-end and look for the ‘Forms’ menu. You can press this to be brought to the listing of all of your forms, or you could alternatively click the ‘New Form’ button.
导航到WordPress后端,然后查找“表单”菜单。 您可以按此按钮将其显示在所有表单的列表中,也可以单击“新建表单”按钮。
Once you click on the ‘New Form’ button, a window will appear. Simply enter the name of the form and a brief description and once redirected you will see the following screen.
单击“新建表单”按钮后,将出现一个窗口。 只需输入表单名称和简短描述,重定向后即可看到以下屏幕。
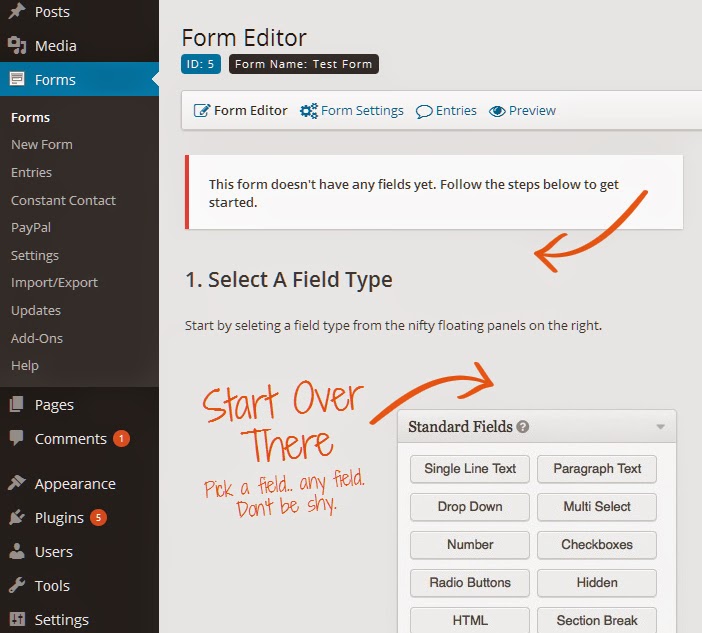
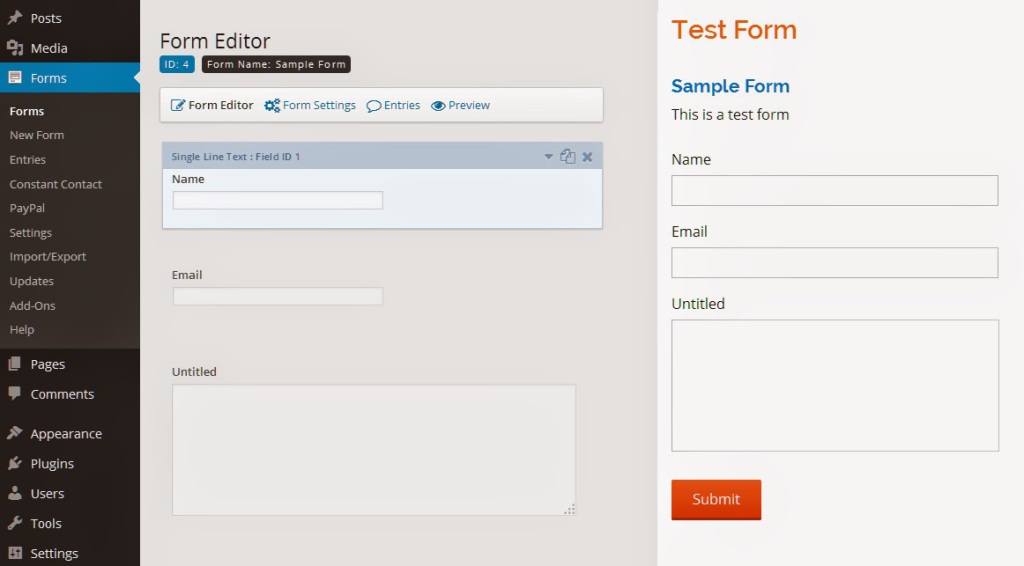
Gravity Forms is split up into two sections. The left section will show you the current elements in your form; while the right side has a listing of all the form elements you can add (conveniently grouped together by function).
重力形式分为两部分。 左侧部分将向您显示表单中的当前元素。 右侧列出了您可以添加的所有表单元素(方便地按功能分组在一起)。
If you require more in-depth understanding of how Gravity Forms work I would suggest reading their documentation on their website.
如果您需要对Gravity Forms的工作方式有更深入的了解, 建议您在其网站上阅读其文档。
添加您的表单字段 (Adding Your Form Fields)
What you will now need to do is build the form itself. For this example I will be adding these fields to the form. Feel free to follow along or add your own fields.
您现在需要做的是构建表单本身。 对于此示例,我将这些字段添加到表单中。 随时关注或添加您自己的字段。
- First Name – (Standard Fields – Single Line Text) 名–(标准字段–单行文本)
- Last Name – (Standard Fields – Single Line Text) 姓氏-(标准字段-单行文字)
- Email – (Advanced Fields – Email) 电子邮件–(高级字段–电子邮件)
- Phone – (Advanced Fields – Phone) 电话–(高级字段–电话)
- Address – (Advanced Fields – Address) 地址–(高级字段–地址)
- Membership Type- (Pricing Fields – Product) 成员资格类型-(定价字段-产品)
- Total Cost – (Pricing Fields – Total) 总成本–(定价字段–总)
Once you have added all of these fields you can move to configuring them for use.
一旦添加了所有这些字段,就可以继续配置它们以供使用。
配置表单字段 (Configuring Your Form Fields)
Most of the form fields you can select can be configured with multiple options. Drop down lists can be populated with options, fields can be required to be processed, validation messages can be set, and much more.
您可以选择的大多数表单字段都可以配置多个选项。 下拉列表可以填充选项,可以要求处理字段,可以设置验证消息等等。
For our scenario we are only using 7 fields, so go ahead and click on each field to expand the list of options and configure them as the following:
对于我们的场景,我们仅使用7个字段,因此,继续并单击每个字段以展开选项列表并将其配置为以下内容:
First Name, Last Name, Email – Mark these fields as being ‘Required’
名,姓,电子邮件 -将这些字段标记为“必填”
Phone, Total Cost – Leave as is, nothing special
电话,总费用 –保留原样,没什么特别的
Address – These steps may be slightly different for you, however I have decided to use the ‘International’ settings, along with ‘Hide Address Line 2 Field’, the default country selected as ‘Australia’ and marked as being ‘Required’
地址 -这些步骤可能对您略有不同,但是我决定使用“国际”设置以及“隐藏地址第2行字段”(默认国家/地区选择为“澳大利亚”并标记为“必填”)
Membership Type – Since this is a product there are multiple options to choose from. I have selected that the ‘Field Type’** will be ‘Radio Buttons’ with two options:
成员资格类型 –由于这是一种产品,因此有多个选项可供选择。 我选择了“字段类型” **为“单选按钮”,有两个选项:
– Yearly Membership ($0.05)
–年度会员($ 0.05)
– Bi-Yearly Membership ($0.08)
–两年会员($ 0.08)
– This field will also be ‘Required’
–此字段也将是“必填”
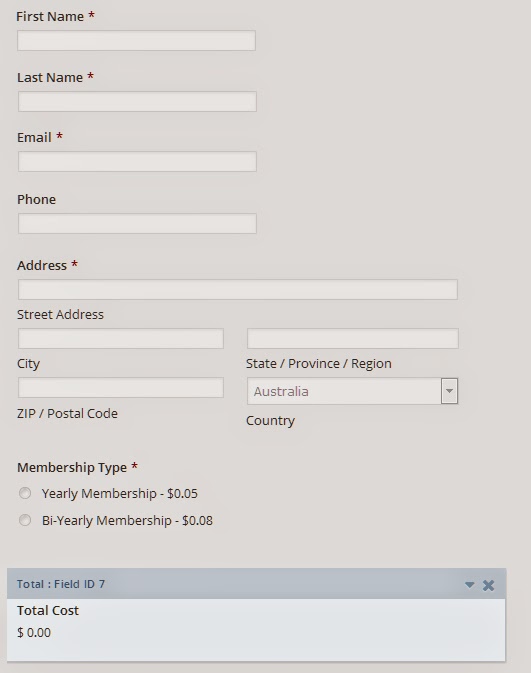
Once you have configured your form fields it should look similar to how mine looks below
配置完表单字段后,其外观应类似于下面的样子
步骤3 –将您的表格与PayPal连接 (Step 3 – Connecting Your Form with PayPal)
Now that we have set up Gravity Forms and connected it to your PayPal account, we need to also connect your individual forms to PayPal.
现在我们已经设置了重力表单并将其连接到您的PayPal帐户,我们还需要将您的个人表单连接到PayPal。
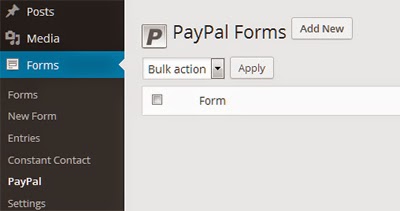
Navigate to the WordPress back-end and look for the ‘Forms’ menu. Under this menu you will see a label called ‘PayPal’. Click this to proceed (if you don’t see this it means you have not installed the PayPal add-on for Gravity Forms).
导航到WordPress后端,然后查找“表单”菜单。 在此菜单下,您将看到一个名为“ PayPal”的标签。 单击此按钮继续(如果没有看到,则表明您尚未安装Gravity Forms的PayPal附加组件)。
The information above may differ depending on the version you’re using. If you don’t see it as shown above, look under ‘Forms > (select your form) > Form Settings’.
上面的信息可能会因所使用的版本而异。 如果您没有如上所示看到它,请在“表单>(选择表单)>表单设置”下查看。
From this screen you can see all of your PayPal forms.
在此屏幕上,您可以查看所有的PayPal表单。
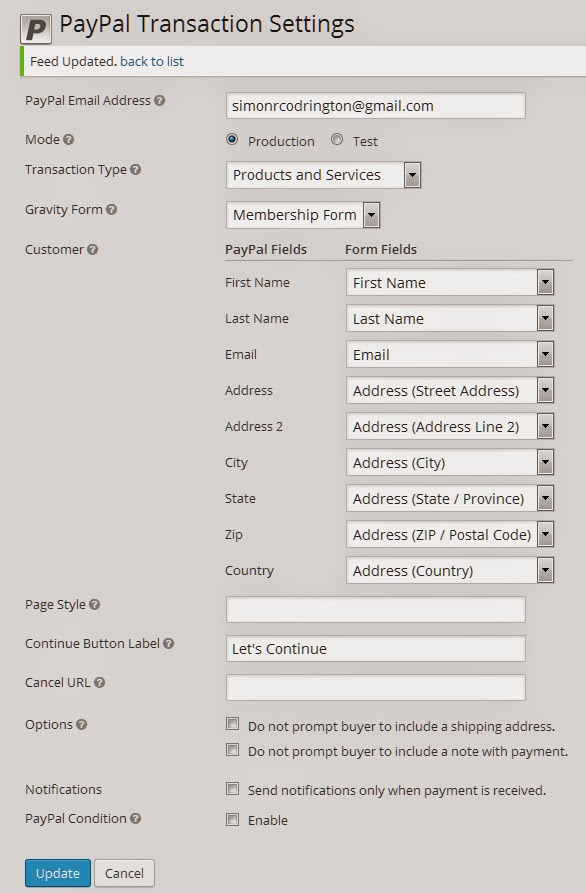
When you add a new payment form you will need to supply the following information:
添加新的付款表格时,您需要提供以下信息:
PayPal Email Address – Enter the address that will be used to collect your payments
贝宝电子邮件地址 –输入用于收款的地址
Mode – Select either production or test
模式 –选择生产或测试
Transaction Type – Select ‘Products and Services’
交易类型 -选择“产品和服务”
Gravity Form – Select the form that will be associated with this payment. Go ahead and select the form you just created.
重力形式 –选择将与此付款相关联的形式。 继续并选择您刚创建的表单。
- Once selected, you will be shown additional information. This information is related to the PayPal integration and includes mapping your fields to standard PayPal fields, selecting the cancel URL location and other elements. Feel free to complete these if required. 选择后,将显示其他信息。 此信息与PayPal集成有关,包括将您的字段映射到标准PayPal字段,选择取消URL位置和其他元素。 如有需要,请随意完成。
Once completed and saved you should see something similar to below.
完成并保存后,您应该会看到类似下面的内容。
步骤4 –将您的会员表格添加到页面 (Step 4 – Adding Your Membership Form to a Page)
Now that your form is ready, all you will need to do is add this form to a page and test it.
现在您的表单已准备就绪,您需要做的就是将此表单添加到页面并进行测试。
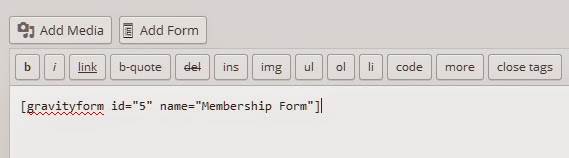
Navigate to the back-end of your website and look for the ‘Pages’ menu item. Create a new page and if you look closely at the visual editor there will be a new button; this button will quickly add your form to your page via a shortcode.
导航到您网站的后端,然后查找“页面”菜单项。 创建一个新页面,如果您仔细查看可视化编辑器,将会有一个新按钮; 此按钮将通过短代码将您的表单快速添加到页面中。
使用重力形式的挂钩和过滤器 (Using Gravity Form’s Hooks and Filters)
Once you have successfully set up your form, you should be able to accept payments for this membership system.
成功设置表格后,您应该可以接受此会员系统的付款。
The user will enter in their information, process to PayPal, pay for their services and then optionally return to the website (generating notifications all round for everyone).
用户将输入他们的信息,处理到PayPal,为他们的服务付费,然后选择返回网站(全面为每个人生成通知)。
While Gravity Forms will do all of the heavy lifting, you may need to perform additional actions or functions, depending on what has happened. This is where Gravity Forms becomes very useful as it provides a number of hooks and filters that we can use.
虽然重力式表格可以完成所有繁重的工作,但您可能需要根据所发生的事情执行其他操作或功能。 在这里重力形式变得非常有用,因为它提供了许多我们可以使用的钩子和过滤器。
For our membership system we are interested in the payment transaction hooks and filters provided by the PayPal add on. There are several of these that are useful; however for this tutorial we will looking at the gform_paypal_fulfillment hook.
对于我们的会员系统,我们对PayPal附件提供的支付交易挂钩和过滤器感兴趣。 其中有几种有用 ; 但是,在本教程中,我们将研究gform_paypal_fulfillment挂钩。
贝宝交易后的处理 (Processing after PayPal Transactions)
The main hook we will be using is the gform_paypal_fulfillment hook.
我们将使用的主要钩子是gform_paypal_fulfillment钩子。
This hook runs once a PayPal transaction has been completed successfully and returns a listing of useful information that we can use in our back-end actions.
PayPal交易成功完成后,此挂钩将运行,并返回可在后端操作中使用的有用信息的列表。
This hook should be attached to a function of your choosing, passing the following four variables:
该钩子应该附加到您选择的函数上,并传递以下四个变量:
$entry$entry$config$config$transaction_id$transaction_id$amount$amount
Each of these variables will contain information about your transaction and its data. For this example, we will be pulling all of our form data about this membership and then emailing that information.
这些变量中的每一个都将包含有关您的交易及其数据的信息。 在此示例中,我们将提取有关该成员资格的所有表单数据,然后通过电子邮件将该信息发送出去。
First create a function and attach it to this hook as follows:
首先创建一个函数并将其附加到此钩子,如下所示:
//function used to hook onto after payments
function membership_payment_processing($entry,$config,$transaction_id,$amount){
        //your post processing to go in here
}
add_action('gform_paypal_fulfillment','membership_payment_processing',10,4);
As a word of warning, be sure to set the ‘priority’ of the hook to 10 and the ‘argument count’ to 4 (as this hook generally wants these to be passed).
提醒一下,请确保将挂钩的“优先级”设置为10,并将“自变量计数”设置为4(因为此挂钩通常希望传递这些参数)。
$entry内的值 (Values Inside Of $entry)
The new function we have created will trigger as soon as payment has been successfully processed.
我们成功创建的新功能将在付款成功后立即触发。
We will look into the $entry variable, which contains an array of values for our transaction. The complete listing of values assigned to this array can be viewed on the Gravity forms $entry object, however the main values we will need will be:
我们将研究$entry变量,该变量包含我们交易的值数组。 可以在Gravity表单$ entry对象上查看分配给该数组的值的完整列表,但是我们需要的主要值为:
form_idform_idpayment_datepayment_datepayment_statuspayment_status
In addition to these named values, the $entry array will also contain all of the fields completed on your form. These will be structured in a numerical fashion with the key of the field represented by a string. For example '1' or '2'.
除了这些命名值之外, $entry数组还将包含在表单上完成的所有字段。 这些将以数字形式构造,并以字符串表示的字段的键。 例如'1'或'2'.
In our example, our first field is first name, therefore the value belonging to first name will be stored in $entry with the key name of '1' so we would assign it to a variable as follows:
在我们的例子,我们的第一场是first name ,因此属于价值first name将被保存在$entry与的键名'1' ,所以我们可以按如下方式将其分配给一个变量:
//assign the first name field to a variable
$first_name = $entry['1']
Your form may have heaps of fields and these may have been moved up and down or created at different times, so generally speaking you can’t rely on the position in the form editor to be correct. You can loop through each of the keys and values for the $entry array and then assign them to a string. Once you have done this for all of your values, you can then send yourself an email (so you can easily see the key and its value).
你的形式可能有场堆和这些可能已被上下移动或创建在不同的时间,所以一般来说,你不能依赖于表格编辑器的位置是正确的。 您可以遍历$entry数组的每个键和值,然后将它们分配给字符串。 对所有值完成此操作后,就可以向自己发送电子邮件(这样您就可以轻松查看键及其值)。
//collect all entry values
function membership_payment_processing($entry,$config,$transaction_id,$amount){
        $message = '';
        foreach($entry as $key=>$value){
                $message .= 'Key: ' . $key . ' Value: ' . $value;
        }
        //send yourself an email (replace the email address below with yours)
        wp_mail('simonrcodrington@gmail.com','Entry Information`,$message);
}
add_action('gform_paypal_fulfillment','membership_payment_processing',10,4);
After this you will be able to determine what key belongs to what values and assign your variables as you need.
之后,您将能够确定哪个键属于哪个值,并根据需要分配变量。
提取我们所需的信息 (Extracting Our Required Information)
Let’s move on to our example. For our example, we will be extracting our form fields into variables so that we can store their values. Your code should look similar to the code below (remember to go through a test run first and determine what the corresponding string value will be for your form fields).
让我们继续我们的示例。 对于我们的示例,我们将表单字段提取到变量中,以便我们可以存储它们的值。 您的代码应类似于下面的代码(请记住首先进行测试,并确定表单字段对应的字符串值是什么)。
//process membership after transaction
function membership_payment_processing($entry,$config,$transaction_id,$amount){
	//first determine if we are processing the correct form
	$form_id = $entry['form_id'];
	if($form_id == 1){

		//collect values values
		$first_name = $entry['1'];
		$last_name = $entry['2'];
		$email = $entry['3'];
		$phone = isset($entry['4']) ? $entry['4'] : '';
		$address_street = $entry['5.1'];
		//notice '5.2' is missing, this is address line 2 we removed from the address configuration
		$address_city = $entry['5.3'];
		$address_state = $entry['5.4'];
		$address_postcode = $entry['5.5'];
		$address_country = $entry['5.6'];
		$membership_type = $entry['6'];
		$total_cost = $amount;
		$transaction_id = $transaction_id;

		//format these values into a message that we can send
		//replace values as required
		$to ='simonrcodrington@gmail.com';
		$subject = 'New Membership Application';

		$header_cell_style = 'background: #ccc; text-align: center; padding: 5px 7px 5px 7px;';
		$cell_style = 'background: #eee; text-align: center; padding: 5px 7px 5px 7px;';

		$message = '';
		$message .= '<h2>New Member Application</h2>';
		$message .= '<p>A new member has successfully been processed</p>';
		$message .= '<table border="1" style="border-collapse: collapse;">';
		$message .='<tr>';
		$message .='<th style="' . $header_cell_style . '"> First name </td>';
		$message .='<th style="' . $header_cell_style . '"> Last name </td>';
		$message .='<th style="' . $header_cell_style . '"> Email </td>';
		$message .='<th style="' . $header_cell_style . '"> Phone </td>';
		$message .='<th style="' . $header_cell_style . '"> Address Street </td>';
		$message .='<th style="' . $header_cell_style . '"> Address City </td>';
		$message .='<th style="' . $header_cell_style . '"> Address State </td>';
		$message .='<th style="' . $header_cell_style . '"> Address Postcode </td>';
		$message .='<th style="' . $header_cell_style . '"> Address Country </td>';
		$message .='<th style="' . $header_cell_style . '"> Membership Type </td>';
		$message .='<th style="' . $header_cell_style . '"> Total Cost </td>';
		$message .='<th style="' . $header_cell_style . '"> Transaction ID </td>';
		$message .='</tr>';
		$message .='<tr>';
		$message .='<td style="' . $cell_style. '">' . $first_name . '</td>';
		$message .='<td style="' . $cell_style. '">' . $last_name . '</td>';
		$message .='<td style="' . $cell_style. '">' . $email . '</td>';
		$message .='<td style="' . $cell_style. '">' . $phone . '</td>';
		$message .='<td style="' . $cell_style. '">' . $address_street . '</td>';
		$message .='<td style="' . $cell_style. '">' . $address_city . '</td>';
		$message .='<td style="' . $cell_style. '">' . $address_state . '</td>';
		$message .='<td style="' . $cell_style. '">' . $address_postcode . '</td>';
		$message .='<td style="' . $cell_style. '">' . $address_country . '</td>';
		$message .='<td style="' . $cell_style. '">' . $membership_type . '</td>';
		$message .='<td style="' . $cell_style. '">' . $total_cost . '</td>';
		$message .='<td style="' . $cell_style. '">' . $transaction_id . '</td>';
		$message .='</tr>';
		$message .= '</table>';

		//add filter to enable HTML messages
		add_filter('wp_mail_content_type','set_email_to_html');

		//send mail
		wp_mail($to,$subject,$message);

		//remove filter (to set back to plain text email)
		remove_filter( 'wp_mail_content_type', 'set_email_to_html' );

	}
}
add_action('gform_paypal_fulfillment','membership_payment_processing',10,4);

//sets the email content type to HTML
function set_email_to_html(){
	return true;
}
If you are interested more in WordPress mail you can click here to view the codex page.
如果您对WordPress邮件更感兴趣,则可以单击此处查看Codex页面 。
We have hooked onto the gform_paypal_fulfillment hook and determined that the correct form is being collected (in my example it was form 1). Once we know we are on the correct form we collect our form values.
我们已经钩住gform_paypal_fulfillment钩子,并确定正在收集正确的表单(在我的示例中是表单1)。 一旦知道我们使用的是正确的表单,便会收集表单值。
After we have all of our values, we create a simple table structure and populate the content.
拥有所有值之后,我们将创建一个简单的表结构并填充内容。
We use a filter called wp_mail_content_type. This filter determines if your mail will be sent as plain text or as HTML. We call this filter right before we send our email and then we remove it again afterwards (to ensure we don’t create a conflict).
我们使用一个名为wp_mail_content_type的过滤器。 此过滤器确定您的邮件是以纯文本还是HTML格式发送。 我们会在发送电子邮件之前立即调用此过滤器,然后再将其删除(以确保不会造成冲突)。
We send our mail to our desired address and it should be formatted as a basic table (with some styling). You should have something similar depending on your email program.
我们将邮件发送到我们想要的地址,并且应该将其格式化为基本表格(带有某些样式)。 根据您的电子邮件程序,您应该有类似的东西。
结论 (In Conclusion)
Now that you know how to use Gravity Forms and its PayPal add-on to take payments, you can use this as a base to create more complex functionality (without the hassle of manually integrating with a payment gateway).
现在,您知道如何使用Gravity Forms及其PayPal附加组件进行付款了,您可以以此为基础来创建更复杂的功能(无需手动与付款网关集成)。
翻译自: https://www.sitepoint.com/processing-payments-with-gravity-forms/
重力传感器 测重力代码


 1万+
1万+

 被折叠的 条评论
为什么被折叠?
被折叠的 条评论
为什么被折叠?
 到【灌水乐园】发言


