


java captcha
In a previous tutorial, we took a deep dive into the WordPress HTTP API and I promised to show you how APIs can be consumed via the HTTP API in a WordPress plugin.
在上一教程中,我们深入研究了WordPress HTTP API ,我答应向您展示如何通过WordPress插件中的HTTP API来使用HTTP API 。
We’ve seen an example of a plugin using the HTTP API during the course of building a Domain WHOIS and Social Data WordPress Widget and in today’s tutorial, we will write a plugin that integrates a CAPTCHA with the WordPress login system using Google’s reCAPTCHA. And of course, the HTTP API will be used to send a POST request to reCAPTCHA to validate the user’s answer to the CAPTCHA challenge.
我们已经在构建Domain WHOIS和Social Data WordPress Widget的过程中看到了使用HTTP API的插件的示例,并且在今天的教程中,我们将编写一个插件,该插件使用Google的reCAPTCHA将CAPTCHA和WordPress登录系统集成在一起。 当然, HTTP API将用于向CAPTCHA发送POST请求,以验证用户对CAPTCHA挑战的回答。
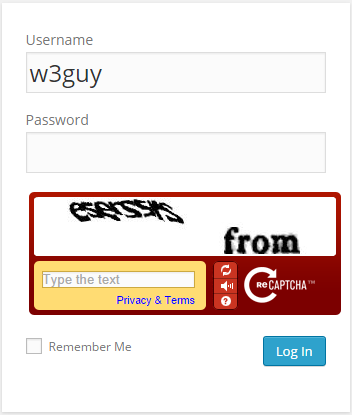
Below is a screenshot of the default WordPress login form protected by a CAPTCHA on activation of the plugin to be developed during this tutorial.
以下是默认的WordPress登录表单的屏幕截图,该表单在激活本教程期间要开发的插件时受CAPTCHA保护。
插件开发 (Plugin Development)
Before we begin coding the plugin, head over to reCAPTCHA, register your domain name and grab your
publicandprivateAPI keys.在我们开始对该插件进行编码之前,请转到reCAPTCHA ,注册您的域名并获取您的
public和privateAPI密钥。
First off, include the plugin header.
首先,包括插件头。
<?php

/*
Plugin Name: WP Login Form with reCAPTCHA
Plugin URI: https://www.sitepoint.com
Description: Add Google's reCAPTCHA to WordPress Login
Version: 1.0
Author: Agbonghama Collins
Author URI: http://w3guy.com
License: GPL2
*/
Create a PHP class with two properties that will store your reCAPTCHA’s private and public key.
创建一个具有两个属性PHP类,该属性将存储reCAPTCHA的私钥和公钥。
class reCAPTCHA_Login_Form {

    /** @type string private key|public key */
    private $public_key, $private_key;
When writing WordPress plugins the OOP way, all action and filter hooks should be in the constructor ( __construct ). Our plugin’s magic constructor method will consist of just two actions hooks that will add the CAPTCHA to the login form and validate the CAPTCHA response.
当以OOP方式编写WordPress插件时,所有动作和过滤器挂钩都应在构造函数( __construct )中。 我们插件的魔术构造函数方法将仅包含两个动作钩子,这些钩子会将CAPTCHA添加到登录表单并验证CAPTCHA响应。
/** class constructor */
    public function __construct() {
        $this->public_key  = '6Le6d-USAAAAAFuYXiezgJh6rDaQFPKFEi84yfMc';
        $this->private_key = '6Le6d-USAAAAAKvV-30YdZbdl4DVmg_geKyUxF6b';

        // adds the captcha to the login form
        add_action( 'login_form', array( $this, 'captcha_display' ) );

        // authenticate the captcha answer
        add_action( 'wp_authenticate_user', array( $this, 'validate_captcha_field' ), 10, 2 );
    }
Code explanation: First, my reCAPTCHA public and private keys are saved to their class properties.
代码说明:首先,将我的reCAPTCHA公钥和私钥保存到其类属性中。
The captcha_display() method that will output the reCAPTCHA challenge is added to the WordPress login by the login_form Action.
所述captcha_display()方法,该方法将输出reCAPTCHA验证被添加到由WordPress的登录login_form动作。
The validate_captcha_field() method that will ensure – the CAPTCHA field isn’t left empty and also the answer is correct – is included to the login validation system by the wp_authenticate_user Action.
wp_authenticate_user操作将确保登录验证系统中包含的validate_captcha_field()方法validate_captcha_field() CAPTCHA字段不为空,并且答案正确)。
Below is the code for the captcha_display() and validate_captcha_field() method we talked about.
下面是我们讨论过的captcha_display()和validate_captcha_field()方法的代码。
/** Output the reCAPTCHA form field. */
    public function captcha_display() {
        ?>
        <script type="text/javascript"
                src="http://www.google.com/recaptcha/api/challenge?k=<?=$this->public_key;?>">
        </script>
        <noscript>
            <iframe src="http://www.google.com/recaptcha/api/noscript?k=<?=$this->public_key;?>"
                    height="300" width="300" frameborder="0"></iframe>
            <br>
            <textarea name="recaptcha_challenge_field" rows="3" cols="40">
            </textarea>
            <input type="hidden" name="recaptcha_response_field"
                   value="manual_challenge">
        </noscript>

    <?php
    }
/**
* Verify the captcha answer
*
* @param $user string login username
* @param $password string login password
*
* @return WP_Error|WP_user
*/
public function validate_captcha_field($user, $password) {
if ( ! isset( $_POST['recaptcha_response_field'] ) || empty( $_POST['recaptcha_response_field'] ) ) {
return new WP_Error( 'empty_captcha', 'CAPTCHA should not be empty');
}
if( isset( $_POST['recaptcha_response_field'] ) && $this->recaptcha_response() == 'false' ) {
return new WP_Error( 'invalid_captcha', 'CAPTCHA response was incorrect');
}
return $user;
}Taking a closer look at the validate_captcha_field() precisely the second if conditional statement, a call is made to recaptcha_response() to check if the CAPTCHA answer is correct ( i.e. returns false if the CAPTCHA response is wrong).
仔细仔细地查看validate_captcha_field()的第二条if条件语句,调用recaptcha_response()来检查CAPTCHA答案是否正确(即,如果CAPTCHA响应错误,则返回false)。
Let’s see the code and explanation of recaptcha_response().
让我们看一下recaptcha_response()的代码和解释。
/**
     * Get the reCAPTCHA API response.
     *
     * @return string
     */
    public function recaptcha_response() {

        // reCAPTCHA challenge post data
        $challenge = isset($_POST['recaptcha_challenge_field']) ? esc_attr($_POST['recaptcha_challenge_field']) : '';

        // reCAPTCHA response post data
        $response  = isset($_POST['recaptcha_response_field']) ? esc_attr($_POST['recaptcha_response_field']) : '';

        $remote_ip = $_SERVER["REMOTE_ADDR"];

        $post_body = array(
            'privatekey' => $this->private_key,
            'remoteip'   => $remote_ip,
            'challenge'  => $challenge,
            'response'   => $response
        );

        return $this->recaptcha_post_request( $post_body );

    }
Code explanation: To verify that the CAPTCHA answer supplied by the user is correct, a POST request need to be sent to the endpoint http://www.google.com/recaptcha/api/verify with the following parameters or body.
代码说明:为了验证用户提供的验证码答案正确,需要使用以下参数或正文将POST请求发送到端点http://www.google.com/recaptcha/api/verify 。
privatekey: Your private keyprivatekey:您的私钥remoteipThe IP address of the user who solved the CAPTCHA.remoteip解决了验证码的用户的IP地址。challengeThe value of recaptcha_challenge_field sent via the form.challenge通过表单发送的recaptcha_challenge_field的值。responseThe value of recaptcha_response_field sent via the form.response通过表单发送的recaptcha_response_field的值。
First, the challenge and response POST data sent by the form is captured and saved to $challenge and $response respectively.
首先,捕获由表单发送的质询和响应POST数据,并将其分别保存到$challenge和$response 。
The IP address of the user is captured by $_SERVER["REMOTE_ADDR"] and save to $remote_ip.
用户的IP地址由$_SERVER["REMOTE_ADDR"]捕获并保存到$remote_ip 。
To send a POST request with the HTTP API, the parameters or body should be array form as follows:
要使用HTTP API发送POST请求,参数或正文应为数组形式,如下所示:
$post_body = array(
            'privatekey' => $this->private_key,
            'remoteip'   => $remote_ip,
            'challenge'  => $challenge,
            'response'   => $response
        );
The POST parameters is passed as an argument to recaptcha_post_request() which will send the request along with the parameters to https://www.google.com/recaptcha/api/verify with the API response returned.
POST参数作为参数传递给recaptcha_post_request() ,它将与参数一起将请求连同参数一起发送到https://www.google.com/recaptcha/api/verify ,并返回API响应。
recaptcha_post_request() returns true if the CAPTCHA answer is correct and false otherwise.
如果验证码答案正确,则recaptcha_post_request()返回true否则返回false 。
Below is the code for recaptcha_post_request()
以下是recaptcha_post_request()的代码
/**
     * Send HTTP POST request and return the response.
     *
     * @param $post_body array HTTP POST body
     *
     * @return bool
     */
    public function recaptcha_post_request( $post_body ) {

        $args = array( 'body' => $post_body );

        // make a POST request to the Google reCaptcha Server
        $request = wp_remote_post( 'https://www.google.com/recaptcha/api/verify', $args );

        // get the request response body
        $response_body = wp_remote_retrieve_body( $request );

        /**
         * explode the response body and use the request_status
         * @see https://developers.google.com/recaptcha/docs/verify
         */
        $answers = explode( "\n", $response_body );

        $request_status = trim( $answers[0] );

        return $request_status;
    }
Code explanation: An array $args with the POST body $post_body save to the key body is created.
代码说明:将创建一个数组$args ,并将其POST正文$post_body保存到密钥body中。
The wp_remote_post send the POST request with the response save to $request.
wp_remote_post发送POST请求,并将响应保存到$request 。
The response body is retrieved by the wp_remote_retrieve_body and saved to $response_body.
响应正文由wp_remote_retrieve_body检索并保存到$response_body 。
If the captcha test was passed, the reCAPTCHA API returns:
如果验证码测试通过,则reCAPTCHA API返回:
true
success
Otherwise the following error is returned
否则返回以下错误
false
incorrect-captcha-sol
To get the recaptcha_post_request method to return a Boolean value i.e. true on success and false on failure; the response $response_body is exploded and the array data with index 0 trimmed to remove any redundant white space from the beginning and end of the string.
为了让recaptcha_post_request返回一个布尔值,即,方法true的成功和false失败; 响应$response_body 爆炸,并修剪索引为0的数组数据,以删除字符串开头和结尾的任何多余空格。
Finally, we close the plugin class.
最后,我们关闭插件类。
} // reCAPTCHA_Login_FormWe are done coding the plugin class. To put the class to work, we need to instantiate it like so:
我们已经完成了插件类的编码。 为了使该类正常工作,我们需要像这样实例化它:
new reCAPTCHA_Login_Form();结语 (Wrap Up)
If you wish to use the plugin on your WordPress site or to study the code in-depth, download the plugin.
如果您想在WordPress网站上使用插件或深入研究代码,请下载 。
This is the second in a series that will demonstrate how the WordPress HTTP API is used in a plugin.
这是本系列的第二部分,将演示如何在插件中使用WordPress HTTP API。
Be sure to keep an eye on the WordPress channel for similar tutorials.
请务必关注WordPress频道,以获取类似的教程。
Happy coding!
祝您编码愉快!
翻译自: https://www.sitepoint.com/integrating-a-captcha-with-the-wordpress-login-form/
java captcha


 2118
2118

 被折叠的 条评论
为什么被折叠?
被折叠的 条评论
为什么被折叠?
 到【灌水乐园】发言


