


 本文介绍了如何结合Cannon.js和Three.js将图像转化为布料材质,使其受到风力影响产生扭曲效果。教程中假设读者熟悉Three.js和Cannon.js的基础知识。内容包括准备场景、创建物理世界、模拟柔软身体、更新网格、建立约束以及实现风吹效果。

cannon.js

Following my previous experiment where I’ve showed you how to build a 3D physics-based menu, let’s now take a look at how to turn an image into a cloth-like material that gets distorted by wind using Cannon.js and Three.js.
在之前的实验中,我向您展示了如何构建基于3D物理的菜单,现在让我们看一下如何使用Cannon.js和Three.js将图像转换为布状材料,并使其被风扭曲。 。
In this tutorial, we’ll assume that you’re comfortable with Three.js and understand the basic principles of the Cannon.js library. If you aren’t, take a look at my previous tutorial about Cannon and how to create a simple world using this 3D engine.
在本教程中,我们假定您熟悉Three.js,并了解Cannon.js库的基本原理。 如果不是这样,请看一下我以前关于Cannon的教程,以及如何使用此3D引擎创建简单的世界。
Before we begin, take a look at the demo that shows a concrete example of a slideshow that uses the cloth effect I’m going to explain. The slideshow in the demo is based on Jesper Landberg’s Infinite draggable WebGL slider.
在开始之前,请看一下演示,该演示显示了使用我将要解释的布料效果的幻灯片演示的具体示例。 演示中的幻灯片基于Jesper Landberg的Infinite draggable WebGL滑块。
准备DOM,场景和图形 (Preparing the DOM, the scene and the figure)
I’m going to start with an example from one of my previous tutorials. I’m using DOM elements to re-create the plane in my scene. All the styles and positions are set in CSS and re-created in the canvas with JavaScript. I just cleaned some stuff I don’t use anymore (like the data-attributes) but the logic is still the same:
我将从先前的一个教程中的一个示例开始。 我正在使用DOM元素在场景中重新创建平面。 所有样式和位置均在CSS中设置,并使用JavaScript在画布中重新创建。 我只是清理了一些我不再使用的东西(例如数据属性),但是逻辑仍然是相同的:
// index.html
<section class="container">
    <article class="tile">
        <figure class="tile__figure">
            <img src="path/to/my/image.jpg"
                class="tile__image" alt="My image" width="400"
                height="300" />
        </figure>
    </article>
</section>
And here we go:
现在我们开始:
创建物理世界并更新现有内容(Creating the physics world and update existing stuff)
We’ll update our Scene.js file to add the physics calculation and pass the physics World as an argument to the Figure object:
我们将更新Scene.js文件以添加物理计算并将物理世界作为参数传递给Figure对象:
// Scene.js’s constructor
this.world = new C.World();
this.world.gravity.set(0, -1000, 0);
For this example, I’m using a large number for gravity because I’m working with big sized objects.
在此示例中,我使用大量重力,因为我正在处理大型物体。
// Scene.js’s constructor
this.figure = new Figure(this.scene, this.world);

// Scene.js's update method
this.world.step(1 / 60);

// We’ll see this below!
this.figure.update()
缝衣服吧 (Let’s do some sewing)
In the last tutorial on Cannon, I talked about rigid bodies. As its name suggests, you give an entire object a shape that will never be distorted. In this example, I will not use rigid bodies but soft bodies. I’ll create a new body per vertex, give it a mass and connect them to recreate the full mesh. After that, like with the rigid bodies, I copy each Three vertices’ position with Cannon’s body position and voilà!
在上一门有关Cannon的教程中,我谈到了刚体。 顾名思义,您可以给整个对象一个永远不会变形的形状。 在此示例中,我将不使用刚体,而使用软体。 我将为每个顶点创建一个新的实体,为其赋予一个质量并将其连接以重新创建完整的网格。 之后,就像使用刚体一样,我将每个三个顶点的位置都复制到Cannon的身体位置和贴图上!
Let’s start by updating the subdivision segments of the mesh with a local variable “size”:
让我们首先使用局部变量“ size”更新网格的细分片段:
const size = 8;

export default class Figure {
    constructor(scene, world) {
    this.world = world

//…

// Createmesh method
this.geometry = new THREE.PlaneBufferGeometry(1, 1, size, size);
Then, we add a new method in our Figure Class called “CreateStitches()” that we’ll call it just after the createMesh() method. The order is important because we’ll use each vertex coordinate to set the base position of our bodies.
然后,在我们的图形类中添加一个名为“ CreateStitches()”的新方法,该方法将在createMesh()方法之后调用。 顺序很重要,因为我们将使用每个顶点坐标来设置物体的基本位置。
创造柔软的身体 (Creating the soft body)
Because I’m using a BufferGeometry rather than Geometry, I have to loop through the position attributes array based on the count value. It limits the number of iterations through the whole array and improves performances. Three.js provides methods that return the correct value based on the index.
因为我使用的是BufferGeometry而不是Geometry,所以我必须根据计数值循环遍历位置属性数组。 它限制了整个数组的迭代次数,并提高了性能。 Three.js提供了根据索引返回正确值的方法。
createStitches() {
    // We don't want a sphere nor a cube for each point of our cloth. Cannon provides the Particle() object, a shape with ... no shape at all!
    const particleShape = new C.Particle();

    const { position } = this.geometry.attributes;
    const { x: width, y: height } = this.sizes;

    this.stitches = [];

    for (let i = 0; i < position.count; i++) {

      const pos = new C.Vec3(
        position.getX(i) * width,
        position.getY(i) * height,
        position.getZ(i)
      );

      const stitch = new C.Body({

        // We divide the mass of our body by the total number of points in our mesh. This way, an object with a lot of vertices doesn’t have a bigger mass.
        mass: mass / position.count,

        // Just for a smooth rendering, you can drop this line but your cloth will move almost infinitely.
        linearDamping: 0.8,

        position: pos,
        shape: particleShape,

        // TEMP, we’ll delete later
        velocity: new C.Vec3(0, 0, -300)
      });

      this.stitches.push(stitch);
      this.world.addBody(stitch);
    }
}
Notice that we multiply by the size of our mesh. That’s because, in the beginning, we set the size of our plane to a size of 1. So each vertex has its coordinates normalized and we have to multiply them afterwards.
注意,我们乘以网格的大小。 这是因为,在开始时,我们将平面的大小设置为1。因此,每个顶点的坐标均已归一化,之后我们必须对其进行乘法运算。
更新网格 (Updating the mesh)
As we need to set our position in normalized coordinates, we have to divide by the width and height values and set it to the bufferAttribute.
由于我们需要在规范化坐标中设置位置,因此必须除以width和height值,然后将其设置为bufferAttribute。
// Figure.js
update() {
    const { position } = this.geometry.attributes;
    const { x: width, y: height } = this.sizes;

    for (let i = 0; i < position.count; i++) {
      position.setXYZ(
        i,
        this.stitches[i].position.x / width,
        this.stitches[i].position.y / height,
        this.stitches[i].position.z
      );
    }

    position.needsUpdate = true;
}
And voilà! Now you should have a falling bunch of unconnected points. Let’s change that by just setting the first row of our stitches to a mass of zero.
和瞧! 现在您应该有一堆未连接的点。 让我们通过仅将针迹的第一行设置为零进行更改。
for (let i = 0; i < position.count; i++) {
      const row = Math.floor(i / (size + 1));

// ...

const stitch = new C.Body({
    mass: row === 0 ? 0 : mass / position.count,

// ...
I guess you noticed I increased the size plus one. Let’s take a look at the wireframe of our mesh:
我想你注意到我增加了大小加一。 让我们看一下网格的线框:
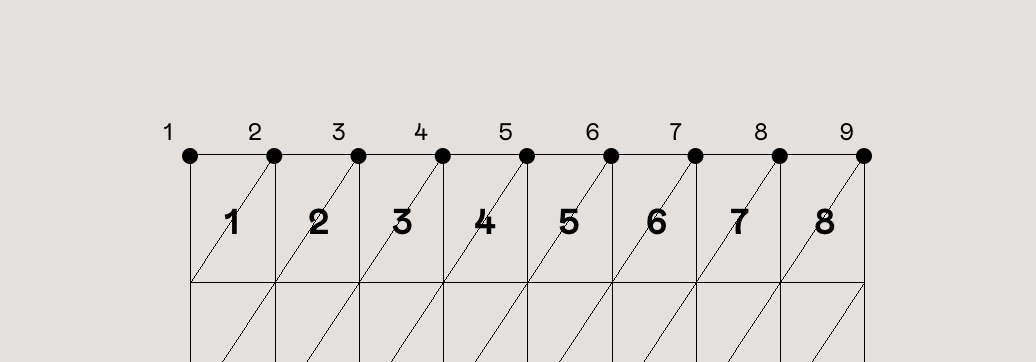
As you can notice, when we set the number of segments with the ‘size’ variable, we have the correct number of subdivisions. But we are working on the mesh so we have one more row and column. By the way, if you inspect the count value we used above, we have 81 vertices (9*9), not 64 (8*8).
如您所见,当我们使用'size'变量设置细分的数量时,我们具有正确的细分数量。 但是我们正在研究网格,因此我们又增加了一行和一列。 顺便说一句,如果您检查我们上面使用的计数值,我们有81个顶点(9 * 9),而不是64个(8 * 8)。
连接一切 (Connecting everything)
Now, you should have a falling bunch of points falling down but not the first line! We have to create a DistanceConstraint from each point to their neighbour.
现在,您应该有一连串的下降点,但第一行却没有! 我们必须从每个点到其邻居创建一个DistanceConstraint。
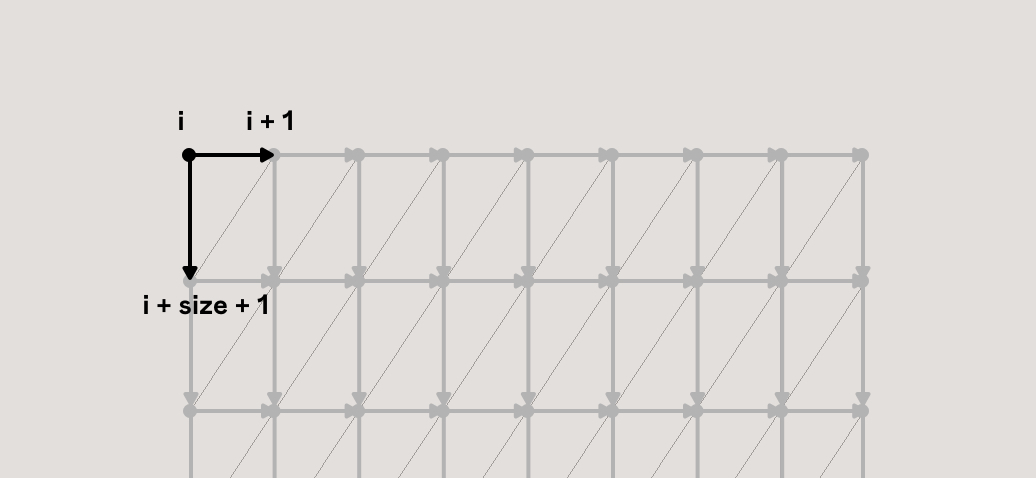
// createStitches()
for (let i = 0; i < position.count; i++) {
    const col = i % (size + 1);
    const row = Math.floor(i / (size + 1));

    if (col < size) this.connect(i, i + 1);
    if (row < size) this.connect(i, i + size + 1);
}

// New method in Figure.js
connect(i, j) {
    const c = new C.DistanceConstraint(this.stitches[i], this.stitches[j]);

    this.world.addConstraint(c);
}
And tadam! You now have a cloth floating within the void. Because of the velocity we set before, you can see the mesh moves but stops quickly. It’s the calm before the storm.
和塔达姆! 您现在有一块布漂浮在空隙中。 由于我们之前设置的速度,您可以看到网格移动但很快停止。 暴风雨来临前的平静。
让风吹(Let the wind blow)
Now that we have a cloth, why not let a bit of wind blow? I’m going to create an array with the length of our mesh and fill it with a direction vector based on the position of my mouse multiplied by a force using simplex noise. Psst, if you have never heard of noise, I suggest reading this article.
现在我们有了一块布,为什么不放些风呢? 我将创建一个具有网格长度的数组,并使用基于鼠标位置乘以使用单纯形噪声的力的方向向量填充方向向量。 抱歉,如果您从未听说过噪音,建议您阅读这篇文章。
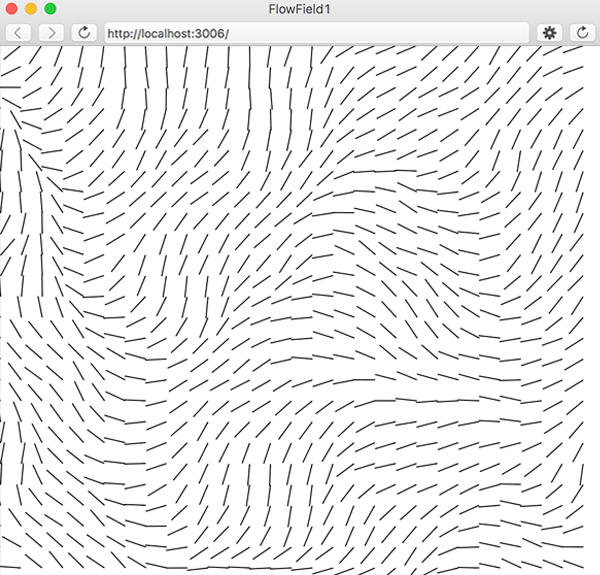
We could imagine the noise looking like this image, except where we have angles in each cell, we’ll have a force between -1 and 1 in our case.
我们可以想象噪声看起来像这张图像,除了在每个像元中有角度的情况下,在这种情况下,我们将产生一个介于-1和1之间的力。
After that, we’ll add the forces of each cell on their respective body and the update function will do the rest.
之后,我们将每个单元的力加到它们各自的主体上,其余的将由update函数完成。
Let’s dive into the code!
让我们深入研究代码!
I’m going to create a new class called Wind in which I’m passing the figure as a parameter.
我将创建一个名为Wind的新类,在其中将图形作为参数传递。
// First, I'm going to set 2 local constants
const baseForce = 2000;
const off = 0.05;

export default class Wind {
    constructor(figure) {
        const { count } = figure.geometry.attributes.position;
        this.figure = figure;

        // Like the mass, I don't want to have too much forces applied because of a large amount of vertices
        this.force = baseForce / count;

        // We'll use the clock to increase the wind movement
        this.clock = new Clock();

        // Just a base direction
        this.direction = new Vector3(0.5, 0, -1);

        // My array
        this.flowfield = new Array(count);

        // Where all will happen!
        this.update()
    }
}
update() {
const time = this.clock.getElapsedTime();
const { position } = this.figure.geometry.attributes;
const size = this.figure.geometry.parameters.widthSegments;
for (let i = 0; i < position.count; i++) {
const col = i % (size + 1);
const row = Math.floor(i / (size + 1));
const force = (noise.noise3D(row * off, col * off, time) * 0.5 + 0.5) * this.force;
this.flowfield[i] = this.direction.clone().multiplyScalar(force);
}
}The only purpose of this object is to update the array values with noise in each frame so we need to amend Scene.js with a few new things.
该对象的唯一目的是用每帧中的噪声更新数组值,因此我们需要使用一些新东西来修改Scene.js。
// Scene.js
this.wind = new Wind(this.figure.mesh);

// ...

update() {
// ...
    this.wind.update();
    this.figure.update();
// ...
}
And before continuing, I’ll add a new method in my update method after the figure.update():
在继续之前,我将在fig.update()之后的更新方法中添加一个新方法:
this.figure.applyWind(this.wind);Let’s write this new method in Figure.js:
让我们在Figure.js中编写这个新方法:
// Figure.js constructor
// To help performance, I will avoid creating a new instance of vector each frame so I'm setting a single vector I'm going to reuse.
this.bufferV = new C.Vec3();

// New method
applyWind(wind) {
    const { position } = this.geometry.attributes;

    for (let i = 0; i < position.count; i++) {
        const stitch = this.stitches[i];

        const windNoise = wind.flowfield[i];
        const tempPosPhysic = this.bufferV.set(
            windNoise.x,
            windNoise.y,
            windNoise.z
        );

        stitch.applyForce(tempPosPhysic, C.Vec3.ZERO);
    }
}
Congratulation, you have created wind, Mother Nature would be proud! But the wind blows in the same direction. Let’s change that in Wind.js by updating our direction with the mouse position.
恭喜,您创造了风,大自然将感到自豪! 但是风向同一方向吹。 让我们通过使用鼠标位置更新方向来在Wind.js中进行更改。
window.addEventListener("mousemove", this.onMouseMove.bind(this));

onMouseMove({ clientX: x, clientY: y }) {
    const { innerWidth: W, innerHeight: H } = window;

    gsap.to(this.direction, {
        duration: 0.8,
        x: x / W - 0.5,
        y: -(y / H) + 0.5
    });
}结论(Conclusion)
I hope you enjoyed this tutorial and that it gave you some ideas on how to bring a new dimension to your interaction effects. Don’t forget to take a look at the demo, it’s a more concrete case of a slideshow where you can see this effect in action.
我希望您喜欢本教程,并且它给了您一些有关如何为交互效果带来新维度的想法。 不要忘了看一下演示,这是幻灯片的一个更具体的案例,您可以在其中看到这种效果。
Don’t hesitate to let me know if there’s anything not clear, feel free to contact me on Twitter @aqro.
如果有任何不清楚的地方,请随时告诉我,请随时通过Twitter @aqro与我联系。
Cheers!
干杯!
cannon.js


 4687
4687

 被折叠的 条评论
为什么被折叠?
被折叠的 条评论
为什么被折叠?
 到【灌水乐园】发言


