


Kinetic Typography may sound complicated but it’s just the elegant way to say “moving text” and, more specifically, to combine motion with text to create animations.
动态排版可能听起来很复杂,但这只是说“移动文本”的一种优雅方式,更具体地说,是将运动与文本结合起来以创建动画。
Imagine text on top of a 3D object, now could you see it moving along the object’s shape? Nice! That’s exactly what we’ll do in this article, we’ll learn how to move text on a mesh using Three.js and three-bmfont-text.
想象一下3D对象顶部的文本,现在您能看到它沿对象形状移动吗? 真好! 这正是我们在本文中要做的,我们将学习如何使用Three.js和three-bmfont-text在网格上移动文本。
We’re going to skip a lot of basics, so to get the most from this article we recommend you have some basic knowledge about Three.js, GLSL shaders, and three-bmfont-text.
我们将跳过很多基础知识,因此,为了从本文中获得最大收益,我们建议您具有有关Three.js,GLSL着色器和three-bmfont-text的一些基础知识。
基础 (Basis)
The main idea for all these demos is to have a texture with text, use it on a mesh and play with it inside shaders. The simplest way of doing it is to have an image with text and then use it as a texture. But it can be a pain to figure out the correct size to try to display crisp text on the mesh, and later to change whatever text is in the image.
所有这些演示的主要思想是使文本带有纹理,在网格上使用该纹理,然后在着色器中对其进行播放。 最简单的方法是使图像带有文本,然后将其用作纹理。 但是,找出正确的大小以尝试在网格上显示清晰的文本,然后再更改图像中的任何文本,可能会很痛苦。
To avoid all these issues, we can generate that texture using code! We create a Render Target (RT) where we can have a scene that has text rendered with three-bmfont-text, and then use it as the texture of a mesh. This way we have more freedom to move, change, or color text. We’ll be taking this route following the next steps:
为了避免所有这些问题,我们可以使用代码生成该纹理! 我们创建一个“渲染目标”(RT),在其中可以有一个场景,该场景的文本使用三色字体文本进行渲染,然后将其用作网格的纹理。 这样,我们就可以更加自由地移动,更改或着色文本。 我们将按照以下步骤采用此路线:
- Set up a RT with the text 用文字设置RT
- Create a mesh and add the RT texture 创建一个网格并添加RT纹理
- Change the texture inside the fragment shader更改片段着色器内的纹理
To begin, we’ll run everything after the font file and atlas are loaded and ready to be used with three-bmfont-text. We won’t be going over this since I explained it in one of my previous articles.
首先,我们将在加载字体文件和图集并准备将其与三bmfont文本一起使用之后运行所有内容。 自从我在以前的一篇文章中对此进行了解释后,我们将不再讨论它。
The structure goes like this:
结构如下:
init() {
// Create geometry of packed glyphs
loadFont(fontFile, (err, font) => {
this.fontGeometry = createGeometry({
font,
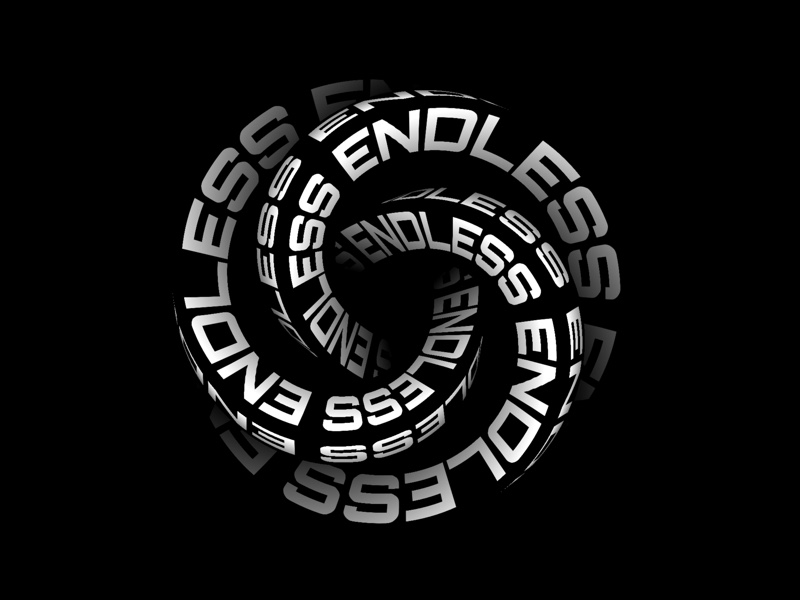
text: "ENDLESS"
});
// Load texture containing font glyphs
this.loader = new THREE.TextureLoader();
this.loader.load(fontAtlas, texture => {
this.fontMaterial = new THREE.RawShaderMaterial(
MSDFShader({
map: texture,
side: THREE.DoubleSide,
transparent: true,
negate: false,
color: 0xffffff
})
);
// Methods are called here
});
});
}Now take a deep breath, grab your tea or coffee, chill, and let’s get started.
现在深吸一口气,喝点茶或咖啡,放松一下,让我们开始吧。
渲染目标 (Render Target)
A Render Target is a texture you can render to. Think of it as a canvas where you can draw whatever is inside and place it wherever you want. Having this flexibility makes the texture dynamic, so we can later add, change, or remove stuff in it.
渲染目标是可以渲染的纹理。 可以将其视为画布,您可以在其中绘制任何内部内容并将其放置在所需位置。 具有这种灵活性可使纹理动态化,因此我们以后可以在其中添加,更改或删除内容。
Let’s set a RT along with a camera and a scene where we’ll place the text.
让我们设置一个RT以及一个摄像机和一个放置文本的场景。
createRenderTarget() {
  // Render Target setup
  this.rt = new THREE.WebGLRenderTarget(
    window.innerWidth,
    window.innerHeight
  );

  this.rtCamera = new THREE.PerspectiveCamera(45, 1, 0.1, 1000);
  this.rtCamera.position.z = 2.5;

  this.rtScene = new THREE.Scene();
  this.rtScene.background = new THREE.Color("#000000");
}
Once we have the RT scene, let’s use the font geometry and material previously created to make the text mesh.
有了RT场景后,让我们使用先前创建的字体几何形状和材质来制作文本网格。
createRenderTarget() {
  // Render Target setup
  this.rt = new THREE.WebGLRenderTarget(
    window.innerWidth,
    window.innerHeight
  );

  this.rtCamera = new THREE.PerspectiveCamera(45, 1, 0.1, 1000);
  this.rtCamera.position.z = 2.5;

  this.rtScene = new THREE.Scene();
  this.rtScene.background = new THREE.Color("#000000");

  // Create text with font geometry and material
  this.text = new THREE.Mesh(this.fontGeometry, this.fontMaterial);

  // Adjust text dimensions
  this.text.position.set(-0.965, -0.275, 0);
  this.text.rotation.set(Math.PI, 0, 0);
  this.text.scale.set(0.008, 0.02, 1);

  // Add text to RT scene
  this.rtScene.add(this.text);

  this.scene.add(this.text); // Add to main scene
}
Note that for now, we added the text to the main scene to render it on the screen.
请注意,目前,我们已将文本添加到主场景以在屏幕上进行渲染。
Cool! Let’s make it more interesting and “paste” the scene over a shape next.
凉! 让我们变得更有趣,然后将场景“粘贴”到一个形状上。
网格化并渲染纹理 (Mesh and render texture)
For simplicity, we’ll first use the shape of a BoxGeometry together with ShaderMaterial to pass custom shaders, time and the render texture uniforms.
为简单起见,我们将首先使用的形状BoxGeometry连同ShaderMaterial传递自定义着色器,时间和渲染纹理制服。
createMesh() {
  this.geometry = new THREE.BoxGeometry(1, 1, 1);

  this.material = new THREE.ShaderMaterial({
    vertexShader,
    fragmentShader,
    uniforms: {
      uTime: { value: 0 },
      uTexture: { value: this.rt.texture }
    }
  });

  this.mesh = new THREE.Mesh(this.geometry, this.material);

  this.scene.add(this.mesh);
}
The vertex shader won’t be doing anything interesting this time; we’ll skip it and focus on the fragment instead, which is sampling the colors of the RT texture. It’s inverted for now to stand out from the background (1. - texture).
这次顶点着色器不会做任何有趣的事情。 我们将跳过它,而是专注于片段,该片段将采样RT纹理的颜色。 现在将其反转以从背景中脱颖而出( 1. - texture )。
varying vec2 vUv;

uniform sampler2D uTexture;

void main() {
  vec3 texture = texture2D(uTexture, vUv).rgb;

  gl_FragColor = vec4(1. - texture, 1.);
}
Normally, we would just render the main scene directly, but with a RT we have to first render to it before rendering to the screen.
通常,我们只是直接渲染主场景,但是使用RT渲染之前,我们必须先渲染到主场景。
render() {
  ...

  // Draw Render Target
  this.renderer.setRenderTarget(this.rt);
  this.renderer.render(this.rtScene, this.rtCamera);
  this.renderer.setRenderTarget(null);
  this.renderer.render(this.scene, this.camera);
}
And now a box should appear on the screen where each face has the text on it:
现在,屏幕上应该会出现一个框,其中每个面都有文字:
Looks alright so far, but what if we want to repeat the text many times around the shape?
到目前为止看起来还不错,但是如果我们想在形状周围重复很多次该怎么办?
重复纹理 (Repeating the texture)
GLSL’s built-in function fract comes handy to make repetition. We’ll use it to repeat the texture coordinates when multiplying them by a scalar so it wraps between 0 and 1.
GLSL的内置函数fract可以方便地进行重复。 当将它们乘以标量时,我们将使用它来重复纹理坐标,以便在0和1之间进行环绕。
varying vec2 vUv;

uniform sampler2D uTexture;

void main() {
  vec2 repeat = vec2(2., 6.); // 2 columns, 6 rows
  vec2 uv = fract(vUv * repeat);

  vec3 texture = texture2D(uTexture, uv).rgb;
  texture *= vec3(uv.x, uv.y, 1.);

  gl_FragColor = vec4(texture, 1.);
}
Notice here that we are also multiplying the texture by the uv components so that we can see the modified texture coordinates visually. This helps us figure out what is going on, since there are very few resources for debugging shaders, so the more ways we can visualize what’s going on, the easier it is to debug! Once we know it’s working the way we intend, we can just comment out, or remove that line.
请注意,在这里,我们还将纹理乘以uv分量,以便可以直观地看到修改后的纹理坐标。 由于用于调试着色器的资源很少,因此这可以帮助我们确定发生了什么,因此,我们可以通过更多方式可视化正在发生的事情来进行调试! 一旦知道它正在按预期的方式工作,我们就可以注释掉或删除该行。
We’re getting there, right? The text should also follow the object’s shape. Here’s where time comes in! We’re going to add it to the x component of the texture coordinate so that the texture moves horizontally.
我们到了那里,对不对? 文本也应遵循对象的形状。 time到了! 我们将其添加到纹理坐标的x分量,以便纹理水平移动。
varying vec2 vUv;

uniform sampler2D uTexture;
uniform float uTime;

void main() {
  float time = uTime * 0.75;
  vec2 repeat = vec2(2., 6.);
  vec2 uv = fract(vUv * repeat + vec2(-time, 0.));

  vec3 texture = texture2D(uTexture, uv).rgb;

  gl_FragColor = vec4(texture, 1.);
}
And for a sweet touch, let’s blend the color with the the background.
为了获得甜美的触感,让我们将颜色与背景融合在一起。
This is basically the process! RT texture, repetition, and motion. Now that we’ve looked at the mesh for so long, using a BoxGeometry gets kind of boring, doesn’t it? Let’s change it in the next final bonus chapter.
这基本上是过程! RT纹理,重复和运动。 既然我们已经看了很长时间的网格,使用BoxGeometry会变BoxGeometry无聊,不是吗? 让我们在下一个最终奖金章节中进行更改。
改变几何 (Changing the geometry)
As a kid, I loved playing and twisting these tangle toys, perhaps that’s the reason why I find satisfaction with knots and twisted shapes? Let this be an excuse to work with a torus knot geometry.
小时候,我喜欢玩和扭扭这些缠结玩具,也许这就是为什么我对打结和扭扭形状感到满意的原因? 让这成为处理圆环结几何形状的借口。
For the sake of rendering smooth text we’ll exaggerate the amount of tubular segments the knot has.
为了呈现流畅的文本,我们将夸大结节的管状段的数量。
createMesh() {
  this.geometry = new THREE.TorusKnotGeometry(9, 3, 768, 3, 4, 3);

  ...
}
Inside the fragment shader, we’ll repeat any number of columns we want just to make sure to leave the same number of rows as the number of radial segments, which is 3.
在片段着色器内部,我们将重复任意数量的列,只是要确保保留与径向段数相同的行数,即3。
varying vec2 vUv;

uniform sampler2D uTexture;
uniform float uTime;

void main() {
  vec2 repeat = vec2(12., 3.); // 12 columns, 3 rows
  vec2 uv = fract(vUv * repeat);

  vec3 texture = texture2D(uTexture, uv).rgb;
  texture *= vec3(uv.x, uv.y, 1.);

  gl_FragColor = vec4(texture, 1.);
}
And here’s our tangled torus knot:
这是我们纠结的圆环结:
Before adding time to the texture coordinates, I think we can make a fake shadow to give a better sense of depth. For that we’ll need to pass the position coordinates from the vertex shader using a varying.
在为纹理坐标添加时间之前,我认为我们可以制作一个假阴影以提供更好的深度感。 为此,我们需要使用变量传递来自顶点着色器的位置坐标。
varying vec2 vUv;
varying vec3 vPos;

void main() {
  vUv = uv;
  vPos = position;

  gl_Position = projectionMatrix * modelViewMatrix * vec4(position, 1.);
}
We now can use the z-coordinates and clamp them between 0 and 1, so that regions of the mesh that are farther from the screen get darker (towards 0), and those closer to the screen, lighter (towards 1).
现在,我们可以使用z坐标并将其钳位在0和1之间,以便远离屏幕的网格区域变暗(朝0),而靠近屏幕的区域变亮(朝1)。
varying vec3 vPos;

void main() {
  float shadow = clamp(vPos.z / 5., 0., 1.);

  gl_FragColor = vec4(vec3(shadow), 1.);
}
See? It sort of looks like white bone:
看到? 它看起来像白色的骨头:
Now the final step! Multiply the shadow to blend it with the texture, and add time again.
现在是最后一步! 将阴影乘以将其与纹理混合,然后再次添加时间。
varying vec2 vUv;
varying vec3 vPos;

uniform sampler2D uTexture;
uniform float uTime;

void main() {
  float time = uTime * 0.5;
  vec2 repeat = -vec2(12., 3.);
  vec2 uv = fract(vUv * repeat - vec2(time, 0.));

  vec3 texture = texture2D(uTexture, uv).rgb;

  float shadow = clamp(vPos.z / 5., 0., 1.);

  gl_FragColor = vec4(texture * shadow, 1.);
}
Fresh out of the oven! Look at this sexy torus coming out of the darkness. Internet high five!
新鲜出炉! 看看这来自黑暗的性感圆环。 互联网高五!
We’ve just scratched the surface making repeated tiles of text, but there are many ways to add fun to the mixture. Could you use trigonometry or noise functions? Play with color? Text position? Or even better, do something with the vertex shader. The sky’s the limit! I encourage you to explore this and have fun with it.
我们只是刮擦了表面,使文本重复出现,但是有很多方法可以增加混合的乐趣。 您可以使用三角函数还是噪声函数? 玩颜色? 文字位置? 甚至更好的方法是使用顶点着色器。 天空是极限! 我鼓励您探索并乐在其中。
Oh! And don’t forget to share it with me on Twitter. If you got any questions or suggestions, let me know.
哦! 并且不要忘记在Twitter上与我分享。 如果您有任何疑问或建议,请告诉我。
Hope you learned something new. Till next time!
希望你学到新东西。 直到下次!
参考和鸣谢 (References and Credits)
翻译自: https://tympanus.net/codrops/2020/06/02/kinetic-typography-with-three-js/


 1万+
1万+

 被折叠的 条评论
为什么被折叠?
被折叠的 条评论
为什么被折叠?
 到【灌水乐园】发言


