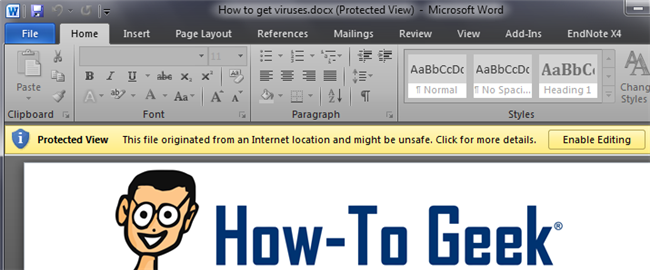
Protected View can stop viruses from installing onto your computer but comes at the price of clicking a button every time you want to edit a document. Here’s how to permanently disable Protected View for all documents in Microsoft Office.
受保护的视图可以阻止病毒安装到您的计算机上,但是这样做的代价是每次您要编辑文档时都单击一个按钮。 以下是永久禁用Microsoft Office中所有文档的保护视图的方法。
Microsoft added many usability and security features to Office 2010 that help protect end users from embedded plugins and viruses that can crash Office or even install viruses. These features go a long way to keep your computer running smoothly, but there are still options you can tweak to disable Protected View for specific files. To fine tune your Protected View options have a look below.
微软在Office 2010中增加了许多可用性和安全性功能,可帮助最终用户免受嵌入式插件和可能导致Office崩溃甚至安装病毒的病毒的侵害。 这些功能对于保持计算机的平稳运行大有帮助,但是您仍然可以调整某些选项来禁用特定文件的保护视图。 要微调您的保护视图选项,请看下面的内容。
禁用特定文档的保护视图 (Disable Protected View for Specific Documents)
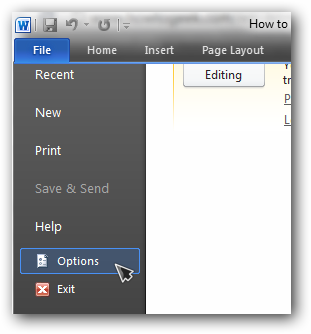
To get to the protected view options, open Microsoft Word 2010 and then go to file and options.
若要访问受保护的视图选项,请打开Microsoft Word 2010,然后转到文件和选项。

On the left column click Trust Center and then click Trust Center Settings.
在左列上单击“信任中心”,然后单击“信任中心设置”。

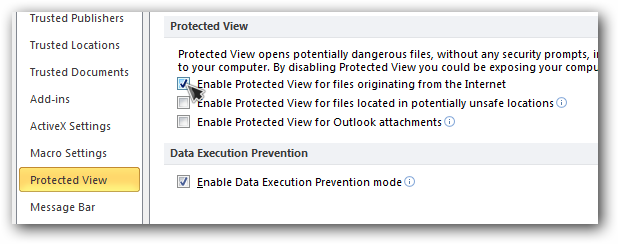
Now on the left column click Protected View and uncheck any documents you would like to open automatically with Protected View disabled. This will allow you to edit the documents without needing to enable editing but may also make your computer an easy target for zero day virus exploits.
现在,在左列上单击“受保护的视图”,然后取消选中要在禁用“受保护的视图”的情况下自动打开的任何文档。 这将使您无需启用编辑即可编辑文档,但也可能使您的计算机成为零日病毒利用的简单目标。

Once you check or un-check the settings you want you can close the windows. Repeat these steps for Microsoft Excel and Powerpoint if you want to disable Protected View there too.
选中或取消选中设置后,您可以关闭窗口。 如果您也要在此处禁用受保护的视图,请对Microsoft Excel和Powerpoint重复这些步骤。
修改安全位置 (Modify Safe Locations)
To add more locations that are marked as safe for Protected View go back to the Trust Center Settings and click Trusted locations on the left.
要添加更多标记为受保护的视图安全的位置,请返回“信任中心设置”,然后单击左侧的“受信任的位置”。

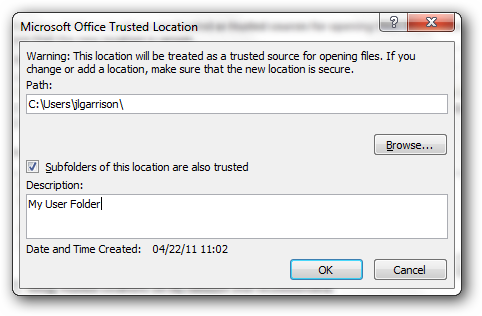
Click add new locations at the bottom and browse to the location you would like to add to the trusted locations list.
单击底部的添加新位置,然后浏览到要添加到受信任位置列表的位置。

Any documents in the new location will now be marked as safe.
现在,新位置中的所有文档都将标记为安全。
从注册表禁用受保护的视图 (Disable Protected View from Registry)
Like most options in Windows there is a way to disable these settings via the registry too. If for some reason the options in Office do not work or you want to be able to automate this setting for multiple computers you can try setting one or more of these registry values below.
像Windows中的大多数选项一样,也可以通过注册表禁用这些设置。 如果由于某些原因,Office中的选项不起作用,或者您希望能够为多台计算机自动执行此设置,则可以尝试在下面设置这些注册表值中的一个或多个。
HKCU\Software\Microsoft\Office\14.0\Word\Security\ProtectedView
HKCU \ Software \ Microsoft \ Office \ 14.0 \ Word \ Security \ ProtectedView
HKCU\Software\Microsoft\Office\14.0\Excel\Security\ProtectedView
HKCU \ Software \ Microsoft \ Office \ 14.0 \ Excel \ Security \ ProtectedView
HKCU\Software\Microsoft\Office\14.0\PowerPoint\Security\ProtectedView
HKCU \ Software \ Microsoft \ Office \ 14.0 \ PowerPoint \ Security \ ProtectedView
The three values you would want to set are:
您要设置的三个值是:
DisableAttachementsInPV
DisableAttachementsInPV
DisableInternetFilesInPV
禁用InternetFilesInPV
DisableUnsafeLocationsInPV
DisableUnsafeLocationsInPV
By setting each value to 1 you will disable Protected View for that file location.
通过将每个值设置为1,您将禁用该文件位置的保护视图。


 3万+
3万+

 被折叠的 条评论
为什么被折叠?


