


impala 对hue
The Hue Dimmer Switch is a great way to add physical controls to your Hue lighting system but it’s a bit rudimentary. Thanks to a handy little app, however, you can teach the Hue Dimmer Switch a bunch of new tricks—like setting any scene with the click of a button.
色相调光器开关是向色相照明系统添加物理控件的一种好方法,但是有点基本。 但是,由于有了一个方便的小应用程序,您可以教Hue Dimmer Switch一堆新的技巧,例如单击按钮即可设置任何场景。
你需要什么 (What You’ll Need)
To follow along with this tutorial, you’ll need a handful of things, most of which you likely have already if you’re interested in doing something like this.
要继续学习本教程,您需要做一些事情,如果您有兴趣做这样的事情,那么可能已经有很多。
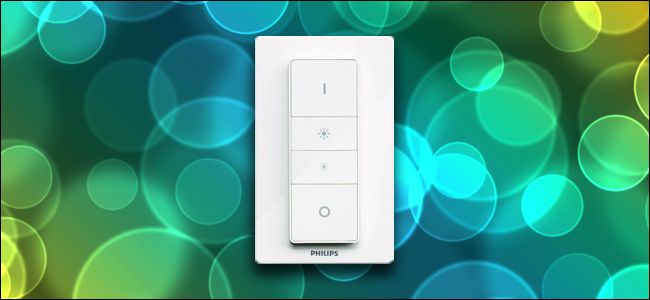
First and foremost, you’ll need the necessary Hue hardware. At minimum, you’ll need the Hue Dimmer Switch and the Hue system (bulbs + bridge). If you’re just getting started with the Hue system and you need the Dimmer Switch, Philips sells them for $25 each, or you can get it in a kit ($35) that includes a single Hue White bulb. This kit saves you $5 over buying the switch and the bulb separately, so we highly recommend going that route. If you need help setting up your Dimmer Switch, check out our guide here.
首先,您需要必要的Hue硬件。 至少,您需要色相调光器开关和色相系统(灯泡+桥)。 如果您只是开始使用Hue系统,并且需要Dimmer Switch,飞利浦会以每只25美元的价格出售它们,或者您可以以套件 (35美元)的价格购买套件 ,其中包括一个Hue White灯泡。 与单独购买开关和灯泡相比,此套件可为您节省5美元,因此我们强烈建议您选择该路线。 如果您在设置调光开关方面需要帮助,请在此处查看我们的指南 。
While you can customize the Hue Dimmer Switch from within the Hue app (which we’ll show you how to do), it’s fairly limited compared to a third-party app called iConnectHue ($4.99). iConnectHue lets you do a whole bunch of cool things with your Hue lights, including customizing your Hue Dimmer Switch.
虽然您可以在Hue应用程序中自定义Hue Dimmer Switch(我们将向您展示如何操作),但与名为iConnectHue (4.99美元)的第三方应用程序相比,它的功能是相当有限的。 通过iConnectHue,您可以使用Hue灯完成很多很酷的事情,包括自定义Hue调光器开关。
It’s currently iOS only and requires iOS 7.1 or higher, and while five bucks is a reasonable price to reprogram your Dimmer Switch to do exactly as you wish, iConnectHue is way more than just a switch programming tool—you can check out the full feature list on their site.
它目前仅在iOS上使用,并且需要iOS 7.1或更高版本,而5美元是对Dimmer Switch重新编程以完全按照您的意愿进行操作的合理价格,而iConnectHue不仅仅是开关编程工具,您还可以查看全部功能列表在他们的网站上。
使用Hue App (Using the Hue App)
Your Hue Dimmer Switch can be configured and customized from within the Hue app itself by first tapping on the settings gear icon in the top-left corner of the screen.
您可以通过在Hue应用程序本身内部配置和自定义Hue调光开关,方法是首先点击屏幕左上角的设置齿轮图标。
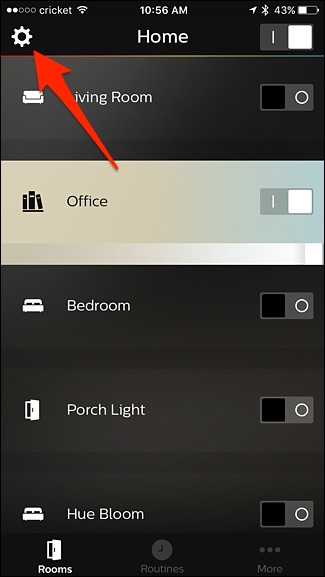
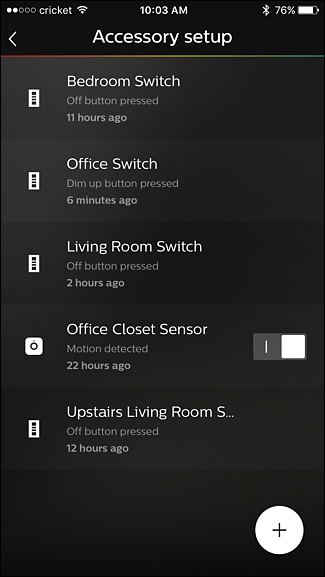
From there, select “Accessory setup”.
从那里选择“附件设置”。
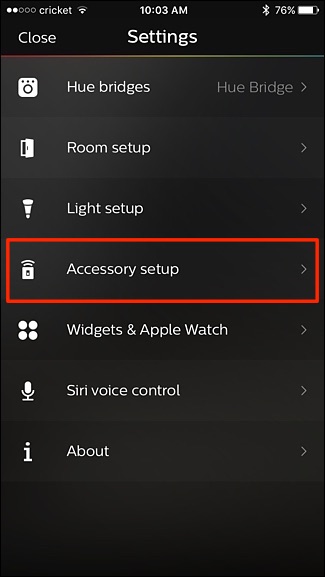
Then select the Hue Dimmer Switch that you want to customize.
然后选择要自定义的Hue Dimmer开关。
You’ll then see a layout of your Hue Dimmer Switch and you can tap on each of the four buttons on the switch to see what it does. Unfortunately, only the “On” button is customizable.
然后,您将看到Hue Dimmer开关的布局,并且可以点击开关上的四个按钮中的每个按钮来查看其功能。 不幸的是,只有“开”按钮是可定制的。
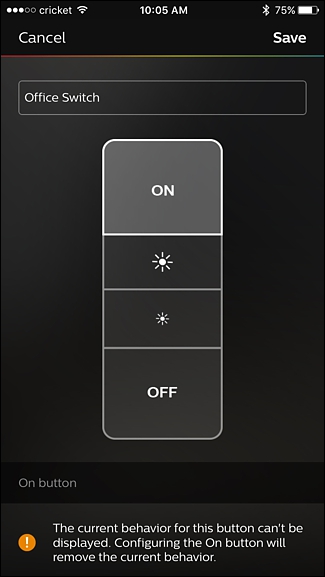
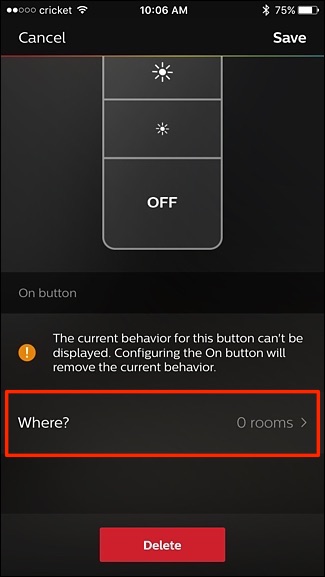
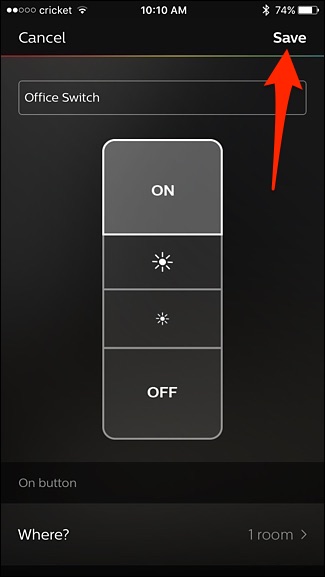
Select the “On” button if it isn’t already, scroll down, and then tap on “Where?”.
如果尚未选择“打开”按钮,请向下滚动,然后点击“在哪里?”。
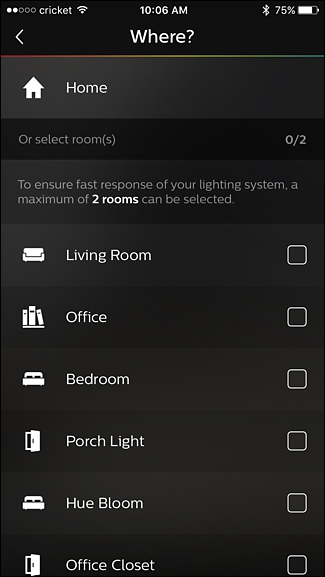
Select the room that you want your Hue Dimmer Switch to control. You can select up to two rooms to control at once. After your selection, hit the back button in the top-left corner to go back.
选择您希望色相调光器开关控制的房间。 您最多可以一次选择两个房间进行控制。 选择后,请点击左上角的“后退”按钮以返回。
Scroll further down and you’ll see that you can set certain scenes for the button’s first press, second press, and so on.
向下滚动,您会看到可以为按钮的第一次按下,第二次按下等设置某些场景。
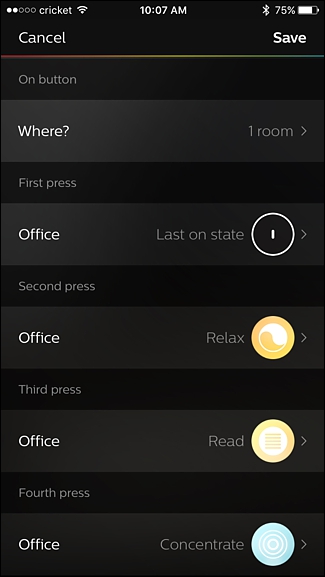
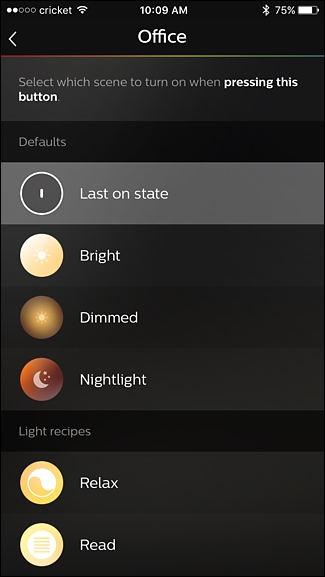
Tap on a button press that you want to change and select a scene or recipe from the list. The Hue Dimmer Switch supports up to five consecutive button presses per button.
点击要更改的按钮,然后从列表中选择场景或配方。 色相调光器开关每个按钮最多支持五次连续的按钮按下。
Once you’ve set the scenes that you want, hit “Save” in the top-right corner and your Hue Dimmer Switch will immediately become configured and is ready to use.
设置好所需的场景后,单击右上角的“保存”,您的Hue Dimmer Switch将立即配置好并可以使用。
使用iConnectHue (Using iConnectHue)
If you want more customization abilities, iConnectHue is the way to go, as it lets you customize any of the buttons on your Hue Dimmer Switch to do practically anything you want. Plus, there are a ton more features to check out, including creating your own animations.
如果您想要更多的自定义功能,则可以使用iConnectHue,因为它使您可以自定义Hue Dimmer Switch上的任何按钮,以执行几乎任何您想做的事情。 此外,还有许多其他功能要签出,包括创建自己的动画 。
Although the process of configuring your Hue Dimmer Switch within iConnectHue isn’t difficult, it takes quite a few steps, and it’s a bit different than the normal Hue setup process by far.
尽管在iConnectHue中配置Hue调光器开关的过程并不困难,但它需要花费很多步骤,并且与正常的Hue设置过程有些不同。
First, you’ll need to link the new app to your Hue Bridge hub, and manually re-create all your scenes (unfortunately, you can’t import scenes from the Hue app). Then, if your Hue Dimmer Switch has been configured before, you’ll wipe it clean to start with a fresh state and re-assign its buttons.
首先,您需要将新应用程序链接到Hue Bridge集线器,并手动重新创建所有场景(不幸的是,您无法从Hue应用程序导入场景)。 然后,如果之前已配置了Hue Dimmer开关,则将其擦干净以使其处于新的状态,然后重新分配其按钮。
第一步:链接顺化桥 (Step One: Link the Hue Bridge)
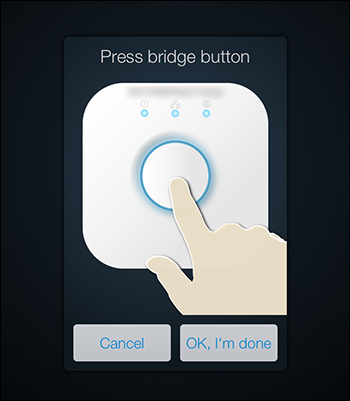
Launch the iConnectHue app and it will immediately start searching your home network for your Hue Bridge. When prompted, press the physical button in the center of the hub, then select “OK, I’m done” when you’ve done so.
启动iConnectHue应用程序,它将立即开始在您的家庭网络中搜索您的Hue Bridge。 出现提示时,按集线器中心的物理按钮,然后选择“确定,我完成了”。
You’ll be prompted to take a tour of the apps features—given that the features are numerous and you want to get your five bucks worth, we recommend checking it out. After the tour, you’ll see the main control screen as pictured below.
系统会提示您浏览一下应用程序的功能-鉴于功能众多,并且您想获得5美元的价值,建议您进行检查。 游览之后,您将看到如下图所示的主控制屏幕。
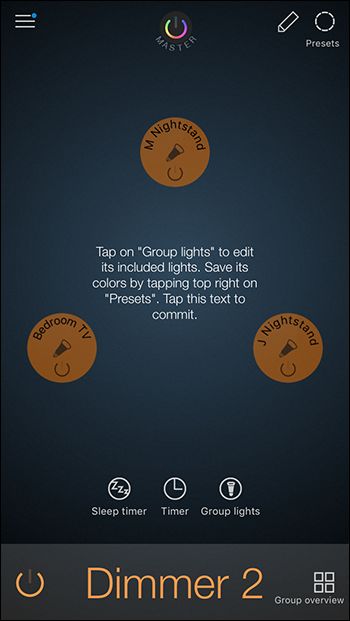
It’s important to note that while the general user interface will look the same for everyone, the actual content of the control panel is dependent on your Hue light system. In our case, we’re running a simple three-bulb system where all three bulbs are located in the same room controlled by a Hue Dimmer Switch.
重要的是要注意,尽管每个用户的通用用户界面看起来都一样,但是控制面板的实际内容取决于您的Hue灯光系统。 在我们的案例中,我们正在运行一个简单的三灯泡系统,其中所有三个灯泡都位于由Hue Dimmer Switch控制的同一房间内。
Although they are grouped correctly with the Dimmer Switch, “Dimmer 2” isn’t a terribly intuitive group name so we’ll change that immediately. You can rename any group by pressing and holding on its name.
尽管已使用调光器开关对它们进行了正确分组,但“ Dimmer 2”并不是一个非常直观的组名,因此我们将立即对其进行更改。 您可以通过按住组名称来重命名任何组。
第二步:手动导入场景 (Step Two: Manually Import Your Scenes)
The next order of business is getting your scenes from the native Hue app into the iConnectHue app. While it sure would be nice if we could just click a button and import them all, the manual import process is actually pretty painless.
下一项业务是将您的场景从本地Hue应用程序导入iConnectHue应用程序。 如果我们只需单击一个按钮并将其全部导入,那肯定会很好,但是手动导入过程实际上是很轻松的。
You don’t need to recreate all your lighting scenes from scratch—you simply need to trigger them with the Hue app so the lights are on and in the correct brightness/color state, and then give that current configuration a name in iConnectHue.
您无需从头开始重新创建所有照明场景-只需使用Hue应用程序触发它们即可使照明打开并处于正确的亮度/颜色状态,然后在iConnectHue中为该当前配置指定名称。
For example, to copy our existing “Movie” scene we use for watching movies (wherein all the bedroom lights are off except for the bias light behind the TV), we would first open up the Hue app and trigger that scene. Confirm that the lights are in the state they should be in (as iConnectHue will simply copy whatever the Hue bridge reports is the current lighting state).
例如,要复制用于观看电影的现有“电影”场景(其中除了电视后面的偏光灯,所有卧室的灯都关闭),我们首先打开Hue应用程序并触发该场景。 确认指示灯处于应处于的状态(因为iConnectHue将仅复制色相桥报告的当前指示灯状态)。
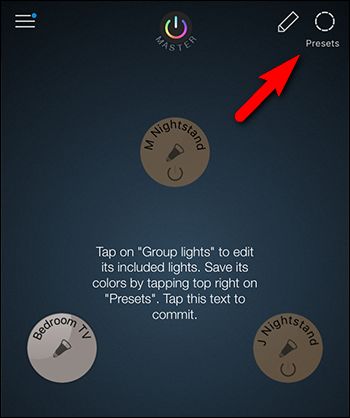
In the iConnectHue app, tap on the little circle labeled “Presets” in the top-right corner. Note that the light indicators on the control panel, seen below, reflect the light configuration we just described (the nightstand lamps are off and the TV bias light is on).
在iConnectHue应用程序中,点击右上角标记为“预设”的小圆圈。 请注意,控制面板上的指示灯(如下所示)反映了我们刚刚描述的灯光配置(床头灯熄灭且电视偏压灯亮)。
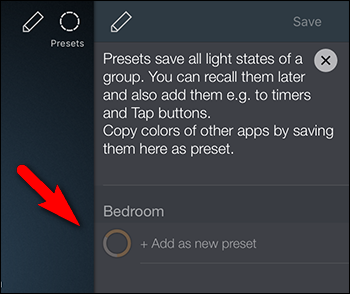
In the Preset menu, tap on “Add as new preset” under the group you wish to add the preset to.
在“预设”菜单中,点击要添加预设的组下的“添加为新预设”。
Repeat the process as many times as you need to for your scenes. Remember you don’t need to import every lighting scene you’ve created—only the ones that you want your Hue Dimmer Switch to invoke.
对场景重复所需的次数。 请记住,您不需要导入您创建的每个照明场景,只需导入您希望Hue Dimmer Switch调用的场景即可。
第三步:将交换机擦拭干净 (Step Three: Wipe the Switch Clean)
Once we’ve imported our lighting scenes, the next order of business is to wipe our Dimmer Switch presets clean. To be clear, you don’t have to perform this step. However, if you do not wipe the previous presets from the switch then they will show up in the iConnectHue app as “Unknown presets”. They’ll still work just the way they did before you started this project, but it’s annoying in two ways: First, you don’t really know what the preset is. Secondly, you can’t adjust them. It’s much better to wipe the switch completely clean and then if you want the old presets to exist alongside your new fancy button configurations, you can easily add them back in.
导入照明场景后,下一个工作就是清除Dimmer Switch预设。 需要明确的是,你不必执行此步骤。 但是,如果您不擦除交换机上的先前预设,则它们将在iConnectHue应用程序中显示为“未知预设”。 他们仍然会像开始该项目之前一样工作,但是它在两个方面令人烦恼:首先,您并不真正了解预设是什么。 其次,您无法调整它们。 最好将开关完全擦拭干净, 然后,如果您希望旧的预设与新的精美按钮配置同时存在,则可以轻松地将其重新添加。
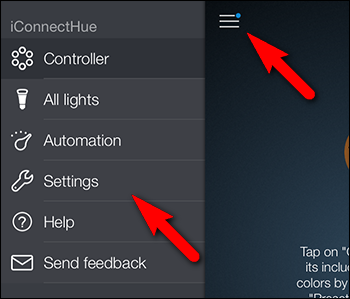
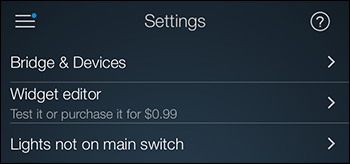
To wipe the switch’s existing presets we just need to hop into the Settings menu. To do so, tap on the menu icon in the upper-left corner and select “Settings”.
要擦除开关的现有预设,我们只需要跳到“设置”菜单即可。 为此,请点击左上角的菜单图标,然后选择“设置”。
Select “Bridges & Devices” at the top of the list.
选择列表顶部的“网桥和设备”。
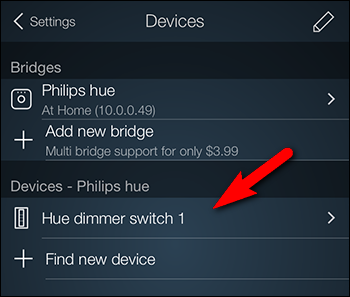
Select your switch from the device list, as seen below.
从设备列表中选择开关,如下所示。
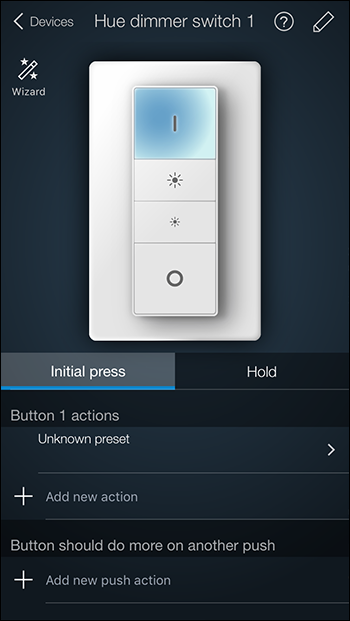
Here is the interface where all the magic happens, and where we’ll be spending the remainder of the tutorial.
这是所有魔术发生的界面,我们将在本教程的其余部分中使用该界面。
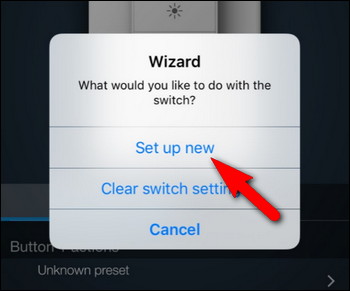
To reset your switch, tap on the “Wizard” icon in the upper left corner and then select “Clear switch settings”.
要重置开关,请点击左上角的“向导”图标,然后选择“清除开关设置”。

第四步:重新分配按钮 (Step Four: Reassign the Buttons)
Now that we’ve cleared the way for our fresh configurations, it’s time to start assigning buttons.
既然我们已经为全新的配置扫清了道路,是时候开始分配按钮了。
Before we dive into configuring the Dimmer Switch to perform new tricks, let’s first highlight how to make it do all its old tricks. By default, the Switch turns the lights on with the top button, brights and dims the lights with the middle buttons, and turns off the lights with the bottom button.
在开始配置调光器开关以执行新技巧之前,让我们首先重点介绍如何使它执行所有旧技巧。 默认情况下,“开关”使用顶部按钮打开灯光,使用中间按钮打开和关闭灯光,使用底部按钮关闭灯光。
If you wish to restore that default functionality and then build on it with additional tricks, simply activate the setup wizard as we did in the previous step and select “Set up new” instead of “Clear switch settings” in the wizard.
如果您希望还原该默认功能,然后使用其他技巧在其上进行构建,只需像上一步中那样激活设置向导,然后在向导中选择“设置新”而不是“清除开关设置”。
This will automatically configure all four buttons to function exactly as they did before we reset them, but with an added bonus: they are now properly labeled and you can edit their configuration.
这将自动将所有四个按钮配置为与我们重置它们之前完全相同的功能,但有一个额外的好处:它们现在已正确标记,您可以编辑其配置。
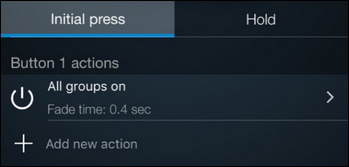
In the screenshot above you can see how what was “Unknown preset” when the setting was inherited from the original setup of the Dimmer Switch is now labeled “All groups on” with an assigned fade time.
在上面的屏幕截图中,您可以看到从调光器开关的原始设置继承设置后的“未知预设”现在被标记为“所有组打开”,并带有指定的淡入时间。
Now let’s take a look at how to add a new and unique function to the Dimmer Switch. Because there are so many potential combinations, we’re simply going so show you how to do one (which teaches you how to access the menus) and then share a little worksheet you can use to keep track of populating all your other buttons.
现在让我们看一下如何向调光器开关添加新的独特功能。 因为存在很多潜在的组合,所以我们只是向您展示如何做一个(教您如何访问菜单),然后共享一个小的工作表,您可以用来跟踪填充所有其他按钮。
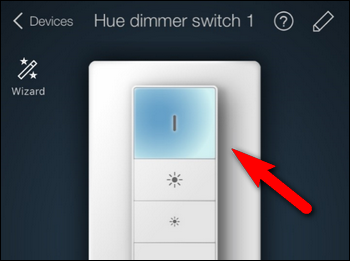
To add an action simply select the button you wish to edit on the interface like so:
要添加动作,只需在界面上选择要编辑的按钮,如下所示:
Select the button function want “Initial Press” for a light click, and “Hold” for a press-and-hold push.
选择按钮功能时,轻按一下“ Initial Press”,然后长按“ Hold”。

Then, select “Add new action” under “Button # Actions” to associate an action with that button press. You can also add in a secondary function in the “Button should do more on another push” section. In this fashion you can assign one function to the first press and one function to the second press.
然后,在“按钮#动作”下选择“添加新动作”,以将一个动作与该按钮按下关联。 您还可以在“按钮应在另一次按下时执行更多操作”部分中添加辅助功能。 您可以通过这种方式为第一次按下分配一个功能,为第二次按下分配一个功能。

When you select the “Add a new action” entry, you are presented with the following options:
选择“添加新动作”条目时,将显示以下选项:
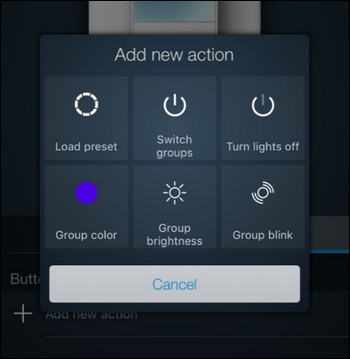
You can load a preset, switch which group of lights the Dimmer Switch is controlling, turn lights off, change the group to a different color, adjust the group brightness, or force the group to blink.
您可以加载预设,切换调光器开关正在控制的灯组,关闭灯,将组更改为其他颜色,调整组的亮度或强制组闪烁。
Select “Load preset” and then pick which preset you wish to associate with the button press you previously selected.
选择“加载预设”,然后选择要与先前选择的按钮关联的预设。
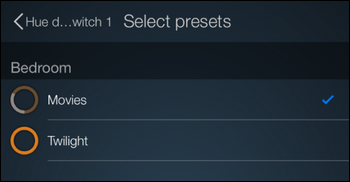
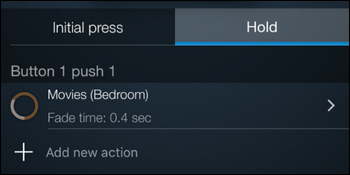
And there you have it: a new function (in this case pressing and holding button 1 to trigger the “Movies” scene in the bedroom) is associated with your Dimmer Switch button:
有了它:新功能(在这种情况下,按住按钮1触发卧室中的“电影”场景)与调光器开关按钮相关联:
To really maximize the button magic, you’ll want to associate different button presses with different scenes, colors, or whatever else your heart desires. While entering all the button combinations is pretty easy, keeping track of all of them while you’re working in the app can be a hassle (we’ll admit that midway through working on our configuration we outright forgot one of the combos we intended to include). With that in mind, we’d recommend printing this handy little fill-in-the-blank list to help you brainstorm what buttons you want to assign to what.
为了真正最大化按钮的魔力,您需要将不同的按钮按下与不同的场景,颜色或您心中想要的任何其他东西相关联。 虽然输入所有按钮组合非常容易,但是在您使用应用程序时跟踪所有按钮组合可能会很麻烦(我们承认在进行配置的过程中,我们彻底忘记了我们打算使用的组合之一包括)。 考虑到这一点,我们建议打印此方便的空白小清单,以帮助您集思广益,想将哪些按钮分配给什么。
We’ve labeled the buttons by the name used in iConnectHue as well as the symbol/function represented on the physical buttons.
我们已使用iConnectHue中使用的名称以及物理按钮上表示的符号/功能标记了按钮。
Button 1 (On):
按钮1(开启):
- First Press: 首次按下:
- Second Press: 第二次按:
- First Hold: 首次举行:
- Second Hold: 二等奖:
Button 1 (On):
按钮1(开启):
Button 2 (Brighten):
按钮2(变亮):
- First Press: 首次按下:
- Second Press: 第二次按:
- First Hold: 首次举行:
- Second Hold: 二等奖:
Button 2 (Brighten):
按钮2(变亮):
Button 3 (Dim):
按钮3(昏暗):
- First Press: 首次按下:
- Second Press: 第二次按:
- First Hold: 首次举行:
- Second Hold: 二等奖:
Button 3 (Dim):
按钮3(昏暗):
Button 4 (Off):
按钮4(关闭):
- First Press: 首次按下:
- Second Press: 第二次按:
- First Hold: 首次举行:
- Second Hold: 二等奖:
Button 4 (Off):
按钮4(关闭):
You certainly don’t need to use all 16 potential options, but the above list will certainly help you decide and plan out what each button should do (and how many functions you wish to assign to it).
您当然不需要使用所有16个可能的选项,但是上面的列表肯定会帮助您决定和计划每个按钮应该做什么(以及希望分配给它多少个功能)。
With the help of a handy little app, a handy little switch, and a little bit of planning you can supercharge your Philips Dimmer Switch to handle all your lighting scenes and functions.
借助方便的小应用程序,方便的小开关和一点点的计划,您可以为Philips Dimmer Switch增压,以处理所有照明场景和功能。
impala 对hue


 1389
1389


 被折叠的 条评论
为什么被折叠?
被折叠的 条评论
为什么被折叠?
 到【灌水乐园】发言


