
进化:从孤胆极客到高效团队

In this installation of Geek School, we look at how we can administer our machines remotely using Remote Assistance, Remote Desktop, Windows Remote Management also known as WinRM, and PowerShell.
在此Geek School安装中,我们研究了如何使用远程协助,远程桌面,Windows远程管理(也称为WinRM)和PowerShell远程管理计算机。
Be sure to check out the previous articles in this Geek School series on Windows 7:
请务必查看Windows 7上此Geek School系列中的先前文章:
And stay tuned for the rest of the series all this week.
并继续关注本周剩余的系列节目。
远程协助 (Remote Assistance)
Remote assistance is a feature which first debuted in Windows XP, and besides the removal of voice chat has remained unchanged. When using remote assistance there are two users connected to one machine, using it as the same time. Firstly there is the person needing assistance who is also known as the host as well as the person assisting the user who is called the helper. Remote assistance is centered around the idea of a virtual helpdesk kind of scenario.
远程协助是Windows XP中首次亮相的功能,此外,语音聊天的删除保持不变。 使用远程协助时,有两个用户连接到一台计算机,同时使用它。 首先,有一个需要帮助的人,也被称为主持人,还有一个帮助用户的人,称为帮助者。 远程协助围绕虚拟服务台这种情况的思想进行。
In order for a someone to request help, they need to send you an invitation to help them. There are three ways you can generate an invitation:
为了使某人请求帮助,他们需要向您发送邀请以帮助他们。 您可以通过三种方式生成邀请:
If both the host and the helper are on the same network you can save a file to a network location.
如果主机和帮助程序都在同一网络上,则可以将文件保存到网络位置。
If they are not on the same network you can send them an email invitation.
如果他们不在同一网络上,则可以向他们发送电子邮件邀请。
If your network is running IPv6, which is highly unlikely at this point in time, you can use easy connect.
如果您的网络正在运行IPv6(目前不太可能),则可以使用easy connect 。
The host is also has the final say of what goes on in the session, for example they can choose whether the helper can control the mouse and keyboard and can even disconnect the session at anytime should they feel uncomfortable with what the helper is doing.
主持人还可以最终确定会话中发生的事情,例如,他们可以选择帮助者是否可以控制鼠标和键盘,甚至可以在他们对助手的操作感到不舒服时随时断开会话。
启用远程协助 (Enabling Remote Assistance)
To enable Remote Assistance, open the Start Menu and right click on Computer, then select Properties from the context menu.
要启用远程协助,请打开“开始”菜单,右键单击“计算机”,然后从上下文菜单中选择“属性”。
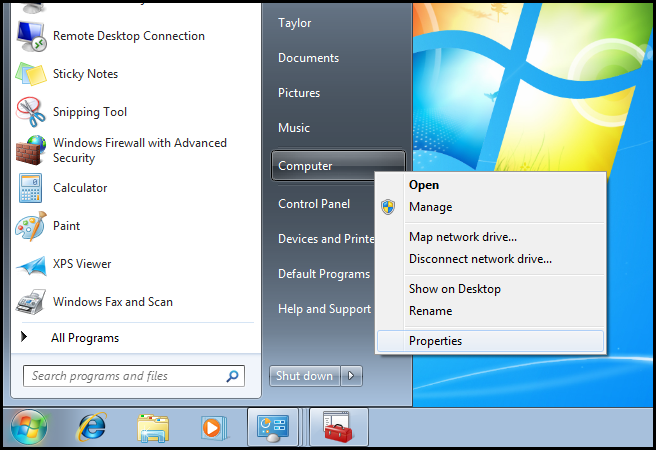
When the System Information dialog opens, click on the Remote settings link located on the left hand side.
当“系统信息”对话框打开时,单击左侧的“远程设置”链接。

Here you will need to check the box that allows Remote Assistance connections to your computer.
在这里,您需要选中允许远程协助连接到计算机的复选框。
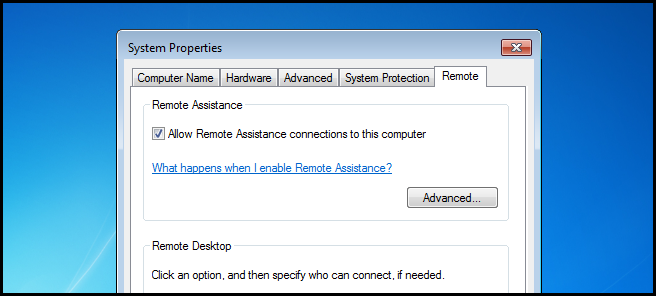
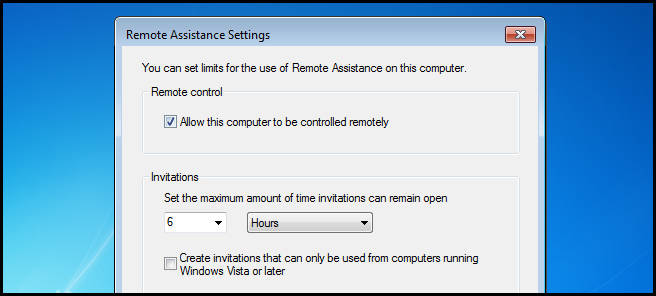
If you click on the advanced button you can change things like whether the helper will be allowed to take control of your mouse and keyboard as well as how long invitations that you generate are valid for.
如果单击高级按钮,则可以更改诸如是否允许助手控制您的鼠标和键盘以及所生成邀请的有效期限之类的信息。
使用远程协助 (Using Remote Assistance)
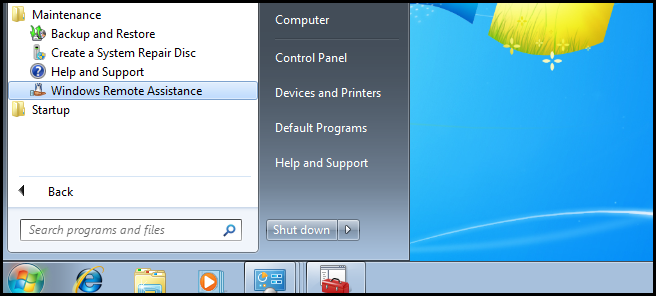
In order to request for someone to help you, you need to make an invitation. To do that open the start menu, expand maintenance and choose Windows Remote Assistance.
为了请求某人帮助您,您需要发出邀请。 为此,请打开“开始”菜单,展开“维护”,然后选择“ Windows远程协助”。
Then choose to invite someone you trust to help you.
然后选择邀请您信任的人来帮助您。
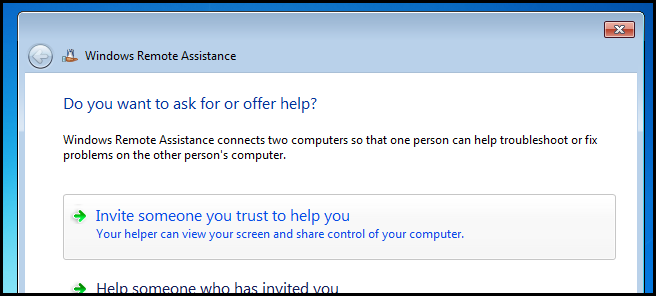
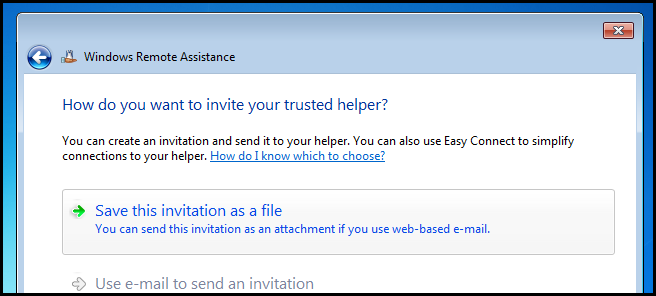
For demonstration purposes I am going to save the invitation out to a file, but feel free to use whatever method you want.
出于演示目的,我将邀请保存到文件中,但可以随时使用所需的任何方法。
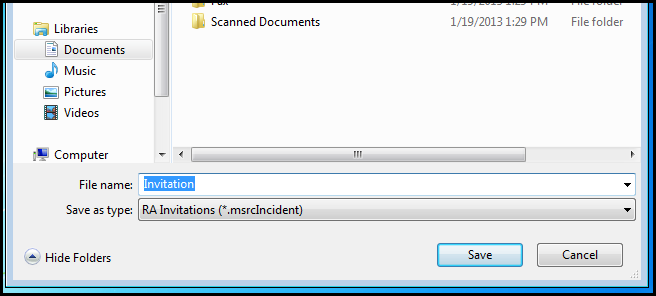
I have shared my documents library with another PC on my network so saving the invitation in here is perfect.
我已经与网络上的另一台PC共享了文档库,因此将邀请保存在这里非常完美。
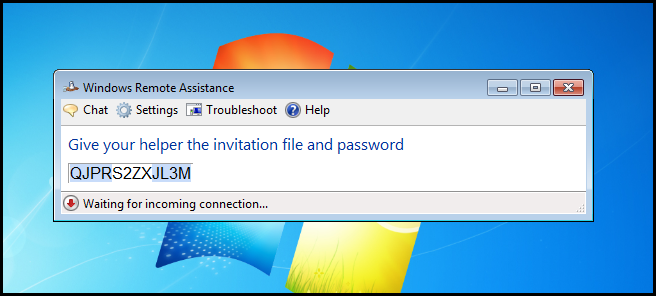
Once you have saved the invitation you will be given a password. This is very important as the helper will need to enter this when they try and connect to your PC.
保存邀请后,您将获得一个密码。 这非常重要,因为帮助者在尝试连接到PC时将需要输入该信息。
I have switched over to a machine running Windows 8. I chose to do this so that you don’t get confused about which PC I’m on. From the Windows 8 machine I simply double click on the invitation.
我已切换到运行Windows 8的计算机。我选择执行此操作,以免您对正在使用的PC感到困惑。 在Windows 8计算机上,我只需双击邀请即可。

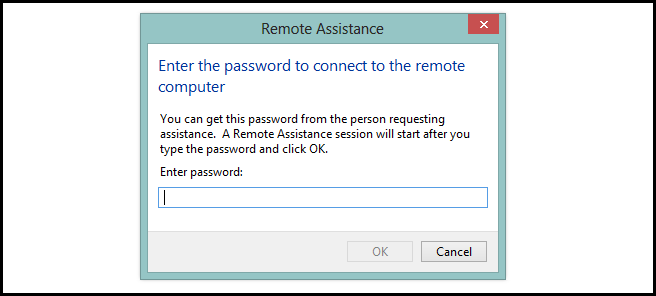
I then enter the password that my buddy, on the on host machine sent to me and click ok.
然后,我在主机上发送给我的好友的密码发送给我,然后单击“确定”。
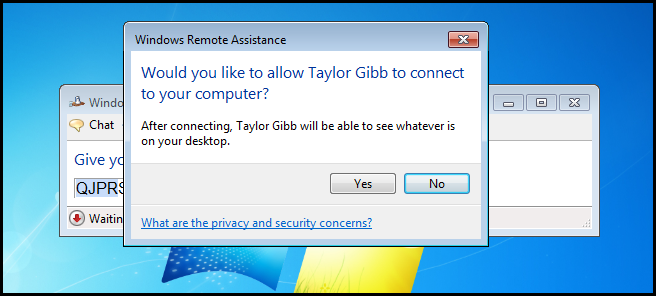
The host will then be asked if they want to allow me to connect to their machine. In this case I know who is trying to connect and so I can click Yes.
然后,将询问主机他们是否要允许我连接到他们的计算机。 在这种情况下,我知道谁在尝试连接,因此可以单击“是”。
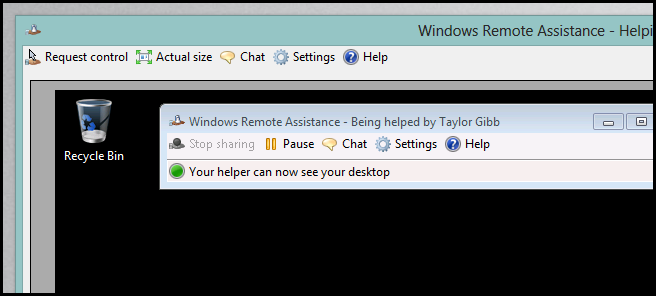
That’s all there is to it. I can now see exactly what you are doing on your Windows 7 computer in real time. If you allowed users to take control of your PC, as seen under the advanced options section, you will see a request control button as seen below. The host will then be allowed to allow or deny your request. You can also use the chat feature if you so choose.
这里的所有都是它的。 现在,我可以实时准确地看到您在Windows 7计算机上正在做什么。 如高级选项部分所示,如果允许用户控制您的PC,则将看到一个请求控制按钮,如下所示。 然后,将允许主机允许或拒绝您的请求。 您也可以选择使用聊天功能。
远程桌面 (Remote Desktop)
While Remote Assistance is focused around a two user scenario, Remote Desktop is focused around a single user. The biggest difference between Remote Assistance and Remote Desktop is that when I connect to a remote desktop session, the computer I am connecting to gets locked so that anyone walking by can’t see what I am doing on that machine. As you probably have guessed by now, Remote Desktop is focused around productivity. For example, if I forgot to edit a document before I left work, when I get home I could use Remote Desktop to connect to that machine and it would be like I am sitting at my desk.
远程协助专注于两个用户的方案,而远程桌面专注于单个用户的方案。 远程协助和远程桌面之间的最大区别在于,当我连接到远程桌面会话时,我连接的计算机将被锁定,以使任何路过的人都看不到我在那台计算机上正在做什么。 您可能已经猜到了,远程桌面专注于生产力。 例如,如果我在下班前忘了编辑文档,当我回到家时,我可以使用远程桌面连接到该计算机,就像我坐在办公桌前一样。
Note: This is so useful I even use it every day at home where I have a couple of servers with no screen attached to them; in fact, they don’t even have a keyboard or mouse. They simply have a power cable and a network cable, that’s all. When I want to to something on the server I simply use remote desktop.
注意:此功能非常有用,我什至每天在家中都使用几台服务器,而这些服务器均未连接屏幕; 实际上,他们甚至没有键盘或鼠标。 它们仅具有电源线和网络线即可。 当我想在服务器上进行操作时,我只是使用远程桌面。
启用远程桌面 (Enabling Remote Desktop)
To enable Remote Desktop, open the Start Menu and right click on Computer, then select Properties from the context menu.
要启用远程桌面,请打开“开始”菜单,右键单击“计算机”,然后从上下文菜单中选择“属性”。
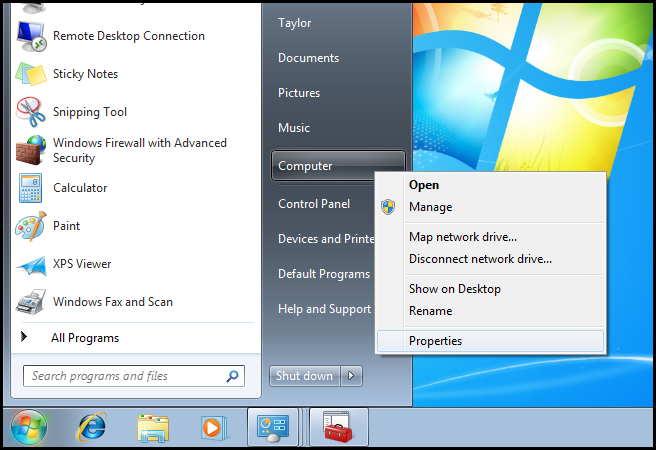
When the System Information dialog opens, click on the Remote settings link located on the left hand side.
当“系统信息”对话框打开时,单击左侧的“远程设置”链接。
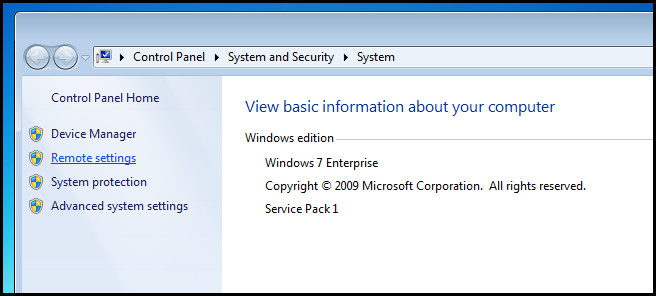
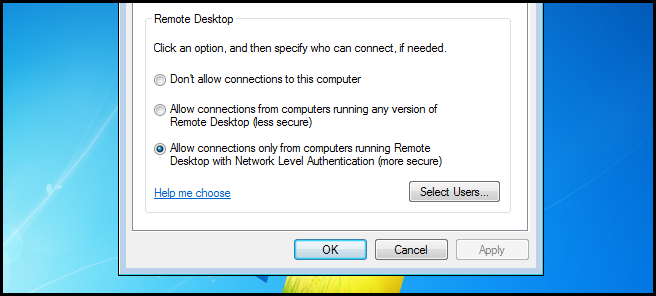
Here you will need to check the box that allows Remote Desktop connections to your computer. There are two options for enabling Remote Desktop:
在这里,您需要选中允许远程桌面连接到计算机的复选框。 启用远程桌面有两个选项:
- Simply allowing connection from any device that implements the Remote Desktop Protocol. This is less secure but allows you to connect to your PC from devices that don’t run Windows for example, an iOS device or even another computer that is running Linux. 只需允许实现远程桌面协议的任何设备进行连接即可。 这种方法的安全性较差,但允许您从不运行Windows的设备(例如iOS设备或什至另一台运行Linux的计算机)连接到PC。
- Alternatively, you can choose to allow connections from Windows 7 or later machines, which implement the RDP with Network Level Authentication. 或者,您可以选择允许来自Windows 7或更高版本的计算机的连接,这些计算机通过网络级身份验证实现RDP。
We can go with the more secure option since I only have computers running Windows 7 and later in my environment.
我们可以选择更安全的选项,因为我的环境中只有运行Windows 7及更高版本的计算机。
使用远程桌面 (Using Remote Desktop)
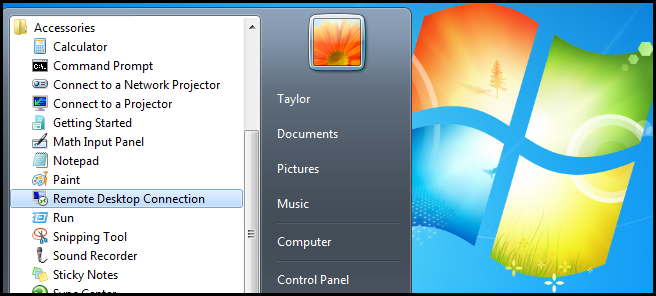
Once you have enabled Remote Desktop on a computer it is very easy to connect to it. To do so, open the Start Menu and expand Accessories, then click on Remote Desktop Connection.
在计算机上启用远程桌面后,很容易连接到它。 为此,请打开“开始”菜单并展开“附件”,然后单击“远程桌面连接”。
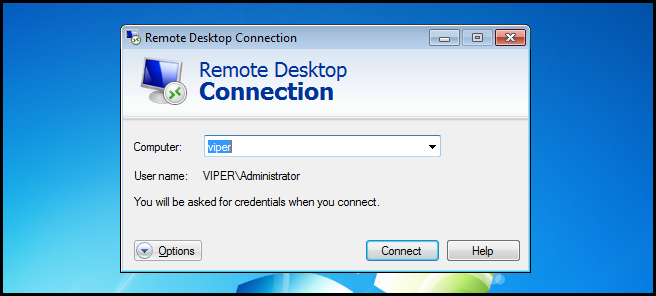
Now you will need to enter the name or IP address of the machine with Remote Desktop enabled, then click connect.
现在,您需要输入启用了远程桌面的计算机的名称或IP地址,然后单击连接。
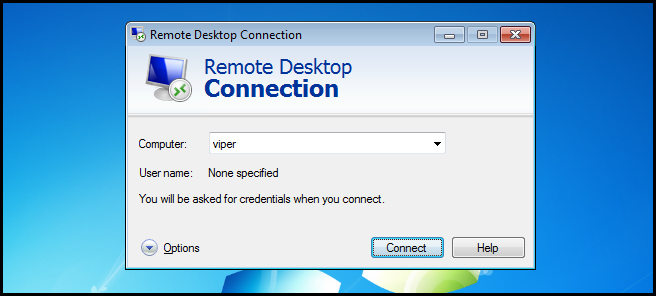
You will be prompted for credentials. Remember: you will need to input credentials of a user on the remote machine and not the one you are connecting from.
系统将提示您输入凭据。 请记住:您将需要输入远程计算机上的用户凭据,而不是您要连接的用户的凭据。
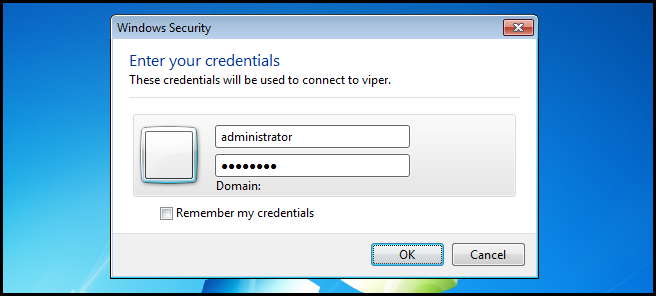
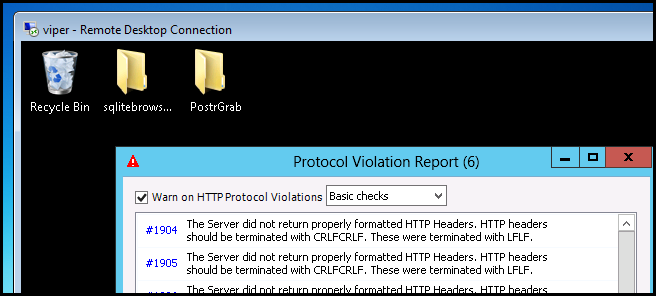
That’s all there is to it. It will now feel like you are sitting at the remote machine.
这里的所有都是它的。 现在感觉就像您坐在远程计算机上一样。
One thing you will notice is that you lose a lot of the visual effects when you use RDP. If you are on a LAN and have Gigabit Ethernet, you may want to change this. To do so, before you connect, click on the options drop down.
您会注意到的一件事是,使用RDP会损失很多视觉效果。 如果您在局域网上并且具有千兆以太网,则可能需要更改此设置。 为此,在连接之前,请单击选项下拉菜单。
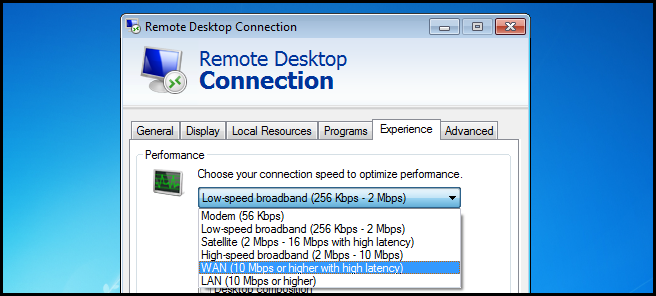
Then switch over to the Experience tab. Here you can choose the speed of you connection, which will determine the optimum settings for you.
然后切换到“体验”选项卡。 在这里,您可以选择连接速度,这将为您确定最佳设置。
WinRM (WinRM)
Note: WinRM is a solid management tool but as you will see in a little while it has been superseded by the ever amazing PowerShell Remoting feature.
注意:WinRM是一个可靠的管理工具,但是不久之后,您将看到它已被功能强大的PowerShell Remoting功能所取代。
Windows Remote Management is a command line-based management protocol. The thing that WinRM really had going for it was that is was based upon the solid HTTP protocol that is allowed through many corporate firewalls, so there was no need to get special ports opened. WinRM doesn’t come enabled on Windows 7 and you will have to manually enable it on the workstations and servers you wish to manage remotely. In order to enable it open an elevated command prompt and run:
Windows远程管理是基于命令行的管理协议。 WinRM真正要做的是基于许多公司防火墙允许的可靠HTTP协议,因此不需要打开特殊端口。 Windows 7并未启用WinRM,您必须在要远程管理的工作站和服务器上手动启用WinRM。 为了启用它,请打开提升权限的命令提示符并运行:
winrm quickconfig
Winrm QuickConfig
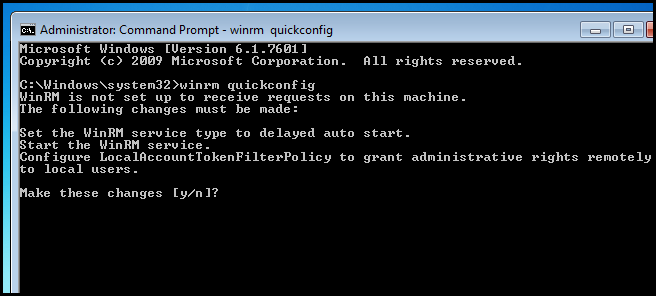
The following system changes take place when you enable WinRM:
启用WinRM时,将发生以下系统更改:
- The Windows Remote Management service gets changed to delayed automatic start. Windows远程管理服务已更改为延迟的自动启动。
- It will create HTTP listeners on all local IP addresses 它将在所有本地IP地址上创建HTTP侦听器
- A firewall exception will be created将创建防火墙例外
That’s really all there is to setting your computer up for WinRM.
这实际上是为WinRM设置计算机的全部功能。
连接到启用WinRM的计算机 (Connecting to a WinRM Enabled Computer)
In order to connect to a computer using WinRM you have to add the machine to your trusted hosts list. To do that simple type in the following command:
为了使用WinRM连接到计算机,您必须将计算机添加到“受信任的主机”列表中。 为此,请输入以下命令:
Note: You will need to change the IP in the command below to the one of the machine you are trying to connect to.
注意:您需要将以下命令中的IP更改为您尝试连接的计算机之一。
winrm set winrm/config/client @{TrustedHosts=”192.168.174.130”}
winrm设置winrm / config / client @ {TrustedHosts =” 192.168.174.130”}
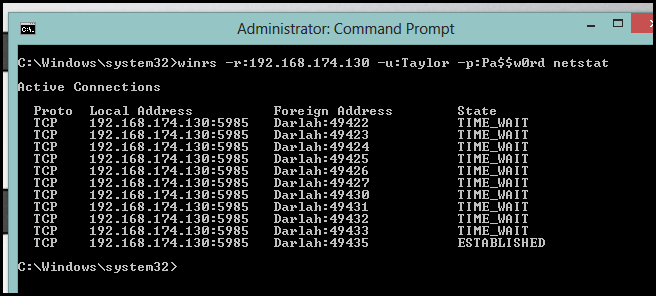
Once you have added the machine to your TrustedHosts, you can connect and run any command you want on the remote machine. To do so you use the Windows Remote Shell (WinRS) command.
将计算机添加到TrustedHosts之后,就可以连接并在远程计算机上运行所需的任何命令。 为此,您可以使用Windows Remote Shell(WinRS)命令。
winrs –r:192.168.174.130 –u:Taylor –p:Pa$$w0rd netstat
winrs –r:192.168.174.130 –u:Taylor –p:Pa $$ w0rd netstat
You will need to substitute the following values:
您将需要替换以下值:
192.168.174.130 for the IP address of a machine with WinRM enabled
启用WinRM的计算机的IP地址为192.168.174.130
Taylor for the username of a local administrator on the remote machine
Taylor为远程计算机上本地管理员的用户名
Pa$$w0rd for the password for the user account specified above.
Pa $$ w0rd为上面指定的用户帐户的密码。
netsat for the command you want to run. Of course, if you really want to see the listening ports on the remote machine, feel free to use netsat.
您要运行的命令的netsat 。 当然,如果您真的想查看远程计算机上的侦听端口,请随时使用netsat。
PowerShell远程处理 (PowerShell Remoting)
As I mentioned earlier, PowerShell’s Remoting feature is built on top of WinRM. So let’s establish what sets it apart from the legacy shell.
如前所述,PowerShell的Remoting功能是基于WinRM构建的。 因此,让我们建立将其与传统Shell区别开的原因。
Object Orientation
面向对象
There is one thing that makes PowerShell as powerful as it is, and that thing is called Object Orientation. Object Oriented Programming, or OOP as it has come to be known, is a style of programming that supports code reuse. One of the methods it uses to accomplish this is allowing you to create compound data structures that are made up of primitive data types like numbers and strings as well as other compound structures. These compound data structures are called objects.
有一件事情可以使PowerShell保持其强大的功能,而这又称为对象定向。 面向对象编程(OOP)是一种支持代码重用的编程风格。 它用来实现此目的的方法之一是允许您创建由原始数据类型(例如数字和字符串)以及其他复合结构组成的复合数据结构。 这些复合数据结构称为对象。
Put simply, an object is a representation of something. Objects contain properties that describe the thing, and methods that tell the object what it can do. For example, you might have an object called Person. The Person object would have:
简而言之,对象就是事物的表示。 对象包含描述事物的属性,以及告诉事物它可以做什么的方法。 例如,您可能有一个名为Person的对象。 Person对象将具有:
- A property describing the color of the person’s eyes. 描述人眼颜色的属性。
- A property describing the color of the person’s hair. 描述人的头发颜色的属性。
- It might have a method called sleep. 它可能有一种称为睡眠的方法。
- It might have a method called walk. 它可能有一个叫做walk的方法。
OOP is actually much more than this, but this will serve as a working definition for now. Since everything in PowerShell is an object, it’s really easy to work with data. For example, the Get-Service cmdlet gets information about services running on your local machine. To see what kind of object it outputs, simply pipe it to Get-Member:
OOP实际上不止于此,但是现在这将作为一个可行的定义。 由于PowerShell中的所有内容都是一个对象,因此使用数据真的很容易。 例如,Get-Service cmdlet获取有关在本地计算机上运行的服务的信息。 要查看其输出的对象类型,只需将其通过管道传递到Get-Member:
Get-Service | Get-Member
服务获取| 获得会员
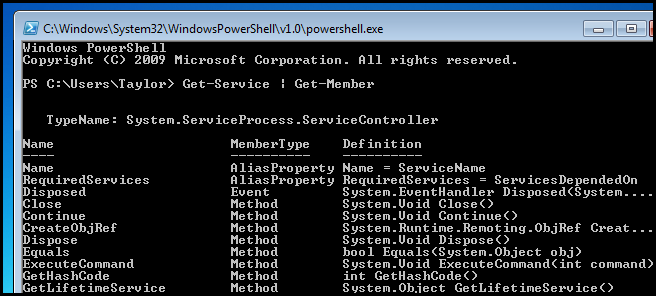
Here you can see it outputs a type of object called a ServiceController. You can also see the Methods and Properties that ServiceController objects support. Given this information, it’s fairly trivial to figure out that you could stop a service by calling the Kill method on the object that represents the service you want to stop.
在这里,您可以看到它输出一种称为ServiceController的对象。 您还可以查看ServiceController对象支持的方法和属性。 有了这些信息,弄清楚您可以通过在表示要停止的服务的对象上调用Kill方法来停止服务,这是很简单的。
远程处理 (Remoting)
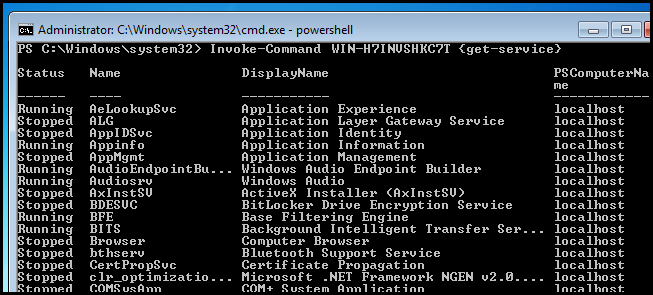
Since we have set up WinRM, our Windows 7 machine is already capable of being remotely controlled via PowerShell. To run a powershell cmdlet on a remote machine you use the Invoke-Command cmdlet:
由于我们已经设置了WinRM,因此我们的Windows 7计算机已经能够通过PowerShell进行远程控制。 要在远程计算机上运行powershell cmdlet,请使用Invoke-Command cmdlet:
Invoke-Command WIN-H7INVSHKC7T {get-service}
调用命令WIN-H7INVSHKC7T {获取服务}
That’s all there is to it.
这里的所有都是它的。
If you have any questions you can tweet me @taybgibb, or just leave a comment.
如果您有任何疑问,可以发给我@taybgibb ,或发表评论。
翻译自: https://www.howtogeek.com/134679/geek-school-learning-windows-7-remote-administration/
进化:从孤胆极客到高效团队


 609
609

 被折叠的 条评论
为什么被折叠?


