


rrt planner

If you’ve been using Microsoft Planner, then you will know there’s more to the application than meets the eye. Here are some features, tips, and tricks to help turn you from a Microsoft Planner novice to a Planner master.
如果您一直在使用Microsoft Planner ,那么您将知道应用程序不仅仅具有视觉效果。 以下是一些功能,技巧和窍门,可帮助您从Microsoft Planner新手转变为Planner管理员。
将表情符号添加到您的任务标题中 (Add Emojis to Your Task Titles)
Words are great, but sometimes emojis are better. You can add emojis anywhere in a task, but for “at a glance” help, the best place is in the task title.
单词很棒,但有时表情符号更好。 您可以在任务中的任何位置添加表情符号,但是对于“一目了然”的帮助,最好的位置是任务标题。
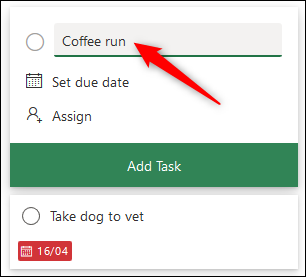
Press the Windows key+. (period) to open the emoji picker (Command+Control+Space on a Mac) and then choose your emoji.
按Windows键+。 (句号)以打开表情符号选择器(在Mac上为Command + Control + Space),然后选择您的表情符号。
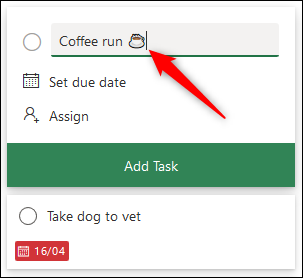
Having the emoji can be really useful for recurring tasks or tasks of a certain type. You can see visually what kind of task it is without having to read the text.
拥有表情符号对于重复执行的任务或某种类型的任务非常有用。 您可以直观地看到它是什么样的任务,而无需阅读文本。
Emojis can also be added to the bucket titles, which is useful for plans that have buckets for specific jobs, such as graphic design, comms, testing, etc. Or, you can add emojis to make it clear what each bucket represents.
表情符号也可以添加到存储桶标题中,这对于具有用于特定工作的存储桶的计划(例如图形设计,通信,测试等)很有用。或者,您可以添加表情符号以明确每个存储桶代表什么。

No matter what you need them for, add emojis to your titles for better understanding and a more visual approach.
无论您需要什么,都可以在标题中添加表情符号,以便更好地理解和采用更直观的方法。
向图块添加附件,清单和注释 (Add Attachments, Checklists, and Notes to the Tiles)
Adding emojis helps show what a task is, but it doesn’t help show how the task is progressing or what needs to be done.
添加表情符号有助于显示任务是什么,但无助于显示任务的进度或需要完成的任务。
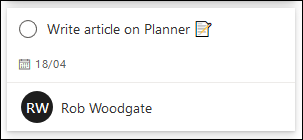
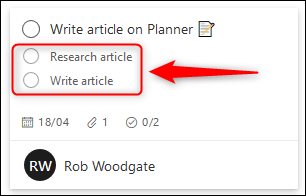
Any attachment, checklist, or notes text that you’ve added to the task can be shown on the tile to make it easier to see what’s going on.
您添加到任务中的所有附件,清单或注释文本都可以显示在图块上,以使您更轻松地查看正在发生的事情。
Open the Planner task and choose “Show On Card” next to the element you want to show on the tile.
打开“计划程序”任务,然后选择要在图块上显示的元素旁边的“在卡片上显示”。
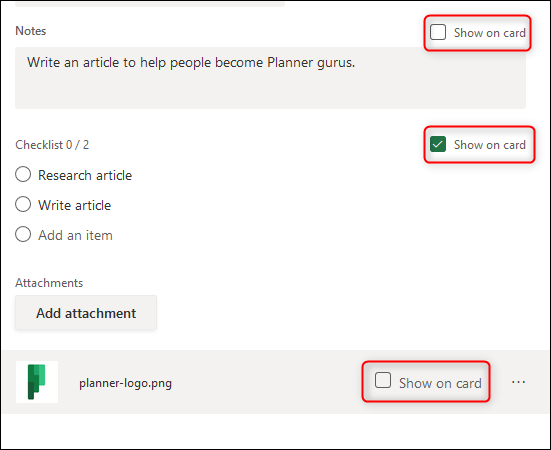
You can only choose one of the three, but you can change your choice at any time. Whatever you’ve enabled will be visible on the tile.
您只能选择三个选项之一,但是可以随时更改选择。 无论您启用了什么,都将在图块上看到它们。
复制单个任务或整个计划 (Copy a Single Task or a Whole Plan)
Do you have a single task that you need to recreate? Don’t bother rewriting the same task multiple times, just copy it.
您是否需要重新创建一个任务? 不要烦恼多次重写同一任务,只需复制它即可。
Open the task you want to copy, click the three-dot menu icon in the top right and then select the “Copy Task” button.
打开要复制的任务,单击右上角的三点菜单图标,然后选择“复制任务”按钮。

Choose the elements of the task you want to copy and then click “Copy.”
选择您要复制的任务的元素,然后单击“复制”。
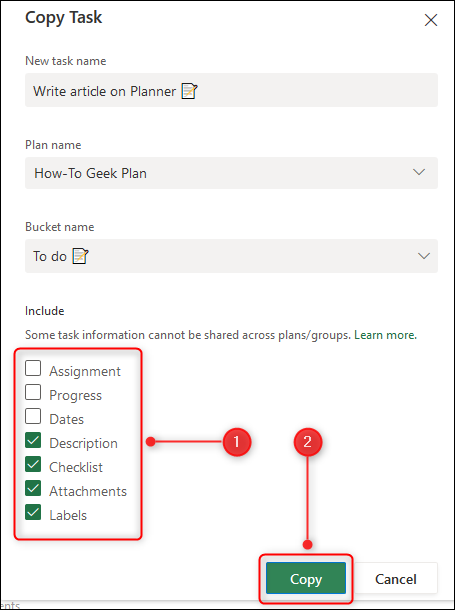
You now have a copy that you can use to create new tasks. This is great for similar tasks you need to assign to different people, whether it’s a task with the same instructions, such as organizing a one-on-one meeting with your boss, or a task that a different person does each day.
现在,您有了一个可用于创建新任务的副本。 这对于需要分配给其他人的类似任务非常有用,无论它是具有相同说明的任务,例如与老板组织一对一会议,还是其他人每天要做的任务。
If you use a whole bunch of similar tasks repeatedly—like a set of tasks you do for every project or a set number of weekly tasks—you can copy an entire plan.
如果您重复使用一堆类似的任务(例如您为每个项目执行的一组任务或一组每周的任务),则可以复制整个计划。
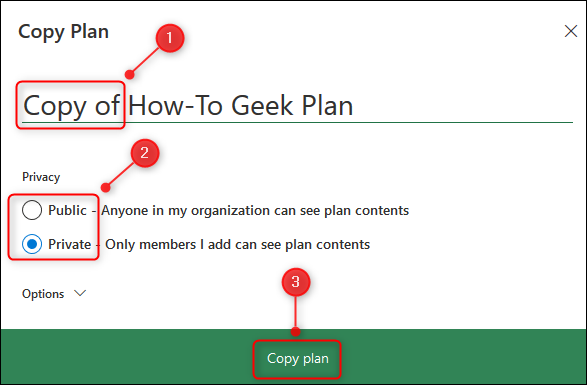
Click the three-dots menu icon at the top of the plan and then select the “Copy Plan” button.
单击计划顶部的三点菜单图标,然后选择“复制计划”按钮。
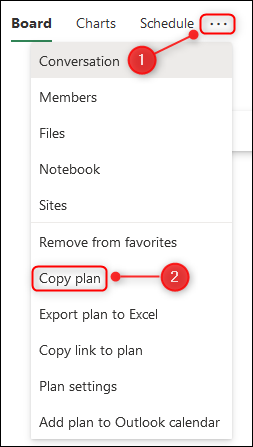
The new plan will use the same name as the source plan but prefixed with “Copy Of.” Change it to the name you want, choose whether it will be publicly available to anyone in your organization, and click “Copy Plan.”
新计划将使用与源计划相同的名称,但以“ Copy Of”为前缀。 将其更改为所需的名称,选择是否对组织中的任何人公开可用,然后单击“复制计划”。
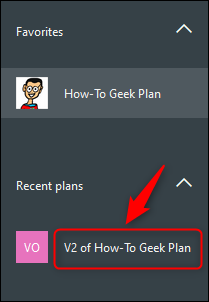
After a few seconds, your new plan will be visible in the “Recent Plans” section of the sidebar.
几秒钟后,新的计划将在边栏的“最近的计划”部分中显示。
Everything will be copied, except:
一切都会被复制,除了:
- Plan description 计划说明
- Plan Members计划成员
- Plan Favorite status计划收藏状态
- Task Attachments任务附件
- Task Assignments任务分配
- Task Progress任务进度
- Task Dates任务日期
- Task Comments and activity任务注释和活动
This works really well for template plans where you need a fresh version on a regular basis.
这对于需要定期更新版本的模板计划非常有效。
在存储桶之间拖动以编辑任务 (Drag Between Buckets to Edit Tasks)
By default, your tasks are grouped in the buckets you use: To-Do, In Progress, Done, or whatever other buckets you’ve created. Planner also gives you the option to group tasks based on properties, such as Due Date, Assignee, Priority, and more.
默认情况下,您的任务会按使用的存储桶进行分组:“待办事项”,“进行中”,“完成”或您创建的其他存储桶。 通过Planner,您还可以选择根据属性(如截止日期,受让人,优先级等)对任务进行分组。
We’ve covered grouping in different buckets before, but here’s a quick recap.
之前我们已经讨论了将分组分为不同的存储桶,但是这里有个简短的回顾。
To change your task groupings, click on the “Group By Bucket” button in the top right of the Microsoft Planner interface.
要更改任务分组,请单击Microsoft Planner界面右上方的“按存储区分组”按钮。

Choose a different property to group your tasks by, and they will automatically rearrange. For example, if you choose “Priority,” your tasks will be grouped into new Priority buckets.
选择一个不同的属性来对您的任务进行分组,它们将自动重新排列。 例如,如果您选择“优先级”,则您的任务将被分组到新的“优先级”存储桶中。

You can drag and drop tasks between these buckets to change the properties. Have you started testing and found some issues? No problem, group by “Progress” and drag the tasks you tested back into the “In Progress” column. Then, group by “Assigned To” and drag tasks into the buckets of the assignee who needs to resolve the issues or into the “Unassigned” bucket if anyone can pick them up.
您可以在这些存储桶之间拖放任务以更改属性。 您是否已开始测试并发现了一些问题? 没问题,按“进度”分组并将您测试的任务拖回“正在进行”列。 然后,按“分配给”分组,然后将任务拖到需要解决问题的受让人的存储桶中,如果有人可以将其拖到“未分配的”存储桶中。
This process is much quicker and much more intuitive than laboriously opening each task and editing each field.
与费力地打开每个任务和编辑每个字段相比,此过程更快,更直观。
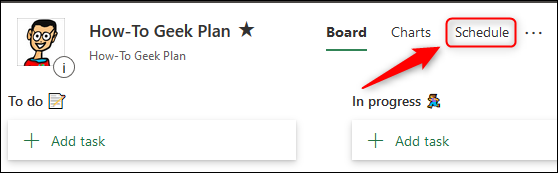
在计划视图中添加任务和更改日期。 (Add Tasks and Change Dates in the Schedule View.)
If you like to see your tasks by Due Date, click the “Schedule” option at the top of the plan.
如果您想按截止日期查看任务,请单击计划顶部的“计划”选项。
This will open a calendar view of all your tasks. You can add new tasks, drag tasks to different days to give them new due dates, or move tasks off the calendar to remove the due date altogether.
这将打开所有任务的日历视图。 您可以添加新任务,将任务拖到不同的日期以为其指定新的截止日期,或将任务移出日历以完全删除截止日期。
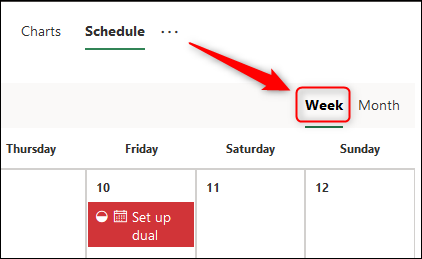
The Schedule shows the current month by default, but you can click the “Week” button to show a week view instead.
时间表默认显示当前月份,但是您可以单击“周”按钮以显示周视图。
The Schedule view is the best way in Microsoft Planner to get a bird’s-eye view of everything you have to do. It’s much easier to understand your workload when you can see it visually.
计划视图是Microsoft Planner中获得所需要做的一切的最佳视图的最佳方法。 当您直观地看到工作量时,了解工作量要容易得多。
Whether you view by Week or by Month, you can drag and drop any task to a new date to change the due date.
无论您是按周还是按月查看,都可以将任何任务拖放到新日期以更改截止日期。

You can also drag any task from the “Unscheduled Tasks” list onto the calendar to give it a due date.
您还可以将任何任务从“计划外任务”列表中拖到日历上,以指定截止日期。
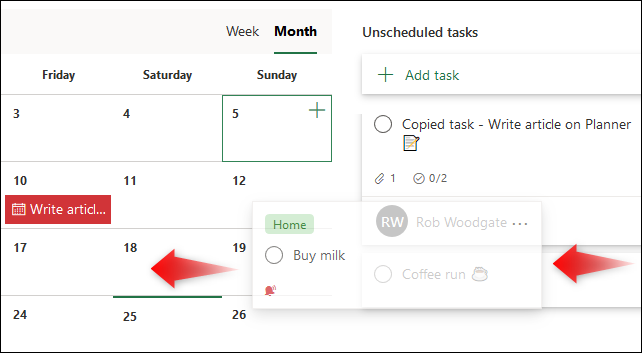
Conversely, you can also drag a task from the calendar into the “Unscheduled Tasks” list to remove its due date.
相反,您也可以将任务从日历中拖到“计划外任务”列表中,以删除其截止日期。
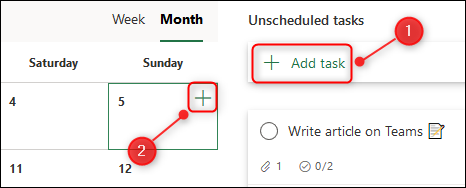
Add new tasks by clicking the “Add Task” button, or by clicking on the Plus (+) sign on any date, which will automatically set the Due Date of the task to be that date.
通过单击“添加任务”按钮或单击任意日期上的加号(+),可以将任务的截止日期自动设置为该日期,从而添加新任务。
The Schedule view will give you a different perspective on your tasks, as well as providing an intuitive view of how much work is coming up.
计划视图将为您提供关于任务的不同视角,并提供即将进行的工作量的直观视图。
查看计划器文件存储中的所有附件 (See All Attachments in the Planner File Store)
Over time, a plan can have lots of attachments, whether they’re images, documents, spreadsheets, or anything else. If you want to find an attachment again, you can look at them in the file store.
随着时间的流逝,一个计划可以包含很多附件,无论它们是图像,文档,电子表格还是其他任何附件。 如果要再次查找附件,可以在文件存储中查看它们。
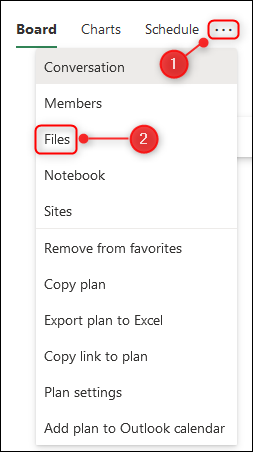
Click on the three-dot menu icon at the top of the plan, and select the “Files” option.
单击计划顶部的三点菜单图标,然后选择“文件”选项。
This will open a new tab in your browser, which shows the SharePoint site that stores all of the files from your tasks.
这将在浏览器中打开一个新选项卡,其中显示了SharePoint网站,该网站存储了任务中的所有文件。
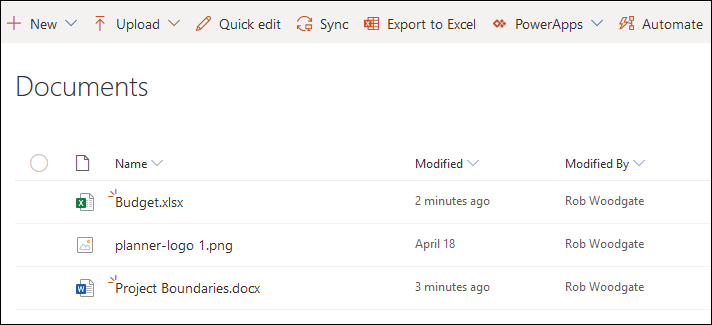
You add, edit, or delete files, but be warned, if you delete a file from here, it will be deleted from your plan. However, if you have lots of attachments in your tasks and you need to find one quickly, this is how to do it.
您添加,编辑或删除文件,但是请注意,如果从此处删除文件,则该文件将从您的计划中删除。 但是,如果您的任务中有很多附件,并且需要快速查找附件,这就是解决方法。
With these tips and tricks, you’re well on your way to knowing everything you need to become a Microsoft Planner master.
有了这些提示和技巧,您就可以充分了解成为Microsoft Planner大师所需的一切。
翻译自: https://www.howtogeek.com/670026/6-tips-and-tricks-for-becoming-a-microsoft-planner-master/
rrt planner


 1598
1598

 被折叠的 条评论
为什么被折叠?
被折叠的 条评论
为什么被折叠?
 到【灌水乐园】发言


