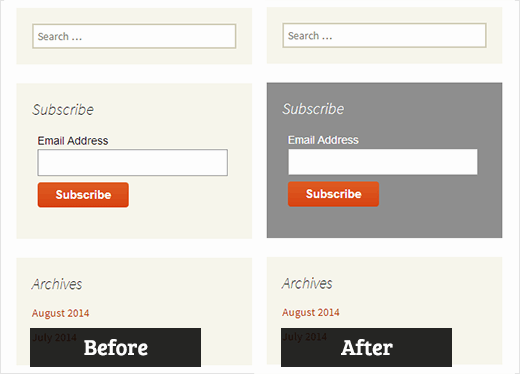
Most sidebar widgets in WordPress usually look the same. It would be fine if all your widgets had the same importance, but the truth is that some widgets are more important for your site’s growth than others. For example, an email list subscription widget is certainly more important than an archives widget. Wouldn’t it be nice if you could easily style important widgets differently? In this article, we will show you how to add custom styles to WordPress widgets.
WordPress中的大多数侧边栏小部件通常看起来都一样。 如果所有小部件都具有相同的重要性,那很好,但是事实是,某些小部件对您网站的增长比其他小部件更为重要。 例如, 电子邮件列表订阅小部件肯定比存档小部件更重要。 如果您可以轻松地以不同的方式设置重要小部件的样式,那岂不是很好吗? 在本文中,我们将向您展示如何向WordPress小部件添加自定义样式。
使用插件向WordPress小部件添加自定义样式 (Using a Plugin to Add Custom Styles to WordPress Widgets)
First thing you need to do is install and activate the Widget CSS Classes plugin. Upon activation simply go to Appearance » Widgets and click on any widget in a sidebar to expand.
您需要做的第一件事是安装并激活Widget CSS Classes插件。 激活后,只需转到外观»小部件 ,然后单击侧栏中的任何小部件即可展开。

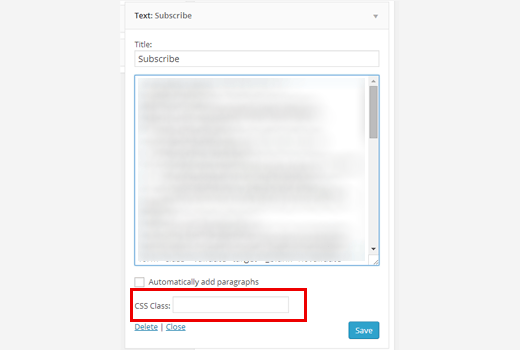
You will notice a new CSS Class field below your widgets, so you can easily define a CSS class for each widget. For example, we added the subscribe class to our subscription form widget.
您会在小部件下方看到一个新的CSS类字段,因此您可以轻松地为每个小部件定义CSS类。 例如,我们将subscribe类添加到了订阅表单小部件中。
Now you can go to your theme’s stylesheet and add your style rules there. Like this:
现在,您可以转到主题的样式表,并在其中添加样式规则。 像这样:
.subscribe {
background-color: #858585;
color:#FFF;
}

You can add any custom CSS you want such as add background, change borders, use different colors, etc.
您可以添加任何所需的自定义CSS,例如添加背景,更改边框,使用不同的颜色等。
手动向WordPress小部件添加自定义样式 (Manually Adding Custom Styles to WordPress Widgets)
If you don’t want to use a plugin, then you can manually add custom styles to your WordPress widgets. By default, WordPress adds CSS classes to different elements including widgets.
如果您不想使用插件,则可以将自定义样式手动添加到WordPress小部件中。 默认情况下, WordPress将CSS类添加到不同的元素(包括小部件)。
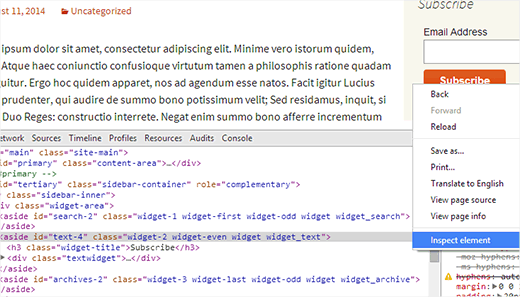
Each widget in your sidebar has a numbered widget class. Like widget-1, widget-2, widget-3, etc. Using Google Chrome’s Inspect Element tool, you can find the CSS class for the widget you want to customize.
侧边栏中的每个小部件都有一个编号的小部件类。 如小部件1,小部件2,小部件3等。使用Google Chrome浏览器的检查元素工具,您可以找到要自定义的小部件CSS类。

As you can see in the screenshot above, the widget we want to customize has widget-2 class added to it by WordPress. Now go to your theme’s stylesheet and add your custom style rules.
如您在上面的屏幕截图中所见,我们要自定义的widget-2已由WordPress添加了widget-2类。 现在转到主题的样式表并添加自定义样式规则。
.widget-2 {
background-color: #858585;
color:#FFF;
}
.widget-2 .widget-title {
font-weight:bold;
}
That’s all, we hope this article helped you add custom styles to WordPress widgets. Play around with the CSS and experiment with different colors. Use A/B split testing to figure out which custom styles work best for your site.
就这样,我们希望本文能帮助您向WordPress小部件添加自定义样式。 尝试CSS,并尝试不同的颜色。 使用A / B拆分测试来确定哪种自定义样式最适合您的网站。
Also if you want an easier way to highlight your sidebar subscribe form widget, then try out OptinMonster because it offers multiple designs, A/B testing, and much more.
另外,如果您想通过一种更简便的方法来突出显示侧边栏订阅表单小部件,请尝试使用OptinMonster,因为它提供了多种设计,A / B测试等。
If you liked this article, then please subscribe to our YouTube Channel for WordPress video tutorials. You can also find us on Twitter and Google+.
如果您喜欢这篇文章,请订阅我们的YouTube频道 WordPress视频教程。 您也可以在Twitter和Google+上找到我们。
翻译自: https://www.wpbeginner.com/wp-themes/how-to-add-custom-styles-to-wordpress-widgets/


 582
582

 被折叠的 条评论
为什么被折叠?


