wordpress 菜单
Have you noticed that many popular websites are now using sticky navigation menu. Normally, navigation menus are displayed on top and disappear as users scroll down. Sticky navigation menus float as users scroll down and are always visible on screen. In this article, we will show you how to easily create a sticky floating navigation menu in WordPress.
您是否注意到许多受欢迎的网站现在都使用粘性导航菜单。 通常,导航菜单显示在顶部,并在用户向下滚动时消失。 粘性导航菜单随着用户向下滚动而浮动,并且始终在屏幕上可见。 在本文中,我们将向您展示如何轻松地在WordPress中创建粘性浮动导航菜单。

方法1:使用插件添加粘性浮动导航菜单 (Method 1: Add Sticky Floating Navigation Menu Using Plugin)
This method is easier and is recommended for all users. If you haven’t setup the navigation menus yet, then please see our guide on how to add a navigation menu in WordPress.
此方法更简单,建议所有用户使用。 如果您尚未设置导航菜单,请参阅有关如何在WordPress中添加导航菜单的指南。
First thing you need to do is install and activate the Sticky Menu (or Anything!) on Scroll plugin. For more details, see our step by step guide on how to install a WordPress plugin.
您需要做的第一件事是在Scroll插件上安装并激活Sticky Menu(或任何东西!) 。 有关更多详细信息,请参阅有关如何安装WordPress插件的分步指南。
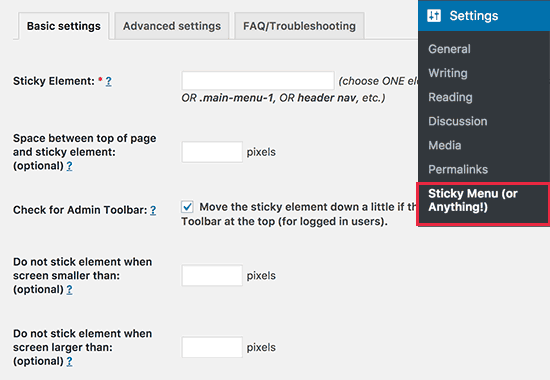
Upon activation, you need to visit Settings » Sticky Menu (or Anything!) page to configure plugin settings.
激活后,您需要访问设置»粘滞菜单(或任何东西!)页面来配置插件设置。

First you need to enter the CSS ID of the navigation menu that you want to make sticky.
首先,您需要输入要粘贴的导航菜单的CSS ID。
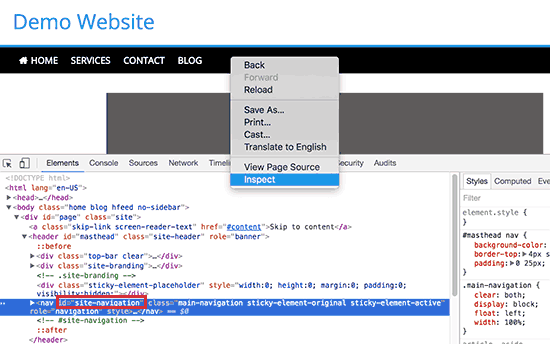
You will need to use your browser’s inspect tool to find the CSS ID used by your navigation menu.
您将需要使用浏览器的检查工具来找到导航菜单使用CSS ID。
Simply visit your website and take your mouse to the navigation menu. After that, you need to right click and select Inspect from your browser’s menu.
只需访问您的网站,然后将鼠标移至导航菜单。 之后,您需要右键单击并从浏览器的菜单中选择“检查”。

This will split your browser screen, and you will be able to see the source code for your navigation menu. You need to find a line of code like this:
这将拆分浏览器屏幕,并且您将能够看到导航菜单的源代码。 您需要找到以下代码行:
<nav id="site-navigation" class="main-navigation" role="navigation">
In this example, our navigation menu’s CSS ID is site-navigation.
在此示例中,导航菜单CSS ID为site-navigation 。
Go ahead and enter the navigation CSS ID in the plugin settings like this #site-navigation.
继续,在插件设置中输入导航CSS ID,例如#site-navigation 。
The next option on the plugin’s settings page is to define the space between the top of your screen and the sticky navigation menu. You can use this setting if your menu is overlapping an element that you do not want to be hidden. If not, then ignore this setting.
插件设置页面上的下一个选项是定义屏幕顶部和粘性导航菜单之间的空间。 如果菜单与不希望隐藏的元素重叠,则可以使用此设置。 如果不是,则忽略此设置。
After that you need to click the checkbox next to the option: ‘Check for Admin Bar’. This allows the plugin to add some space for the WordPress admin bar which is only added for logged in users.
之后,您需要单击选项旁边的复选框:“检查管理栏”。 这允许插件为WordPress管理栏添加一些空间,该空间仅为登录用户添加。
The next option in the settings page allows you unstick the navigation menu if a user is visiting your website using a smaller screen such as a mobile device.
如果用户使用较小的屏幕(例如移动设备)访问您的网站,则设置页面中的下一个选项可让您取消导航菜单的显示。
You can test how it looks on mobile devices or tablets. If you don’t like it, then you can add 780px for this option.
您可以测试它在移动设备或平板电脑上的外观。 如果您不喜欢它,则可以为此选项添加780px。
Don’t forget to click on the save settings button to store your changes.
不要忘记单击“保存设置”按钮来存储您的更改。
You can now visit your website to see your sticky floating navigation menu in action.
现在,您可以访问您的网站,以查看您的即时浮动导航菜单。

方法2:手动添加粘性浮动导航菜单 (Method 2: Manually Add Sticky Floating Navigation Menu)
This method requires you to add custom CSS code to your theme. If you haven’t done this before, then please see our guide on how to easily add custom css to your WordPress site.
此方法要求您向主题添加自定义CSS代码。 如果您以前没有做过,请参阅我们的指南,以了解如何轻松地将自定义CSS添加到您的WordPress网站 。
First you need to visit Appearance » Customize to launch theme customizer.
首先,您需要访问Appearance»Customize以启动主题定制器。

Click on ‘Additional CSS’ in the left pane and then add this CSS code.
单击左窗格中的“其他CSS”,然后添加此CSS代码。
#site-navigation {
    background:#fff;
    height:60px;
    z-index:170;
    margin:0 auto;
    border-bottom:1px solid #dadada;
    width:100%;
    position:fixed;
    top:0;
    left:0;
    right:0;
    text-align: center;
}
Replace #site-navigation with the CSS ID of your navigation menu and click on the Save & Publish button.
将#site-navigation替换为导航菜单CSS ID,然后单击Save&Publish按钮。
You can now visit your website to see your sticky floating navigation menu in action.
现在,您可以访问您的网站,以查看您的即时浮动导航菜单。
If your navigation menu normally appears after the site header, then this CSS code could overlap the site title and header.
如果导航菜单通常出现在网站标题之后,则此CSS代码可能与网站标题和标题重叠。
This can be easily adjusted by adding a margin to your header area using some CSS like this:
可以通过使用以下CSS在页眉区域添加边距来轻松调整:
.site-branding {
margin-top:60px;
}
Replace site-branding with the CSS class of your header area.
将site-branding替换为标题区域CSS类。
We hope this article helped you add sticky floating navigation menu to your WordPress site. You may also want to see our list of 15 best tutorials to master WordPress navigation menus.
我们希望本文能帮助您将粘性浮动导航菜单添加到WordPress网站。 您可能还需要查看我们的15个最佳教程列表, 以掌握WordPress导航菜单 。
If you liked this article, then please subscribe to our YouTube Channel for WordPress video tutorials. You can also find us on Twitter and Facebook.
如果您喜欢这篇文章,请订阅我们的YouTube频道 WordPress视频教程。 您也可以在Twitter和Facebook上找到我们。
翻译自: https://www.wpbeginner.com/wp-themes/how-to-create-a-sticky-floating-navigation-menu-in-wordpress/
wordpress 菜单


 本文向用户展示了如何在WordPress中轻松创建粘性浮动导航菜单,提供了使用插件和手动添加两种方法。通过插件方法,推荐使用Sticky Menu (or Anything!) on Scroll 插件,设置导航菜单的CSS ID,调整与屏幕顶部的空间等。手动方法则需要添加自定义CSS代码,以实现菜单的粘性和浮动效果。


 865
865

 被折叠的 条评论
为什么被折叠?


