
wordpress用cdn
After our redesign, WPBv4, we spent some time doing performance optimization (still some work left to do). After doing some optimization, we saw a major performance improvement on the site. It was noticeable enough that our users emailed us asking about it. We’ve heard your requests, and a complete guide on what we did to speed up our site will be up very soon. Even though we had covered how to install MaxCDN in our tutorial about W3 Total Cache, we have made some additional changes since then. In this article, we will show you how to install and setup MaxCDN in WordPress.
在重新设计WPBv4之后 ,我们花了一些时间进行性能优化(还有一些工作要做)。 经过一些优化后,我们发现该站点的性能有了很大的提高。 引人注目的是,我们的用户向我们发送了电子邮件询问。 我们已经听到了您的要求,关于如何加快网站运行速度的完整指南将很快发布。 即使我们在有关W3 Total Cache的教程中介绍了如何安装MaxCDN,此后我们也进行了一些其他更改。 在本文中,我们将向您展示如何在WordPress中安装和设置MaxCDN 。
Here is the email we got from one of our users:
这是我们从一位用户那里收到的电子邮件:
“…the main reason I am contacting you is to ask about site speed. How on earth you manage to speed up your site so fast? The speed is insane and I just loved it.”
“…我与您联系的主要原因是询问网站速度。 您到底如何设法如此快地加快网站速度? 速度太疯狂了,我很喜欢它。”
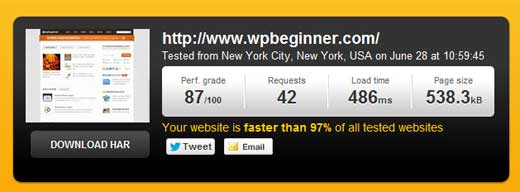
We did numerous tests using a site called Pingdom. The fastest load time of our homepage was just 483ms. We ran the test numerous times (different hours and datacenters). Our load time range on the homepage was 483ms – 1.7s. Below is one of the screenshots:
我们使用名为Pingdom的站点进行了许多测试。 我们首页的最快加载时间仅为483ms。 我们进行了多次测试(不同的时间和数据中心)。 我们在首页上的加载时间范围为483ms – 1.7s。 以下是屏幕截图之一:
A lot went into the performance optimization (reducing HTTP queries such as loading scripts only when they are needed, combining scripts and stylesheets, optimizing images etc). But one of the main components that makes our website load fast and keeps us from crashing is a great WordPress CDN. We are using MaxCDN, and you can our MaxCDN review in our Blueprint section where we explain why we use MaxCDN. If you don’t know what is a CDN or why you need a CDN, then you should check out or infographic “What the Heck is a CDN“.
性能优化方面有很多工作(减少HTTP查询,例如仅在需要时加载脚本,组合脚本和样式表,优化图像等)。 但是,使我们的网站快速加载并阻止崩溃的主要组件之一是出色的WordPress CDN。 我们正在使用MaxCDN ,您可以在我们的蓝图部分中对我们的MaxCDN进行评论 ,其中我们解释了为什么使用MaxCDN。 如果您不知道什么是CDN或为什么需要CDN,则应查看或查看“ 什么是CDN ”。
Now having that said, in order to follow this tutorial, you MUST have a MaxCDN account. It’s very affordable and well worth the money. If you don’t have an account, you can sign up now. You can get 25% off using our MaxCDN coupon “wpbeginner”
如此说来,为了遵循本教程,您必须拥有一个MaxCDN帐户。 这是非常实惠的,物有所值。 如果您没有帐户,可以立即注册。 您可以使用我们的MaxCDN 优惠券 “ wpbeginner”获得25%的折扣。
影片教学 (Video Tutorial)
If you don’t like the video or need more instructions, then continue reading.
如果您不喜欢该视频或需要更多说明,请继续阅读。
Once you have created your account with MaxCDN, you need to install this free WordPress plugin called W3 Total Cache.
使用MaxCDN创建帐户后,您需要安装这个名为W3 Total Cache的免费WordPress插件。
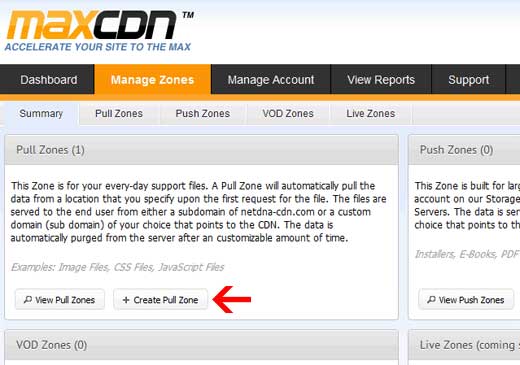
First thing you need to do is login to your MaxCDN account and create a “Pull Zone”. To do this, click on the Manage Zones button and then click on “Create Pull Zone” icon.
您需要做的第一件事是登录您的MaxCDN帐户并创建一个“拉区”。 为此,请单击“管理区域”按钮,然后单击“创建拉出区域”图标。
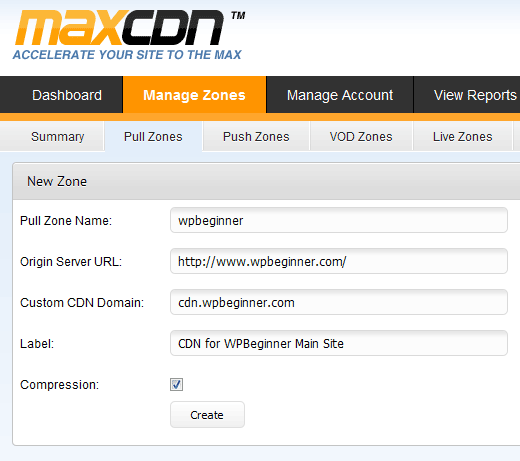
On the next page, you will be asked to enter the details for your new Pull zone.
在下一页上,将要求您输入新“拉动”区域的详细信息。
- Pull Zone Name: This can be anything without spaces, minimum 3 characters long. Think of this as your username. 拉区名称:可以是没有空格的任何字符,至少3个字符长。 将此视为您的用户名。
- Origin Server URL: Enter the URL of your wordpress blog. Must have “http://” and the trailing slash(/). 原始服务器URL:输入您的wordpress博客的URL。 必须有“ http://”和结尾的斜杠(/)。
- Custom CDN Domain: Use any subdomain for example: cdn.wpbeginner.com 自定义CDN域:使用任何子域,例如:cdn.wpbeginner.com
- Label: This is like a description field. It is optional to add a description. 标签:这就像一个说明字段。 添加描述是可选的。
- Compression: We recommend that you enable this as it will save the usage of bandwidth on your account. 压缩:我们建议您启用此功能,因为这样可以节省帐户带宽的使用。
Once you click create, you will see a success screen. In that green box, you will have a URL for your CDN. It will look something like “wpb.wpbeginner.netdna-cdn.com”. Let’s copy this URL and save it in your notepad. We will need to use it in later steps. If you go to your dashboard, you will now see the zone that you have created. Click on the “manage” icon.
单击创建后,您将看到一个成功屏幕。 在该绿色框中,您将具有CDN的URL。 它看起来像“ wpb.wpbeginner.netdna-cdn.com”。 让我们复制此URL并将其保存在记事本中。 我们将需要在以后的步骤中使用它。 如果转到仪表板,现在将看到您创建的区域。 点击“管理”图标。

Next, you need to click on the “Settings” tab and look at the custom domains.
接下来,您需要单击“设置”选项卡,然后查看自定义域。
The goal here is to add multiple subdomains (CNAMEs), so we can improve pipelining performance in the browser. To do this click on the edit button on Custom Domains, and simply add multiple custom domains.
此处的目标是添加多个子域(CNAME),以便我们可以提高浏览器中的流水线性能。 为此,请单击“自定义域”上的“编辑”按钮,然后简单地添加多个自定义域。
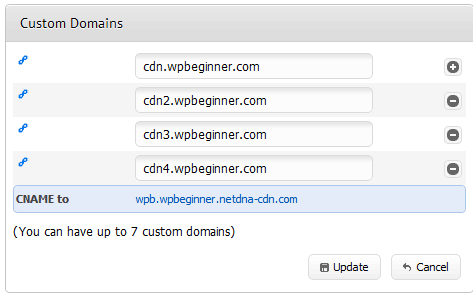
Once you have added the custom subdomains, then simply click update. In the Compression settings, make sure you enable GZip compression.
添加自定义子域后,只需单击更新。 在“压缩”设置中,确保启用GZip压缩。
Now that you have configured your pull zone, take the long CDN url that you got in previous steps which looked like this “wpb.wpbeginner.netdna-cdn.com”. We are going to need this to set CNAME records. We will show you how to create the CNAME record using cPanel. Most WordPress hosting providers are using cPanel. Login to your cPanel, then scroll down to the Domains Section and click on Simple DNS Zone Editor.
现在,您已经配置了拉区,请使用在前面的步骤中获得的长CDN网址,看起来像“ wpb.wpbeginner.netdna-cdn.com”。 我们将需要此设置CNAME记录。 我们将向您展示如何使用cPanel创建CNAME记录。 大多数WordPress托管提供商都在使用cPanel。 登录到您的cPanel,然后向下滚动到“域”部分,然后单击“ 简单DNS区域编辑器” 。

On this page, you will need to fill out the fields to Add an CNAME Record. The two values you will be required to fill are: Name and CNAME.
在此页面上,您需要填写字段以添加CNAME记录。 您将需要填写的两个值是:Name和CNAME。
- Name: This is the name of your Custom CDN Domain. For example, our custom CDN domain is cdn.wpbeginner.com, so we will put “cdn” in our name field.名称:这是您的自定义CDN域的名称。 例如,我们的自定义CDN域是cdn.wpbeginner.com,因此我们将“ cdn”放在我们的名称字段中。
- CNAME: This will be URL provided to you by MaxCDN when you created the pull zone. For example: “wpb.wpbeginner.netdna-cdn.com”.CNAME:这是MaxCDN在创建提取区域时提供给您的URL。 例如:“ wpb.wpbeginner.netdna-cdn.com”。
Example screenshot:
屏幕截图示例:

Repeat this process for all the custom domains you will add. The CNAME value will be the same. All you are changing is the name to like “cdn”, “cdn2” etc. Adding the CNAME method may be different if you have a non cPanel host.
对您将添加的所有自定义域重复此过程。 CNAME值将相同。 您所要更改的只是名称,如“ cdn”,“ cdn2”等。如果您拥有非cPanel主机,则添加CNAME方法可能会有所不同。
Now that you have configured MaxCDN, lets go ahead and integrate it with WordPress. We will need to use the W3 Total Cache plugin. Install and activate the plugin. On the General screen, if you scroll down, you will see the CDN box. Enable CDN and select NetDNA/MaxCDN option.
现在,您已经配置了MaxCDN ,让我们继续将其与WordPress集成。 我们将需要使用W3 Total Cache插件 。 安装并激活插件。 在常规屏幕上,如果向下滚动,将看到CDN框。 启用CDN并选择NetDNA / MaxCDN选项。
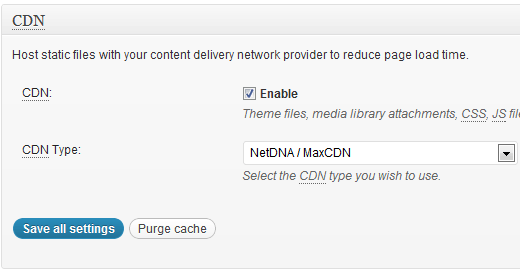
Save the settings. Now, you will need to go to CDN menu in W3 Total Cache to configure MaxCDN with WordPress. This page will ask you to enter your API ID, API Key, and your custom domain names.
保存设置。 现在,您将需要转到W3 Total Cache中的CDN菜单,以使用WordPress配置MaxCDN。 该页面将要求您输入API ID,API密钥和自定义域名。

You can get your API ID and Key from your MaxCDN Dashboard. If you go Manage Account » API. Click on add key, and create your key.
您可以从MaxCDN信息中心获取API ID和密钥。 如果您去管理帐户»API。 单击添加密钥,然后创建您的密钥。

Once you configure the W3 Total Cache part, you are good to go. You can click on the Test NetDNA button, and you should be able to get Test passed.
一旦配置了W3 Total Cache部分,就可以了。 您可以单击“测试NetDNA”按钮,并且应该能够通过测试。
Want to speed up your WordPress? Well, then we recommend that you start using a CDN service like MaxCDN. Use the MaxCDN coupon “wpbeginner” to get 25% off.
是否想加快您的WordPress? 好吧,那么我们建议您开始使用像MaxCDN这样的CDN服务。 使用MaxCDN优惠券“ wpbeginner”可获得25%的折扣。
翻译自: https://www.wpbeginner.com/wp-tutorials/how-install-wordpress-cdn-solution-maxcdn/
wordpress用cdn


 1354
1354


 被折叠的 条评论
为什么被折叠?


