raspberry pi
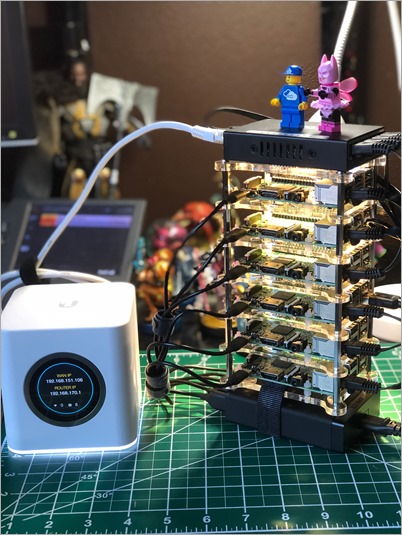
First, why would you do this? Why not. It's awesome. It's a learning experience. It's cheaper to get 6 pis than six "real computers." It's somewhat portable. While you can certainly quickly and easily build a Kubernetes Cluster in the cloud within your browser using a Cloud Shell, there's something more visceral about learning it this way, IMHO. Additionally, it's a non-trivial little bit of power you've got here. This is also a great little development cluster for experimenting. I'm very happy with the result.
首先,您为什么要这样做? 为什么不。 这很棒。 这是一种学习经验。 与六个“真实计算机”相比,获得6 pis便宜。 它有点便携。 当然,您可以使用Cloud Shell在浏览器中的云中快速轻松地构建Kubernetes集群,但IMHO则是通过这种方式学习它的更多内在体验。 此外,这是您拥有的非凡的功能。 这也是一个很好的实验开发集群。 我对结果感到非常满意。
By the end of this blog post you'll have not just Hello World but you'll have Cloud Native Distributed Containerized RESTful microservice based on ARMv7 w/ k8s Hello World! as a service. (original Tweet). ;)
到本博文结尾,您不仅将拥有Hello World ,还将拥有基于带k8s Hello World的ARMv7的Cloud Native Distributed Containerized RESTful微服务! 作为服务。 (原始推文)。 ;)
Not familiar with why Kubernetes is cool? Check out Julia Evans' blog and read her K8s posts and you'll be convinced!
不熟悉为什么Kubernetes很酷? 查看Julia Evans的博客并阅读她的K8s帖子,您将被说服!
硬件列表(向下滚动以查看软件) (Hardware List (scroll down for Software))
Here's your shopping list. You may have a bunch of this stuff already. I had the Raspberry Pis and SD Cards already.
这是您的购物清单。 您可能已经有很多这样的东西。 我已经有了Raspberry Pi和SD卡。
6 - Raspberry Pi 3 - I picked 6, but you should have at least 3 or 4.
6- Raspberry Pi 3-我选了6,但您应该至少有3或4。
One Boss/Master and n workers. I did 6 because it's perfect for the power supply, perfect for the 8-port hub, AND it's a big but not unruly number.
一位老板/船长和n名工人。 我做了6个是因为它非常适合电源,适合8端口集线器,而且它是一个很大但并非不守规矩的数字。
6 - Raspberry Pi 3 - I picked 6, but you should have at least 3 or 4.
6- Raspberry Pi 3-我选了6,但您应该至少有3或4。
6 - Samsung 32Gb Micro SDHC cards - Don't be too cheap.
6-三星32Gb Micro SDHC卡-别太便宜。
- Faster SD cards are better. SD卡越快越好。
6 - Samsung 32Gb Micro SDHC cards - Don't be too cheap.
6-三星32Gb Micro SDHC卡-别太便宜。
2x6 - 1ft flat Ethernet cables - Flat is the key here.
2x6-1英尺扁平以太网电缆-扁平是此处的关键。
- They are WAY more flexible. If you try to do this with regular 1ft cables you'll find them inflexible and frustrating. Get extras. 它们更加灵活。 如果您尝试使用常规的1英尺电缆执行此操作,则会发现它们不灵活且令人沮丧。 获得额外优惠。
2x6 - 1ft flat Ethernet cables - Flat is the key here.
2x6-1英尺扁平以太网电缆-扁平是此处的关键。
1 - Anker PowerPort 6 Port USB Charging Hub - Regardless of this entire blog post, this product is amazing.
1- Anker PowerPort 6端口USB充电集线器-不管这篇博客文章如何,这款产品都很棒。
It's almost the same physical size as a Raspberry Pi, so it fits perfect at the bottom of your stack. It puts out 2.4a per port AND (wait for it) it includes SIX 1ft Micro USB cables...perfect for running 6 Raspberry Pis with a single power adapter.
它的物理尺寸几乎与Raspberry Pi相同,因此非常适合堆栈底部。 它在每个端口上输出2.4a并(等待)包括6条1ft微型USB电缆...非常适合通过一个电源适配器运行6个Raspberry Pi。
1 - Anker PowerPort 6 Port USB Charging Hub - Regardless of this entire blog post, this product is amazing.
1- Anker PowerPort 6端口USB充电集线器-不管这篇博客文章如何,这款产品都很棒。
1 - 7 layer Raspberry Pi Clear Case Enclosure - I only used 6 of these, which is cool.
1-7层Raspberry Pi透明外壳-我只使用了6个,这很酷。
- I love this case, and it looks fantastic. 我喜欢这种情况,看起来很棒。
1 - 7 layer Raspberry Pi Clear Case Enclosure - I only used 6 of these, which is cool.
1-7层Raspberry Pi透明外壳-我只使用了6个,这很酷。
1 - Black Box USB-Powered 8-Port Switch - This is another amazing and AFAIK unique product.
1-黑盒USB供电的8端口开关-这是另一个令人惊叹且AFAIK独特的产品。
- An overarching goal for this little stack is that it be easy to move around and set up but also to power. We have power to spare, so I'd like to avoid a bunch of "wall warts" or power adapters. This is an 8 port switch that can be powered over a Raspberry Pi's USB. Because I'm given up to 2.4A to each micro USB, I just plugged this hub into one of the Pis and it worked no problem. It's also...wait for it...the size of a Pi. It also include magnets for mounting. 这个小堆栈的总体目标是易于移动和设置,但也很容易上电。 我们有余力,所以我想避免一堆“壁疣”或电源适配器。 这是一个8端口交换机,可以通过Raspberry Pi的USB供电。 因为我给每个微型USB分配了高达2.4A的电流,所以我只是将此集线器插入了其中的一个Pis,它没有任何问题。 它也...等待... Pi的大小。 它还包括用于安装的磁铁。
1 - Black Box USB-Powered 8-Port Switch - This is another amazing and AFAIK unique product.
1-黑盒USB供电的8端口开关-这是另一个令人惊叹且AFAIK独特的产品。
1 - Some Small Router - This one is a little tricky and somewhat optional.
1-一些小型路由器-这个有点棘手,有些可选项。
You can just put these Pis on your own Wifi and access them that way, but you need to think about how they get their IP address. Who doles out IPs via DHCP? Static Leases? Static IPs completely?
您可以将这些Pis放在自己的Wifi上并以这种方式访问它们,但是您需要考虑它们如何获得其IP地址。 谁通过DHCP分配IP? 静态租赁? 完全是静态IP?
- The root question is - How portable do you want this stack to be? I propose you give them their own address space and their own router that you then use to bridge to other places. Easiest way is with another router (you likely have one lying around, as I did. Could be any router...and remember hub/switch != router. 根本问题是-您希望此堆栈具有多大的可移植性? 我建议您给他们提供自己的地址空间和他们自己的路由器,然后使用它们桥接到其他地方。 最简单的方法是使用另一台路由器(就像我一样,您可能有一个在附近。可以是任何路由器...并记住集线器/交换机!=路由器。
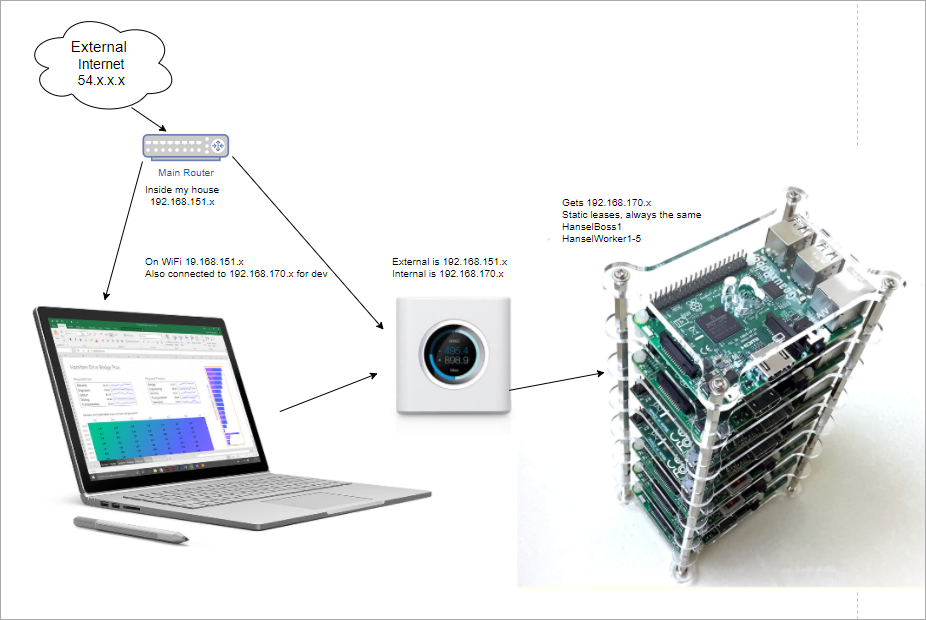
- Here is a bad network diagram that makes the point, I think. The idea is that I should be able to go to a hotel or another place and just plug the little router into whatever external internet is available and the cluster will just work. Again, not needed unless portability matters to you as it does to me. 我认为,这是一个糟糕的网络图,可以说明这一点。 我的想法是,我应该能够去旅馆或其他地方,只需将小路由器插入任何可用的外部互联网,群集就可以正常工作。 同样,不需要,除非便携性对您和我一样重要。
You could ALSO possibly get this to work with a Travel Router but then the external internet it consumed would be just Wifi and your other clients would get on your network subnet via Wifi as well. I wanted the relative predictability of wired.
您也可以使它与Travel Router一起使用,但是它消耗的外部互联网只是Wifi,而其他客户端也可以通过Wifi进入您的网络子网。 我想要有线的相对可预测性。
What I WISH existed was a small router - similar to that little 8 port hub - that was powered off USB and had an internal and external Ethernet port. This ZyXEL Travel Router is very close...hm...
我希望有一个小型路由器-类似于那个小的8端口集线器-断电USB并具有内部和外部以太网端口。 这个ZyXEL旅行路由器非常接近...嗯...
1 - Some Small Router - This one is a little tricky and somewhat optional.
1-一些小型路由器-这个有点棘手,有些可选项。
Optional - Pelican Case if you want portability. I'll see what airport security thinks. O_O
可选-鹈鹕皮套,如果您需要便携性。 我将看看机场安全部门的想法。 O_O
Optional - Tiny Keyboard and Mouse - Raspberry Pis can put out about 500mA per port for mice and keyboards. The number one problem I see with Pis is not giving them enough power and/or then having an external device take too much and then destabilize the system. This little keyboard is also a touchpad mouse and can be used to debug your Pi when you can't get remote access to it. You'll also want an HMDI cable occasionally.
可选-微型键盘和鼠标-Raspberry Pis可以为鼠标和键盘的每个端口输出大约500mA的电流。 我看到的Pis的第一大问题是没有给他们足够的动力,和/或让外部设备占用过多的电源,然后破坏了系统的稳定性。 这个小键盘也是触摸板鼠标,当您无法远程访问它时,可以用来调试Pi。 您还偶尔需要HMDI电缆。
You're Rich - If you have money to burn, get the 7" Touchscreen Display and a Case for it, just to show off htop in color on one of the Pis.
道奇网络图 (Dodgey Network Diagram)
免责声明(Disclaimer)
OK, first things first, a few disclaimers.
好的,首先,一些免责声明。
The software in this space is moving fast. There's a non-zero chance that some of this software will have a new version out before I finish this blog post. In fact, when I was setting up Kubernetes, I created a few nodes, went to bed for 6 hours, came back and made a few more nodes and a new version had come out. Try to keep track, keep notes, and be aware of what works with what.
这个领域的软件发展Swift。 在我完成本博客文章之前,其中某些软件将有一个新版本出现的可能性不为零。 实际上,当我设置Kubernetes时,我创建了几个节点,上床睡觉了6个小时,回来了,又增加了几个节点,然后出现了新版本。 尝试保持跟踪,记录笔记,并注意什么适用于什么。
Next, I'm just learning this stuff. I may get some of this wrong. While I've built (very) large distributed systems before, my experience with large orchestrators (primarily in banks) was with large proprietary ones in Java, C++, COM, and later in C#, .NET 1.x,2.0, and WCF. It's been really fascinating to see how Kubernetes thinks about these things and comparing it to how we thought about these things in the 90s and very early 2000s. A lot of best practices that were HUGE challenges many years ago are now being codified and soon, I hope, will "just work" for a new generation of developer. At least another full page of my resume is being marked [Obsolete] and I'm here for it. Things change and they are getting better.
接下来,我只是在学习这些东西。 我可能会弄错一些。 虽然我曾经构建过(非常)大型的分布式系统,但是我在大型编排器(主要在银行)中的经验是使用Java,C ++,COM以及后来的C#、. NET 1.x,2.0和WCF中的大型专有程序。 。 看到Kubernetes如何看待这些事情并将其与我们在90年代和2000年代初期对这些事情的看法进行比较,真是令人着迷。 许多最佳实践是很多年前面临的巨大挑战,现在已经整理成文,我希望不久之后,这些“最佳实践”将对新一代开发人员“奏效”。 至少我的简历的另一整页被标记为[已过时],我在这里。 情况发生了变化,并且越来越好。
软件 (Software)
Get your Raspberry PIs and SD cards together. Also bookmark and subscribe to Alex Ellis' blog as you're going to find yourself there a lot. He's the author of OpenFaas, which I'll be using today and he's done a LOT of work making this experiment possible. So thank you Alex for being awesome! He has a great post on how Multi-stage Docker files make it possible to effectively use .NET Core on a Raspberry Pi while still building on your main machine. He and I spent a few late nights going around and around to make this easy.
将您的Raspberry PI和SD卡放在一起。 还要添加书签并订阅Alex Ellis的博客,因为您会发现自己在那里很多。 他是OpenFaas的作者,我今天将使用它,并且他已经做了很多工作,使得该实验成为可能。 因此,谢谢Alex的出色表现! 他在多阶段Docker文件如何使仍可以在您的主机上构建的Raspberry Pi上有效地使用.NET Core上发表了精彩的文章。 他和我花了一些深夜来回走动,以简化此操作。
Alex has put together a Gist we iterated on and I'll summarize here. You'll do these instructions n times for all machines.
亚历克斯汇总了我们反复讨论的要点,在这里我将进行总结。 您将对所有机器执行n次这些说明。
You'll do special stuff for the ONE master/boss node and different stuff for the some number of worker nodes.
您将为一个主节点/老板节点执行特殊操作,并为一定数量的工作节点执行其他操作。
ADVANCED TIP! If you know what you're doing Linux-wise, you should save this excellent prep.sh shell script that Alex made, then SKIP to the node-specific instructions below. If you want to learn more, do it step by step.
先进的提示! 如果您知道自己在Linux上正在做什么,则应保存Alex编写的出色的prep.sh shell脚本,然后将其跳过以下特定于节点的说明。 如果您想了解更多,请逐步进行。
所有节点 (ALL NODES)
Burn Jessie to a SD Card
将Jessie刻录到SD卡
You're going to want to get a copy of Raspbian Jesse Lite and burn it to your SD Cards with Etcher, which is the only SD Card Burner you need. It's WAY better than the competition and it's open source.
您将需要获取Raspbian Jesse Lite的副本,然后使用Etcher将其刻录到SD卡中,这是您唯一需要的SD卡刻录器。 它比竞争对手更好,而且是开源的。
You can also try out Hypriot and their "optimized docker image for Raspberry Pi" but I personally tried to get it working reliably for a two days and went back to Jesse. No disrespect.
您还可以尝试使用Hypriot及其“针对Raspberry Pi的优化的docker映像”,但我个人尝试将其可靠地工作了两天,然后返回了Jesse。 别无礼
Burn Jessie to a SD Card
将Jessie刻录到SD卡
Creating an empty file called "ssh" before you put the card in the Raspberry Pi
在将卡放入Raspberry Pi中之前,创建一个名为“ ssh”的空文件
SSH into the new Pi
SSH进入新的Pi
I'm on Windows so I used WSL (Ubuntu) for Windows that lets me SSH and do run Linux natively.
我在Windows上,因此我在Windows上使用WSL(Ubuntu) ,使我可以SSH并在本机上运行Linux。
ssh pi@raspberrypi
ssh pi @ raspberrypi
- Login pi, password raspberry. 登录pi,密码为raspberry。
SSH into the new Pi
SSH进入新的Pi
Change the Hostname
更改主机名
I ran
我跑了
rasbpi-config
then immediately reboot with "sudo reboot"
然后立即使用“ sudo reboot”重启
Install Docker
安装Docker
curl -sSL get.docker.com | sh && \ sudo usermod pi -aG docker
Disable Swap. Important, you'll get errors in Kuberenetes otherwise
禁用交换。 重要提示,否则,您将在Kuberenetes中得到错误
sudo dphys-swapfile swapoff && \ sudo dphys-swapfile uninstall && \ sudo update-rc.d dphys-swapfile remove
Go edit /boot/cmdline.txt with your favorite editor, or use
使用您喜欢的编辑器编辑/boot/cmdline.txt或使用
sudo nano /boot/cmdlineand add this at the very end. Don't press enter.cgroup_enable=cpuset cgroup_enable=memoryInstall Kubernetes
安装Kubernetes
curl -s https://packages.cloud.google.com/apt/doc/apt-key.gpg | sudo apt-key add - && \ echo "deb http://apt.kubernetes.io/ kubernetes-xenial main" | sudo tee /etc/apt/sources.list.d/kubernetes.list && \ sudo apt-get update -q && \ sudo apt-get install -qy kubeadm
主/老板节点(MASTER/BOSS NODE)
After ssh'ing into my main node, I used /ifconfig eth0 to figure out what the IP adresss was. Ideally you want this to be static (not changing) or at least a static lease. I logged into my router and set it as a static lease, so my main node ended up being 192.168.170.2, and .1 is the router itself.
在进入主节点后,我使用了/ ifconfig eth0来确定IP地址是什么。 理想情况下,您希望它是静态的(不变)或至少是静态租约。 我登录到路由器并将其设置为静态租约,因此我的主节点最终为192.168.170.2,而.1是路由器本身。
Then I initialized this main node
然后我初始化了这个主节点
sudo kubeadm init --apiserver-advertise-address=192.168.170.2
This took a WHILE. Like 10-15 min, so be patient.
这花了一个时间。 大约10到15分钟,所以要耐心等待。
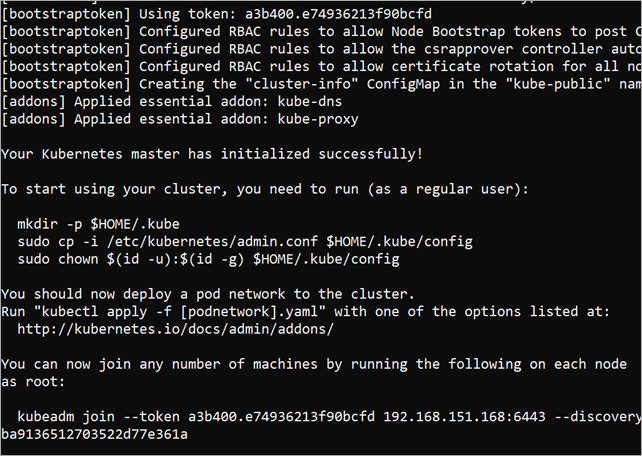
Kubernetes uses this admin.conf for a ton of stuff, so you're going to want a copy in your $HOME folder so you can call "kubectl" easily later, copy it and take ownership.
Kubernetes使用此admin.conf进行大量处理,因此您将需要在$ HOME文件夹中创建一个副本,以便稍后可以轻松调用“ kubectl”,进行复制并获得所有权。
mkdir -p $HOME/.kube sudo cp -i /etc/kubernetes/admin.conf $HOME/.kube/config sudo chown $(id -u):$(id -g) $HOME/.kube/config
When this is done, you'll get a nice print out with a ton of info and a token you have to save. Save it all. I took a screenshot.
完成此操作后,您将得到漂亮的打印输出,其中包含大量信息和必须保存的令牌。 全部保存。 我截图了。
工人点 (WORKER NODES)
Ssh into your worker nodes and join them each to the main node. This line is the line you needed to have saved above when you did a kubectl init.
SSH到您的工作程序节点中,并将它们分别连接到主节点。 这行是在执行kubectl初始化时需要保存的行。
kubeadm join --token d758dc.059e9693bfa5 192.168.170.2:6443 --discovery-token-ca-cert-hash sha256:c66cb9deebfc58800a4afbedf0e70b93c086d02426f6175a716ee2f4d
奏效了吗? (Did it work?)
While ssh'ed into the main node - or from any networked machine that has the admin.conf on it - try a few commands.
切换到主节点(或从上面有admin.conf的任何联网计算机)切换到主节点时,请尝试一些命令。
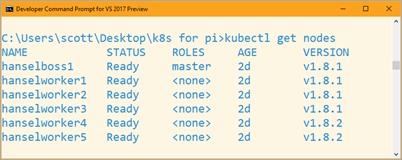
Here I'm trying "kubectl get nodes" and "kubectl get pods."
在这里,我正在尝试“ kubectl获取节点”和“ kubectl获取吊舱”。
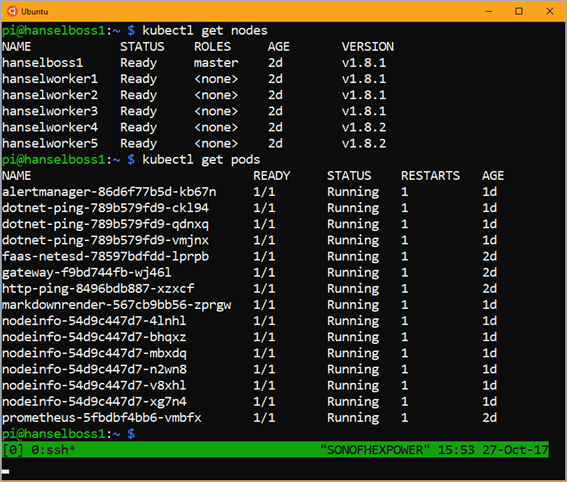
Note that I already have some stuff installed, so you'll want try "kubectl get pods --namespace kube-system" to see stuff running. If everything is "Running" then you can finish setting up networking. Kubernetes has fifty-eleven choices for networking and I'm not qualified to pick one. I tried Flannel and gave up and then tried Weave and it just worked. YMMV. Again, double check Alex's Gist if this changes.
请注意,我已经安装了一些东西,因此您需要尝试“ kubectl get pods --namespace kube-system”来查看东西正在运行。 如果一切都在“运行”,则可以完成网络设置。 Kubernetes有十一十一种网络选择,我没有资格选择一种。 我尝试了Flannel并放弃了,然后尝试了Weave,它才起作用。 YMMV。 同样,再次检查Alex的要点,如果情况发生变化。
kubectl apply -f https://git.io/weave-kube-1.6
At this point you should be ready to run some code!
此时,您应该已经准备好运行一些代码!
你好世界...与Markdown (Hello World...with Markdown)
Back to Alex's gist, I'll try this "markdownrender" app. It will take some Markdown and return HTML.
回到Alex的要点,我将尝试使用此“ markdownrender”应用程序。 这将需要一些Markdown并返回HTML。
Go get the function.yml from here and create the new app on your new cluster.
从这里获取function.yml并在新集群上创建新应用。
$ kubectl create -f function.yml
$ curl -4 http://localhost:31118 -d "# test"
<p><h1>test</h1></p>
This part can be tricky - it was for me. You need to understand what you're doing here. How do we know the ports? A few ways. First, it's listed as nodePort in the function.yml that represents the desired state of the application.
这部分可能很棘手-这是给我的。 您需要了解您在这里做什么。 我们如何知道端口? 几种方法。 首先,它在function.yml中列为nodePort,代表应用程序的所需状态。
We can also run "kubectl get svc" and see the ports for various services.
我们还可以运行“ kubectl get svc”并查看各种服务的端口。
pi@hanselboss1:~ $ kubectl get svc
NAME             TYPE        CLUSTER-IP       EXTERNAL-IP   PORT(S)          AGE
alertmanager     NodePort    10.103.43.130    <none>        9093:31113/TCP   1d
dotnet-ping      ClusterIP   10.100.153.185   <none>        8080/TCP         1d
faas-netesd      NodePort    10.103.9.25      <none>        8080:31111/TCP   2d
gateway          NodePort    10.111.130.61    <none>        8080:31112/TCP   2d
http-ping        ClusterIP   10.102.150.8     <none>        8080/TCP         1d
kubernetes       ClusterIP   10.96.0.1        <none>        443/TCP          2d
markdownrender   NodePort    10.104.121.82    <none>        8080:31118/TCP   1d
nodeinfo         ClusterIP   10.106.2.233     <none>        8080/TCP         1d
prometheus       NodePort    10.98.110.232    <none>        9090:31119/TCP   2d
See those ports that are outside:insider? You can get to markdownrender directly from 31118 on an internal IP like localhost, or the main/master IP. Those 10.x.x.x are all software networking, you can not worry about them. See?
看到外面的那些端口:内幕? 您可以直接从31118在内部IP(例如localhost)或主/主IP上获取markdownrender。 那些10.xxx都是软件网络,您不必担心。 看到?
pi@hanselboss1:~ $ curl -4 http://192.168.170.2:31118 -d "# test"
<h1>test</h1>

pi@hanselboss1:~ $ curl -4 http://10.104.121.82:31118 -d "# test"
curl: (7) Failed to connect to 10.104.121.82 port 31118: Network is unreachable
Can we access this cluster from another machine? My Windows laptop, perhaps?
我们可以从另一台机器访问该集群吗? 我的Windows笔记本电脑,也许吗?
从Windows机器(或其他地方)访问Raspberry Pi Kubernetes群集 (Access your Raspberry Pi Kubernetes Cluster from your Windows Machine (or elsewhere))
I put KubeCtl on my local Windows machine put it in the PATH.
我将KubeCtl放在本地Windows计算机上,并将其放在PATH中。
I copied the admin.conf over from my Raspberry Pi. You will likely use scp or WinSCP.
我从Raspberry Pi复制了admin.conf。 您可能会使用scp或WinSCP 。
I made a little local batch file like this. I may end up with multiple clusters and I want it easy to switch between them.
我做了一个像这样的本地批处理文件。 我可能会遇到多个群集,并且希望在它们之间轻松切换。
- SET KUBECONFIG="C:\users\scott\desktop\k8s for pi\admin.conf 为pi \ admin.conf设置SET KUBECONFIG =“ C:\ users \ scott \ desktop \ k8s
Once you have Kubectl on another machine that isn't your Pi, try running "kubectl proxy" and see if you can hit your cluster like this. Remember you'll get weird "Connection refused" if kubectl thinks you're talking to a local cluster.
一旦在不是Pi的另一台计算机上安装Kubectl,尝试运行“ kubectl代理”,看看是否可以像这样打集群。 请记住,如果kubectl认为您正在与本地集群通信,您将得到“连接被拒绝”的怪异信息。
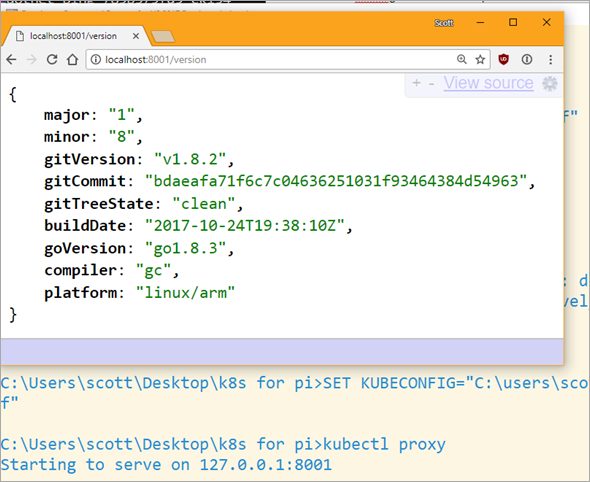
Here you can get to localhost:8001/api and move around, then you've successfully punched a hole over to your cluster (proxied) and you can treat localhost:8001 as your cluster. So "kubectl proxy" made that possible.
在这里,您可以转到localhost:8001 / api并四处移动,然后您已经成功地对集群打了个洞(代理),并且可以将localhost:8001视为集群。 因此,“ kubectl代理”使这成为可能。
If you have WSL (Windows Subsystem for Linux) - and you should - then you could also do this and TUNNEL to the API. But I'm going to get cert errors and generally get frustrated. However, tunneling like this to other apps from Windows or elsewhere IS super useful. What about the Kubernetes Dashboard?
如果您有WSL(适用于Linux的Windows子系统),并且应该这样做,那么您也可以这样做,并将隧道连接到API。 但是我会遇到证书错误,并且通常会感到沮丧。 但是,像这样从Windows或其他地方到其他应用程序的隧道传输非常有用。 那Kubernetes仪表板呢?
~ $ sudo ssh -L 8001:10.96.0.1:443 pi@192.168.170.2
I'm going to install the Kubernetes Dashboard like this:
我将像这样安装Kubernetes仪表板:
kubectl apply -f https://raw.githubusercontent.com/kubernetes/dashboard/master/src/deploy/alternative/kubernetes-dashboard-arm.yaml
Pay close attention to that URL! There are several sites out there that may point to older URLs, non ARM dashboard, or use shortened URLs. Make sure you're applying the ARM dashboard. I looked here https://github.com/kubernetes/dashboard/tree/master/src/deploy.
请密切注意该URL! 有几个站点可能指向较旧的URL,非ARM仪表板或使用缩短的URL。 确保您正在应用ARM仪表板。 我在这里https://github.com/kubernetes/dashboard/tree/master/src/deploy 。
NOTE: If you have a security error or isse with the dashboard, try http://localhost:8001/api/v1/
注意:如果仪表板出现安全错误或问题,请尝试http:// localhost:8001 / api / v1 / 名称空间/ kube-system / 服务/ http :kubernetes- 仪表板:/ proxy /并注意“ http”和“ https”
Notice I'm using the "alternative" dashboard. That's for development and I'm saying I don't care at all about security when accessing it. Be aware.
注意,我正在使用“替代”仪表板。 那是为了发展,我是说我根本不关心访问安全性。 意识到。
I can see where my Dashboard is running, the port and the IP address.
我可以看到仪表板的运行位置,端口和IP地址。
pi@hanselboss1:~ $ kubectl get svc --namespace kube-system
NAME                   TYPE        CLUSTER-IP   EXTERNAL-IP   PORT(S)         AGE
kube-dns               ClusterIP   10.96.0.10   <none>        53/UDP,53/TCP   2d
kubernetes-dashboard   ClusterIP   10.98.2.15   <none>        80/TCP          2d
NOW I can punch a hole with that nice ssh tunnel...
现在我可以用那个漂亮的ssh隧道打个洞了...
~ $ sudo ssh -L 8080:10.98.2.15:80 pi@192.168.170.2
I can access the Kubernetes Dashboard now from my Windows machine at http://localhost:8080 and hit Skip to login.
我现在可以从Windows机器上的http:// localhost:8080访问Kubernetes仪表板,然后单击“跳过”以登录。
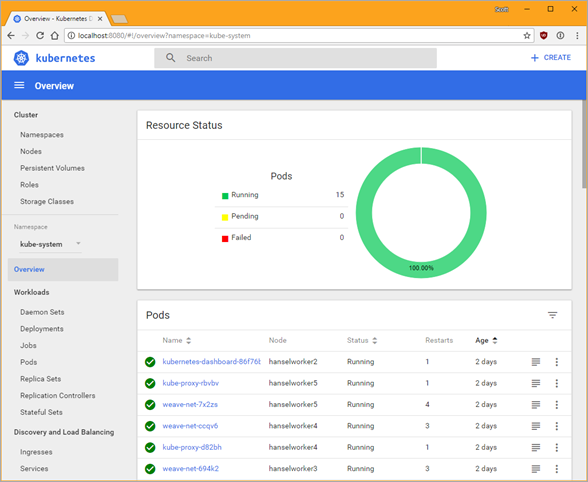
Do note the Namespace dropdown and think about what you're viewing. There's the kube-system stuff that manages the cluster
请注意命名空间下拉列表,并考虑您正在查看的内容。 有kube-system的东西来管理集群
添加OpenFaas并调用无服务器功能(Adding OpenFaas and calling a serverless function)
Let's go to the next level. We'll install OpenFaas - think Azure Functions or Amazon Lambda, except for your own Docker and Kubernetes cluster. To be clear, OpenFaas is an Application that we will run on Kubernetes, and it will make it easier to run other apps. Then we'll run other stuff on it...just some simple apps like Hello World in Python and .NET Core. OpenFaas is one of several open source "Serverless" solutions.
让我们进入下一个层次。 我们将安装OpenFaas-考虑使用Azure Functions或Amazon Lambda,但您自己的Docker和Kubernetes群集除外。 显然,OpenFaas是一个我们将在Kubernetes上运行的应用程序,它将使运行其他应用程序变得更加容易。 然后,我们将在其上运行其他内容...只是一些简单的应用程序,例如Python和.NET Core中的Hello World。 OpenFaas是几种开源“无服务器”解决方案之一。
Do you need to use OpenFaas? No. But if your goal is to write a DoIt() function and put it on your little cluster easily and scale it out, it's pretty fabulous.
您需要使用OpenFaas吗? 不会。但是,如果您的目标是编写DoIt()函数并将其轻松放置在您的小群集上并进行扩展,则非常好。
Remember my definition of Serverless...there ARE servers, you just don't think about them.
记住我对无服务器的定义...有ARE服务器,您只是不考虑它们。
Serverless Computing is like this - Your code, a slider bar, and your credit card.
无服务器计算就是这样-您的代码,一个滑块和您的信用卡。
Let's go.
我们走吧。
Raspberry Pi上Kubernetes上OpenFaas的.NET Core (.NET Core on OpenFaas on Kubernetes on Raspberry Pi)
I ssh'ed into my main/master cluster Pi and set up OpenFaas:
我将其放入主/主群集Pi并设置了OpenFaas:
git clone https://github.com/alexellis/faas-netes && cd faas-netes

kubectl apply -f faas.armhf.yml,rbac.yml,monitoring.armhf.yml
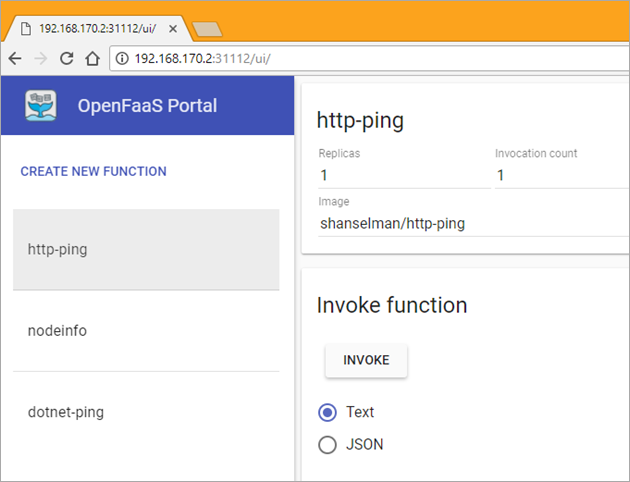
Once OpenFaas is installed on your cluster, here's Alex's great instructions on how to setup your first OpenFaas Python function, so give that a try first and test it. Once we've installed that Python function, we can also hit http://192.168.170.2:31112/ui/ (where that's your main Boss/Master's IP) and see it the OpenFaas UI.
将OpenFaas安装到您的集群后,这是Alex关于如何设置您的第一个OpenFaas Python函数的重要说明,因此请尝试一下并对其进行测试。 安装完该Python函数后,我们还可以点击http://192.168.170.2:31112/ui/(这是您的主要Boss / Master的IP),并查看它的OpenFaas UI。
OpenFaas and the "faas-netes" we setup above automates the build and deployment of our apps as Docker Images to Kuberetes. It makes the "Developer's Inner Loop" simpler. I'm going to make my .NET app, build, deploy, then change, build, deploy and I want it to "just work" on my cluster. And later, and I want it to scale.
我们在上面设置的OpenFaas和“ faas-net”自动将我们的应用程序构建和部署为Docker镜像到Kuberetes。 它使“开发人员的内在循环”更加简单。 我将制作.NET应用程序,进行构建,部署,然后更改,构建,部署,然后希望它在群集上“正常工作”。 后来,我希望它可以扩展。
I'm doing .NET Core, and since there is a runtime for .NET Core for Raspberry Pi (and ARM system) but no SDK, I need to do the build on my Windows machine and deploy from there.
我正在使用.NET Core,并且由于有适用于Raspberry Pi(和ARM系统)的.NET Core运行时,但没有SDK,因此我需要在Windows机器上进行构建并从那里进行部署。
Quick Aside: There are docker images for ARM/Raspberry PI for running .NET Core. However, you can't build .NET Core apps (yet?) directly ON the ARM machine. You have to build them on an x86/x64 machine and then get them over to the ARM machine. That can be SCP/FTPing them, or it can be making a docker container and then pushing that new docker image up to a container registry, then telling Kubernetes about that image. K8s (cool abbv) will then bring that ARM image down and run it. The technical trick that Alex and I noticed was of course that since you're building the Docker image on your x86/x64 machine, you can't RUN any stuff on it. You can build the image but you can't run stuff within it. It's an unfortunate limitation for now until there's a .NET Core SDK on ARM.
快速说明:有用于运行.NET Core的ARM / Raspberry PI的docker映像。 但是,您不能直接在ARM机器上构建.NET Core应用程序(还?)。 您必须在x86 / x64机器上构建它们,然后将它们转移到ARM机器上。 可能是通过SCP / FTP对其进行存储,也可能是制作docker容器,然后将该新的docker映像推送到容器注册表中,然后将有关该映像的信息告知Kubernetes。 然后,K8s(很酷的abbv)将降低该ARM映像并运行它。 我和Alex注意到的技术诀窍当然是由于您是在x86 / x64机器上构建Docker映像,因此您无法在其中运行任何东西。 您可以构建映像,但是不能在其中运行任何东西。 在ARM上没有.NET Core SDK之前,这是一个不幸的限制。
What's required on my development machine (not my Raspberry Pis?
开发机器(不是我的Raspberry Pi)需要什么?
- I installed KubeCtl (see above) in the PATH 我在PATH中安装了KubeCtl(请参见上文)
I installed OpenFaas's Faas-CLI command line and put it in the PATH
我安装了OpenFaas的Faas-CLI命令行并将其放在PATH中
I installed Docker for Windows. You'll want to make sure your machine has some flavor of Docker if you have a Mac or Linux machine.
我安装了Docker for Windows 。 如果您拥有Mac或Linux计算机,则需要确保您的计算机具有某种Docker风格。
I ran docker login at least once.
我至少运行过docker登录一次。
I installed Docker for Windows. You'll want to make sure your machine has some flavor of Docker if you have a Mac or Linux machine.
我安装了适用于Windows的Docker 。 如果您拥有Mac或Linux计算机,则需要确保您的计算机具有某种Docker风格。
I installed .NET Core from http://dot.net/core
Here's the gist we came up with, again thanks Alex! I'm going to do it from Windows.
这是我们想出的要点,再次感谢Alex! 我将从Windows上执行此操作。
I'll use the faas-cli to make a new function with charp. I'm calling mine dotnet-ping.
我将使用faas-cli通过charp创建一个新函数。 我打电话给我的dotnet-ping。
faas-cli new --lang csharp dotnet-ping
I'll edit the FunctionHandler.cs to add a little more. I'd like to know the machine name so I can see the scaling happen when it does.
我将编辑FunctionHandler.cs以添加更多内容。 我想知道机器名称,以便可以看到缩放时发生的情况。
using System;
using System.Text;

namespace Function
{
    public class FunctionHandler
    {
        public void Handle(string input) {
            Console.WriteLine("Hi your input was: "+ input + " on " + System.Environment.MachineName);
        }
    }
}
Check out the .yml file for your new OpenFaas function. Note the gateway IP should be your main Pi, and the port is 31112 which is OpenFaas.
签出.yml文件以获取新的OpenFaas功能。 请注意,网关IP应该是您的主要Pi,端口是31112,即OpenFaas。
I also changed the image to include "shanselman/" which is my Docker Hub. You could also use a local Container Registry if you like.
我还更改了镜像,使其包含“ shanselman /”,这是我的Docker Hub。 如果愿意,也可以使用本地Container Registry。
provider:
  name: faas
  gateway: http://192.168.170.2:31112

functions:
  dotnet-ping:
    lang: csharp
    handler: ./dotnet-ping
    image: shanselman/dotnet-ping
Head over to the ./template/csharp/Dockerfile and we're going to change it. Ordinarily it's fine if you are publishing from x64 to x64 but since we are doing a little dance, we are going to build and publish the .NET apps as linux-arm from our x64 machine, THEN push it, we'll use a multi stage docker file. Change the default Docker file to this:
转到./template/csharp/Dockerfile,我们将对其进行更改。 通常,如果您是从x64发行到x64,这很好,但是由于我们在做些跳舞,所以我们将在x64机器上以linux-arm的形式构建和发布.NET应用,然后将其推送,我们将使用多阶段docker文件。 将默认的Docker文件更改为此:
FROM microsoft/dotnet:2.0-sdk as builder

ENV DOTNET_CLI_TELEMETRY_OPTOUT 1

# Optimize for Docker builder caching by adding projects first.

RUN mkdir -p /root/src/function
WORKDIR /root/src/function
COPY ./function/Function.csproj  .

WORKDIR /root/src/
COPY ./root.csproj  .
RUN dotnet restore ./root.csproj

COPY .  .

RUN dotnet publish -c release -o published -r linux-arm

ADD https://github.com/openfaas/faas/releases/download/0.6.1/fwatchdog-armhf /usr/bin/fwatchdog
RUN chmod +x /usr/bin/fwatchdog

FROM microsoft/dotnet:2.0.0-runtime-stretch-arm32v7

WORKDIR /root/
COPY --from=builder /root/src/published .
COPY --from=builder /usr/bin/fwatchdog /

ENV fprocess="dotnet ./root.dll"
EXPOSE 8080
CMD ["/fwatchdog"]
Notice a few things. All the RUN commands are above the second FROM where we take the results of the first container and use its output to build the second ARM-based one. We can't RUN stuff because we aren't on ARM, right?
注意几件事。 所有RUN命令都在第二个FROM之上,我们从中获取第一个容器的结果并使用其输出来构建第二个基于ARM的容器。 我们不能运行东西,因为我们不在ARM上,对吗?
We use the Faas-Cli to build the app, build the docker container, AND publish the result to Kubernetes.
我们使用Faas-Cli来构建应用程序,构建docker容器,并将结果发布到Kubernetes。
faas-cli build -f dotnet-ping.yml --parallel=1
faas-cli push -f dotnet-ping.yml
faas-cli deploy -f dotnet-ping.yml --gateway http://192.168.170.2:31112
And here is the dotnet-ping command running on the pi, as seen within the Kubernetes Dashboard.
这是在pi上运行的dotnet-ping命令,如Kubernetes仪表板中所示。
I can then scale them out like this:
然后,我可以像这样扩展它们:
kubectl scale deploy/dotnet-ping --replicas=6
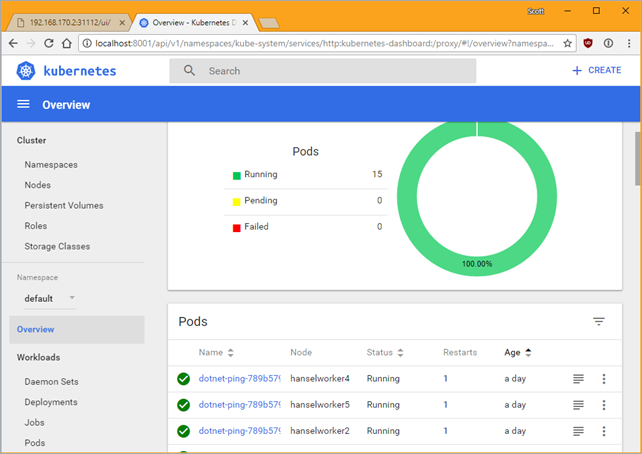
And if I hit it multiple times - either via curl or via the dashboard, I see it's hitting different pods:
而且,如果我多次击打它(通过卷曲或通过仪表板),我会看到它击中了不同的吊舱:
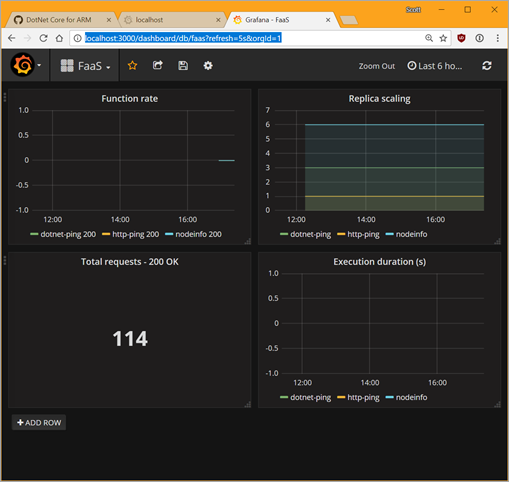
If I want to get super fancy, I can install Grafana - a dashboard manager by running locally in my machine on port 3000
如果我想超级喜欢,可以通过在本地计算机上的端口3000上本地运行来安装Grafana-仪表板管理器
docker run -p 3000:3000 -d grafana/grafana
Then I can add OpenFaas a datasource by pointing Grafana to http://192.168.170.2/31119 which is where the Prometheus metrics app is already running, then import the OpenFaas dashboard from the grafana.json file that is in the I cloned it from.
然后,我可以通过将Grafana指向已经运行Prometheus指标应用程序的http://192.168.170.2/31119来添加OpenFaas数据源,然后从我从中克隆的grafana.json文件中导入OpenFaas仪表板。 。
Super cool. I'm going to keep using this little Raspberry Pi Kubernetes Cluster to learn as I get ready to do real K8s in Azure! Thanks to Alex Ellis for his kindness and patience and to Jessie Frazelle for making me love both Windows AND Linux!
超酷。 当我准备在Azure中做真正的K8时,我将继续使用这个小的Raspberry Pi Kubernetes集群来学习! 感谢Alex Ellis的友善和耐心,感谢Jessie Frazelle使我爱上Windows和Linux!
* If you like this blog, please do use my Amazon links as they help pay for projects like this! They don't make me rich, but a few dollars here and there can pay for Raspberry Pis!
*如果你喜欢这个博客,请不要用我的亚马逊的链接,因为他们对这样的项目帮助支付! 它们并不能使我致富,但是在这里和那里只要花几美元就能买到Raspberry Pis!
raspberry pi


 3551
3551


 被折叠的 条评论
为什么被折叠?


