
powershell脚本
Geoff Bard at Corillian (we work together) wrote up a good tutorial on working/playing with Signed PowerShell scripts. He graciously agreed to let me reprint a linted version here:
Corillian的Geoff Bard(我们一起工作)撰写了一篇有关使用Signed PowerShell脚本工作/播放的很好的教程。 他客气地答应让我在这里转载棉绒版:
Signing PowerShell Scripts
签署PowerShell脚本
Execution Policies
执行政策
PowerShell supports a concept called "execution policies" in order to help deliver a more secure command line administration experience. Execution policies define the restrictions under which PowerShell loads files for execution and configuration. The four execution policies are Restricted, AllSigned, RemoteSigned, and Unrestricted.
PowerShell支持称为“执行策略”的概念,以帮助提供更安全的命令行管理体验。 执行策略定义了PowerShell加载文件以执行和配置的限制。 四个执行策略是“受限”,“全部签名”,“远程签名”和“不受限制”。
PowerShell is configured to run in its most secure mode by default. This mode is the "Restricted" execution policy, in which PowerShell operates as an interactive shell only. The modes are: Restricted (default execution policy, does not run scripts, interactive only); AllSigned (runs scripts; all scripts and configuration files must be signed by a publisher that you trust; opens you to the risk of running signed (but malicious) scripts, after confirming that you trust the publisher); RemoteSigned (runs scripts; all scripts and configuration files downloaded from communication applications such as Microsoft Outlook, Internet Explorer, Outlook Express and Windows Messenger must be signed by a publisher that you trust; opens you to the risk of running malicious scripts not downloaded from these applications, without prompting); Unrestricted (runs scripts; all scripts and configuration files downloaded from communication applications such as Microsoft Outlook, Internet Explorer, Outlook Express and Windows Messenger run after confirming that you understand the file originated from the Internet; no digital signature is required; opens you to the risk of running unsigned, malicious scripts downloaded from these applications).
默认情况下,PowerShell配置为以其最安全的模式运行。 此模式是“受限”执行策略,在该策略中,PowerShell仅作为交互式外壳程序运行。 这些模式是:受限(默认执行策略,不运行脚本,仅交互式); AllSigned (运行脚本;所有脚本和配置文件必须由您信任的发布者签名;在确认您信任发布者之后,使您冒着运行签名(但恶意)脚本的风险); RemoteSigned (运行脚本;从Microsoft Outlook,Internet Explorer,Outlook Express和Windows Messenger等通信应用程序下载的所有脚本和配置文件必须由您信任的发布者签名;使您有运行未从这些脚本下载的恶意脚本的风险申请,无提示); 不受限制(运行脚本;从通讯应用程序(例如Microsoft Outlook,Internet Explorer,Outlook Express和Windows Messenger)下载的所有脚本和配置文件在确认您了解文件源于Internet之后便会运行;不需要数字签名;将您打开运行从这些应用程序下载的未签名的恶意脚本的风险)。
Changing Execution Policy
更改执行政策
Run the following from a PowerShell prompt (AllSigned is an example):
从PowerShell提示符运行以下命令(AllSigned是一个示例):
Set-ExecutionPolicy AllSigned
Set-ExecutionPolicy AllSigned
This command requires administrator privileges. Changes to the execution policy are recognized immediately.
此命令需要管理员权限。 执行策略的更改将立即被识别。
Restricted Execution Policy
限制执行政策
If you're reading this for the first time, PowerShell may have just displayed the error message as you tried to run a script:
如果您是第一次阅读本文,PowerShell可能在您尝试运行脚本时刚刚显示了错误消息:
The file C:\my_script.ps1 cannot be loaded. The execution of scripts is disabled on this system. Please see "Get-Help about_signing" for more details.
无法加载文件C:\ my_script.ps1。 在此系统上禁用脚本的执行。 请参阅“ Get_Help about_signing”以获取更多详细信息。
The default execution policy of PowerShell is called "Restricted." In this mode, PowerShell operates as an interactive shell only. It does not run scripts, and loads only configuration files signed by a publisher that you trust.
PowerShell的默认执行策略称为“受限”。 在这种模式下,PowerShell仅充当交互式外壳。 它不运行脚本,并且仅加载由您信任的发布者签名的配置文件。
Environment
环境
The AllSigned execution policy is best for production since it forces the requirement for digital signatures on all scripts and configuration files.
AllSigned执行策略最适合生产,因为它在所有脚本和配置文件上强制要求数字签名。
Script Signing Background
脚本签名背景
Adding a digital signature to a script requires that it be signed with a code signing certificate. Two types are suitable: those created by a certificate authority (such as Verisign etc.), and those created by a user (called a self-signed certificate).
向脚本中添加数字签名需要使用代码签名证书对其进行签名。 两种类型均适用:由证书颁发机构创建的类型(例如Verisign等)和由用户创建的类型(称为自签名证书)。
If your scripts are specific to your internal use, you maybe able to self-sign. You can also buy a code signing certificate from another certificate authority if you like.
如果您的脚本是特定于您的内部使用的,则也许可以进行自签名。 如果愿意,您还可以从其他证书颁发机构购买代码签名证书。
For a self-signed certificate, a designated computer is the authority that creates the certificate. The benefits of self-signing include its zero cost as well as creation speed and convenience. The drawback is that the certificate must be installed on every computer that will be running the scripts, since other computers will not trust the computer used to create the certificate.
对于自签名证书,指定的计算机是创建证书的机构。 自签名的好处包括零成本以及创建速度和便利性。 缺点是证书必须安装在将要运行脚本的每台计算机上,因为其他计算机将不信任用于创建证书的计算机。
To create a self-signed certificate, the makecert.exe program is required. This is available as part of the Microsoft .NET Framework SDK or Microsoft Windows Platform SDK. The latest is the .NET Framework 2.0 SDK – after installing, makecert.exe is found in the "C:\Program Files\Microsoft Visual Studio 8\SDK\v2.0\Bin\" directory.
要创建自签名证书,需要makecert.exe程序。 这是Microsoft .NET Framework SDK或Microsoft Windows Platform SDK的一部分。 最新的是.NET Framework 2.0 SDK –安装后,可以在“ C:\ Program Files \ Microsoft Visual Studio 8 \ SDK \ v2.0 \ Bin \”目录中找到makecert.exe。
Viewing Certificates
查看证书
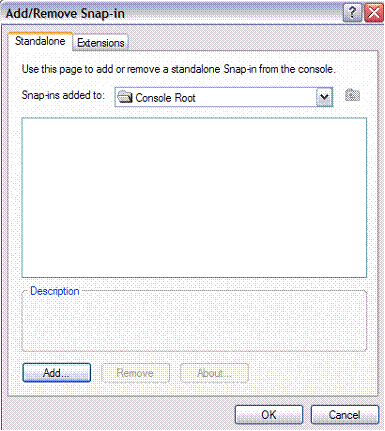
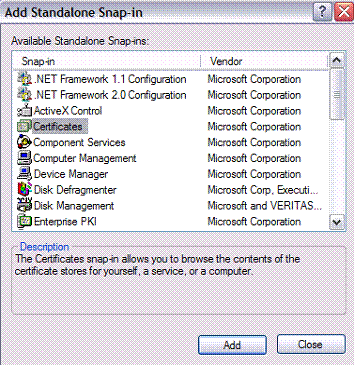
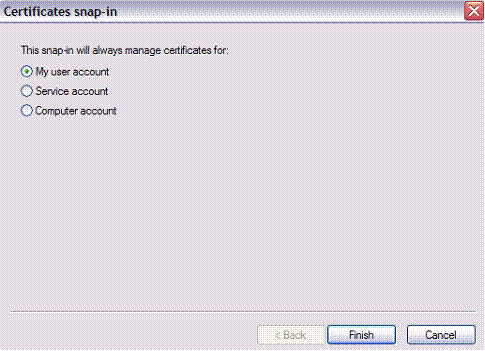
Set up to view the Certificates by running mmc.exe and adding the Certificates snap-in:
通过运行mmc.exe并添加“证书”管理单元来设置以查看证书:
Setting Up a Self-Signed Certificate
设置自签名证书
Run the following from a Command Prompt. It creates a local certificate authority for your computer:
从命令提示符处运行以下命令。 它为您的计算机创建本地证书颁发机构:
makecert -n "CN=PowerShell Local Certificate Root" -a sha1 -eku 1.3.6.1.5.5.7.3.3 -r -sv root.pvk root.cer -ss Root -sr localMachine
makecert -n“ CN = PowerShell本地证书根目录” -a sha1 -eku 1.3.6.1.5.5.7.3.3 -r -sv root.pvk root.cer -ss根目录-sr localMachine
You will be prompted for the private key:
系统将提示您输入私钥:
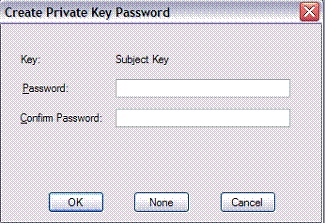
Next you’ll be prompted for the private key you entered above:
接下来,将提示您输入在上面输入的私钥:
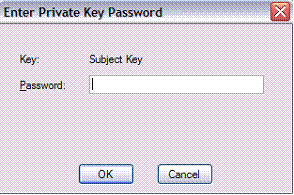
This will create the trusted root certificate authority:
这将创建受信任的根证书颁发机构:

Now run the following from a Command Prompt. It generates a personal certificate from the above certificate authority:
现在从命令提示符处运行以下命令。 它从上述证书颁发机构生成个人证书:
makecert -pe -n "CN=PowerShell User" -ss MY -a sha1 -eku 1.3.6.1.5.5.7.3.3 -iv root.pvk -ic root.cer
makecert -pe -n“ CN = PowerShell用户” -ss MY -a sha1 -eku 1.3.6.1.5.5.7.3.3 -iv root.pvk -ic root.cer
You’ll be prompted for the private key:
系统将提示您输入私钥:
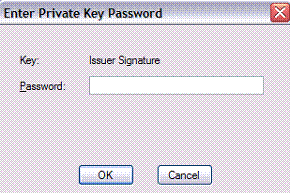
There will now be a certificate in the Personal store:
现在,个人商店中将有一个证书:

After the above steps, verify from Powershell that the certificate was generated correctly:
完成上述步骤之后,请从Powershell验证证书已正确生成:
PS C:\ > Get-ChildItem cert:\CurrentUser\My -codesign
PS C:\> Get-ChildItem证书:\ CurrentUser \ My -codesign

You can now delete the two temporary files root.pvk and root.cer in your working directory. The certificate info is stored with that of others, in "C:\Documents and Settings\[username]\Application Data\Microsoft\SystemCertificates\My\".
现在,您可以在工作目录中删除两个临时文件root.pvk和root.cer。 证书信息与其他证书信息一起存储在“ C:\ Documents and Settings \ [用户名] \ Application Data \ Microsoft \ SystemCertificates \ My \”中。
Signing a Script
签署脚本
To test the effectiveness of digitally signing a Powershell script, try it with a particular script “foo.ps1”:
要测试对Powershell脚本进行数字签名的有效性,请尝试使用特定的脚本“ foo.ps1”:
PS C:\> Set-ExecutionPolicy AllSigned
PS C:\> Set-ExecutionPolicy AllSigned
PS C:\> .\foo.ps1
PS C:\> 。\ foo.ps1
The file C:\foo.ps1 cannot be loaded. The file C:\foo.ps1 is not digitally signed. The script will not execute on the system. Please see "get-help about_signing" for more details..
无法加载文件C:\ foo.ps1。 文件C:\ foo.ps1没有经过数字签名。 该脚本将不会在系统上执行。 请参阅“获取有关about_signing的帮助”以了解更多详细信息。
At line:1 char:9 + .\foo.ps1 <<<<
在第1行:9个字符+。\ foo.ps1 <<<<
Now sign the script:
现在签署脚本:
PS C:\> Set-AuthenticodeSignature c:\foo.ps1 @(Get-ChildItem cert:\CurrentUser\My -codesign)[0]
PS C:\> Set-AuthenticodeSignature c:\ foo.ps1 @((Get-ChildItem cert:\ CurrentUser \ My -codesign)[0]
Directory: C:\
目录:C:\
SignerCertificate Status Path
----------------- ------ ----
A180F4B81AA81143AD2969114D26A2CC2D2AD65B Valid foo.ps1
SignerCertificate状态路径----------------- ------ ---- A180F4B81AA81143AD2969114D26A2CC2D2AD65B有效foo.ps1
This actually modifies the end of the script with a signature block. For example, if the script consisted of the following commands:
实际上,这会使用签名块修改脚本的结尾。 例如,如果脚本由以下命令组成:
param ( [string] $You = $(read-host "Enter your first name") )
write-host "$You so totally rocks"
param([string] $ You = $(read-host“输入您的名字”)) 写主机“ $ You真是太不可思议了”
After the script is signed, it looks like this:
脚本签名后,如下所示:
param ( [string] $You = $(read-host "Enter your first name") )
write-host "$You so totally rocks"
param([string] $ You = $(read-host“输入您的名字”)) 写主机“ $ You真是太不可思议了”
# SIG # Begin signature block # MIIEMwYJKoZIhvcNAQcCoIIEJDCCBCACAQExCzAJBgUrDgMCGgUAMGkGCisGAQQB # gjcCAQSgWzBZMDQGCisGAQQBgjcCAR4wJgIDAQAABBAfzDtgWUsITrck0sYpfvNR # AgEAAgEAAgEAAgEAAgEAMCEwCQYFKw4DAhoFAAQU6vQAn5sf2qIxQqwWUDwTZnJj
...snip... # m5ugggI9MIICOTCCAaagAwIBAgIQyLeyGZcGA4ZOGqK7VF45GDAJBgUrDgMCHQUA # Dxoj+2keS9sRR6XPl/ASs68LeF8o9cM=
# SIG # End signature block
#SIG#开始签名块#MIIEMwYJKoZIhvcNAQcCoIIEJDCCBCACAQExCzAJBgUrDgMCGgUAMGkGCisGAQQB #gjcCAQSgWzBZMDQGCisGAQQBgjcCAR4wJgIDAQAABBAfzDtgWUsITrck0sYpfvNR #AgEAAgEAAgEAAgEAAgEAMCEwCQYFKw4DAhoFAAQU6vQAn5sf2qIxQqwWUDwTZnJj ...剪... #m5ugggI9MIICOTCCAaagAwIBAgIQyLeyGZcGA4ZOGqK7VF45GDAJBgUrDgMCHQUA #Dxoj + 2keS9sRR6XPl / ASs68LeF8o9cM = #SIG#结束签名块
Execute the script once again:
再次执行脚本:
PS C:\> .\foo.ps1 Do you want to run software from this untrusted publisher?
PS C:\> 。\ foo.ps1 您是否要运行此不受信任的发布者的软件?
The file C:\foo.ps1 is published by CN=PowerShell User. This publisher is not trusted on your system. Only run scripts from trusted publishers.
文件C:\ foo.ps1由CN = PowerShell User发布。 该发布者在您的系统上不受信任。 仅运行来自受信任的发布者的脚本。
[V] Never run [D] Do not run [R] Run once [A] Always run [?] Help (default is "D"):
[V]从不运行[D]不运行[R]运行一次[A]始终运行[?]帮助(默认为“ D”):
Answer "A" and the script proceeds to run, and runs without prompting thereafter. A new certificate is also created in the Trusted Publishers container:
回答“ A”,脚本将继续运行,并且此后无需提示即可运行。 在“受信任的发布者”容器中还将创建一个新证书:

If the certificate is missing the script will fail.
如果缺少证书,脚本将失败。
Running Signed Scripts Elsewhere
在其他地方运行签名脚本
PowerShell will be unable to validate a signed script on computers other than the one where it was signed. Attempting to do so gives an error:
PowerShell将无法在签名脚本以外的其他计算机上验证签名脚本。 尝试这样做会产生错误:
PS C:\ > .\foo.ps1 The file C:\foo.ps1 cannot be loaded. The signature of the certificate can not be verified. At line:1 char:9 + .\foo.ps1 <<<<
PS C:\> 。\ foo.ps1 无法加载文件C:\ foo.ps1。 证书的签名无法验证。 在第1行:9个字符+。\ foo.ps1 <<<<
Signed scripts can be transported by exporting (from original computer) and importing (to the new computer) the Powershell certificates found in the Trusted Root Certification Authorities container. Optionally, the Trusted Publishers can also be moved to prevent the first-time prompt.
可以通过导出(从原始计算机)和导入(到新计算机)在“受信任的根证书颁发机构”容器中找到的Powershell证书来传输已签名的脚本。 (可选)还可以移动“受信任的发布者”以防止出现首次提示。
From the Current User certificate store, go to the Trusted Root Certification Authorities container and locate the PowerShell Local Certificate Root certificate. Right-click on it and click All Tasks, Export:
从“当前用户”证书存储中,转到“受信任的根证书颁发机构”容器,然后找到PowerShell本地证书根证书。 右键单击它,然后单击所有任务,导出:

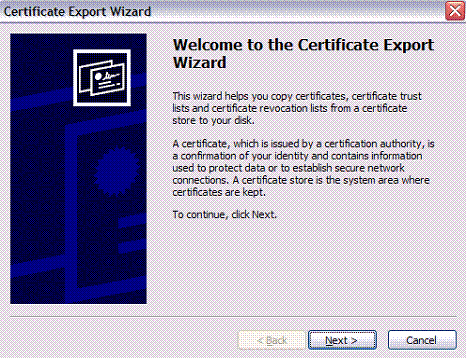
Click Next at the prompt:
在提示下单击“下一步”:
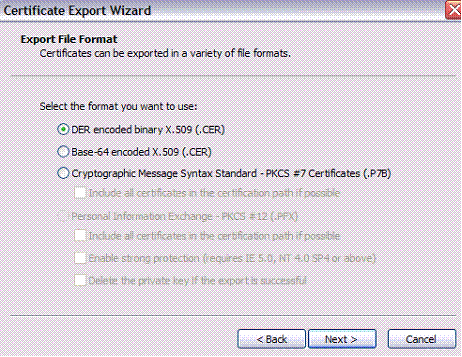
Leave the format at the default DER and click Next:
将格式保留为默认DER,然后单击“下一步”:
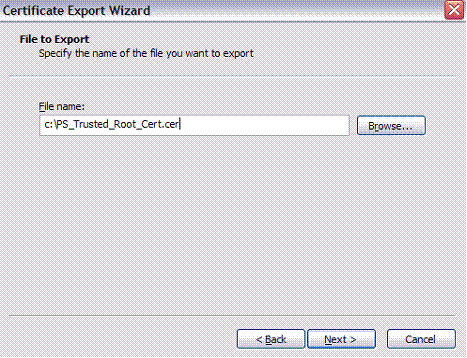
Enter your desired path and name of the exported certificate, and click Next:
输入所需的路径和导出证书的名称,然后单击下一步:
Click Finish and close out the wizard:
单击完成,然后关闭向导:

Login on the target machine as the user under which scripts will be running. Open MMC and add the Certificates snap-in for the current user, locating the Trusted Root Certification Authorities container.
以将在其下运行脚本的用户身份登录目标计算机。 打开MMC并添加当前用户的证书管理单元,找到“受信任的根证书颁发机构”容器。
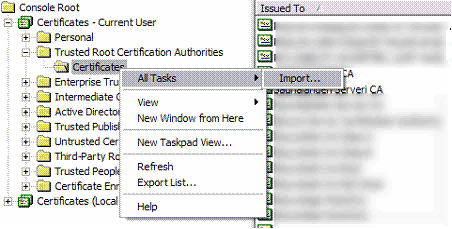
Expand the container to find the Certificates store. Right-click on it and select All Tasks, Import:
展开容器以找到证书存储。 右键单击它,然后选择所有任务,导入:
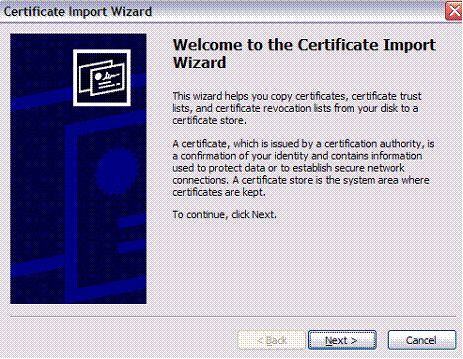
Click Next to continue:
单击下一步继续:
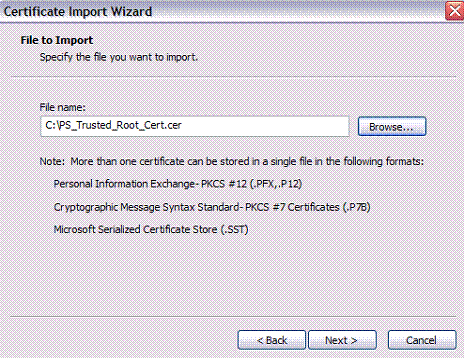
Locate the certificate you exported earlier and click Next:
找到您之前导出的证书,然后单击“下一步”:
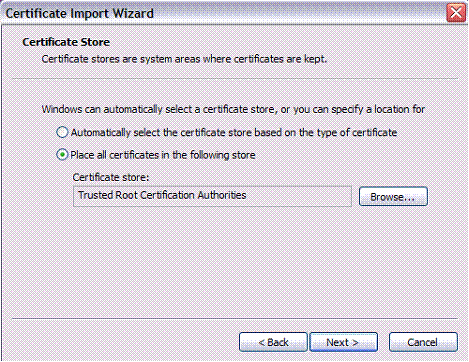
Leave the next step at its default and click Next:
将下一步保留为默认值,然后单击下一步:
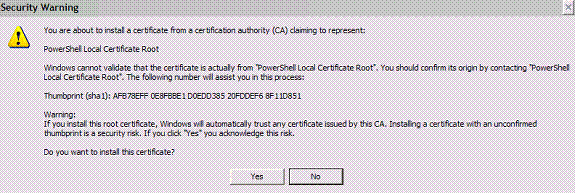
Read the security warning and click Yes to install the certificate:
阅读安全警告,然后单击“是”以安装证书:
Your signed script should now run on the new computer. Note that Powershell will prompt you the first time it’s run unless you also import the Trusted Publishers certificate.
您签名的脚本现在应该在新计算机上运行。 请注意,除非您也导入Trusted Publishers证书,否则Powershell会在第一次运行时提示您。
翻译自: https://www.hanselman.com/blog/signing-powershell-scripts
powershell脚本


 5416
5416

 被折叠的 条评论
为什么被折叠?


