


Extract horizontal and vertical lines by using morphological operations
使用形态学运算提取水平和垂直线
Goal
在本教程中,您将学习如何:
应用两个非常常见的形态运算符(即 Dilation 和 Erosion),创建自定义内核,以便在水平轴和垂直轴上提取直线。 为此,您将使用以下 OpenCV 函数:
在一个示例中,您的目标是从(music sheet)乐谱中提取(music notes)乐谱。
Theory
形态学操作
形态学是一组图像处理操作,它们基于预定义的结构元素(也称为内核)处理图像。 输出图像中每个像素的值基于输入图像中相应像素与其相邻像素的比较。 通过选择内核的大小和形状,您可以构建一个对输入图像的特定形状敏感的形态学操作。
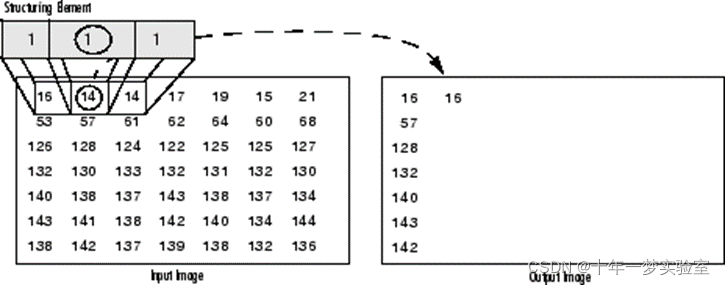
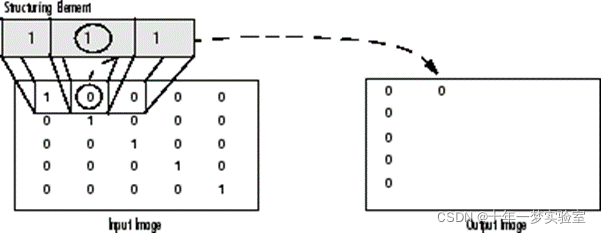
两个最基本的形态学运算是膨胀和腐蚀。 膨胀将像素添加到图像中对象的边界,而腐蚀则恰恰相反。 添加或删除的像素数量分别取决于用于处理图像的结构元素的大小和形状。 一般来说,这两个操作遵循的规则如下:
Dilation:膨胀:输出像素的值是落在结构元素大小和形状内的所有像素的最大值。 例如在二值图像中,如果输入图像的任何像素落在内核范围内的值设置为 1,则输出图像的相应像素也将设置为 1。 后者适用于任何类型的图像(例如灰度、bgr 等)。

二值图像的膨胀
灰度图像上的膨胀
Erosion:侵蚀:反之亦然适用于侵蚀操作。 输出像素的值是属于结构元素大小和形状的所有像素的最小值。 请看下面的示例图:
二值图像上的侵蚀

灰度图像上的侵蚀
Structuring Elements
结构元素
从上面可以看出,通常在任何形态学操作中,用于探测输入图像的结构元素是最重要的部分。
结构元素是一个仅由 0 和 1 组成的矩阵,可以具有任意形状和大小。 通常比正在处理的图像小得多,而值为 1 的像素定义邻域。 结构元素的中心像素,称为原点,标识感兴趣的像素——正在处理的像素。
例如,下图说明了一个 7x7 大小的菱形结构元素。
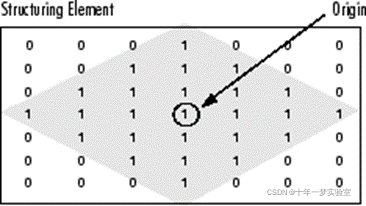
一种菱形结构元件及其起源
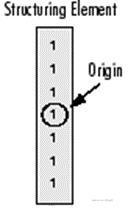
结构化元素可以有许多常见的形状,例如线条、菱形、圆盘、周期线以及圆形和大小。 您通常会选择与您要在输入图像中处理/提取的对象具有相同大小和形状的结构元素。 例如,要在图像中查找线条,请创建一个线性结构元素,您将在后面看到。
Code
本教程代码如下所示。
/**
 * @file Morphology_3(Extract_Lines).cpp
 * @brief Use morphology transformations for extracting horizontal and vertical lines sample code
 * 使用形态变换提取水平和垂直线示例代码
 * @author OpenCV team
 */

#include <opencv2/core.hpp>
#include <opencv2/imgproc.hpp>
#include <opencv2/highgui.hpp>
#include <iostream>

void show_wait_destroy(const char* winname, cv::Mat img);

using namespace std;
using namespace cv;

int main(int argc, char** argv)
{
    //! [load_image]
    CommandLineParser parser(argc, argv, "{@input | notes.png | input image}");
    Mat src = imread( samples::findFile( parser.get<String>("@input") ), IMREAD_COLOR);
    if (src.empty())
    {
        cout << "Could not open or find the image!\n" << endl;
        cout << "Usage: " << argv[0] << " <Input image>" << endl;
        return -1;
    }

    // Show source image
    imshow("src", src);
    //! [load_image]

    //! [gray]
    // Transform source image to gray if it is not already
    Mat gray;

    if (src.channels() == 3)
    {
        cvtColor(src, gray, COLOR_BGR2GRAY);
    }
    else
    {
        gray = src;
    }

    // Show gray image
    show_wait_destroy("gray", gray);
    //! [gray]

    //! [bin]
    // Apply adaptiveThreshold at the bitwise_not of gray, notice the ~ symbol
    Mat bw;
    adaptiveThreshold(~gray, bw, 255, ADAPTIVE_THRESH_MEAN_C, THRESH_BINARY, 15, -2);//提取边缘

    // Show binary image
    show_wait_destroy("binary", bw);//显示二值图像
    //! [bin]

    //! [init]
    // Create the images that will use to extract the horizontal and vertical lines
	//创建将用于提取水平和垂直线的图像
    Mat horizontal = bw.clone();
    Mat vertical = bw.clone();
    //! [init]

    //! [horiz]
    // 在水平轴上指定大小
    int horizontal_size = horizontal.cols / 30;

    // Create structure element for extracting horizontal lines through morphology operations
	//通过形态学操作创建用于提取水平线的结构元素
    Mat horizontalStructure = getStructuringElement(MORPH_RECT, Size(horizontal_size, 1));

    //应用形态学操作
    erode(horizontal, horizontal, horizontalStructure, Point(-1, -1));
    dilate(horizontal, horizontal, horizontalStructure, Point(-1, -1));

    // 显示提取的水平线
    show_wait_destroy("horizontal", horizontal);
    //! [horiz]

    //! [vert]
    // 在垂直轴上指定大小
    int vertical_size = vertical.rows / 30;

    // Create structure element for extracting vertical lines through morphology operations
	//通过形态学操作创建用于提取垂直线的结构元素
    Mat verticalStructure = getStructuringElement(MORPH_RECT, Size(1, vertical_size));

    // 应用形态学操作
    erode(vertical, vertical, verticalStructure, Point(-1, -1));
    dilate(vertical, vertical, verticalStructure, Point(-1, -1));

    //显示提取的垂直线
    show_wait_destroy("vertical", vertical);
    //! [vert]

    //! [smooth]
    // 反向 垂直图像Inverse vertical image
    bitwise_not(vertical, vertical);
    show_wait_destroy("vertical_bit", vertical);

    // 根据以下逻辑提取边缘和平滑图像
    // 1. extract edges
    // 2. dilate(edges)
    // 3. src.copyTo(smooth)
    // 4. blur smooth img
    // 5. smooth.copyTo(src, edges)

    // Step 1
    Mat edges;
    adaptiveThreshold(vertical, edges, 255, ADAPTIVE_THRESH_MEAN_C, THRESH_BINARY, 3, -2);//提取边缘
    show_wait_destroy("edges", edges);

    // Step 2
    Mat kernel = Mat::ones(2, 2, CV_8UC1);
    dilate(edges, edges, kernel);//膨胀
    show_wait_destroy("dilate", edges);

    // Step 3
    Mat smooth;
    vertical.copyTo(smooth);

    // Step 4
    blur(smooth, smooth, Size(2, 2));//滤波smooth

    // Step 5
    smooth.copyTo(vertical, edges);//将edges掩膜添加到滤波的smooth

    // 显示最终结果
    show_wait_destroy("smooth - final", vertical);//
    //! [smooth]

    return 0;
}
//显示图像等待按键销毁窗口
void show_wait_destroy(const char* winname, cv::Mat img) {
    imshow(winname, img);
    moveWindow(winname, 500, 0);
    waitKey(0);
    destroyWindow(winname);
}
Explanation / Result
解释/结果
从这里获取图像raw.githubusercontent.com。
Load Image
CommandLineParser parser(argc, argv, "{@input | notes.png | input image}");
Mat src = imread( samples::findFile( parser.get<String>("@input") ), IMREAD_COLOR);
if (src.empty())
{
cout << "Could not open or find the image!\n" << endl;
cout << "Usage: " << argv[0] << " <Input image>" << endl;
return -1;
}
// Show source image
imshow("src", src);

Grayscale
// Transform source image to gray if it is not already
Mat gray;
if (src.channels() == 3)
{
cvtColor(src, gray, COLOR_BGR2GRAY);
}
else
{
gray = src;
}
// Show gray image
show_wait_destroy("gray", gray);

Grayscale to Binary image 灰度图转二值图像
// Apply adaptiveThreshold at the bitwise_not of gray, notice the ~ symbol
//在灰色的 bitwise_not 上应用 AdaptiveThreshold,注意 ~ 符号
Mat bw;
adaptiveThreshold(~gray, bw, 255, ADAPTIVE_THRESH_MEAN_C, THRESH_BINARY, 15, -2);
// 显示二值图像
show_wait_destroy("binary", bw);

adaptiveThreshold()
| void cv::adaptiveThreshold | ( | src, | |
| dst, | |||
| double | maxValue, | ||
| int | adaptiveMethod, | ||
| int | thresholdType, | ||
| int | blockSize, | ||
| double | C | ||
| ) |
Python:
| cv.adaptiveThreshold( | src, maxValue, adaptiveMethod, thresholdType, blockSize, C[, dst] | ) -> | dst |
将自适应阈值应用于数组。
该函数根据公式将灰度图像转换为二值图像:
THRESH_BINARY

THRESH_BINARY_INV

其中 T(x,y) 是为每个像素单独计算的阈值(请参阅 AdaptiveMethod 参数)。
该函数可以就地处理图像。
Parameters
| src | Source 8-bit single-channel image. |
| dst | Destination image of the same size and the same type as src. |
| maxValue | Non-zero value assigned to the pixels for which the condition is satisfied |
| adaptiveMethod | Adaptive thresholding algorithm to use, see AdaptiveThresholdTypes. The BORDER_REPLICATE | BORDER_ISOLATED is used to process boundaries. |
| thresholdType | Thresholding type that must be either THRESH_BINARY or THRESH_BINARY_INV, see ThresholdTypes. |
| blockSize | Size of a pixel neighborhood that is used to calculate a threshold value for the pixel: 3, 5, 7, and so on. |
| C | Constant subtracted from the mean or weighted mean (see the details below). Normally, it is positive but may be zero or negative as well. |
参数
src 源 8 位单通道图像。
dst 与 src 大小相同类型的目标图像。
maxValue 分配给满足条件的像素的非零值
AdaptiveMethod 要使用的自适应阈值算法,请参阅 AdaptiveThresholdTypes。 BORDER_REPLICATE | BORDER_ISOLATED 用于处理边界。
thresholdType 阈值类型,必须是 THRESH_BINARY 或 THRESH_BINARY_INV,请参阅 ThresholdTypes。
blockSize 用于计算像素阈值的像素邻域的大小:3、5、7 等。
C 从平均值或加权平均值中减去常数(详见下文)。 通常,它是正数,但也可能为零或负数。
ADAPTIVE_THRESH_MEAN_C
Python:cv.ADAPTIVE_THRESH_MEAN_C
阈值 T(x,y) 是 (x,y) 的 blockSize×blockSize 邻域减去 C 的平均值
ADAPTIVE_THRESH_GAUSSIAN_C
Python:cv.ADAPTIVE_THRESH_GAUSSIAN_C
阈值 T(x,y) 是 (x,y) 的blockSize×blockSize邻域减去 C 的加权和(与高斯窗口的互相关)。 默认 sigma(标准差)用于指定的 blockSize 。 见 getGaussianKernel OpenCV: Image Filtering
Output images
现在我们准备应用形态学操作来提取水平线和垂直线,从而将音符从乐谱中分离出来,但首先让我们初始化我们将为此使用的输出图像:
// Create the images that will use to extract the horizontal and vertical lines
//创建将用于提取水平和垂直线的图像
Mat horizontal = bw.clone();
Mat vertical = bw.clone();
Structure elements
结构元素
正如我们在理论中指定的那样,为了提取我们想要的对象,我们需要创建相应的结构元素。 由于我们要提取水平线,因此相应的结构元素将具有以下形状:

在源代码中,这由以下代码片段表示:
// 在水平轴上指定大小Specify size on horizontal axis
int horizontal_size = horizontal.cols / 30;
// Create structure element for extracting horizontal lines through morphology operations通过形态学操作创建用于提取水平线的结构元素
Mat horizontalStructure = getStructuringElement(MORPH_RECT, Size(horizontal_size, 1));
// Apply morphology operations 应用形态学操作
erode(horizontal, horizontal, horizontalStructure, Point(-1, -1));
dilate(horizontal, horizontal, horizontalStructure, Point(-1, -1));
// Show extracted horizontal lines显示提取的水平线
show_wait_destroy("horizontal", horizontal);

他同样适用于垂直线,具有相应的结构元素:
再次表示如下:
// 在垂直轴上指定大小Specify size on vertical axis
int vertical_size = vertical.rows / 30;
// Create structure element for extracting vertical lines through morphology operations通过形态学操作创建用于提取垂直线的结构元素
Mat verticalStructure = getStructuringElement(MORPH_RECT, Size(1, vertical_size));
// 应用形态学操作
erode(vertical, vertical, verticalStructure, Point(-1, -1));
dilate(vertical, vertical, verticalStructure, Point(-1, -1));
// 显示提取的垂直线
show_wait_destroy("vertical", vertical);

Refine edges / Result
如您所见,我们快到了。 但是,此时您会注意到音符的边缘有些粗糙。 出于这个原因,我们需要细化边缘以获得更平滑的结果:
// Inverse vertical image
bitwise_not(vertical, vertical);
show_wait_destroy("vertical_bit", vertical);
// 根据逻辑提取边缘和平滑图像 Extract edges and smooth image according to the logic
// 1. 提取边缘 extract edges
// 2. 膨胀 dilate(edges)
// 3. src.copyTo(smooth)
// 4. blur smooth img
// 5. smooth.copyTo(src, edges)
// Step 1
Mat edges;
adaptiveThreshold(vertical, edges, 255, ADAPTIVE_THRESH_MEAN_C, THRESH_BINARY, 3, -2);//提取的音符边缘
show_wait_destroy("edges", edges);
// Step 2
Mat kernel = Mat::ones(2, 2, CV_8UC1);
dilate(edges, edges, kernel);
show_wait_destroy("dilate", edges);
// Step 3
Mat smooth;
vertical.copyTo(smooth);
// Step 4
blur(smooth, smooth, Size(2, 2));
// Step 5
smooth.copyTo(vertical, edges);
// Show final result
show_wait_destroy("smooth - final", vertical);

参考:
自适应阈值化操作:adaptiveThreshold()函数
在图像阈值化操作中,更关注的是从二值化图像中,分离目标区域和背景区域,但是仅仅通过设定固定阈值很难达到理想的分割效果。而自适应阈值,则是根据像素的邻域块的像素值分布来确定该像素位置上的二值化阈值。这样做的好处:
1. 每个像素位置处的二值化阈值不是固定不变的,而是由其周围邻域像素的分布来决定的。
2. 亮度较高的图像区域的二值化阈值通常会较高,而亮度低的图像区域的二值化阈值则会相适应的变小。
3. 不同亮度、对比度、纹理的局部图像区域将会拥有相对应的局部二值化阈值。
函数原型
void adaptiveThreshold(InputArray src, OutputArray dst,
double maxValue, int adaptiveMethod,
int thresholdType, int bolckSize, double C)
参数说明
参数1:InputArray类型的src,输入图像,填单通道,单8位浮点类型Mat即可。
参数2:函数运算后的结果存放在这。即为输出图像(与输入图像同样的尺寸和类型)。
参数3:预设满足条件的最大值。
参数4:指定自适应阈值算法。可选择ADAPTIVE_THRESH_MEAN_C 或 ADAPTIVE_THRESH_GAUSSIAN_C两种。(具体见下面的解释)。
参数5:指定阈值类型。可选择THRESH_BINARY或者THRESH_BINARY_INV两种。(即二进制阈值或反二进制阈值)。
参数6:表示邻域块大小,用来计算区域阈值,一般选择为3、5、7......等。
参数7:参数C表示与算法有关的参数,它是一个从均值或加权均值提取的常数,可以是负数。(具体见下面的解释)
对参数4与参数7内容的解释:
自适应阈值化计算大概过程是为每一个象素点单独计算的阈值,即每个像素点的阈值都是不同的,就是将该像素点周围B*B区域内的像素加权平均,然后减去一个常数C,从而得到该点的阈值。B由参数6指定,常数C由参数7指定。
ADAPTIVE_THRESH_MEAN_C,为局部邻域块的平均值,该算法是先求出块中的均值,再减去常数C。
ADAPTIVE_THRESH_GAUSSIAN_C,为局部邻域块的高斯加权和。该算法是在区域中(x, y)周围的像素根据高斯函数按照他们离中心点的距离进行加权计算,再减去常数C。
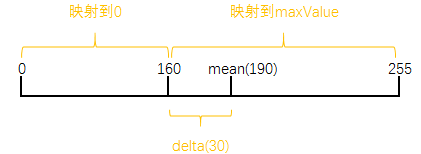
举个例子:如果使用平均值方法,平均值mean为190,差值delta(即常数C)为30。那么灰度小于160的像素为0,大于等于160的像素为255。如下图:
如果是反向二值化,如下图
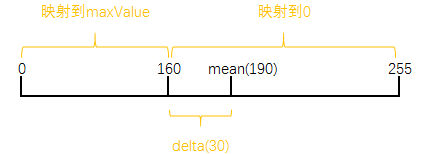
delta(常数C)选择负值也是可以的。
代码演示
/*
自适应阈值:adaptiveThreshold()函数
*/
#include <opencv2/core/core.hpp>
#include <opencv2/highgui/highgui.hpp>
#include <opencv2/imgproc/imgproc.hpp>
#include <iostream>
using namespace std;
using namespace cv;
int main()
{
//------------【1】读取源图像并检查图像是否读取成功------------
Mat srcImage = imread("D:\\OutPutResult\\ImageTest\\build.jpg");
if (!srcImage.data)
{
cout << "读取图片错误,请重新输入正确路径!\n";
system("pause");
return -1;
}
imshow("【源图像】", srcImage);
//------------【2】灰度转换------------
Mat srcGray;
cvtColor(srcImage, srcGray, CV_RGB2GRAY);
imshow("【灰度图】", srcGray);
//------------【3】初始化相关变量---------------
Mat dstImage; //初始化自适应阈值参数
const int maxVal = 255;
int blockSize = 3; //取值3、5、7....等
int constValue = 10;
int adaptiveMethod = 0;
int thresholdType = 1;
/*
自适应阈值算法
0:ADAPTIVE_THRESH_MEAN_C
1:ADAPTIVE_THRESH_GAUSSIAN_C
--------------------------------------
阈值类型
0:THRESH_BINARY
1:THRESH_BINARY_INV
*/
//---------------【4】图像自适应阈值操作-------------------------
adaptiveThreshold(srcGray, dstImage, maxVal, adaptiveMethod, thresholdType, blockSize, constValue);
imshow("【自适应阈值】", dstImage);
waitKey(0);
return 0;
}
显示结果:
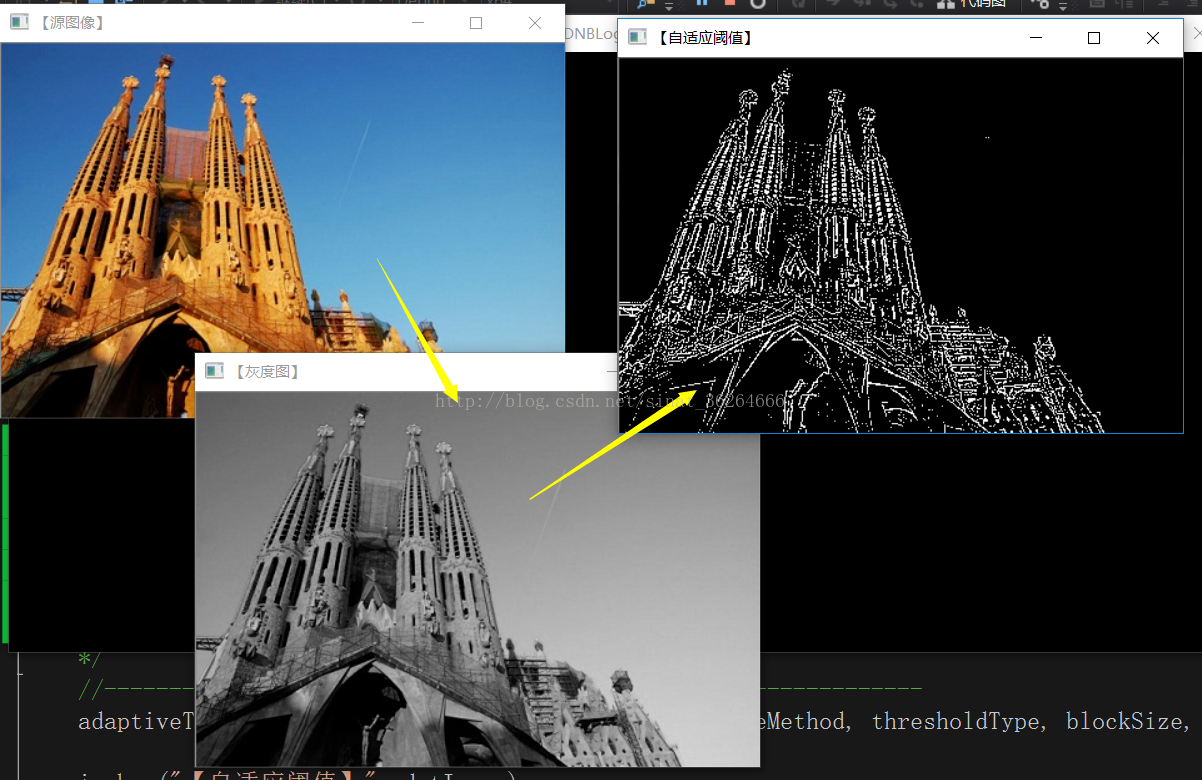
可以发现自适应阈值能很好的观测到边缘信息。阈值的选取是算法自动完成的,很方便
opencv中copyTo函数的使用_moiraz的博客-CSDN博客_copyto函数
使用copyTo函数可以得到一个复制的矩阵。
copyTo还有一个重构函数copyTo(B,MASK)。意思是可以得到一个附加掩膜MASK的矩阵B。我们从图像的角度来看这个函数的作用。
首先需要生成一张掩膜MASK,一般情况下这个膜和你需要操作的对象图像一样大。
对一幅图加一个掩膜顾名思义,就是想要盖住图片的某一部分。所以使用A.copyTo(B,MASK)之后得到的是A被MASK掩盖后的图像。因为初始化的掩膜时黑色的,如果直接加上去整个图片都会被掩盖了,所以需要把一部分你不想盖住的位置改成别的颜色。这里就可以用到前面的设置ROI的算法。


 1259
1259

 被折叠的 条评论
为什么被折叠?
被折叠的 条评论
为什么被折叠?
 到【灌水乐园】发言


