


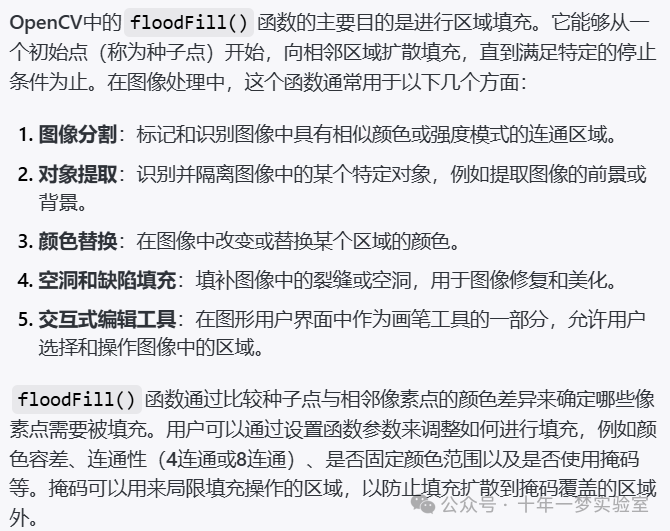
image
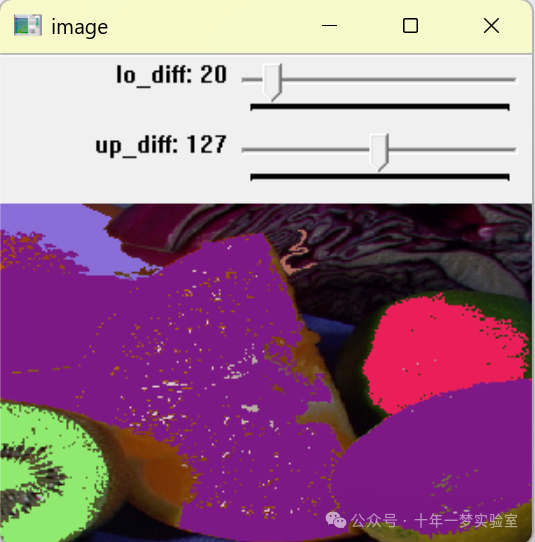
mask
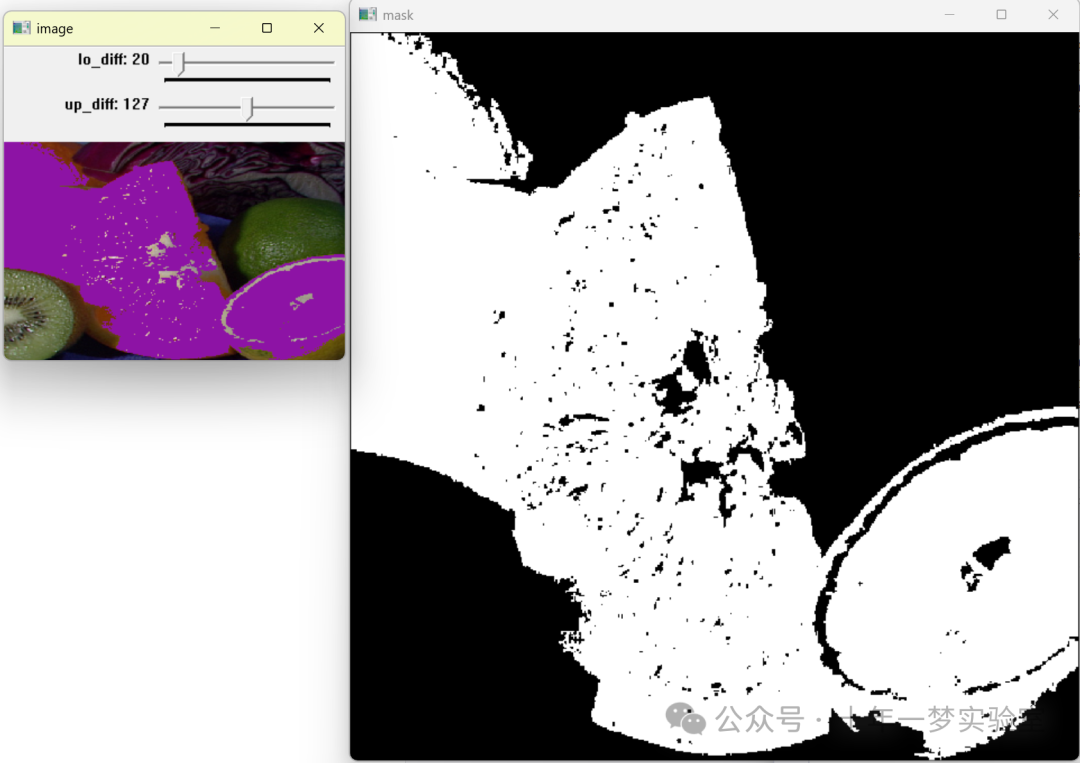
mask
#include "opencv2/imgproc.hpp" // 包含OpenCV图像处理头文件
#include "opencv2/imgcodecs.hpp" // 包含OpenCV图像编码头文件
#include "opencv2/videoio.hpp" // 包含OpenCV视频IO头文件
#include "opencv2/highgui.hpp" // 包含OpenCV高层GUI头文件


#include <iostream> // 包含标准输入输出流库


using namespace cv; // 使用命名空间cv,避免每次调用OpenCV函数时都要写cv::
using namespace std; // 使用命名空间std,避免每次使用标准库时都要写std::


// 帮助函数,输出程序用法信息
static void help(char** argv)
{
    // 输出程序的使用说明
    cout << "\nThis program demonstrated the floodFill() function\n"
            "Call:\n"
        <<  argv[0]
        <<  " [image_name -- Default: fruits.jpg]\n" << endl;


    // 输出热键信息
    cout << "Hot keys: \n"
            "\tESC - quit the program\n" // ESC键退出程序
            "\tc - switch color/grayscale mode\n" // c键切换颜色/灰度模式
            "\tm - switch mask mode\n" // m键切换掩膜模式
            "\tr - restore the original image\n" // r键恢复原始图像
            "\ts - use null-range floodfill\n" // s键使用零范围泛洪填充(Simple floodfill)
            "\tf - use gradient floodfill with fixed(absolute) range\n" // f键使用固定范围渐变泛洪填充(Fixed Range floodfill)
            "\tg - use gradient floodfill with floating(relative) range\n" // g键使用浮动范围渐变泛洪填充(Gradient floodfill)
            "\t4 - use 4-connectivity mode\n" // 4键使用4连通模式
            "\t8 - use 8-connectivity mode\n" << endl; // 8键使用8连通模式
}


// 定义全局变量
Mat image0, image, gray, mask; // 原图像、当前图像、灰度图和掩膜图
int ffillMode = 1; // 泛洪填充模式,默认为1
int loDiff = 20, upDiff = 20; // 泛洪填充的下差和上差
int connectivity = 4; // 连接模式,默认为4连通
int isColor = true; // 表示是否为彩色模式
bool useMask = false; // 表示是否使用掩膜
int newMaskVal = 255; // 新掩膜值


// 鼠标回调函数
static void onMouse( int event, int x, int y, int, void* )
{
    if( event != EVENT_LBUTTONDOWN ) // 如果事件不是左键按下,则直接返回
        return;


    Point seed = Point(x,y); // 构建种子点
    int lo = ffillMode == 0 ? 0 : loDiff; // 根据ffillMode确定下差
    int up = ffillMode == 0 ? 0 : upDiff; // 根据ffillMode确定上差
    // 构建标志信息,包含连接模式、新掩膜值、以及填充模式
    int flags = connectivity + (newMaskVal << 8) +
                (ffillMode == 1 ? FLOODFILL_FIXED_RANGE : 0);
    // 生成随机颜色
    int b = (unsigned)theRNG() & 255;
    int g = (unsigned)theRNG() & 255;
    int r = (unsigned)theRNG() & 255;
    Rect ccomp; // 定义泛洪区域的矩形


    // 根据是否为彩色模式确定新的填充值
    Scalar newVal = isColor ? Scalar(b, g, r) : Scalar(r*0.299 + g*0.587 + b*0.114);
    Mat dst = isColor ? image : gray; // 根据是否为彩色模式选择目标图像
    int area; // 泛洪区域的面积


    if( useMask ) // 如果使用掩膜模式
    {
        threshold(mask, mask, 1, 128, THRESH_BINARY); // 阈值化处理掩膜图
        area = floodFill(dst, mask, seed, newVal, &ccomp, Scalar(lo, lo, lo),
                  Scalar(up, up, up), flags); // 泛洪填充,并返回填充区域面积
        imshow( "mask", mask ); // 显示掩膜图
    }
    else // 如果不使用掩膜模式
    {
        area = floodFill(dst, seed, newVal, &ccomp, Scalar(lo, lo, lo),
                  Scalar(up, up, up), flags); // 泛洪填充,并返回填充区域面积
    }


    imshow("image", dst); // 显示图像
    cout << area << " pixels were repainted\n"; // 输出重绘像素数
}


// 程序主函数
int main( int argc, char** argv )
{
    // 解析命令行参数
    cv::CommandLineParser parser (argc, argv,
        "{help h | | show help message}{@image|fruits.jpg| input image}"
    );
    if (parser.has("help")) // 如果带有help参数,则显示帮助信息
    {
        parser.printMessage();
        return 0;
    }
    // 获取命令行指定的图像文件名称,如果没有指定则为默认值
    string filename = parser.get<string>("@image");
    // 加载图像
    image0 = imread(samples::findFile(filename), 1);


    if( image0.empty() ) // 如果图像为空,则输出提示信息并返回
    {
        cout << "Image empty\n";
        parser.printMessage();
        return 0;
    }
    help(argv); // 显示程序使用说明


    image0.copyTo(image); // 将原图像拷贝到当前图像
    cvtColor(image0, gray, COLOR_BGR2GRAY); // 将原图像转化为灰度图
    mask.create(image0.rows+2, image0.cols+2, CV_8UC1); // 创建掩膜图


    namedWindow( "image", 0 ); // 创建窗口
    // 创建轨迹条,用于调整泛洪填充的下差和上差
    createTrackbar( "lo_diff", "image", &loDiff, 255, 0 );
    createTrackbar( "up_diff", "image", &upDiff, 255, 0 );


    setMouseCallback( "image", onMouse, 0 ); // 设置鼠标回调函数


    for(;;) // 无限循环
    {
        imshow("image", isColor ? image : gray); // 显示图像


        char c = (char)waitKey(0); // 获取一个按键
        if( c == 27 ) // 如果按键是ESC,则退出程序
        {
            cout << "Exiting ...\n";
            break;
        }
        // 根据按键进行不同的操作
        switch( c )
        {
        case 'c': // 切换颜色模式
            if( isColor )
            {
                cout << "Grayscale mode is set\n";
                cvtColor(image0, gray, COLOR_BGR2GRAY); // 转换为灰度图像
                mask = Scalar::all(0); // 重置掩膜
                isColor = false;
            }
            else
            {
                cout << "Color mode is set\n";
                image0.copyTo(image); // 还原为彩色图像
                mask = Scalar::all(0); // 重置掩膜
                isColor = true;
            }
            break;
        case 'm': // 切换掩膜模式
            if( useMask )
            {
                destroyWindow( "mask" ); // 销毁掩膜窗口
                useMask = false;
            }
            else
            {
                namedWindow( "mask", 0 ); // 创建掩膜窗口
                mask = Scalar::all(0); // 重置掩膜
                imshow("mask", mask); // 显示掩膜
                useMask = true;
            }
            break;
        case 'r': // 恢复原始图像
            cout << "Original image is restored\n";
            image0.copyTo(image); // 拷贝原图到当前图像
            cvtColor(image, gray, COLOR_BGR2GRAY); // 转换为灰度图
            mask = Scalar::all(0); // 重置掩膜
            break;
        case 's': // 设置为简单泛洪填充模式
            cout << "Simple floodfill mode is set\n";
            ffillMode = 0;
            break;
        case 'f': // 设置为固定范围渐变泛洪填充模式
            cout << "Fixed Range floodfill mode is set\n";
            ffillMode = 1;
            break;
        case 'g': // 设置为浮动范围渐变泛洪填充模式
            cout << "Gradient (floating range) floodfill mode is set\n";
            ffillMode = 2;
            break;
        case '4':
            // 当用户按下'4'键时,输出提示信息并设置连通性为4(4连通)
            cout << "4-connectivity mode is set\n";
            connectivity = 4; // 设置连通性变量为4,意味着接下来floodFill操作将使用4连通区域
            break; // 跳出switch
        case '8':
            // 当用户按下'8'键时,输出提示信息并设置连通性为8(8连通)
            cout << "8-connectivity mode is set\n";
            connectivity = 8; // 设置连通性变量为8,意味着接下来floodFill操作将使用8连通区域
            break; // 跳出switch
        }
    }


    return 0; // 程序结束,返回0值
}
int area = floodFill(dst, mask, seed, newVal, &ccomp,
Scalar(lo, lo, lo), Scalar(up, up, up), flags);


 被折叠的 条评论
为什么被折叠?
被折叠的 条评论
为什么被折叠?
 到【灌水乐园】发言


