原文首发于个人站点 基于PyTorch-DGL 实现图卷积网络 | 梦家
更新:
在此附上图卷积网络GCN理论篇:
- 图卷积网络GCN(Graph Convolution Network)(一)研究背景和空域图卷积
- 图卷积网络GCN(Graph Convolution Network)(二)图上的傅里叶变换和逆变换
- 图卷积网络GCN(Graph Convolution Network)(三)详解三代图卷积网络理论
基于PyTorch框架实现图卷积神经网络
项目源代码参考本人Github.
依赖库
- DGL 0.1.3
- PyTorch 0.4.1
- networkX 2.2
利用DGL构建图
# -*- coding: utf-8 -*-

"""
@Date: 2019/1/11

@Author: dreamhome

@Summary:  DGL graph.
"""
import dgl
import torch
import networkx as nx

import matplotlib.pyplot as plt


def build_karate_club_graph():
    g = dgl.DGLGraph()
    # add 34 nodes into the graph; nodes are labeled from 0~33
    g.add_nodes(34)
    # all 78 edges as a list of tuples
    edge_list = [(1, 0), (2, 0), (2, 1), (3, 0), (3, 1), (3, 2),
                 (4, 0), (5, 0), (6, 0), (6, 4), (6, 5), (7, 0), (7, 1),
                 (7, 2), (7, 3), (8, 0), (8, 2), (9, 2), (10, 0), (10, 4),
                 (10, 5), (11, 0), (12, 0), (12, 3), (13, 0), (13, 1), (13, 2),
                 (13, 3), (16, 5), (16, 6), (17, 0), (17, 1), (19, 0), (19, 1),
                 (21, 0), (21, 1), (25, 23), (25, 24), (27, 2), (27, 23),
                 (27, 24), (28, 2), (29, 23), (29, 26), (30, 1), (30, 8),
                 (31, 0), (31, 24), (31, 25), (31, 28), (32, 2), (32, 8),
                 (32, 14), (32, 15), (32, 18), (32, 20), (32, 22), (32, 23),
                 (32, 29), (32, 30), (32, 31), (33, 8), (33, 9), (33, 13),
                 (33, 14), (33, 15), (33, 18), (33, 19), (33, 20), (33, 22),
                 (33, 23), (33, 26), (33, 27), (33, 28), (33, 29), (33, 30),
                 (33, 31), (33, 32)]
    # add edges two lists of nodes: src and dst
    src, dst = tuple(zip(*edge_list))
    g.add_edges(src, dst)
    # edges are directional in DGL; make them bi-directional
    g.add_edges(dst, src)

    return g


if __name__ == '__main__':
    G = build_karate_club_graph()
    print('%d nodes.' % G.number_of_nodes())
    print('%d edges.' % G.number_of_edges())

    fig, ax = plt.subplots()
    fig.set_tight_layout(False)
    nx_G = G.to_networkx().to_undirected()
    pos = nx.kamada_kawai_layout(nx_G)
    nx.draw(nx_G, pos, with_labels=True, node_color=[[0.5, 0.5, 0.5]])
    plt.show()

    # assign features to nodes or edges
    G.ndata['feat'] = torch.eye(34)
    print(G.nodes[2].data['feat'])
    print(G.nodes[1, 2].data['feat'])
构建图卷积神经网络
# -*- coding: utf-8 -*-

"""
@Date: 2019/1/14

@Author: dreamhome

@Summary: define a Graph Convolutional Network (GCN)
"""
import torch
import torch.nn as nn


def gcn_message(edges):
    """
    compute a batch of message called 'msg' using the source nodes' feature 'h'
    :param edges:
    :return:
    """
    return {'msg': edges.src['h']}


def gcn_reduce(nodes):
    """
    compute the new 'h' features by summing received 'msg' in each node's mailbox.
    :param nodes:
    :return:
    """
    return {'h': torch.sum(nodes.mailbox['msg'], dim=1)}


class GCNLayer(nn.Module):
    """
    Define the GCNLayer module.
    """

    def __init__(self, in_feats, out_feats):
        super(GCNLayer, self).__init__()
        self.linear = nn.Linear(in_feats, out_feats)

    def forward(self, g, inputs):
        # g is the graph and the inputs is the input node features
        # first set the node features
        g.ndata['h'] = inputs
        # trigger message passing on all edges
        g.send(g.edges(), gcn_message)
        # trigger aggregation at all nodes
        g.recv(g.nodes(), gcn_reduce)
        # get the result node features
        h = g.ndata.pop('h')
        # perform linear transformation
        return self.linear(h)


class GCN(nn.Module):
    """
    Define a 2-layer GCN model.
    """
    def __init__(self, in_feats, hidden_size, num_classes):
        super(GCN, self).__init__()
        self.gcn1 = GCNLayer(in_feats, hidden_size)
        self.gcn2 = GCNLayer(hidden_size, num_classes)

    def forward(self, g, inputs):
        h = self.gcn1(g, inputs)
        h = torch.relu(h)
        h = self.gcn2(g, h)
        return h


if __name__ == '__main__':
    net = GCN(34, 5, 2)
训练过程
# -*- coding: utf-8 -*-

"""
@Date: 2019/1/14

@Author: dreamhome

@Summary: train  semi-supervised setting
"""
import torch
import torch.nn.functional as F

import networkx as nx
import matplotlib.animation as animation
import matplotlib.pyplot as plt

from model import GCN
from build_graph import build_karate_club_graph

import warnings
warnings.filterwarnings('ignore')


net = GCN(34, 5, 2)
print(net)
G = build_karate_club_graph()

inputs = torch.eye(34)
labeled_nodes = torch.tensor([0, 33])  # only the instructor and the president nodes are labeled
labels = torch.tensor([0, 1])

optimizer = torch.optim.Adam(net.parameters(), lr=0.01)
all_logits = []

for epoch in range(20):
    logits = net(G, inputs)
    all_logits.append(logits.detach())
    logp = F.log_softmax(logits, 1)

    # compute loss for labeled nodes
    loss = F.nll_loss(logp[labeled_nodes], labels)

    optimizer.zero_grad()
    loss.backward()
    optimizer.step()

    print('Epoch %d | Loss: %.4f' % (epoch, loss.item()))


def draw(i):
    cls1color = '#00FFFF'
    cls2color = '#FF00FF'
    pos = {}
    colors = []
    for v in range(34):
        pos[v] = all_logits[i][v].numpy()
        cls = pos[v].argmax()
        colors.append(cls1color if cls else cls2color)
    ax.cla()
    # ax.axis('off')
    ax.set_title('Epoch: %d' % i)
    nx.draw_networkx(nx_G.to_undirected(), pos, node_color=colors, with_labels=True, node_size=300, ax=ax)


nx_G = G.to_networkx().to_undirected()
fig = plt.figure(dpi=150)
fig.clf()
ax = fig.subplots()
# draw(1)  # draw the prediction of the first epoch

ani = animation.FuncAnimation(fig, draw, frames=len(all_logits), interval=200)
plt.show()
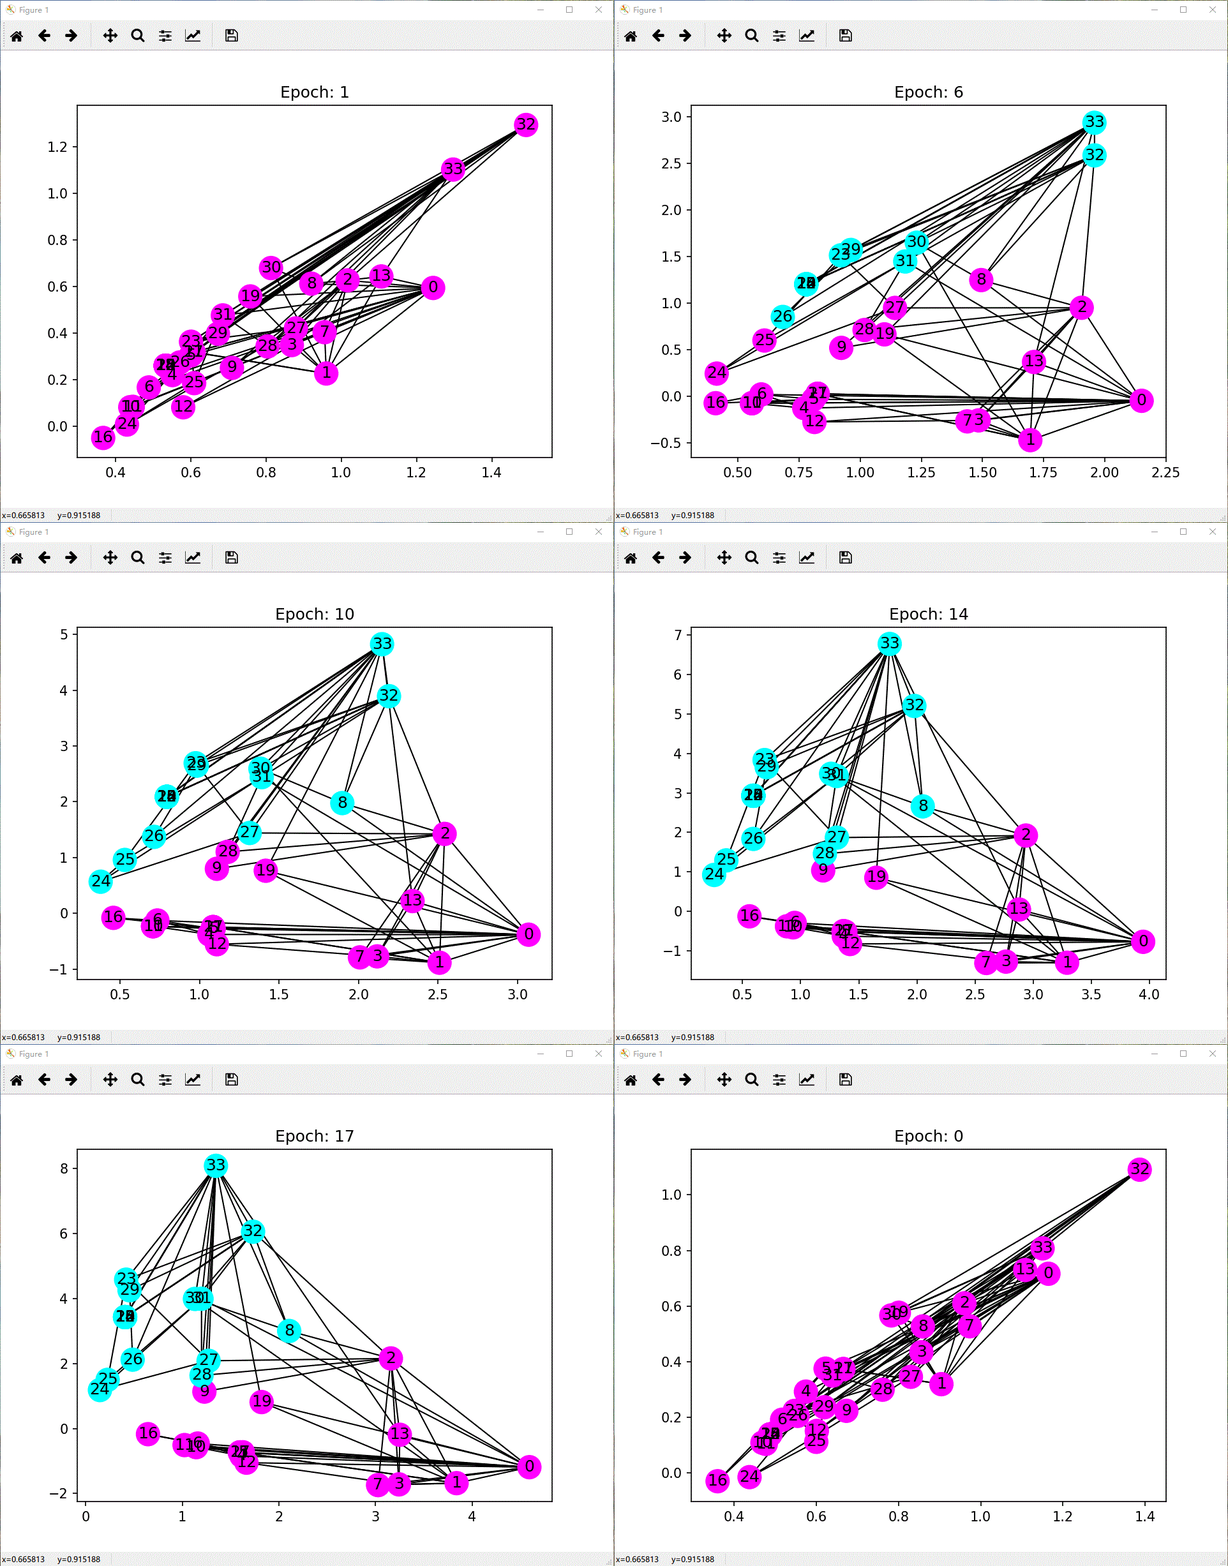
训练过程可视化

项目参考:教程


 631
631


 被折叠的 条评论
为什么被折叠?


