	// Enable multiple touches
	[glView setMultipleTouchEnabled:YES];

	director_ = (CCDirectorIOS*) [CCDirector sharedDirector];

	director_.wantsFullScreenLayout = YES;

	// Display FSP and SPF
	[director_ setDisplayStats:YES];

	// set FPS at 60
	[director_ setAnimationInterval:1.0/60];
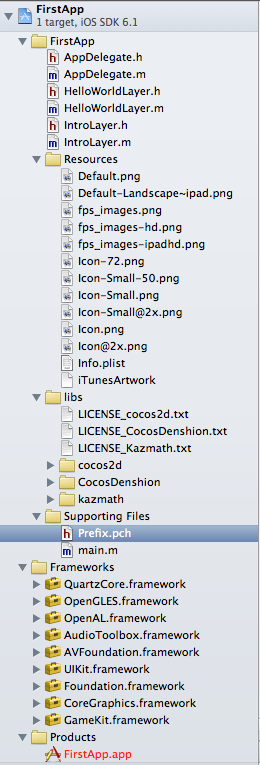
项目结构如下图所示:
我们要了解下面的东西:
1. Resources 目录下是一些png文件和info.plist.
Default.png是ios加载程序时显示的图像。
Icon.png是程序图标,注意icon.png有很多个版本,这些是用来在不同设备或者不同列表中显示的。如在iphone1-3上图标会用icon.png, 在iphone4-5等retina显示屏上会显示Icon@2x.png。
Info.plist是程序配置文件,可以修改一些重要信息,例如程序支持的设备显示方向。
2. Supporting Files目录。
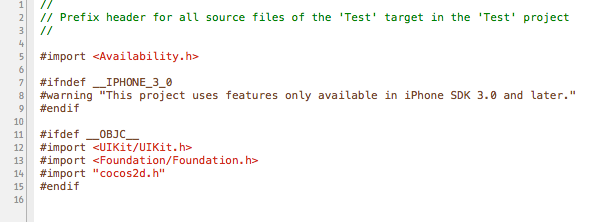
此目录下有个Prefix.pch。PCH文件是预编译头文件,只有很少变化的头文件才可以被添加到该文件中。这样可以提前编译一些代码比如框架之类。
如果我们不需要修改cocos2d-iphone源文件,那么加入进来, 后面新建类的时候就不用再import进来了。
另外还有个main.m. 这是程序入口,里面创建了一个自动释放池。
3. AppDelegate
此类用于初始化程序配置, 如多点触摸, 显示状态,设置帧率, 以及设置横竖屏。
	// Enable multiple touches
	[glView setMultipleTouchEnabled:YES];

	director_ = (CCDirectorIOS*) [CCDirector sharedDirector];

	director_.wantsFullScreenLayout = YES;

	// Display FSP and SPF
	[director_ setDisplayStats:YES];

	// set FPS at 60
	[director_ setAnimationInterval:1.0/60];
// Supported orientations: Landscape. Customize it for your own needs
- (BOOL)shouldAutorotateToInterfaceOrientation:(UIInterfaceOrientation)interfaceOrientation
{
    return ( UIInterfaceOrientationIsPortrait( interfaceOrientation ) );
//    return UIInterfaceOrientationIsLandscape(interfaceOrientation);
}
4. IntroLayer.
此类用于显示程序加载画面以及过度至HelloWorldLayer
5. HelloWorldLayer.
此类继承CCLayer,但是该类提供了一个静态方法+(id) scene:, 方法中首先创建了一个CCScene,然后创建一个HelloWorldLayer实例添加到CCScene对象中,再把CCScene对象返回给调用者。
// Helper class method that creates a Scene with the HelloWorldLayer as the only child.
+ (CCScene *)scene {
    // 'scene' is an autorelease object.
    CCScene *scene = [CCScene node];

    // 'layer' is an autorelease object.
    IntroLayer *layer = [IntroLayer node];

    // add layer as a child to scene
    [scene addChild:layer];

    // return the scene
    return scene;
}
-(id)init:方法:
此方法才是创建显示内容的关键。
我们的hello world,再熟悉不过了。
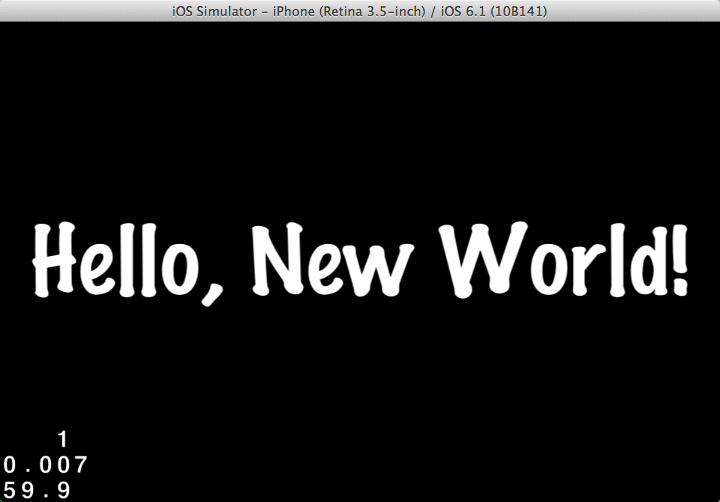
要做的是,创建一个Label,显示在屏幕中间。
我们可以修改如下:
-(id) init
{
	// always call "super" init
	// Apple recommends to re-assign "self" with the "super's" return value
	if( (self=[super init]) ) {

		// create and initialize a Label
		CCLabelTTF *label = [CCLabelTTF labelWithString:@"Hello, New World!" fontName:@"Marker Felt" fontSize:64];

		// ask director for the window size
		CGSize size = [[CCDirector sharedDirector] winSize];

		// position the label on the center of the screen
		label.position =  ccp( size.width /2 , size.height/2 );

		// add the label as a child to this Layer
		[self addChild: label];

	}
	return self;
}
运行:
是不是很霸气?


 2万+
2万+

 被折叠的 条评论
为什么被折叠?


