


Building a decoder transformer model on AMD GPU(s) — ROCm Blogs
在这篇博客中,我们展示了如何使用PyTorch 2.0和ROCm在单个节点上的单个和多个AMD GPU上运行Andrej Karpathy精美的PyTorch重新实现的GPT。我们使用莎士比亚的作品来训练我们的模型,然后进行推理,看看我们的模型是否能生成类似莎士比亚的文本。
GPT模型的核心是仅解码器的Transformer架构。这种架构一次生成一个输出令牌(在我们的例子中是字符),以自回归的方式,意命着每个生成的令牌都依赖于之前生成的令牌。为了更深入地了解这个模型的工作方式,我们强烈推荐回顾:
• Andrej Karpathy的视频《让我们从头开始构建GPT:从零开始,用代码,一步步来》
• 论文《注意力就是全部》
我们首先使用PyTorch和ROCm在单个GPU上训练我们的模型,然后稍微修改代码以使用PyTorch的分布式数据并行(Distributed Data Parallel)在两个GPU上运行。
在多个GPU上的分布式数据并行性工作如下:
1. 将当前的全局训练批次分割成每个GPU上的小型本地批次。例如,如果你有8个GPU,全局批次设置为32个样本,那么每个GPU将有一个4个样本的本地批次大小。
2. 将模型复制到每个设备,以便每个设备可以独立处理其本地批次。
3. 进行前向传播,然后进行反向传播,并输出权重的梯度,对于该本地批次的模型损失。这在多个设备上同时发生。
4. 同步每个设备计算出的局部梯度,并将它们结合起来更新模型权重。更新后的权重随后重新分配给每个设备。
为了更深入地了解PyTorch中的分布式训练,请参考《使用DDP进行多GPU训练》。
前提条件
要跟随本教程,您必须具备以下软件:
• [ROCm](ROCm quick start installation guide for Linux — ROCm installation (Linux))
• [PyTorch](Installing PyTorch for ROCm — ROCm installation (Linux))
• Linux 操作系统
接下来,通过运行以下代码确保您的系统能够识别两个AMD GPU:
! rocm-smi --showproductname输出应该如下所示:
================= ROCm 系统管理接口 ================
========================= 产品信息 ============================
GPU[0] : 卡系列:Instinct MI210
GPU[0] : 卡型号:0x0c34
GPU[0] : 卡生产商:Advanced Micro Devices, Inc. [AMD/ATI]
GPU[0] : 卡SKU:D67301
GPU[1] : 卡系列:Instinct MI210
GPU[1] : 卡型号:0x0c34
GPU[1] : 卡生产商:Advanced Micro Devices, Inc. [AMD/ATI]
GPU[1] : 卡SKU:D67301
===================================================================
===================== ROCm SMI 日志结束 =========================
确保 PyTorch 也能识别这些GPU:
import torch
import torch.nn as nn
from torch.nn import functional as F
print(f"number of GPUs: {torch.cuda.device_count()}")
print([torch.cuda.get_device_name(i) for i in range(torch.cuda.device_count())])
输出应该如下所示:
number of GPUs: 2
['AMD Radeon Graphics', 'AMD Radeon Graphics']
加载数据
我们使用的是 tiny_shakespeare 数据集,它包含了来自各种剧作的40,000行莎士比亚作品。让我们加载它并查看前200个字符。
! wget https://raw.githubusercontent.com/karpathy/char-rnn/master/data/tinyshakespeare/input.txt
with open('input.txt', 'r', encoding='utf-8') as f:
    text = f.read()
print(text[:200])
First Citizen:
Before we proceed any further, hear me speak.
All:
Speak, speak.
First Citizen:
You are all resolved rather to die than to famish?
All:
Resolved. resolved.
First Citizen:
First, you接下来,我们从文本中的唯一字符创建我们的词汇表和字符与整数之间的映射。
chars = sorted(list(set(text)))
vocab_size = len(chars)
# 创建从字符到整数的映射
stoi = { ch:i for i,ch in enumerate(chars) }
itos = { i:ch for i,ch in enumerate(chars) }
encode = lambda s: [stoi[c] for c in s] # 编码器:接受一个字符串,输出一个整数列表
decode = lambda l: ''.join([itos[i] for i in l]) # 解码器:接受一个整数列表,输出一个字符串
现在,我们在编码字符后将数据分割成训练集和测试集(即,将每个字符转换成一个整数)。
data = torch.tensor(encode(text), dtype=torch.long)
n = int(0.9*len(data)) # 前90%作为训练集,其余为验证集
train_data = data[:n]
val_data = data[n:]
让我们来看一个我们的输入和目标的例子。
block_size = 8
x = train_data[:block_size]
y = train_data[1:block_size+1]
for t in range(block_size):
    context = x[:t+1]
    target = y[t]
    print(f"when input is {context} the target: {target}")
when input is tensor([18]) the target: 47
when input is tensor([18, 47]) the target: 56
when input is tensor([18, 47, 56]) the target: 57
when input is tensor([18, 47, 56, 57]) the target: 58
when input is tensor([18, 47, 56, 57, 58]) the target: 1
when input is tensor([18, 47, 56, 57, 58, 1]) the target: 15
when input is tensor([18, 47, 56, 57, 58, 1, 15]) the target: 47
when input is tensor([18, 47, 56, 57, 58, 1, 15, 47]) the target: 58创建解码器变换模型
让我们设置一些超参数,我们将使用这些超参数来构造和训练模型。因为我们可以访问强大的AMD GPU,我们可以扩大我们的网络规模,并设置与Andrej在他的视频教程中使用的相同的超参数。这包括增加我们的批量大小、块大小、层数和头数以及嵌入大小。我们希望这将使我们得到一个更低的损失值。
# 超参数
batch_size = 64 # 我们将并行处理多少独立序列?
block_size = 256 # 预测的最大上下文长度是多少?
max_iters = 5000
eval_interval = 100
learning_rate = 3e-4
device = 'cuda' if torch.cuda.is_available() else 'cpu'
eval_iters = 200
n_embd = 384
n_head = 6
n_layer = 6
dropout = 0.2
# ------------

torch.manual_seed(1337) # 设置手动种子以实现可复现性
解码器变换器架构
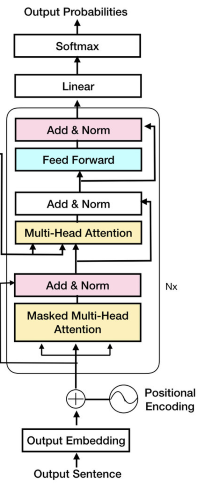
下面是我们的主模型类,它创建了一个解码器变换器架构。其组件包括:
• 自注意机制:允许解码器在生成输出时对输入序列的不同部分进行加权。
• 掩码自注意:通过掩盖后续位置,防止解码器在训练期间看到未来的标记。
• 解码器层:由多个子层组成,如多头注意力和前馈神经网络,促进信息处理和生成。
class Head(nn.Module):
    """ one head of self-attention """

    def __init__(self, head_size):
        super().__init__()
        self.key = nn.Linear(n_embd, head_size, bias=False)
        self.query = nn.Linear(n_embd, head_size, bias=False)
        self.value = nn.Linear(n_embd, head_size, bias=False)
        self.register_buffer('tril', torch.tril(torch.ones(block_size, block_size)))

        self.dropout = nn.Dropout(dropout)

    def forward(self, x):
        # input of size (batch, time-step, channels)
        # output of size (batch, time-step, head size)
        B,T,C = x.shape
        k = self.key(x)   # (B,T,hs)
        q = self.query(x) # (B,T,hs)
        # compute attention scores ("affinities")
        wei = q @ k.transpose(-2,-1) * k.shape[-1]**-0.5 # (B, T, hs) @ (B, hs, T) -> (B, T, T)
        # here we use the upper triangular matrix trick to create a mask for the self-attention mechanism
        # this mask ensures that during training, the decoder can only attend to positions before the current token being generated, preventing it from peeking at future token, i.e. from left-to-right attention only
        wei = wei.masked_fill(self.tril[:T, :T] == 0, float('-inf')) # (B, T, T)
        wei = F.softmax(wei, dim=-1) # (B, T, T)
        wei = self.dropout(wei)
        # perform the weighted aggregation of the values
        v = self.value(x) # (B,T,hs)
        out = wei @ v # (B, T, T) @ (B, T, hs) -> (B, T, hs)
        return out

class MultiHeadAttention(nn.Module):
    """ multiple heads of self-attention in parallel """

    def __init__(self, num_heads, head_size):
        super().__init__()
        self.heads = nn.ModuleList([Head(head_size) for _ in range(num_heads)])
        self.proj = nn.Linear(head_size * num_heads, n_embd)
        self.dropout = nn.Dropout(dropout)

    def forward(self, x):
        out = torch.cat([h(x) for h in self.heads], dim=-1)
        out = self.dropout(self.proj(out))
        return out

class FeedFoward(nn.Module):
    """ a simple linear layer followed by a non-linearity """

    def __init__(self, n_embd):
        super().__init__()
        self.net = nn.Sequential(
            nn.Linear(n_embd, 4 * n_embd),
            nn.ReLU(),
            nn.Linear(4 * n_embd, n_embd),
            nn.Dropout(dropout),
        )

    def forward(self, x):
        return self.net(x)

class Block(nn.Module):
    """ Transformer block: communication followed by computation """

    def __init__(self, n_embd, n_head):
        # n_embd: embedding dimension, n_head: the number of heads we'd like
        super().__init__()
        head_size = n_embd // n_head
        self.sa = MultiHeadAttention(n_head, head_size)
        self.ffwd = FeedFoward(n_embd)
        self.ln1 = nn.LayerNorm(n_embd)
        self.ln2 = nn.LayerNorm(n_embd)

    def forward(self, x):
        x = x + self.sa(self.ln1(x))
        x = x + self.ffwd(self.ln2(x))
        return x

class GPTLanguageModel(nn.Module):

    def __init__(self):
        super().__init__()
        # each token directly reads off the logits for the next token from a lookup table
        self.token_embedding_table = nn.Embedding(vocab_size, n_embd)
        self.position_embedding_table = nn.Embedding(block_size, n_embd)
        self.blocks = nn.Sequential(*[Block(n_embd, n_head=n_head) for _ in range(n_layer)])
        self.ln_f = nn.LayerNorm(n_embd) # final layer norm
        self.lm_head = nn.Linear(n_embd, vocab_size)

        # better init, not covered in the original GPT video, but important, will cover in followup video
        self.apply(self._init_weights)

    def _init_weights(self, module):
        if isinstance(module, nn.Linear):
            torch.nn.init.normal_(module.weight, mean=0.0, std=0.02)
            if module.bias is not None:
                torch.nn.init.zeros_(module.bias)
        elif isinstance(module, nn.Embedding):
            torch.nn.init.normal_(module.weight, mean=0.0, std=0.02)

    def forward(self, idx, targets=None):
        B, T = idx.shape

        # idx and targets are both (B,T) tensor of integers
        tok_emb = self.token_embedding_table(idx) # (B,T,C)
        pos_emb = self.position_embedding_table(torch.arange(T, device=device)) # (T,C)
        x = tok_emb + pos_emb # (B,T,C)
        x = self.blocks(x) # (B,T,C)
        x = self.ln_f(x) # (B,T,C)
        logits = self.lm_head(x) # (B,T,vocab_size)

        if targets is None:
            loss = None
        else:
            B, T, C = logits.shape
            logits = logits.view(B*T, C)
            targets = targets.view(B*T)
            loss = F.cross_entropy(logits, targets)

        return logits, loss

    def generate(self, idx, max_new_tokens):
        # idx is (B, T) array of indices in the current context
        for _ in range(max_new_tokens):
            # crop idx to the last block_size tokens
            idx_cond = idx[:, -block_size:]
            # get the predictions
            logits, loss = self(idx_cond)
            # focus only on the last time step
            logits = logits[:, -1, :] # becomes (B, C)
            # apply softmax to get probabilities
            probs = F.softmax(logits, dim=-1) # (B, C)
            # sample from the distribution
            idx_next = torch.multinomial(probs, num_samples=1) # (B, 1)
            # append sampled index to the running sequence
            idx = torch.cat((idx, idx_next), dim=1) # (B, T+1)
        return idx
实用函数
在我们训练我们的模型之前,我们需要两个实用函数:
• 一个在每个预定义的迭代次数后评估我们的训练和评估损失的函数
• 一个获取随机数据批次的函数为了估计我们的损失:
@torch.no_grad()
def estimate_loss(model):
    out = {}
    model.eval()
    for split in ['train', 'val']:
        losses = torch.zeros(eval_iters)
        for k in range(eval_iters):
            X, Y = get_batch(split)
            logits, loss = model(X, Y)
            losses[k] = loss.item()
        out[split] = losses.mean()
    model.train()
    return out
为了获取一小批数据:
# 数据载入
def get_batch(split):
    # 生成一小批输入 x 和目标 y 的数据
    data = train_data if split == 'train' else val_data
    ix = torch.randint(len(data) - block_size, (batch_size,))
    x = torch.stack([data[i:i+block_size] for i in ix])
    y = torch.stack([data[i+1:i+block_size+1] for i in ix])
    x, y = x.to(device), y.to(device)
    return x, y
训练和推理
现在我们有了所有必须的组件,让我们实例化我们的模型,训练它,并运行一些推理来生成我们(希望是)像莎士比亚风格的文本。
这是我们的主函数:
def main():
    model = GPTLanguageModel()
    model = model.to(device)

    # 打印模型中的参数数量
    print(sum(p.numel() for p in model.parameters())/1e6, 'M参数')

    # 创建一个PyTorch优化器
    optimizer = torch.optim.AdamW(model.parameters(), lr=learning_rate)

    for iter in range(max_iters):

        # 每隔一段时间在训练和验证集上评估损失
        if iter % eval_interval == 0 or iter == max_iters - 1:
            losses = estimate_loss(model)
            print(f"步骤 {iter}: 训练损失 {losses['train']:.4f}, 验证损失 {losses['val']:.4f}")

        # 抽样一批数据
        xb, yb = get_batch('train')

        # 估算损失
        logits, loss = model(xb, yb)
        optimizer.zero_grad(set_to_none=True)
        loss.backward()
        optimizer.step()

    # 使用我们的模型运行推理来生成文本
    context = torch.zeros((1, 1), dtype=torch.long, device=device)
    print(decode(model.generate(context, max_new_tokens=2000)[0].tolist()))
我们创建了一个脚本 gpt_single_gpu.py 包含所有必需的命令。使用以下代码运行它:
python3 gpt_single_gpu.py这是从脚本中得到的预期输出:
10.788929 M parameters
step 0: train loss 4.2221, val loss 4.2306
step 100: train loss 2.4966, val loss 2.5012
step 200: train loss 2.4029, val loss 2.4295
...
step 4900: train loss 0.8676, val loss 1.5644
step 4999: train loss 0.8598, val loss 1.5677
这是我们生成文本的前几行看起来像:
Thou fellow'dst idst the game of his names;
And yet since was Menenius, one would thrident again
That Anne. But where shall do become me injuries?

JULIET:
O though often thee cortainted matter,--
A better with him he gone hath
A colder-balm equal-deniving,
Of what a peril the people, when he did make me
Disobedition, become him to see
That conceive on earth fitting his finger,
在验证损失为1.5677的情况下,生成的文本看起来几乎像英文,并且模型能够学习到莎士比亚输入文本的对话风格。
Each time we run inference, we expect a different result. This is because the model samples from the distribution with all possible tokens, where each token’s probability is given by the softmax function.
在单节点上使用多个GPU分布式训练
为了在PyTorch中使用多个GPU进行我们的模型训练,我们将使用[PyTorch的分布式数据并行](What is Distributed Data Parallel (DDP) — PyTorch Tutorials 2.3.0+cu121 documentation)。为此,我们只需对当前代码做一些小的修改。
首先,让我们从PyTorch中导入一些必需的函数:
import torch.multiprocessing as mp
from torch.distributed import init_process_group, destroy_process_group
from torch.nn.parallel import DistributedDataParallel as DDP
接下来,让我们设置分布式数据并行组。通常,每个GPU运行一个进程,因此我们需要设置一个组,以便所有进程和GPU可以彼此通信。让我们创建一个执行此操作的小函数。
def ddp_setup(rank, world_size):
    """
    world_size: GPU的数量
    rank: GPU的id,从0到world_size - 1
    """

    os.environ['MASTER_ADDR'] = 'localhost'
    os.environ['MASTER_PORT'] = '12355'

    # 初始化进程组
    backend = "nccl"
    init_process_group(backend=backend, rank=rank, world_size=world_size)
    torch.cuda.set_device(rank)
在实例化我们的模型之前,我们需要调用这个设置函数。接下来,我们稍微修改我们的主函数,以便它可以在多个GPU上运行。注意,我们的主函数现在需要两个参数:`rank`(GPU的ID)和`world_size`(GPU的数量)。
def main(rank:int, world_size:int):
    print(f"在rank/gpu {rank}上训练DDP模型。")
    ddp_setup(rank, world_size)

    # 每个gpu/进程获得不同的种子
    torch.manual_seed(1337 + rank)

    model = GPTLanguageModel()
    model.to(rank)
    model = DDP(model, device_ids=[rank])
    ... # 训练的其余部分与单个进程的主函数相同

    # 运行推理
    if rank == 0: # 只在主进程上运行推理。如果没有这个if语句,每个进程都会运行自己的预测
        print('生成文本')
        context = torch.zeros((1, 1), dtype=torch.long, device=device)
        # 因为模型现在是分布式的,我们需要通过加上"module"来展开它
        print(decode(model.module.generate(context, max_new_tokens=500)[0].tolist()))

    # 一旦模型训练完毕,销毁进程以便干净退出
    destroy_process_group()
完整的代码
我们创建了一个脚本 gpt_multiple_gpus.py,里面包含了所有必需的命令。要运行它,请使用以下代码:
python3 gpt_multiple_gpus.py以下是该脚本的预期输出。
We have 2 GPUs! Using 2 GPUs
Training DDP model on rank/gpu 1.
Training DDP model on rank/gpu 0.
10.788929 M parameters
10.788929 M parameters
GPU/rank 0 step 0: train loss 4.2221, val loss 4.2306
GPU/rank 1 step 0: train loss 4.2228, val loss 4.2304
GPU/rank 0 step 500: train loss 1.6010, val loss 1.7904
GPU/rank 1 step 500: train loss 1.5984, val loss 1.7871
...
GPU/rank 1 step 4999: train loss 0.5810, val loss 1.7733
GPU/rank 0 step 4999: train loss 0.5807, val loss 1.7723
这里是我们生成的文本:
HENRY BOLINGBROKE:
Warwick, It say; and he is safe, and whose
With unmorable slaves, they have stafd too:
So say the tidings you for Richmond, with ride?

BUSHY:
Marry, my Lord Clarence to my noble lady.

GLOUCESTER:
Go, to thee to thy daughter as I may break;
And what do now thy will I, I do me say
My name; it is the king.

BUCKINGHAM:
'Twas every stranger:--
Nay, my good son.
输出来自两个不同的GPU(排名 0 和 1),每个训练/验证损失都是不同的。这是因为每个进程都获得了一个不同的种子,以便它们不会在相同的数据批次上进行训练。


 3305
3305

 被折叠的 条评论
为什么被折叠?
被折叠的 条评论
为什么被折叠?
 到【灌水乐园】发言


