


如果你想要程序中自己绘制一些图形,那么只需要重写一下CCNode的draw方法,并在里面实现你的绘制方法就行了:
下面介绍一下常用的绘制函数:
//设置绘制颜色
ccDrawColor4B( GLubyte r, GLubyte g, GLubyte b, GLubyte a )
r : 红色份量 g : 绿色份量 b : 蓝色份量 a : 透明度
4个参数的数值范围:0~255
ccDrawColor4F( GLfloat r, GLfloat g, GLfloat b, GLfloat a );
r : 红色份量 g : 绿色份量 b : 蓝色份量 a : 透明度
4个参数的数值范围:0~1的浮点数
//设置点的大小单位为像素
ccPointSize(GLfloat pointSize)
pointSize:点的大小 (这个只对点有效果)
//绘制一个点
ccDrawPoint(CGPoint point)
point : 点的坐标
//设置绘制线条的宽度
glLineWith(GLfloat width);
width : 线条宽度
//绘制一条线
ccDrawLine(CGPoint origin, CGPoint destination)
origin : 起始坐标
destination : 终点坐标
//绘制多边形
ccDrawPoly(const CGPoint *vertices, NSUInteger numOfVertices, BOOL closePolygon)
vertices:顶点数组
numOfVertices:顶点数量
closePolygon:是否封闭多边形
//绘制填充多边形
ccDrawSolidPoly(const CGPoint *poli, NSUInteger numberOfPoints, ccColor4F color)
vertices:顶点数组
numOfVertices:顶点数量
color:填充颜色
//绘制矩形
ccDrawRect(CGPoint origin, CGPoint destination)
origon:矩形右上角的顶点
destination:矩形左下角的顶点
//绘制填充矩形
ccDrawRect(CGPoint origin, CGPoint destination , ccColor4F color)
origon:矩形右上角的顶点
destination:矩形左下角的顶点
color:填充颜色
//绘制圆形(这个方法可以用于绘制正多边形)
ccDrawCircle(CGPoint center, float radius, float angle, NSUInteger segments, BOOL drawLineToCenter)
center : 圆心点坐标
radius : 半径长度
angle : 圆形旋转角度值的范围是 0~2*M_PI( M_PI = π)为一周(360度)
segments : 顶点数量(边数 = 定点数 - 1),当这个值为1时绘制的是一个点 ,2为一条直线,3为三角形.......定点数越大越趋近于圆,一般来说这个值为2*radius就足够了。
drawLineToCenter : 是否绘制半径线:绘制一条从中心点到第一个定点的线条
//绘制贝塞尔曲线
ccDrawCubicBezier(CGPoint origin, CGPoint control1, CGPoint control2, CGPoint destination, NSUInteger segments)
origin :起始点
control1 :控制点1
control2 :控制点2
destination :结束点
segments :顶点数量
要注意一点你必须把这些方法写在draw方法中,否则不会被绘制到屏幕上。而且这些绘制方法会在每一帧调用一次,如果前一帧绘制的图形,在下一帧没有调用到,那么它们在下一帧就不会被绘制到屏幕上。当场景中添加的图片较多时帧数会降低,是因为图片越多描绘一次的时间越长,帧数就降低了。
下面我们来实现一个简单的画笔功能:
首先新建一个项目,在HelloWorldLayer头文件中添加一个实例变量:
NSMutableArray* drawAllarray;
这个是用来存储画笔痕迹的
并添加两个全局变量:colorType画笔颜色,lineWith画笔宽度
int colorType = 0;
int lineWith = 1;
然后在初始化方法里面添加如下代码:
//存储所有的画笔痕迹
drawAllarray = [[NSMutableArray alloc] init];
//设置菜单字体和颜色
[CCMenuItemFont setFontName:@"AppleGothic"];
[CCMenuItemFont setFontSize:15];
//改变画笔颜色
CCMenuItem* item1 = [CCMenuItemFont itemWithString:@"改变画笔颜色" target:self selector:@selector(updateDrawColor)];
//撤销操作
CCMenuItem* item2 = [CCMenuItemFont itemWithString:@"撤销操作" target:self selector:@selector(cancle)];
//改变画线宽度
CCMenuItem* item3 = [CCMenuItemFont itemWithString:@"改变画线宽度" target:self selector:@selector(updateLineWidth)];
CCMenu * menu = [CCMenu menuWithItems:item1,item3,item2, nil];
[menu alignItemsVertically];
menu.position = ccp(50, 150);
[self addChild:menu];
注册和删除单触点接收:
-(void)onEnter
{
[super onEnter];
[[[CCDirector sharedDirector] touchDispatcher] addTargetedDelegate:self priority:0 swallowsTouches:YES];
}
-(void)onExit
{
[super onExit];
[[[CCDirector sharedDirector] touchDispatcher] removeDelegate:self];
}
接着我们要触摸响应方法中存储画笔痕迹:
-(BOOL)ccTouchBegan:(UITouch *)touch withEvent:(UIEvent *)event
{
CGPoint locationPoint = [self convertTouchToNodeSpace:touch];
CCPointArray* pointarray = [[[CCPointArray alloc] init] autorelease];
[pointarray addControlPoint:locationPoint];
NSMutableArray* drawonearray = [[NSMutableArray alloc] init];
[drawonearray addObject:[NSString stringWithFormat:@"%d",colorType]];
[drawonearray addObject:[NSString stringWithFormat:@"%d",lineWith]];
[drawonearray addObject:pointarray];
[drawAllarray addObject:drawonearray];
return YES;
}
-(void)ccTouchMoved:(UITouch *)touch withEvent:(UIEvent *)event
{
CGPoint locationPoint = [self convertTouchToNodeSpace:touch];
[(CCPointArray*)[[drawAllarray lastObject] lastObject] addControlPoint:locationPoint];
}
首次触摸响应方法里面定义了两个数组:
pointarray : 存储触点位置
drawonearray : 存储当前画笔颜色,宽度和触点位置
接着把存储有当前画笔信息的数组drawonearray添加到drawAllarray中。
在触摸移动的方法里存储当前画笔痕迹(出点位置)
接着在draw方法中把这些画笔描绘出来:
-(void)draw
{
for (NSMutableArray* array in drawAllarray)
{
[self updatedrawcolorWith:[(NSString*)[array objectAtIndex:0] intValue]];
[self lineWidth:[(NSString*)[array objectAtIndex:1] intValue]];
CCPointArray* pointarray = [array lastObject];
int l = pointarray.count;
for (int i = 0; i < l; i++)
{
if (l > 1)
{
ccDrawLine([pointarray getControlPointAtIndex:i-1], [pointarray getControlPointAtIndex:i]);
}
else
{
ccDrawPoint([pointarray getControlPointAtIndex:i]);
}
}
}
}
这里使用ccDrawLine把画笔痕迹连接起来这样我们的画笔功能就实现了。
下面是相关的其它方法:
//改变画笔颜色
-(void)updateDrawColor
{
if (colorType == 3)
{
colorType = 0;
}
else
colorType++;
[self updatedrawcolorWith:colorType];
}
-(void)updatedrawcolorWith:(int) type
{
switch (type)
{
case 0:
ccDrawColor4F(1, 1, 1, 1);
break;
case 1:
ccDrawColor4F(1, 0, 0, 1);
break;
case 2:
ccDrawColor4F(0, 1, 0, 1);
break;
case 3:
ccDrawColor4F(0, 0, 1, 1);
break;
default:
break;
}
}
//改变画线宽度
-(void)updateLineWidth
{
if (lineWith > 4)
{
lineWith = 0;
}
lineWith++;
glLineWidth(lineWith);
}
-(void)lineWidth:(int)type
{
glLineWidth(type);
}
//撤销操作
-(void)cancle
{
[drawAllarray removeLastObject];
}
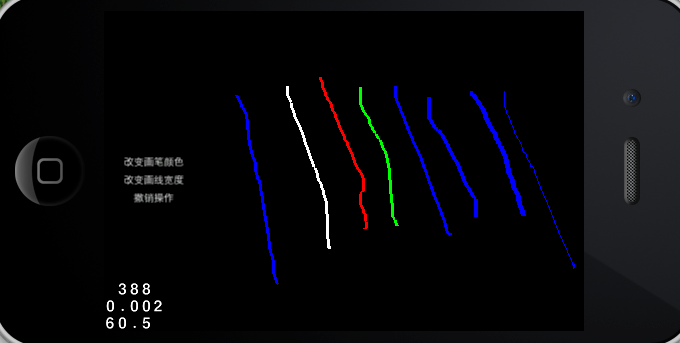
运行截图2.8-1:


 4080
4080

 被折叠的 条评论
为什么被折叠?
被折叠的 条评论
为什么被折叠?
 到【灌水乐园】发言


