


一、添加依赖
CMakelist.txt的find_package中增加urdf依赖。
package.xml中增加urdf依赖:
<build_depend>urdf</build_depend>
<run_depend>urdf</run_depend>
二、写一个urdf文件
一般的urdf文件test.urdf起来像是这样:
<?xml version="1.0"?>
<robot name="two_rod">

  <material name="blue">
    <color rgba="0 0 .8 1"/>
  </material>

  <link name="base_link">
    <visual>
      <geometry>
        <cylinder length="0.2" radius="0.03"/>
      </geometry>
    </visual>
  </link>

  <link name="rod">
    <visual>
      <geometry>
        <cylinder length="0.2" radius="0.03"/>
      </geometry>
      <origin rpy="0 1.57075 0 " xyz="0.1 0 0"/>
      <material name="blue"/>
    </visual>
    <collision>
      <geometry>
        <cylinder length="0.2" radius="0.03"/>
      </geometry>
      <origin rpy="0 1.57075 0 " xyz="0.1 0 0"/>
    </collision>
    <inertial>
      <mass value="0.05"/>
      <inertia ixx="1.0" ixy="0.0" ixz="0.0" iyy="1.0" iyz="0.0" izz="1.0"/>
    </inertial>
  </link>

  <joint name="connect" type="prismatic">
    <axis xyz="1 0 0" />
    <parent link="base_link"/>
    <child link="rod"/>
    <limit effort="1000.0" lower="-0.38" upper="0" velocity="0.5"/>
    <origin rpy="0 0 0" xyz="0.19 0 .2"/>
  </joint>

</robot>
以下逐行解释上面的urdf的语法结构和关键字:
<?xml version="1.0"?>
<robot name="two_rod">  <!-- 为当前设计的机器人结构起名,之后会成为生成这个结构pdf的文件名 -->

  <material name="blue">  <!-- “材料”定义一个颜色变量名blue,可为下面的结构设置颜色 -->
    <color rgba="0 0 .8 1"/>  <!-- 定义这个颜色的rgb值 -->
  </material>

  <link name="base_link">  <!-- 定义第一个“结构”的名字。一般规则:以某一个结构作为基准坐标系时,起名为base_link -->
    <visual>  <!-- 以“视觉”关键字包围起来的部分,为在rviz中的可见部分 -->
      <geometry>  <!-- 以“几何”关键字包围起来的部分,为这个结构的形状。存在cylinder、box、sphere等形状,还有一种为mesh,为从其他文件载入。eg:mesh filename="package://pr2_description/meshes/gripper_v0/l_finger_tip.dae" -->
        <cylinder length="0.2" radius="0.03"/>  <!-- 这个“圆筒”形状的默认颜色为红色,这里定义了它的长度和半径 -->
      </geometry>
    </visual>
  </link>

  <link name="rod">  <!-- 这里定义了第二个“结构” -->
    <visual>
      <geometry>
        <cylinder length="0.2" radius="0.03"/>
      </geometry>
      <origin rpy="0 1.57075 0 " xyz="0.1 0 0"/>  <!-- “原点”定义在自己坐标系中的姿态和位置 -->
      <material name="blue"/>  <!-- 这里使用了上面定义的blue颜色 -->
    </visual>
    <collision>  <!-- “碰撞”体积定义在仿真时,对应结构的物理体积,一般使它和geometry中的参数设置一致。其他情况:需要更快计算碰撞检测时可将复杂结构的碰撞体积定义为比较简单的几何形状,或者为了限制行为接近敏感设备时将碰撞体积设置较大来增加安全区域 -->
      <geometry>
        <cylinder length="0.2" radius="0.03"/>  <!-- 同上的圆筒参数一致 -->
      </geometry>
      <origin rpy="0 1.57075 0 " xyz="0.1 0 0"/>  <!-- 原点参数也一致 -->
    </collision>
    <inertial>  <!-- “惯量” -->
      <mass value="0.05"/>  <!-- “质量”单位Kg -->
      <inertia ixx="1.0" ixy="0.0" ixz="0.0" iyy="1.0" iyz="0.0" izz="1.0"/>  <!-- 为转动惯量矩阵,需要刚体动力学基础,可用一些三维制图软件计算 -->
    </inertial>
  </link>

  <joint name="connect" type="prismatic">  <!-- “关节”用来定义结构之间的关系,这里设置的为“棱形”,存在fixed、continuous、revolute等连接方式 -->
    <axis xyz="1 0 0" />  <!-- 用来设置这个关节的移动方向,默认为x轴,若为0 0 1则为沿z轴移动,也可以复合设置 -->
    <parent link="base_link"/>  <!-- 指定这个关节所连接的“父”结构 -->
    <child link="rod"/>  <!-- 指定这个关节所连接的“子”结构 -->
    <limit effort="1000.0" lower="-0.38" upper="0" velocity="0.5"/>  <!-- “极限”用来约束:“力量”、“最大值”、“最小值”、“速度”的上限,默认为无穷大 -->
    <origin rpy="0 0 0" xyz="0.19 0 .2"/>  <!-- “原点”定义在父结构坐标系中,子结构坐标系的姿态和位置 -->
  </joint>

</robot>在ROS官方有更详细的joint、link和properties的关键字解释。
(上面带注释的代码可能会在执行时报错,使用无注释的部分即可。)
三、使用命令
check_urdf test.urdf检查urdf文件是否正确。
urdf_to_graphiz test.urdf生成这个urdf文件的pdf图像。
使用urdf语法解析器检查urdf、xml文件是否可以可以正常载入(可忽略,Parse a urdf file)。
四、使用robot_state_publisher包中的两个话题接口接收urdf文件和控制joint
<launch>
  <node pkg="robot_state_publisher" type="robot_state_publisher" name="rob_st_pub" >
    <remap from="robot_description" to="different_robot_description" />
    <remap from="joint_states" to="different_joint_states" />
  </node>
</launch>
这个launch仅为示例,告诉joint_states、robot_description这两个接口话题如何更改名字使用。
robot_description目前未见到由话题发布urdf的例子,但它有同名的参数接口使用:
<launch>
  <param name="robot_description" command="cat $(find urdf_tutorial)/urdf/test.urdf" />
  <node name="robot_state_publisher" pkg="robot_state_publisher" type="state_publisher" />
  <node name="state_publisher_node" pkg="urdf_tutorial" type="state_publisher_node" />
</launch>
joint_states话题的消息为sensor_msgs/JointState.msg,内容:
std_msgs/Header header
  uint32 seq
  time stamp
  string frame_id
string[] name
float64[] position
float64[] velocity
float64[] effort
在消息中name用来指定robot_state_publisher要操作test.urdf载入文件中的joint。
在消息中position用来为name所指定的joint设置运动参数值,其余的为关节中与之对应的速度和力量。
可以在上面launch的节点state_publisher_node中来发布joint_states话题。
state_publisher_node看起来像这样:
#include <ros/ros.h>
#include <sensor_msgs/JointState.h>
#include <tf/transform_broadcaster.h>

int main(int argc, char** argv)
{
  ros::init(argc, argv, "state_publisher_node");
  ros::NodeHandle n;
  ros::Publisher joint_pub = n.advertise<sensor_msgs::JointState>("joint_states", 1);
  ros::Rate loop_rate(30);
  double connect_value = 0;
  bool jump = 0;
  sensor_msgs::JointState joint_state_msg;

  while (ros::ok())
  {
    joint_state_msg.header.stamp = ros::Time::now();
    joint_state_msg.name.resize(1);
    joint_state_msg.position.resize(1);
    joint_state_msg.name[0] ="connect";
    joint_state_msg.position[0] = connect_value;

    joint_pub.publish(joint_state_msg);

    if (connect_value >= -0.01 && jump == 1)
    {
      connect_value += 0.01;
      if (connect_value >= 1)
        jump = 0;
    }
    if (connect_value <= 1.01 && jump == 0)
    {
      connect_value -= 0.01;
      if (connect_value <= 0)
        jump = 1;
    }
    loop_rate.sleep();
  }
    return 0;
}
使用launch启动这个节点:
<launch>
  <param name="robot_description" command="cat $(find urdf_tutorial)/urdf/test.urdf" />

  <node name="robot_state_publisher" pkg="robot_state_publisher" type="state_publisher" />
  <node name="state_publisher_node" pkg="urdf_tutorial" type="state_publisher_node" output="screen" />
  <node name="rviz" pkg="rviz" type="rviz" />
</launch>
可以看到蓝色的杆延x轴前后移动,但程序中的移动范围不受urdf文件中limit的约束:
接下来,在程序中加入TF变换使整个系统移动起来,依靠joint的连接使所有的link处于同一个相对坐标系:

#include <ros/ros.h>
#include <sensor_msgs/JointState.h>
#include <tf/transform_broadcaster.h>
int main(int argc, char** argv)
{
ros::init(argc, argv, "state_publisher_node");
ros::NodeHandle n;
ros::Publisher joint_pub = n.advertise<sensor_msgs::JointState>("joint_states", 1);
tf::TransformBroadcaster broadcaster;
ros::Rate loop_rate(30);
const double degree = M_PI/180;
double connect_value = 0, angle=0;
bool jump = 0;
geometry_msgs::TransformStamped odom_trans;
sensor_msgs::JointState joint_state_msg;
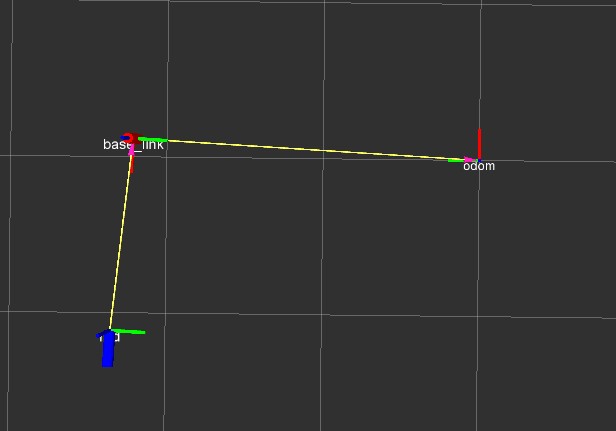
odom_trans.header.frame_id = "odom";
odom_trans.child_frame_id = "base_link";
while (ros::ok())
{
joint_state_msg.header.stamp = ros::Time::now();
joint_state_msg.name.resize(1);
joint_state_msg.position.resize(1);
joint_state_msg.name[0] ="connect";
joint_state_msg.position[0] = connect_value;
odom_trans.header.stamp = ros::Time::now();
odom_trans.transform.translation.x = cos(angle)*2;
odom_trans.transform.translation.y = sin(angle)*2;
odom_trans.transform.translation.z = 0.7;
odom_trans.transform.rotation = tf::createQuaternionMsgFromYaw(angle+M_PI/2);
joint_pub.publish(joint_state_msg);
broadcaster.sendTransform(odom_trans);
if (connect_value >= -0.01 && jump == 1)
{
connect_value += 0.01;
if (connect_value >= 1)
jump = 0;
}
if (connect_value <= 1.01 && jump == 0)
{
connect_value -= 0.01;
if (connect_value <= 0)
jump = 1;
}
angle += degree/4;
loop_rate.sleep();
}
return 0;
}继续使用上一个launch启动,在rviz中将odom设为Fixed Frame,可以看到两个杆围绕着odom转的很魔性:
如果不使用joint,就需要两个TF变换才是使两个杆相对运动,这里不再浪费篇幅。
五、使用joint_state_publisher包GUI控制joint
joint_state_publisher的GUI会加载所有非fixed类型的joint控制link移动,修改test_urdf.launch为:
<launch>
  <param name="robot_description" command="cat $(find urdf_tutorial)/urdf/test.urdf" />
  <param name="use_gui" value="true"/>

  <node name="joint_state_publisher" pkg="joint_state_publisher" type="joint_state_publisher" />
  <node name="robot_state_publisher" pkg="robot_state_publisher" type="state_publisher" />
  <node name="rviz" pkg="rviz" type="rviz" />
</launch>
启动它后,可使用joint_state_publisher的GUI:
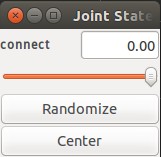
因为只有一个joint所以只有一个可用滑块,滑动它观察rviz中两个杆的相对位置。(urdf中limit参数会用来约束这里滑块上下限值。)
六、使用xacro简化urdf文件
使用以xacro为后缀的文件,而不再是urdf后缀。ROS官方网站对Using Xacro to Clean Up a URDF File和Xacro tutorials已经讲述的很明晰,不再敖述,此处只做归纳。
1、在xacro中,前两行必须是:
<?xml version="1.0"?>
<robot xmlns:xacro="http://www.ros.org/wiki/xacro" name="robot_name">  <!-- 此处的name类似urdf中的robot name,给它起个名字 -->
2、初始化变量的关键字为property:
<xacro:property name="width" value="0.2" />在其他位置可以以"${width}"、"${width+2}"的方式调用,也可使用立即数"${5/6}",字符串类型可以"${width}_abc"叠加等。
可以使用YAML文件来初始化变量:
<xacro:property name="props" value="${load_yaml('props.yaml')}"/>3、宏的关键字为macro:
<xacro:macro name="pr2_caster" params="suffix *origin **content">①name用来指定宏名,供之后调用。
②params用来声明这个宏内的多个变量。
不带“*”的为普通变量。
一颗“*”的变量为一个insert_block,在urdf中相当于一行,例如这种:
<cylinder length="0.2" radius="0.03"/>两颗“*”的变量也为一个insert_block,但它相当于urdf中的一层,例如这种:
<inertial>
  <mass value="0.05"/>
  <inertia ixx="1.0" ixy="0.0" ixz="0.0" iyy="1.0" iyz="0.0" izz="1.0"/>
</inertial>
③在宏声明好之后,在下面继续写macro所包含的内容,insert_block的使用形式如下:
<xacro:macro name="pr2_caster" params="suffix *origin **content">
  <joint name="caster_${suffix}_joint">
    <axis xyz="0 0 1" />
  </joint>
  <link name="caster_${suffix}">
    <xacro:insert_block name="origin" />
    <xacro:insert_block name="content" />
  </link>
</xacro:macro>
这个macro中包含了一个joint和一个link,使用这个macro:
<xacro:pr2_caster suffix="front_left">
  <pose xyz="0 1 0" rpy="0 0 0" />
  <container>
    <color name="yellow"/>
    <mass>0.1</mass>
  </container>
</xacro:pr2_caster>
“suffix”在第一行初始化,“*origin”会在第二行定义出pose,“**content”在3~6行定义出container。(按变量定义的顺序初始化)
使用了这个宏后,相当于写了一个:
<joint name="caster_front_left_joint">
  <axis xyz="0 0 1" />
</joint>
<link name="caster_front_left">
  <pose xyz="0 1 0" rpy="0 0 0" />
  <color name="yellow" />
  <mass>0.1</mass>
</link>
4、预处理关键字为include:
<xacro:include filename="$(find package)/other_file.xacro" />用来载入其他xacro文件,为载入的文件增加名称空间:
<xacro:include filename="other_file.xacro" ns="namespace"/>使用“${namespace.property}”的方式来调用不同名称空间的参数。
5、向robot_state_publisher的robot_description接口载入xacro文件:
<param name="robot_description" command="$(find xacro)/xacro.py '$(find pr2_description)/robots/pr2.urdf.xacro'" />6、那两根魔性的杆test.urdf文件写成xacro文件如下:
<?xml version="1.0"?>
<robot name="two_rod" xmlns:xacro="http://ros.org/wiki/xacro">

  <xacro:property name="length" value="0.2" />
  <xacro:property name="radius" value="0.03" />

  <material name="blue">
    <color rgba="0 0 .8 1"/>
  </material>

  <xacro:macro name="base" params="apellation *shape1">
    <link name="${apellation}">
      <visual>
        <geometry>
          <xacro:insert_block name="shape1" />
        </geometry>
      </visual>
    </link>
  </xacro:macro>

  <xacro:base apellation="base_link">
    <cylinder length="${length}" radius="${radius}"/>
  </xacro:base>

  <xacro:macro name="rod" params="apellation *shape1 *shape2 **content1">
    <link name="${apellation}">
      <visual>
        <geometry>
          <xacro:insert_block name="shape1" />
        </geometry>
        <xacro:insert_block name="shape2" />
        <material name="blue"/>
      </visual>
      <collision>
        <geometry>
          <xacro:insert_block name="shape1" />
        </geometry>
        <xacro:insert_block name="shape2" />
      </collision>
      <xacro:insert_block name="content1" />
    </link>
  </xacro:macro>

  <xacro:rod apellation="rod">
    <cylinder length="${length}" radius="${radius}"/>
    <origin rpy="0 1.57075 0 " xyz="0.1 0 0"/>
    <inertial>
      <mass value="0.05"/>
      <inertia ixx="1.0" ixy="0.0" ixz="0.0" iyy="1.0" iyz="0.0" izz="1.0"/>
    </inertial>
  </xacro:rod>

  <xacro:macro name="joint_connect" params="apellation style">
    <joint name="${apellation}" type="${style}">
      <axis xyz="1 0 0" />
      <parent link="base_link"/>
      <child link="rod"/>
      <limit effort="1000.0" lower="-0.38" upper="0" velocity="0.5"/>
      <origin rpy="0 0 0" xyz="0.19 0 .2"/>
    </joint>
  </xacro:macro>

  <xacro:joint_connect apellation="connect" style="prismatic"/>

</robot>
将每个link和joint都写成了macro,然后再分别定义,其实较短的urdf不宜写成xacro,反倒复杂了,以上只是做练习不考虑实用。
用launch启动:
<launch>
  <param name="robot_description" command="$(find xacro)/xacro.py '$(find urdf_tutorial)/urdf/test.xacro'" />
  <param name="use_gui" value="true"/>

  <node name="joint_state_publisher" pkg="joint_state_publisher" type="joint_state_publisher" />
  <node name="robot_state_publisher" pkg="robot_state_publisher" type="state_publisher" />
  <node name="rviz" pkg="rviz" type="rviz" />
</launch>


 2604
2604


 被折叠的 条评论
为什么被折叠?
被折叠的 条评论
为什么被折叠?
 到【灌水乐园】发言


