


目录
一、创建环境
系统:win11
python:3.10
pytorch>1.7
安装anaconda
打开cmd窗口,输入conda create -n yolov5 python=3.10,创建新的环境,避免配置时出错影响其他环境。
激活新创建的环境:

输入activate yolov5,当C:前面出现yolov5(设置环境名)时,激活成功。
二、导入pytorch库和CUDA、cudnn
2.1Pytorch
进入Pytorch官网PyTorch,选择如下参数: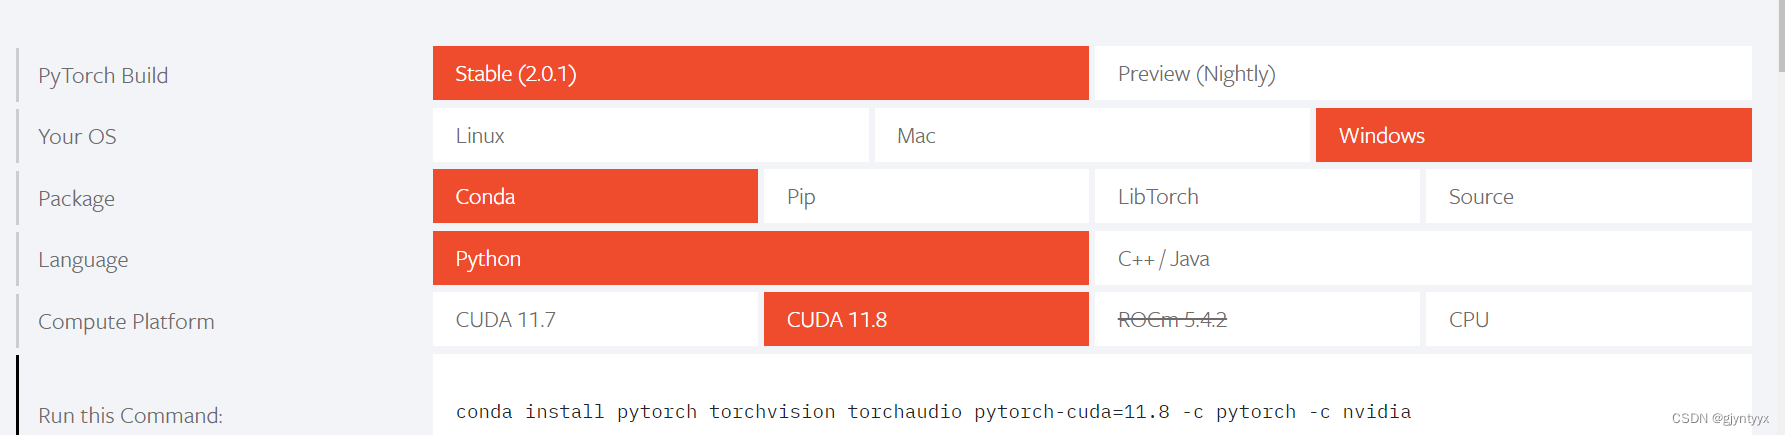
复制run this command中的代码到cmd中运行。
也可以选择老版本Previous PyTorch Versions | PyTorch,但Pytorch版本应该大于1.7。

出现done后表示pytorch添加成功。
2.2 CUDA
安装CUDA
参考了这篇博客
(25条消息) CUDA和cudnn的安装_MT_Lucky的博客-CSDN博客
根据上面Pytorch版本选择对应的CUDA版本,我这边对应的是CUDA11.8,并查看自己的Nvidia驱动程序版本足够。

下载地址 CUDA Toolkit Archive | NVIDIA Developer

选择对应版本并按照这个设置来下载,安装过程全选默认就可以,如果要改变安装位置就在安装选项这部分选择自定义。
设置系统环境变量


验证CUDA是否装好
打开cmd输入ncc --version
如果出现版本号等信息则安装成功
2.3cudnn
cudnn与CUDA有对应的版本关系,也是直接去官网下载就行cudnn下载地址
下载下来之后进行解压,然后将解压出来的
(1)\cuda\bin\文件夹下所有文件复制到CUDA安装目录\bin\文件夹中
(2)\cuda\include\文件夹下所有文件复制到CUDA安装目录\include\文件夹中
(3)\cuda\lib\x64\文件夹下所有文件复制到CUDA安装目录\lib\x64\文件夹中
三、源码测试
3.1下载源码
mirrors / ultralytics / yolov5 · GitCode下载ultralytics大神的yolov5开源代码。
3.2更改解释器
解压后以IDE打开,下面以vscode为例。

选择解释器路径为刚创建的虚拟环境解释器。

3.3安装依赖项
进入requirements.txt文件,复制第二行代码pip install -r requirements.txt,到终端中运行。

如果没有报错信息出现代表安装成功。
3.4测试
图片测试
运行左侧的detect.py文件
如果该文件夹出现下列两个图片,则代表yolov5网络copy成功,后续可以尝试训练自己的数据集。
其他测试
可以在终端输入下面这行代码,.后面是文件路径
python detect.py --source ./data/video/test.mp4 --weights ./weights/yolov5s.pt --conf 0.4
下面是可供选择的文件类型,source和weight都可以更改,source放自己想要测试的视频/图片等,weight可以去下载作者做好的权重文件,也可以自己跑训练集后输入。
Usage - sources:
    $ python detect.py --weights yolov5s.pt --source 0                               # webcam
                                                     img.jpg                         # image
                                                     vid.mp4                         # video
                                                     screen                          # screenshot
                                                     path/                           # directory
                                                     list.txt                        # list of images
                                                     list.streams                    # list of streams
                                                     'path/*.jpg'                    # glob
                                                     'https://youtu.be/Zgi9g1ksQHc'  # YouTube
                                                     'rtsp://example.com/media.mp4'  # RTSP, RTMP, HTTP stream

Usage - formats:
    $ python detect.py --weights yolov5s.pt                 # PyTorch
                                 yolov5s.torchscript        # TorchScript
                                 yolov5s.onnx               # ONNX Runtime or OpenCV DNN with --dnn
                                 yolov5s_openvino_model     # OpenVINO
                                 yolov5s.engine             # TensorRT
                                 yolov5s.mlmodel            # CoreML (macOS-only)
                                 yolov5s_saved_model        # TensorFlow SavedModel
                                 yolov5s.pb                 # TensorFlow GraphDef
                                 yolov5s.tflite             # TensorFlow Lite
                                 yolov5s_edgetpu.tflite     # TensorFlow Edge TPU
                                 yolov5s_paddle_model       # PaddlePaddle
或者也可以通过更改detect.py的代码:
def parse_opt():
    parser = argparse.ArgumentParser()
    parser.add_argument('--weights', nargs='+', type=str, default=ROOT / 'yolov5s.pt', help='model path or triton URL')
    parser.add_argument('--source', type=str, default=ROOT / 'data/images', help='file/dir/URL/glob/screen/0(webcam)')
    parser.add_argument('--data', type=str, default=ROOT / 'data/coco128.yaml', help='(optional) dataset.yaml path')
    parser.add_argument('--imgsz', '--img', '--img-size', nargs='+', type=int, default=[640], help='inference size h,w')
    parser.add_argument('--conf-thres', type=float, default=0.25, help='confidence threshold')
    parser.add_argument('--iou-thres', type=float, default=0.45, help='NMS IoU threshold')
    parser.add_argument('--max-det', type=int, default=1000, help='maximum detections per image')
    parser.add_argument('--device', default='', help='cuda device, i.e. 0 or 0,1,2,3 or cpu')
    parser.add_argument('--view-img', action='store_true', help='show results')
    parser.add_argument('--save-txt', action='store_true', help='save results to *.txt')
    parser.add_argument('--save-conf', action='store_true', help='save confidences in --save-txt labels')
    parser.add_argument('--save-crop', action='store_true', help='save cropped prediction boxes')
    parser.add_argument('--nosave', action='store_true', help='do not save images/videos')
    parser.add_argument('--classes', nargs='+', type=int, help='filter by class: --classes 0, or --classes 0 2 3')
    parser.add_argument('--agnostic-nms', action='store_true', help='class-agnostic NMS')
    parser.add_argument('--augment', action='store_true', help='augmented inference')
    parser.add_argument('--visualize', action='store_true', help='visualize features')
    parser.add_argument('--update', action='store_true', help='update all models')
    parser.add_argument('--project', default=ROOT / 'runs/detect', help='save results to project/name')
    parser.add_argument('--name', default='exp', help='save results to project/name')
    parser.add_argument('--exist-ok', action='store_true', help='existing project/name ok, do not increment')
    parser.add_argument('--line-thickness', default=3, type=int, help='bounding box thickness (pixels)')
    parser.add_argument('--hide-labels', default=False, action='store_true', help='hide labels')
    parser.add_argument('--hide-conf', default=False, action='store_true', help='hide confidences')
    parser.add_argument('--half', action='store_true', help='use FP16 half-precision inference')
    parser.add_argument('--dnn', action='store_true', help='use OpenCV DNN for ONNX inference')
    parser.add_argument('--vid-stride', type=int, default=1, help='video frame-rate stride')
    opt = parser.parse_args()
    opt.imgsz *= 2 if len(opt.imgsz) == 1 else 1  # expand
    print_args(vars(opt))
    return opt
下载权重文件
可以在下面网站中下载作者训练好的权重文件,不同权重的识别效果不同,训练对应权重的时间也不同。
Releases · ultralytics/yolov5 (github.com)

将下载好 的权重文件放在根目录下,与代码中的文件路径对应
四、训练数据集
引用下面博客
(25条消息) 在CPU上跑yolov5(详细步骤+适合入门)_yolov5 cpu_她叫谢雨路的博客-CSDN博客
4.1制作自己的数据集

在根目录下创建好上述文件夹,将训练用图片导入到images的train中去,训练图可自己拍摄,也可以找公开的数据集,自己拍摄最好在100+张。
训练集为了节省时间直接和训练集用同一套了。
(26条消息) 如何正确使用机器学习中的训练集、验证集和测试集?_nkwshuyi的博客-CSDN博客
使用labelme函数为图片一一创建标签图像标注软件labelme - 知乎 (zhihu.com)

将labelme的输出路径选为/label/json,由于yolov5无法直接识别json文件,采用以下代码转化为txt,自己改下对应的路径和标签名称。
import json
import os

name2id = {'cat': 0}  # 标签名称


def convert(img_size, box):
    dw = 1. / (img_size[0])
    dh = 1. / (img_size[1])
    x = (box[0] + box[2]) / 2.0 - 1
    y = (box[1] + box[3]) / 2.0 - 1
    w = box[2] - box[0]
    h = box[3] - box[1]
    x = x * dw
    w = w * dw
    y = y * dh
    h = h * dh
    return (x, y, w, h)


def decode_json(json_floder_path, json_name):
    txt_name = 'D:/studydata/deeplearning/YOLO/yolov5-master-pytorch/yolov5-master/owndata/cat/datasets/labels/txt/' + json_name[0:-5] + '.txt'
    # txt文件夹的绝对路径
    txt_file = open(txt_name, 'w')

    json_path = os.path.join(json_floder_path, json_name)
    data = json.load(open(json_path, 'r', encoding='gb2312', errors='ignore'))

    img_w = data['imageWidth']
    img_h = data['imageHeight']

    for i in data['shapes']:

        label_name = i['label']
        if (i['shape_type'] == 'rectangle'):
            x1 = int(i['points'][0][0])
            y1 = int(i['points'][0][1])
            x2 = int(i['points'][1][0])
            y2 = int(i['points'][1][1])

            bb = (x1, y1, x2, y2)
            bbox = convert((img_w, img_h), bb)
            txt_file.write(str(name2id[label_name]) + " " + " ".join([str(a) for a in bbox]) + '\n')


if __name__ == "__main__":

    json_floder_path = 'D:/studydata/deeplearning/YOLO/yolov5-master-pytorch/yolov5-master/owndata/cat/datasets/labels/json/'
    # json文件夹的绝对路径
    json_names = os.listdir(json_floder_path)
    for json_name in json_names:
        decode_json(json_floder_path, json_name)
4.2修改配置文件
cat_parameter.yaml
在yolov5/data/coco128.yaml中先复制一份,粘贴到owndata/cat/中,改名为cat_parameter.yaml
cat_parameter.yaml文件需要修改的参数是nc与names。nc是标签名个数,names就是标签的名字,以及文件路径也要修改。
path: owndata/cat/datasets  # dataset root dir
train: images/train  # train images (relative to 'path') 128 images
val: images/train  # val images (relative to 'path') 128 images
test:  # test images (optional)

nc: 1  # number of classes
names: ['cat']  # class names
如果标签数多,names之间用,隔开。
path是绝对路径
train是在path绝对路径条件下的训练集路径,即:wzry/datasets/images/train
val同上,但是是验证集,为了方便,让训练集和验证集是一个。。
test可不填
yolov5m.yaml
直接在yolov5/models复制对应的配置到cat文件夹中,更改里面nc参数

五、开始训练
5.1train.py参数配置
    parser = argparse.ArgumentParser()
    parser.add_argument('--weights', type=str, default=ROOT / 'yolov5m-seg.pt', help='initial weights path')
    parser.add_argument('--cfg', type=str, default='owndata/cat/yolov5m.yaml', help='model.yaml path')
    parser.add_argument('--data', type=str, default=ROOT / 'owndata/cat/cat_parameter.yaml', help='dataset.yaml path')
    parser.add_argument('--hyp', type=str, default=ROOT / 'data/hyps/hyp.scratch-low.yaml', help='hyperparameters path')
    parser.add_argument('--epochs', type=int, default=150, help='total training epochs')
    parser.add_argument('--batch-size', type=int, default=16, help='total batch size for all GPUs, -1 for autobatch')
    parser.add_argument('--imgsz', '--img', '--img-size', type=int, default=640, help='train, val image size (pixels)')
    parser.add_argument('--rect', action='store_true', help='rectangular training')
    parser.add_argument('--resume', nargs='?', const=True, default=False, help='resume most recent training')
    parser.add_argument('--nosave', action='store_true', help='only save final checkpoint')
    parser.add_argument('--noval', action='store_true', help='only validate final epoch')
    parser.add_argument('--noautoanchor', action='store_true', help='disable AutoAnchor')
    parser.add_argument('--noplots', action='store_true', help='save no plot files')
    parser.add_argument('--evolve', type=int, nargs='?', const=300, help='evolve hyperparameters for x generations')
    parser.add_argument('--bucket', type=str, default='', help='gsutil bucket')
    parser.add_argument('--cache', type=str, nargs='?', const='ram', help='image --cache ram/disk')
    parser.add_argument('--image-weights', action='store_true', help='use weighted image selection for training')
    parser.add_argument('--device', default='0', help='cuda device, i.e. 0 or 0,1,2,3 or cpu')
    parser.add_argument('--multi-scale', action='store_true', help='vary img-size +/- 50%%')
    parser.add_argument('--single-cls', action='store_true', help='train multi-class data as single-class')
    parser.add_argument('--optimizer', type=str, choices=['SGD', 'Adam', 'AdamW'], default='SGD', help='optimizer')
    parser.add_argument('--sync-bn', action='store_true', help='use SyncBatchNorm, only available in DDP mode')
    parser.add_argument('--workers', type=int, default=8, help='max dataloader workers (per RANK in DDP mode)')
    parser.add_argument('--project', default=ROOT / 'runs/train', help='save to project/name')
    parser.add_argument('--name', default='exp', help='save to project/name')
    parser.add_argument('--exist-ok', action='store_true', help='existing project/name ok, do not increment')
    parser.add_argument('--quad', action='store_true', help='quad dataloader')
    parser.add_argument('--cos-lr', action='store_true', help='cosine LR scheduler')
    parser.add_argument('--label-smoothing', type=float, default=0.0, help='Label smoothing epsilon')
    parser.add_argument('--patience', type=int, default=100, help='EarlyStopping patience (epochs without improvement)')
    parser.add_argument('--freeze', nargs='+', type=int, default=[0], help='Freeze layers: backbone=10, first3=0 1 2')
    parser.add_argument('--save-period', type=int, default=-1, help='Save checkpoint every x epochs (disabled if < 1)')
    parser.add_argument('--seed', type=int, default=0, help='Global training seed')
    parser.add_argument('--local_rank', type=int, default=1, help='Automatic DDP Multi-GPU argument, do not modify')
主要更改default参数:
设置weights/cfg/data三者的路径,
epochs训练轮次,越多训练效果拟合越好,太多会过拟合
batch-size批次大小,越大越快,但是会导致cpu显存不够用
device选择cpu or gpu训练,填0
workers多线程设置,大了容易报错
其他的可以看看help后面写的
5.2训练报错整理
error1
ImportError: Bad git executable.
The git executable must be specified in one of the following ways:
- be included in your $PATH
- be set via $GIT_PYTHON_GIT_EXECUTABLE
- explicitly set via git.refresh()All git commands will error until this is rectified.
This initial warning can be silenced or aggravated in the future by setting the
solution
安装git:(25条消息) Git 详细安装教程(详解 Git 安装过程的每一个步骤)_git安装_mukes的博客-CSDN博客
error2
OMP: Error #15: Initializing libiomp5md.dll, but found libiomp5md.dll already initialized.
OMP: Hint This means that multiple copies of the OpenMP runtime have been linked into the program. That is dangerous, since it can degrade performance or cause incorrect results. The best thing to do is to ensure that only a single OpenMP runtime is linked into the process, e.g. by avoiding static linking of the OpenMP runtime in any library. As an unsafe, unsupported, undocumented workaround you can set the environment variable KMP_DUPLICATE_LIB_OK=TRUE to allow the program to continue to execute, but that may cause crashes or silently produce incorrect results. For more information, please see http://www.intel.com/software/products/support/.
solution
删掉anaconda yolov5虚拟环境中的\Anaconda3\envs\work\Library\bin\libiomp5md.dll
error3
c盘爆满
error4
File "D:\study\Anaconda3\envs\yolov5\lib\site-packages\torch\__init__.py", line 122, in <module>
raise err
OSError: [WinError 1455] 页面文件太小,无法完成操作。 Error loading "D:\study\Anaconda3\envs\yolov5\lib\site-packages\torch\lib\nvfuser_codegen.dll" or one of its dependencies.
solution
将虚拟内存转移到其他空闲盘,并调大虚拟内存大小。
error5
WARNING Cache directory E:\studydata\deeplearning\yolov5-master\owndata\cat\datasets\labels is not writeable: [WinError 183] : 'E:\\studydata\\deeplearning\\yolov5-master\\owndata\\cat\\datasets\\labels\\train.cache.npy' -> 'E:\\studydata\\deeplearning\\yolov5-master\\owndata\\cat\\datasets\\labels\\train.cache' Traceback (most recent call last):
solution
这个错误提示表明,代码试图写入文件 'E:\studydata\deeplearning\yolov5-master\owndata\cat\datasets\labels\train.cache.npy',但是遇到了问题。错误代码 WinError 183 表示尝试创建一个已经存在的文件,或者路径中的某个目录不存在。以下是一些可能的解决方法:
1. **检查路径是否正确**:确保 'E:\studydata\deeplearning\yolov5-master\owndata\cat\datasets\labels\' 这个目录存在。如果不存在,你需要创建它。
2. **检查文件是否已存在**:如果 'train.cache.npy' 或者 'train.cache' 文件已经存在,可能会导致这个问题。你可以尝试删除这些文件,然后再次运行代码。
3. **检查文件权限**:可能是由于权限问题,代码无法写入文件。确保你有写入这个目录和文件的权限。如果你正在使用 Windows,你可以尝试以管理员身份运行你的 Python 环境。
如果以上建议都无法解决问题,那么问题可能在于你的代码。你可能需要检查你的代码,看看是否在尝试写入文件之前,确保文件不存在或者路径已经创建。
六、结果
终于搞定了,不知道为什么GPU报错就是多。。。
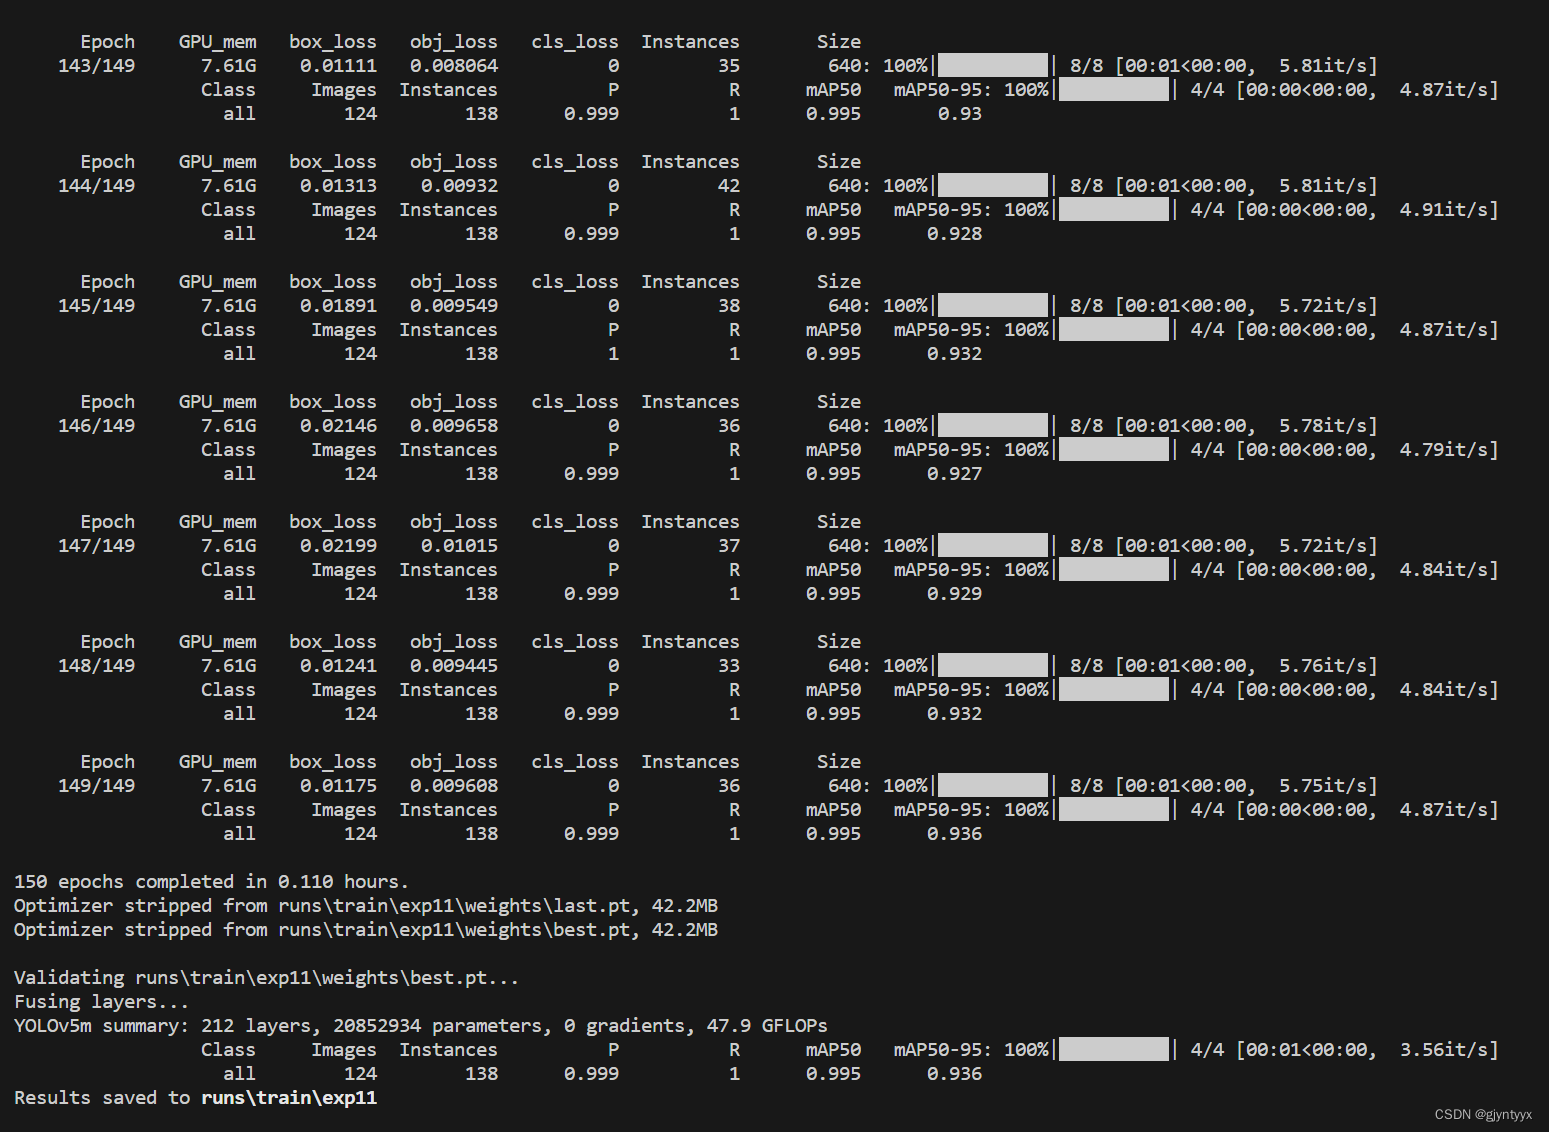
最后结果如下所示


 9981
9981


 被折叠的 条评论
为什么被折叠?
被折叠的 条评论
为什么被折叠?
 到【灌水乐园】发言


