


/*****************************************************************************/
/**
*
* run_vdma_frame_buffer API
*
* 这个API是应用程序与其他API之间的接口。当应用程序使用正确的参数调用此API时,
* 该API将调用其他API来配置VDMA的读取和写入路径,基于ID。之后,它将启动VDMA的读取和写入路径。
*
* @param	InstancePtr 是XAxiVdma数据结构的句柄。
* @param	DeviceId 是当前VDMA的设备ID。
* @param	hsize 是帧的水平尺寸。它将以像素为单位。
* 		帧的实际大小将通过将此值与tdata宽度相乘来计算。
* @param 	vsize 是帧的垂直尺寸。
* @param	buf_base_addr 是帧将被VDMA写入和读取的缓冲区地址。
* @param 	number_frame_count 指定中断应在多少帧后发生。
* @param 	enable_frm_cnt_intr 用于启用帧计数中断
*		当设置为1时。
* @param    select 用于设置读取通道、写入通道或者读取和写入通道。
* @return
*		- XST_SUCCESS 如果示例成功完成
*		- XST_FAILURE 如果示例失败。
*
******************************************************************************/

int run_vdma_frame_buffer(XAxiVdma* InstancePtr, int DeviceId, int hsize,
		int vsize, int buf_base_addr, int number_frame_count,
		int enable_frm_cnt_intr,vdma_run_mode mode)
{
	int Status,i;
	XAxiVdma_Config *Config;
	XAxiVdma_FrameCounter FrameCfgPtr;

	/* This is one time initialization of state machine context.
	 * In first call it will be done for all VDMA instances in the system.
	 */
	if(context_init==0) {
		for(i=0; i < XPAR_XAXIVDMA_NUM_INSTANCES; i++) {
			vdma_context[i].InstancePtr = NULL;
			vdma_context[i].device_id = -1;
			vdma_context[i].hsize = 0;
			vdma_context[i].vsize = 0;
			vdma_context[i].init_done = 0;
			vdma_context[i].buffer_address = 0;
			vdma_context[i].enable_frm_cnt_intr = 0;
			vdma_context[i].number_of_frame_count = 0;

		}
		context_init = 1;
	}

	/* The below initialization will happen for each VDMA. The API argument
	 * will be stored in internal data structure
	 */

	/* The information of the XAxiVdma_Config comes from hardware build.
	 * The user IP should pass this information to the AXI DMA core.
	 */
	Config = XAxiVdma_LookupConfig(DeviceId);
	if (!Config) {
		xil_printf("No video DMA found for ID %d\r\n",DeviceId );
		return XST_FAILURE;
	}

	if(vdma_context[DeviceId].init_done ==0) {
		vdma_context[DeviceId].InstancePtr = InstancePtr;

		/* Initialize DMA engine */
		Status = XAxiVdma_CfgInitialize(vdma_context[DeviceId].InstancePtr,
						Config, Config->BaseAddress);
		if (Status != XST_SUCCESS) {
			xil_printf("Configuration Initialization failed %d\r\n",
					Status);
			return XST_FAILURE;
		}

		vdma_context[DeviceId].init_done = 1;
	}

	vdma_context[DeviceId].device_id = DeviceId;
	vdma_context[DeviceId].vsize = vsize;

	vdma_context[DeviceId].buffer_address = buf_base_addr;
	vdma_context[DeviceId].enable_frm_cnt_intr = enable_frm_cnt_intr;
	vdma_context[DeviceId].number_of_frame_count = number_frame_count;
	vdma_context[DeviceId].hsize = hsize * (Config->Mm2SStreamWidth>>3);

	/* Setup the write channel */
	if ((mode == BOTH) || (mode == ONLY_WRITE)) {
		Status = WriteSetup(&vdma_context[DeviceId]);
		if (Status != XST_SUCCESS) {
			xil_printf("Write channel setup failed %d\r\n", Status);
			if (Status == XST_VDMA_MISMATCH_ERROR)
				xil_printf("DMA Mismatch Error\r\n");
			return XST_FAILURE;
		}
	}

	/* Setup the read channel */
	if ((mode == BOTH) || (mode == ONLY_READ)) {
		Status = ReadSetup(&vdma_context[DeviceId]);
		if (Status != XST_SUCCESS) {
			xil_printf("Read channel setup failed %d\r\n", Status);
			if (Status == XST_VDMA_MISMATCH_ERROR)
				xil_printf("DMA Mismatch Error\r\n");
			return XST_FAILURE;
		}
	}

	/* The frame counter interrupt is enabled, setting VDMA for same */
	if(vdma_context[DeviceId].enable_frm_cnt_intr) {
		FrameCfgPtr.ReadDelayTimerCount = 1;
		FrameCfgPtr.ReadFrameCount = number_frame_count;
		FrameCfgPtr.WriteDelayTimerCount = 1;
		FrameCfgPtr.WriteFrameCount = number_frame_count;

		XAxiVdma_SetFrameCounter(vdma_context[DeviceId].InstancePtr,&FrameCfgPtr);
		/* Enable DMA read and write channel interrupts. The configuration for interrupt
		 * controller will be done by application	 */
		XAxiVdma_IntrEnable(vdma_context[DeviceId].InstancePtr,
				XAXIVDMA_IXR_ERROR_MASK |
				XAXIVDMA_IXR_FRMCNT_MASK,XAXIVDMA_WRITE);
		XAxiVdma_IntrEnable(vdma_context[DeviceId].InstancePtr,
				XAXIVDMA_IXR_ERROR_MASK |
				XAXIVDMA_IXR_FRMCNT_MASK,XAXIVDMA_READ);
	} else	{
		/* Enable DMA read and write channel interrupts. The configuration for interrupt
		* controller will be done by application	 */
		XAxiVdma_IntrEnable(vdma_context[DeviceId].InstancePtr,
					XAXIVDMA_IXR_ERROR_MASK,XAXIVDMA_WRITE);
		XAxiVdma_IntrEnable(vdma_context[DeviceId].InstancePtr,
					XAXIVDMA_IXR_ERROR_MASK ,XAXIVDMA_READ);
	}

	/* Start the DMA engine to transfer */
	Status = StartTransfer(vdma_context[DeviceId].InstancePtr,mode);
	if (Status != XST_SUCCESS) {
		if(Status == XST_VDMA_MISMATCH_ERROR)
			xil_printf("DMA Mismatch Error\r\n");
		return XST_FAILURE;
	}
#if DEBUG_MODE
	xil_printf("Code is in Debug mode, Make sure that buffer addresses are at valid memory \r\n");
	xil_printf("In triple mode, there has to be six consecutive buffers for Debug mode \r\n");
	{
		u32 pixels,j,Addr = vdma_context[DeviceId].buffer_address;
		u8 *dst,*src;
		u32 total_pixel = vdma_context[DeviceId].WriteCfg.Stride * vdma_context[DeviceId].vsize;
		src = (unsigned char *)Addr;
		dst = (unsigned char *)Addr + (total_pixel * vdma_context->InstancePtr->MaxNumFrames);

		for(j=0;j<vdma_context->InstancePtr->MaxNumFrames;j++) {
			for(pixels=0;pixels<total_pixel;pixels++) {
				if(src[pixels] != dst[pixels]) {
					xil_printf("VDMA transfer failed: SRC=0x%x, DST=0x%x\r\n",
							src[pixels],dst[pixels]);
					exit(-1);
				}
			}
			src = src + total_pixel;
			dst = dst + total_pixel;
		}
	}
	xil_printf("VDMA transfer is happening and checked for 3 frames \r\n");
#endif

	return XST_SUCCESS;
}
一个比较经典的VDMA的初始化代码串,其原型是这个例程。
在例程的基础上添加了模式选择,也就是vdma_run_mode mode传入参数,可以选择只读、只写、读写模式。
 例程中的代码是经典的三缓存VDMA函数,虽然函数名字写着三缓存,但其实VDMA的帧缓存数量不在代码中设置(也可能是我没发现),如果想改变帧缓存的设置,可以在BD设计中对VDMA IP核进行修改。
在两个读写通道的设置函数中,

vdma_context->InstancePtr->MaxNumFrames就是帧缓存数量,是平台自带的参数,由BD设计决定。而划线的部分则是缓存地址设置函数。
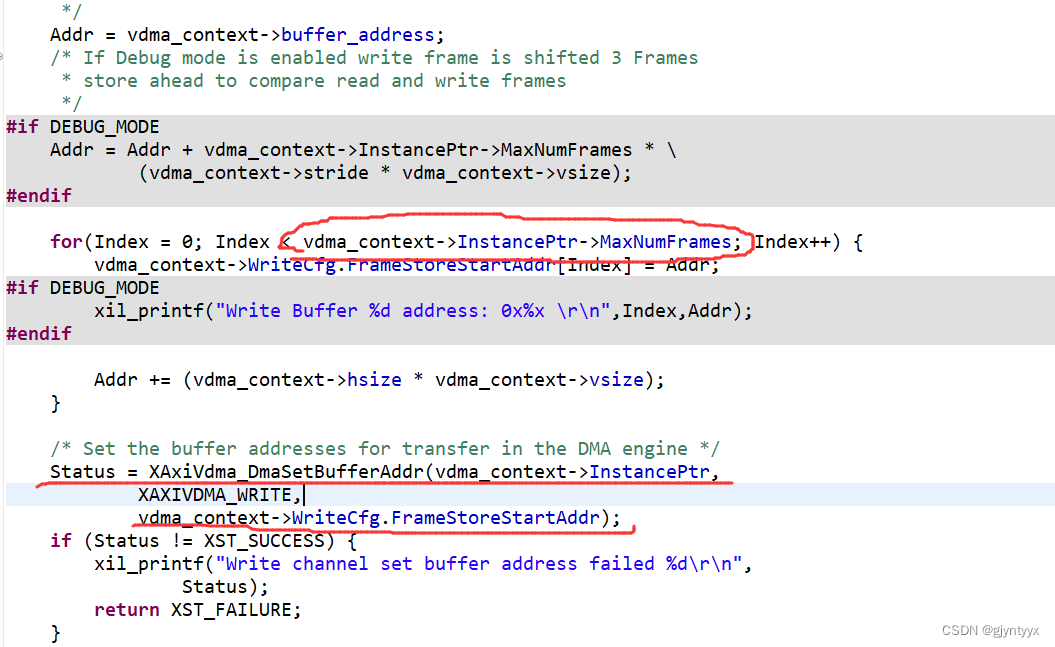
这部分设置我照抄例程了,没仔细看。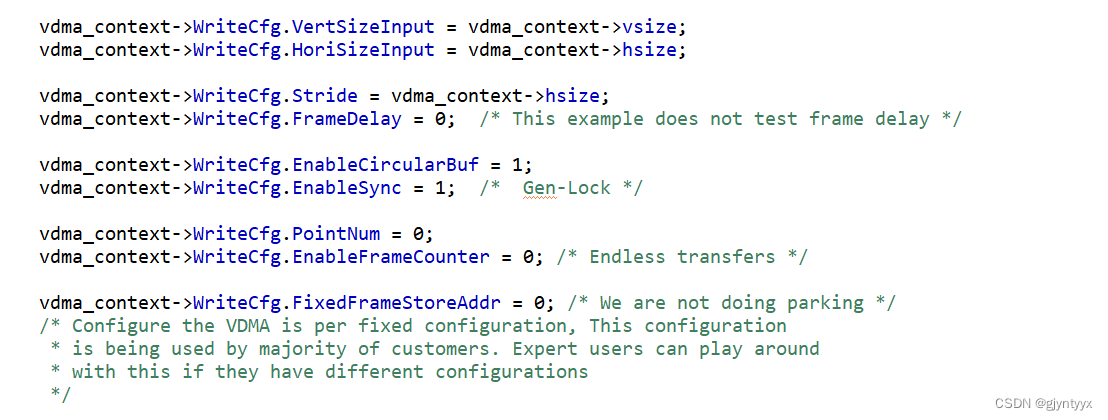


 2069
2069


 被折叠的 条评论
为什么被折叠?
被折叠的 条评论
为什么被折叠?
 到【灌水乐园】发言


