


目录
1.1 添加必要的组件scene,camera,webrenderer等
CSS2DRender官方有两个案例
CSS2DRenderer 是一个附加组件,必须显式导入。CSS2DObject的实例中包含Dom元素。
import { CSS2DRenderer, CSS2DObject } from 'three/addons/renderers/CSS2DRenderer.js';当然引入这个的同时,同样的引入three,OrbitControls
import * as THREE from 'three';
import { OrbitControls } from 'three/addons/controls/OrbitControls.js';
1第一个案例是css2d_label.html

1.1 添加必要的组件scene,camera,webrenderer等
先创建必要的场景scene,相机camera,渲染器webrenderer,控制器controls和灯光DirectionalLight.
let camera, scene, renderer, labelRenderer;
 //场景
    scene = new THREE.Scene();
    //相机
    camera = new THREE.PerspectiveCamera( 45, window.innerWidth / window.innerHeight, 0.1, 200 );
    camera.position.set( 10, 5, 20 );

//摄像机是一个layers的成员. 这是一个从Object3D继承而来的属性。
//当摄像机的视点被渲染的时候,物体必须和当前被看到的摄像机共享至少一个层
    camera.layers.enableAll();//
     //WebGLRenderer渲染器
    renderer = new THREE.WebGLRenderer();
    renderer.setPixelRatio( window.devicePixelRatio );
    renderer.setSize( window.innerWidth, window.innerHeight );
    document.body.appendChild( renderer.domElement );
     //控制器
     const controls = new OrbitControls( camera, renderer.domElement );
     controls.minDistance = 5;
     controls.maxDistance = 100;
//灯光
    const dirLight = new THREE.DirectionalLight( 0xffffff, 3 );
    dirLight.position.set( 0, 0, 1 );
    dirLight.layers.enableAll();//
    scene.add( dirLight );
这里camera有个layers属性,官方的解释如下:
物体的层级关系。 物体只有和一个正在使用的Camera至少在同一个层时才可见。当使用Raycaster进行射线检测的时候此项属性可以用于过滤不参与检测的物体.
这时运行,界面的黑的。
1.2 创建循环渲染的函数
function animate() {
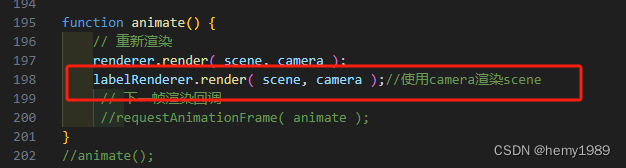
// 重新渲染
renderer.render( scene, camera );
// 下一帧渲染回调
requestAnimationFrame( animate );
}
animate();或者如下在renderer部分添加renderer.setAnimationLoop( animate );在animate里删掉回调的一行


1.3 创建辅助器
   // //坐标辅助器 这个正式产品发布时一般会隐藏
    const axesHelper = new THREE.AxesHelper( 5 );
    axesHelper.layers.enableAll();
    scene.add( axesHelper );
1.4 创建地球
 // //创建地球
        const EARTH_RADIUS = 1;//地球半径
        //radius — 球体半径,默认为1。
        //widthSegments — 水平分段数(沿着经线分段),最小值为3,默认值为32。这里是16
        //heightSegments — 垂直分段数(沿着纬线分段),最小值为2,默认值为16  这里是16
            const earthGeometry = new THREE.SphereGeometry( EARTH_RADIUS, 16, 16 );
            //地球材质
            const earthMaterial = new THREE.MeshPhongMaterial( {
                specular: 0x333333,//材质的高光颜色
                shininess: 5,//specular高亮的程度,越高的值越闪亮。默认值为 30
                map: textureLoader.load( '../three.js-r163/examples/textures/planets/earth_atmos_2048.jpg' ),//颜色贴图
                specularMap: textureLoader.load( '../three.js-r163/examples/textures/planets/earth_specular_2048.jpg' ),//镜面反射贴图值会影响镜面高光以及环境贴图对表面的影响程度。默认值为null
                normalMap: textureLoader.load( '../three.js-r163/examples/textures/planets/earth_normal_2048.jpg' ),//用于创建法线贴图的纹理
                normalScale: new THREE.Vector2( 0.85, 0.85 )//法线贴图对材质的影响程度。典型范围是0-1。默认值是Vector2设置为(1,1)
            } );
            //.colorSpace : string  默认值为THREE.NoColorSpace。 请参阅texture constants来了解其他格式的详细信
            earthMaterial.map.colorSpace = THREE.SRGBColorSpace;//  SRGB空间颜色
            //地球网格
            const earth = new THREE.Mesh( earthGeometry, earthMaterial );
            scene.add( earth );
 earth.layers.enableAll();//
1.5 增加月球
 // //月球
    const MOON_RADIUS = 0.27;//月球半径
    const moonGeometry = new THREE.SphereGeometry( MOON_RADIUS, 16, 16 );
    const moonMaterial = new THREE.MeshPhongMaterial( {
        shininess: 5,
        map: textureLoader.load( '../three.js-r163/examples/textures/planets/moon_1024.jpg' )
    } );
    moonMaterial.map.colorSpace = THREE.SRGBColorSpace;
    moon = new THREE.Mesh( moonGeometry, moonMaterial );
    scene.add( moon );
 moon.position.set(5,0,0);
 moon.layers.enableAll();//
1.6 添加CSS2DRender
// //创建 css的里显示的部分
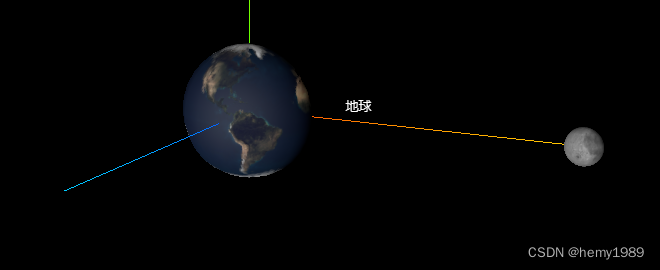
const earthDiv = document.createElement( 'div' );
earthDiv.className = 'label';
earthDiv.textContent = 'Earth';
earthDiv.style.backgroundColor = 'transparent';
//创建CSS2DObject实例
const earthLabel = new CSS2DObject( earthDiv );
earthLabel.position.set( 1.5 * EARTH_RADIUS, 0, 0 );
earthLabel.center.set( 0, 1 );
earth.add( earthLabel );
earthLabel.layers.set( 0 );//设层级
// //CSS2D渲染器
labelRenderer = new CSS2DRenderer();
//将渲染器的尺寸调整为(width, height).
labelRenderer.setSize( window.innerWidth, window.innerHeight );
labelRenderer.domElement.style.position = 'absolute';
labelRenderer.domElement.style.top = '0px';
document.body.appendChild( labelRenderer.domElement );

1.7 修复控制器无反应
这时候发现,控制器没反应了。需要把控制器第二个参数修改下
 或者
或者
 需要把控制器的代码都移动到 labelRenderer后面。


控制器控制旋转,文字始终面对着屏幕。
const earthMassDiv = document.getElementById( 'earthMass' );
    // const earthMassDiv = document.createElement( 'div' );
    // earthMassDiv.className = 'label';
    // earthMassDiv.textContent = '5.97237e24 kg';
    // earthMassDiv.style.backgroundColor = 'transparent';

    const earthMassLabel = new CSS2DObject( earthMassDiv );
    earthMassLabel.position.set( 1.5 * EARTH_RADIUS, 0, 0 );
    earthMassLabel.center.set( 0, 0 );
    earth.add( earthMassLabel );
    earthMassLabel.layers.set( 1 );
    const moonDiv = document.getElementById( 'moon' );
    // const moonDiv = document.createElement( 'div' );
    // moonDiv.className = 'label';
    // moonDiv.textContent = 'Moon';
    // moonDiv.style.backgroundColor = 'transparent';

    const moonLabel = new CSS2DObject( moonDiv );
    moonLabel.position.set( 1.5 * MOON_RADIUS, 0, 0 );
    moonLabel.center.set( 0, 1 );
    moon.add( moonLabel );
    moonLabel.layers.set( 0 );
    const moonMassDiv = document.getElementById( 'moonMass' );
    //const moonMassDiv = document.createElement( 'div' );
    // moonMassDiv.className = 'label';
    // moonMassDiv.textContent = '7.342e22 kg';
    // moonMassDiv.style.backgroundColor = 'transparent';

    const moonMassLabel = new CSS2DObject( moonMassDiv );
    moonMassLabel.position.set( 1.5 * MOON_RADIUS, 0, 0 );
    moonMassLabel.center.set( 0, 0 );
    moon.add( moonMassLabel );
    moonMassLabel.layers.set( 1 );

1.8 月球动画

1.9 窗口大小监听

1.10 lil-gui
//引入ui

import { GUI } from 'three/addons/libs/lil-gui.module.min.js';
const layers = {
'Toggle Name': function () {
camera.layers.toggle( 0 );
},
'Toggle Mass': function () {
camera.layers.toggle( 1 );
},
'Enable All': function () {
camera.layers.enableAll();
},
'Disable All': function () {
camera.layers.disableAll();
}
};
function initGui() {
//实例化一个gui对象
gui = new GUI();
gui.title( 'Camera Layers' );//标题
gui.add( layers, 'Toggle Name' );
gui.add( layers, 'Toggle Mass' );
gui.add( layers, 'Enable All' );
gui.add( layers, 'Disable All' );
gui.open();
}

1.11 css.html全部代码
<!DOCTYPE html>
<html>
	<head>
		<meta charset="utf-8">
		<meta name="viewport" content="width=device-width, user-scalable=no, minimum-scale=1.0, maximum-scale=1.0">
		<title>three.js css2d - label</title>
		<link type="text/css" rel="stylesheet" href="../three.js-r163/examples/main.css">
		<style>
			.label {
				color: #FFF;
				font-family: sans-serif;
				padding: 2px;
				background: rgba( 0, 0, 0, .6 );
			}

		</style>
	</head>
	<body>
		<div id="info"><a href="https://threejs.org" target="_blank" rel="noopener">three.js</a> css2d - label</div>
        <div id="earth" class="label" style="background: transparent;">地球</div>
        <div id="earthMass" class="label" style="background: transparent;">5.97237e24 kg</div>
        <div id="moon" class="label" style="background: transparent;">月球</div>
        <div id="moonMass" class="label" style="background: transparent;">7.342e22 kg</div>
		<script type="importmap">
			{
				"imports": {
                    "three": "../three.js-r163/build/three.module.js",
                    "three/addons/":"../three.js-r163/examples/jsm/"
				}
			}
		</script>

		<script type="module" src="css.js"></script>
</body>
</html>
1.12 css.js全部代码
import * as THREE from 'three';
import { OrbitControls } from 'three/addons/controls/OrbitControls.js';
//引入CSS2D渲染器
import { CSS2DRenderer, CSS2DObject } from 'three/addons/renderers/CSS2DRenderer.js';
//引入ui
import { GUI } from 'three/addons/libs/lil-gui.module.min.js';

let gui;

let camera, scene, renderer, labelRenderer;

const layers = {

    'Toggle Name': function () {

        camera.layers.toggle( 0 );

    },
    'Toggle Mass': function () {

        camera.layers.toggle( 1 );

    },
    'Enable All': function () {

        camera.layers.enableAll();

    },

    'Disable All': function () {

        camera.layers.disableAll();

    }

};

const clock = new THREE.Clock();
const textureLoader = new THREE.TextureLoader();

let moon;

init();
//animate();

function init() {
    //场景
    scene = new THREE.Scene();
    //相机
    camera = new THREE.PerspectiveCamera( 45, window.innerWidth / window.innerHeight, 0.1, 200 );
    camera.position.set( 10, 5, 20 );

//摄像机是一个layers的成员. 这是一个从Object3D继承而来的属性。
//当摄像机的视点被渲染的时候,物体必须和当前被看到的摄像机共享至少一个层
    camera.layers.enableAll();//


     //WebGLRenderer渲染器
    renderer = new THREE.WebGLRenderer();
    renderer.setPixelRatio( window.devicePixelRatio );
    renderer.setSize( window.innerWidth, window.innerHeight );
    document.body.appendChild( renderer.domElement );
    renderer.setAnimationLoop( animate );  //请求再次执行函数animate 渲染下一帧    每个可用帧都会调用的函数render


    //灯光
    const dirLight = new THREE.DirectionalLight( 0xffffff, 3 );
    dirLight.position.set( 0, 0, 1 );
    dirLight.layers.enableAll();//
    scene.add( dirLight );


    // //坐标辅助器 这个正式产品发布时一般会隐藏
    const axesHelper = new THREE.AxesHelper( 5 );
    axesHelper.layers.enableAll();
    scene.add( axesHelper );


        // //创建地球
        const EARTH_RADIUS = 1;//地球半径
        //radius — 球体半径,默认为1。
        //widthSegments — 水平分段数(沿着经线分段),最小值为3,默认值为32。这里是16
        //heightSegments — 垂直分段数(沿着纬线分段),最小值为2,默认值为16  这里是16
            const earthGeometry = new THREE.SphereGeometry( EARTH_RADIUS, 16, 16 );
            //地球材质
            const earthMaterial = new THREE.MeshPhongMaterial( {
                specular: 0x333333,//材质的高光颜色
                shininess: 5,//specular高亮的程度,越高的值越闪亮。默认值为 30
                map: textureLoader.load( '../three.js-r163/examples/textures/planets/earth_atmos_2048.jpg' ),//颜色贴图
                specularMap: textureLoader.load( '../three.js-r163/examples/textures/planets/earth_specular_2048.jpg' ),//镜面反射贴图值会影响镜面高光以及环境贴图对表面的影响程度。默认值为null
                normalMap: textureLoader.load( '../three.js-r163/examples/textures/planets/earth_normal_2048.jpg' ),//用于创建法线贴图的纹理
                normalScale: new THREE.Vector2( 0.85, 0.85 )//法线贴图对材质的影响程度。典型范围是0-1。默认值是Vector2设置为(1,1)
            } );
            //.colorSpace : string  默认值为THREE.NoColorSpace。 请参阅texture constants来了解其他格式的详细信
            earthMaterial.map.colorSpace = THREE.SRGBColorSpace;//  SRGB空间颜色
            //地球网格
            const earth = new THREE.Mesh( earthGeometry, earthMaterial );
            scene.add( earth );
            earth.layers.enableAll();//

    // //月球
    const MOON_RADIUS = 0.27;//月球半径
    const moonGeometry = new THREE.SphereGeometry( MOON_RADIUS, 16, 16 );
    const moonMaterial = new THREE.MeshPhongMaterial( {
        shininess: 5,
        map: textureLoader.load( '../three.js-r163/examples/textures/planets/moon_1024.jpg' )
    } );
    moonMaterial.map.colorSpace = THREE.SRGBColorSpace;
    moon = new THREE.Mesh( moonGeometry, moonMaterial );
    scene.add( moon );
    moon.position.set(5,0,0);
    // //
    moon.layers.enableAll();//


    const earthDiv = document.getElementById( 'earth' );
    // //创建 css的里显示的部分
    // const earthDiv = document.createElement( 'div' );
    // earthDiv.className = 'label';
    // earthDiv.textContent = 'Earth';
    // earthDiv.style.backgroundColor = 'transparent';
    //创建CSS2DObject实例
    const earthLabel = new CSS2DObject( earthDiv );
    earthLabel.position.set( 1.5 * EARTH_RADIUS, 0, 0 );
    earthLabel.center.set( 0, 1 );
    earth.add( earthLabel );
    earthLabel.layers.set( 0 );//设层级

    const earthMassDiv = document.getElementById( 'earthMass' );
    // const earthMassDiv = document.createElement( 'div' );
    // earthMassDiv.className = 'label';
    // earthMassDiv.textContent = '5.97237e24 kg';
    // earthMassDiv.style.backgroundColor = 'transparent';

    const earthMassLabel = new CSS2DObject( earthMassDiv );
    earthMassLabel.position.set( 1.5 * EARTH_RADIUS, 0, 0 );
    earthMassLabel.center.set( 0, 0 );
    earth.add( earthMassLabel );
    earthMassLabel.layers.set( 1 );
    const moonDiv = document.getElementById( 'moon' );
    // const moonDiv = document.createElement( 'div' );
    // moonDiv.className = 'label';
    // moonDiv.textContent = 'Moon';
    // moonDiv.style.backgroundColor = 'transparent';

    const moonLabel = new CSS2DObject( moonDiv );
    moonLabel.position.set( 1.5 * MOON_RADIUS, 0, 0 );
    moonLabel.center.set( 0, 1 );
    moon.add( moonLabel );
    moonLabel.layers.set( 0 );
    const moonMassDiv = document.getElementById( 'moonMass' );
    //const moonMassDiv = document.createElement( 'div' );
    // moonMassDiv.className = 'label';
    // moonMassDiv.textContent = '7.342e22 kg';
    // moonMassDiv.style.backgroundColor = 'transparent';

    const moonMassLabel = new CSS2DObject( moonMassDiv );
    moonMassLabel.position.set( 1.5 * MOON_RADIUS, 0, 0 );
    moonMassLabel.center.set( 0, 0 );
    moon.add( moonMassLabel );
    moonMassLabel.layers.set( 1 );


    // //CSS2D渲染器
    labelRenderer = new CSS2DRenderer();
    //将渲染器的尺寸调整为(width, height).
    labelRenderer.setSize( window.innerWidth, window.innerHeight );
    labelRenderer.domElement.style.position = 'absolute';
    labelRenderer.domElement.style.top = '0px';
    document.body.appendChild( labelRenderer.domElement );

   //控制器
   const controls = new OrbitControls( camera, labelRenderer.domElement);
   controls.minDistance = 5;
   controls.maxDistance = 100;

    // //窗口大小监控
    window.addEventListener( 'resize', onWindowResize );
    // //UI部分
     initGui();

}

function onWindowResize() {

    camera.aspect = window.innerWidth / window.innerHeight;
    camera.updateProjectionMatrix();
    renderer.setSize( window.innerWidth, window.innerHeight );
    labelRenderer.setSize( window.innerWidth, window.innerHeight );
}


function animate() {
    // 重新渲染
    renderer.render( scene, camera );
    labelRenderer.render( scene, camera );//使用camera渲染scene
    //getElapsedTime(),获取自时钟启动后的秒数,摒弃将oldTime设置为当前时间,如果autoStart设置为true且时钟并未运行,则该方法同时启动时钟
        const elapsed = clock.getElapsedTime();
    //月球动画  半径为5的圆周运动
    moon.position.set( Math.sin( elapsed ) * 5, 0, Math.cos( elapsed ) * 5 );
     // 下一帧渲染回调
     //requestAnimationFrame( animate );
}
//animate();
function initGui() {

    //实例化一个gui对象
    gui = new GUI();

    gui.title( 'Camera Layers' );//标题

    gui.add( layers, 'Toggle Name' );
    gui.add( layers, 'Toggle Mass' );
    gui.add( layers, 'Enable All' );
    gui.add( layers, 'Disable All' );

    gui.open();

}
2 第二个案案例webgl_loader_pdb.html
这个案例主要是在加载pdb的函数里,获取三维结构的原子,连线,原子名字和颜色,进行渲染。
其他的模块都差不多,就不多介绍。主要介绍加载的地方。
2.1 pdb是什么

pdb用txt打开看到的内容如下:

2.3 加载后查看pdb的数据
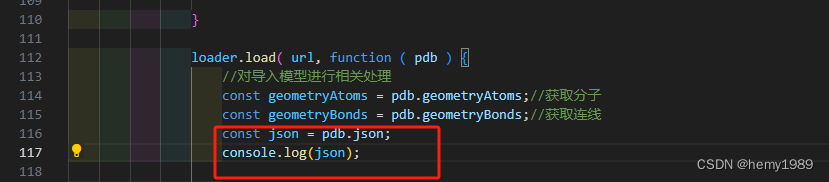
可以看到geometryAtoms,geometryBonds和json字段:

2.2 加载后查看pdb的json数据

 这里包含了CSS2DObject需要的显示内容和颜色。
2.4先实例化原子


2.5实例化原子的名字


2.6 实例化键(原子间的连接线)


2.7 css全部脚本
<!DOCTYPE html>
<html lang="en">
	<head>
		<title>three.js webgl - molecules</title>
		<meta charset="utf-8">
		<meta name="viewport" content="width=device-width, user-scalable=no, minimum-scale=1.0, maximum-scale=1.0">
		<link type="text/css" rel="stylesheet" href="../three.js-r163/examples/main.css">
		<style>
			.label {
				text-shadow: -1px 1px 1px rgb(0,0,0);
				margin-left: 25px;
				font-size: 20px;
			}
		</style>
	</head>
	<body>
		<div id="container"></div>
		<div id="info"><a href="https://threejs.org" target="_blank" rel="noopener">three.js webgl</a> - molecules</div>
		<script type="importmap">
			{
				"imports": {
                    "three": "../three.js-r163/build/three.module.js",
                    "three/addons/":"../three.js-r163/examples/jsm/"
				}
			}
		</script>

		<script type="module" src="pdb.js"></script>
</body>
</html>
2.8 js全部脚本
import * as THREE from 'three';
//轨迹球控制器(TrackballControls)TrackballControls 与 OrbitControls 相类似。然而,它不能恒定保持摄像机的up向量。 这意味着,如果摄像机绕过“北极”和“南极”,则不会翻转以保持“右侧朝上”。
			import { TrackballControls } from 'three/addons/controls/TrackballControls.js';
            //用于加载资源的加载程序。蛋白质数据库文件格式是描述分子三维结构的文本文件
			import { PDBLoader } from 'three/addons/loaders/PDBLoader.js';
            //引入CSS2D渲染器
			import { CSS2DRenderer, CSS2DObject } from 'three/addons/renderers/CSS2DRenderer.js';
            //引入ui库
			import { GUI } from 'three/addons/libs/lil-gui.module.min.js';

			let camera, scene, renderer, labelRenderer;
			let controls;
            //Group组
			let root;

            //对象
			const MOLECULES = {
				'Ethanol': 'ethanol.pdb',
				'Aspirin': 'aspirin.pdb',
				'Caffeine': 'caffeine.pdb',
				'Nicotine': 'nicotine.pdb',
				'LSD': 'lsd.pdb',
				'Cocaine': 'cocaine.pdb',
				'Cholesterol': 'cholesterol.pdb',
				'Lycopene': 'lycopene.pdb',
				'Glucose': 'glucose.pdb',
				'Aluminium oxide': 'Al2O3.pdb',
				'Cubane': 'cubane.pdb',
				'Copper': 'cu.pdb',
				'Fluorite': 'caf2.pdb',
				'Salt': 'nacl.pdb',
				'YBCO superconductor': 'ybco.pdb',
				'Buckyball': 'buckyball.pdb',
				'Graphite': 'graphite.pdb'
			};

			const params = {
				molecule: 'caffeine.pdb'
			};
            //实例化PDB加载器
			const loader = new PDBLoader();
			const offset = new THREE.Vector3();

			init();
			animate();

			function init() {
                //场景
				scene = new THREE.Scene();
				scene.background = new THREE.Color( 0x050505 );
                //相机
				camera = new THREE.PerspectiveCamera( 70, window.innerWidth / window.innerHeight, 1, 5000 );
				camera.position.z = 1000;
				scene.add( camera );
                //灯
				const light1 = new THREE.DirectionalLight( 0xffffff, 2.5 );
				light1.position.set( 1, 1, 1 );
				scene.add( light1 );

				const light2 = new THREE.DirectionalLight( 0xffffff, 1.5 );
				light2.position.set( - 1, - 1, 1 );
				scene.add( light2 );

				root = new THREE.Group();
				scene.add( root );

				//web渲染器
				renderer = new THREE.WebGLRenderer( { antialias: true } );
				renderer.setPixelRatio( window.devicePixelRatio );
				renderer.setSize( window.innerWidth, window.innerHeight );
				document.getElementById( 'container' ).appendChild( renderer.domElement );
                //CSS2D标签渲染器
				labelRenderer = new CSS2DRenderer();
				labelRenderer.setSize( window.innerWidth, window.innerHeight );
				labelRenderer.domElement.style.position = 'absolute';
				labelRenderer.domElement.style.top = '0px';
				labelRenderer.domElement.style.pointerEvents = 'none';
				document.getElementById( 'container' ).appendChild( labelRenderer.domElement );

				//球形控制器
				controls = new TrackballControls( camera, renderer.domElement );
				controls.minDistance = 500;
				controls.maxDistance = 2000;

				//加载模型
				loadMolecule( params.molecule );

				//监听窗口大小
				window.addEventListener( 'resize', onWindowResize );

				//ui
				const gui = new GUI();

				gui.add( params, 'molecule', MOLECULES ).onChange( loadMolecule );//切换不同的模型
				gui.open();

			}

			//

			function loadMolecule( model ) {
                //模型地址
				const url = ' ../three.js-r163/examples/models/pdb/' + model;
                //移除已有的
				while ( root.children.length > 0 ) {

					const object = root.children[ 0 ];
					object.parent.remove( object );

				}

				loader.load( url, function ( pdb ) {
                    //对导入模型进行相关处理
					const geometryAtoms = pdb.geometryAtoms;//获取几何原子
					const geometryBonds = pdb.geometryBonds;//获取几何纽带(连线)
					const json = pdb.json;//名字和颜色存在这个json里

                    console.log(pdb);
                    console.log(json);

					const boxGeometry = new THREE.BoxGeometry( 1, 1, 1 ); //立方缓冲几何体
					const sphereGeometry = new THREE.IcosahedronGeometry( 1, 3 ); //二十面缓冲几何体  球
                    //让模型居中
					geometryAtoms.computeBoundingBox();//计算物体包围盒尺寸
					geometryAtoms.boundingBox.getCenter( offset ).negate();
                    //.negate () : 向量取反,即: x = -x, y = -y , z = -z。

					geometryAtoms.translate( offset.x, offset.y, offset.z );
					geometryBonds.translate( offset.x, offset.y, offset.z );

                    //所有的分子
					let positions = geometryAtoms.getAttribute( 'position' );//分子位置
					const colors = geometryAtoms.getAttribute( 'color' );//分子颜色

					const position = new THREE.Vector3();//每个的位置
					const color = new THREE.Color();

					for ( let i = 0; i < positions.count; i ++ ) {

						position.x = positions.getX( i );
						position.y = positions.getY( i );
						position.z = positions.getZ( i );

						color.r = colors.getX( i );
						color.g = colors.getY( i );
						color.b = colors.getZ( i );

						const material = new THREE.MeshPhongMaterial( { color: color } );

						const object = new THREE.Mesh( sphereGeometry, material );//球
                        //copy ( v : Vector3 ) : 将所传入Vector3的x、y和z属性复制给这一Vector3
						object.position.copy( position );
                        //multiplyScalar将该向量与所传入的标量s进行相乘
						object.position.multiplyScalar( 75 );
						object.scale.multiplyScalar( 25 );//大小
						root.add( object );
                        //
						const atom = json.atoms[ i ];
                        //标签
						const text = document.createElement( 'div' );
						text.className = 'label';
						text.style.color = 'rgb(' + atom[ 3 ][ 0 ] + ',' + atom[ 3 ][ 1 ] + ',' + atom[ 3 ][ 2 ] + ')';//标签颜色
						text.textContent = atom[ 4 ];//标签内容

						const label = new CSS2DObject( text );
						label.position.copy( object.position );
						root.add( label );

					}
//所有的连线
					positions = geometryBonds.getAttribute( 'position' );//线位置

					const start = new THREE.Vector3();//线起点
					const end = new THREE.Vector3();//线终点

                    //线
					for ( let i = 0; i < positions.count; i += 2 ) {

						start.x = positions.getX( i );
						start.y = positions.getY( i );
						start.z = positions.getZ( i );

						end.x = positions.getX( i + 1 );
						end.y = positions.getY( i + 1 );
						end.z = positions.getZ( i + 1 );

						start.multiplyScalar( 75 );
						end.multiplyScalar( 75 );

						const object = new THREE.Mesh( boxGeometry, new THREE.MeshPhongMaterial( { color: 0xffffff } ) );
						object.position.copy( start );
						object.position.lerp( end, 0.5 );
						object.scale.set( 5, 5, start.distanceTo( end ) );//线条
						object.lookAt( end );
						root.add( object );

					}

					render();

				} );

			}

			//

			function onWindowResize() {

				camera.aspect = window.innerWidth / window.innerHeight;
				camera.updateProjectionMatrix();

				renderer.setSize( window.innerWidth, window.innerHeight );
				labelRenderer.setSize( window.innerWidth, window.innerHeight );

				render();

			}

			function animate() {

				requestAnimationFrame( animate );
				controls.update();

				const time = Date.now() * 0.0004;

				root.rotation.x = time;
				root.rotation.y = time * 0.7;

				render();

			}

			function render() {

				renderer.render( scene, camera );
				labelRenderer.render( scene, camera );

			}


 3185
3185


 被折叠的 条评论
为什么被折叠?
被折叠的 条评论
为什么被折叠?
 到【灌水乐园】发言


