


VirtualWriting虚拟手写笔
文章目录
前言
这是Virtual-Life的第二个小项目,考虑到键盘打字又慢又费力🤔 ,所以我干脆改成了手写,感觉效果还是不错滴
总体来说,该项目难度较大,涉及Qt,多线程,计算机视觉,api的调用。由于我们的目的是学习Opencv🤤 ,所以我将重点讲解一下与视觉相关的,其它的仅蜻蜓点水一下就算了(主要是因为我也没搞懂😎)
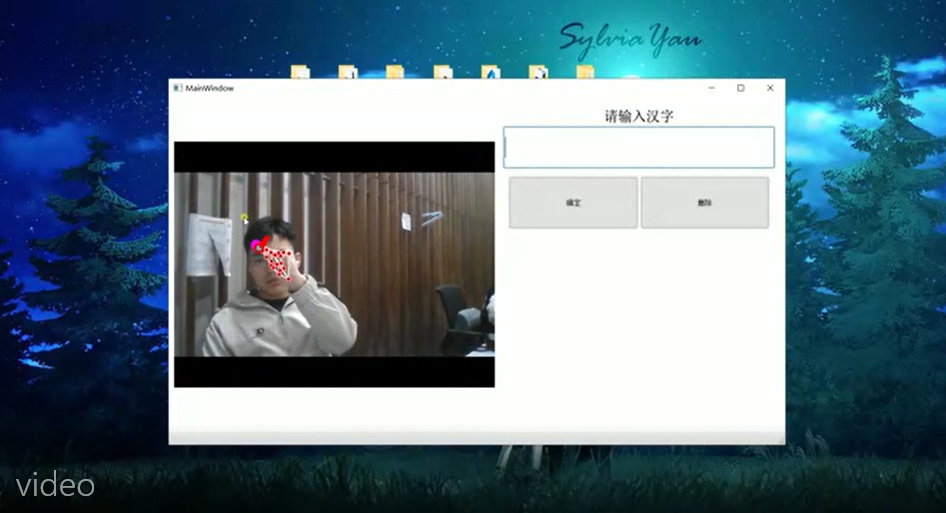
效果
可隔空写字,文字识别,控制鼠标移动、确定点击
知识体系
软件架构

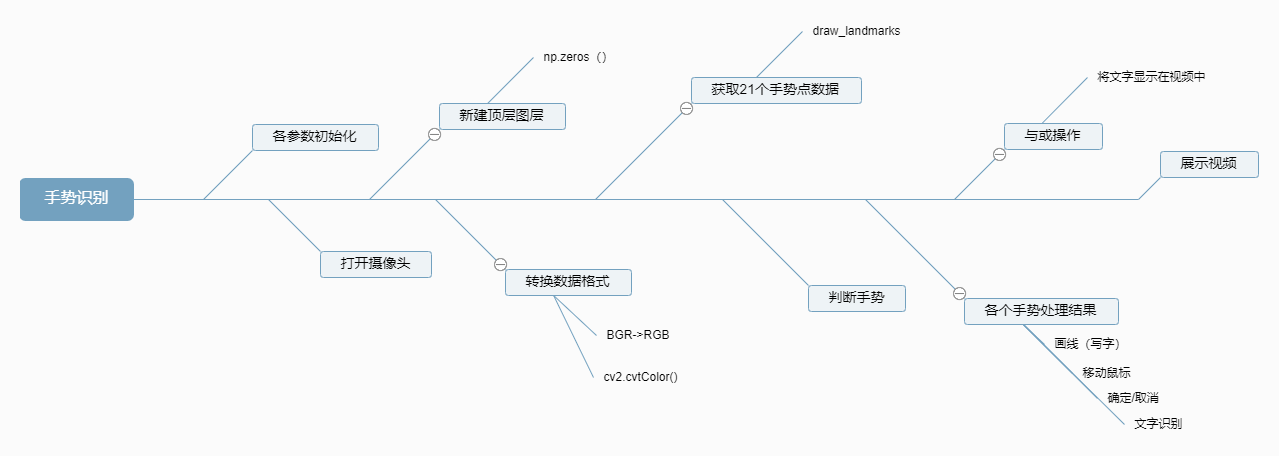
手势识别流程
视觉部分详解
	wScr, hScr = autopy.screen.size()
    wCam, hCam = 640, 480
    smoothening = 7
    initial_length = 100

    plocX, plocY = 0, 0
    clocX, clocY = 0, 0

    mp_hands = mp.solutions.hands
    hands = mp_hands.Hands(static_image_mode=False,
                           max_num_hands=2,
                           min_detection_confidence=0.7,
                           min_tracking_confidence=0.5)
    mpDraw = mp.solutions.drawing_utils

    gesture_lines = []
autopy.screen.size()功能:返回屏幕宽高的像素点个数
cap = cv2.VideoCapture(0)
cap.open(0)
img_black = np.zeros((hCam,wCam,3),dtype='uint8')
新建一个黑色的图层,方便将文字储存到这张图层上,上传至百度AI平台识别
img_RGB = cv2.cvtColor(frame, cv2.COLOR_BGR2RGB)
results = hands.process(img_RGB)

if results.multi_hand_landmarks:

   # 在图片上打印习惯用手和打印地标
   print(results.multi_hand_landmarks)

   # 画出21个手势点
   mpDraw.draw_landmarks(frame,results.multi_hand_landmarks[0],mp_hands.HAND_CONNECTIONS)

   # 将手势位置数据存到hand_list中
   handpoint_list = hand_point(results,h,w)
results = hands.process(img_RGB)得到手势点数据
让我们看看hand_point()函数怎么实现的
# 将21个手势点的x,y数据存入列表中
def hand_point(result,h,w):
 handpoint_list = []


  hand_21 = result.multi_hand_landmarks[0]
    # print("hand_21.landmark[0].x",hand_21.landmark[0].x)
    # print("w",w)

    # 将hand_21.landmark的特定元素加到handpoint_list列表中
  handpoint_list.append([int(hand_21.landmark[0].x * w), int(hand_21.landmark[0].y * h)])
  handpoint_list.append([int(hand_21.landmark[1].x * w), int(hand_21.landmark[1].y * h)])
  handpoint_list.append([int(hand_21.landmark[2].x * w), int(hand_21.landmark[2].y * h)])
  handpoint_list.append([int(hand_21.landmark[3].x * w), int(hand_21.landmark[3].y * h)])
  #......(省略)
  handpoint_list.append([int(hand_21.landmark[20].x * w),
                         int(hand_21.landmark[20].y * h)])

  return handpoint_list
其实就是用切片的方面转移数据
下面几个简单的手势判断
#手势(竖起大拇指)处理结果
if hand_pose == 'Thumb_up' and len(gesture_lines) > 10:

    # 保存手写文字图片到该路径
    cv2.imwrite('picture/character.jpg', img_black)


    gesture_lines = []

    # 重新新建图层,用于擦除文字
    img_black = np.zeros((h, w, c),dtype='uint8')

# 只伸出食指移动,用于控制鼠标移动
elif hand_pose =='Index_up':

    # 获取食指顶部位置
    index_x,index_y = handpoint_list[8]

    # 电脑鼠标移动
    screen_x = np.interp(index_x, (0, wCam),(0, wScr))
    screen_y = np.interp(index_y, (0, hCam), (0, hScr))

    # 一阶滤波算法
    clocX = plocX + (screen_x - plocX) / smoothening
    clocY = plocY + (screen_y - plocY) / smoothening
    autopy.mouse.move(clocX,clocY)

    cv2.circle(frame,(index_x,index_y),10,(255,0,255),cv2.FILLED)

    #留到下次滤波算法使用,平滑鼠标移动
    plocX, plocY = clocX, clocY

# 食指中指合并,表示确定
elif hand_pose == 'Index_middle_up':
    if p_to_p_distance(handpoint_list[8],handpoint_list[12]) < 50:
        index_x, index_y = handpoint_list[8]
        middle_x, middle_y = handpoint_list[12]
        click_x, click_y = int((index_x + middle_x)/2), int((index_y + middle_y)/2)
        cv2.circle(frame, (click_x, click_y), 10, (0, 255, 0), cv2.FILLED)
        autopy.mouse.click()

# 小指橡皮檫功能
elif hand_pose == 'Pinky_up':
    pinky_x, pinky_y = handpoint_list[20]
    cv2.circle(frame, (pinky_x, pinky_y), 15, (0, 255, 0), cv2.FILLED)
    cv2.circle(img_black, (pinky_x, pinky_y), 15, (0, 0, 0), cv2.FILLED)
画字操作
frame,hand_list = index_thumb_pt(frame,results)
if hand_list['click']:

    # 画字
    draw_character(gesture_lines, img_black)

    # 将笔坐标点轨迹添加至手势线列表中
    gesture_lines.append(hand_list["pt"])
下面我将重点介绍一下 index_thumb_pt()函数
# 拇指食指捏在一起,表示笔,以便写字
def index_thumb_pt(img,result):
    h, w = img.shape[0], img.shape[1]
    hand_dic = {}
    hand_21 = result.multi_hand_landmarks[0]
    thumb_x = hand_21.landmark[4].x * w
    thumb_y = hand_21.landmark[4].y * h
    index_x = hand_21.landmark[8].x * w
    index_y = hand_21.landmark[8].y * h

    # 笔的落点
    choose_pt = (int((thumb_x + index_x)/2),int((thumb_y + index_y)/2))

    # 计算出食指顶点和拇指顶点的距离
    dst = np.sqrt(np.square(thumb_x - index_x) + np.square(thumb_y - index_y))
    click_state = False

    # 判断三指闭合,拇指食指捏紧的手势(模拟笔)
    if dst < 30 and hand_21.landmark[3].x < hand_21.landmark[12].x < hand_21.landmark[17].x and \
            hand_21.landmark[3].x < hand_21.landmark[16].x < hand_21.landmark[17].x and \
            hand_21.landmark[3].x < hand_21.landmark[20].x < hand_21.landmark[17].x and \
            hand_21.landmark[6].y < hand_21.landmark[20].y < hand_21.landmark[0].y and \
            hand_21.landmark[6].y < hand_21.landmark[16].y < hand_21.landmark[0].y and \
            hand_21.landmark[6].y < hand_21.landmark[12].y < hand_21.landmark[0].y:
        click_state = True

        # 绘制笔中心的蓝心红边圆环
        cv2.circle(img, choose_pt, 10, (0, 0, 255), -1)  # 绘制点击坐标,为轨迹的坐标
        cv2.circle(img, choose_pt, 5, (255, 220, 30), -1)

    # dic列表的pt元素存储坐标,click存储点击的状态
    hand_dic['pt'] = choose_pt
    hand_dic['click'] = click_state

    return img, hand_dic
index_thumb_pt()函数功能:画字函数,返回视频帧(frame),手势点的列表(hand_list)
输入参数:视频帧(frame),手势处理数据
dst = np.sqrt(np.square(thumb_x - index_x) + np.square(thumb_y - index_y))square是平方,sqrt是开方
dst是经勾股定理处理后的两点距离
画线函数的实现
# 画线函数,将手势线列表里的数据绘制成函数
def draw_character(gesture_lines,img):
    if len(gesture_lines) >= 2:

        # 取列表最后一个元素
        pt1 = gesture_lines[-1]

        #取列表的倒数第二个函数
        pt2 = gesture_lines[-2]

        #勾股定理画线
		if np.sqrt((pt1[0] - pt2[0]) ** 2 + (pt1[1] - pt2[1]) ** 2) < 30:
            cv2.line(img, pt1, pt2, (0,0,255), thickness=6)
img_gray = cv2.cvtColor(img_black,cv2.COLOR_BGR2GRAY)

#简单二值化
_, imgInv = cv2.threshold(img_gray,50, 255, cv2.THRESH_BINARY_INV)
# 转换格式
imgInv = cv2.cvtColor(imgInv,cv2.COLOR_GRAY2BGR)

# 把文字图层(此时文字是黑色的)加到视频流上层
img = cv2.bitwise_and(frame,imgInv)

# 文字由黑色转为红色
img = cv2.bitwise_or(img,img_black)
二值化参考:CV6 图像的算术运算(以简单的抠图为例)
感觉代码我都注释的很清楚了,新手估计都能学会~
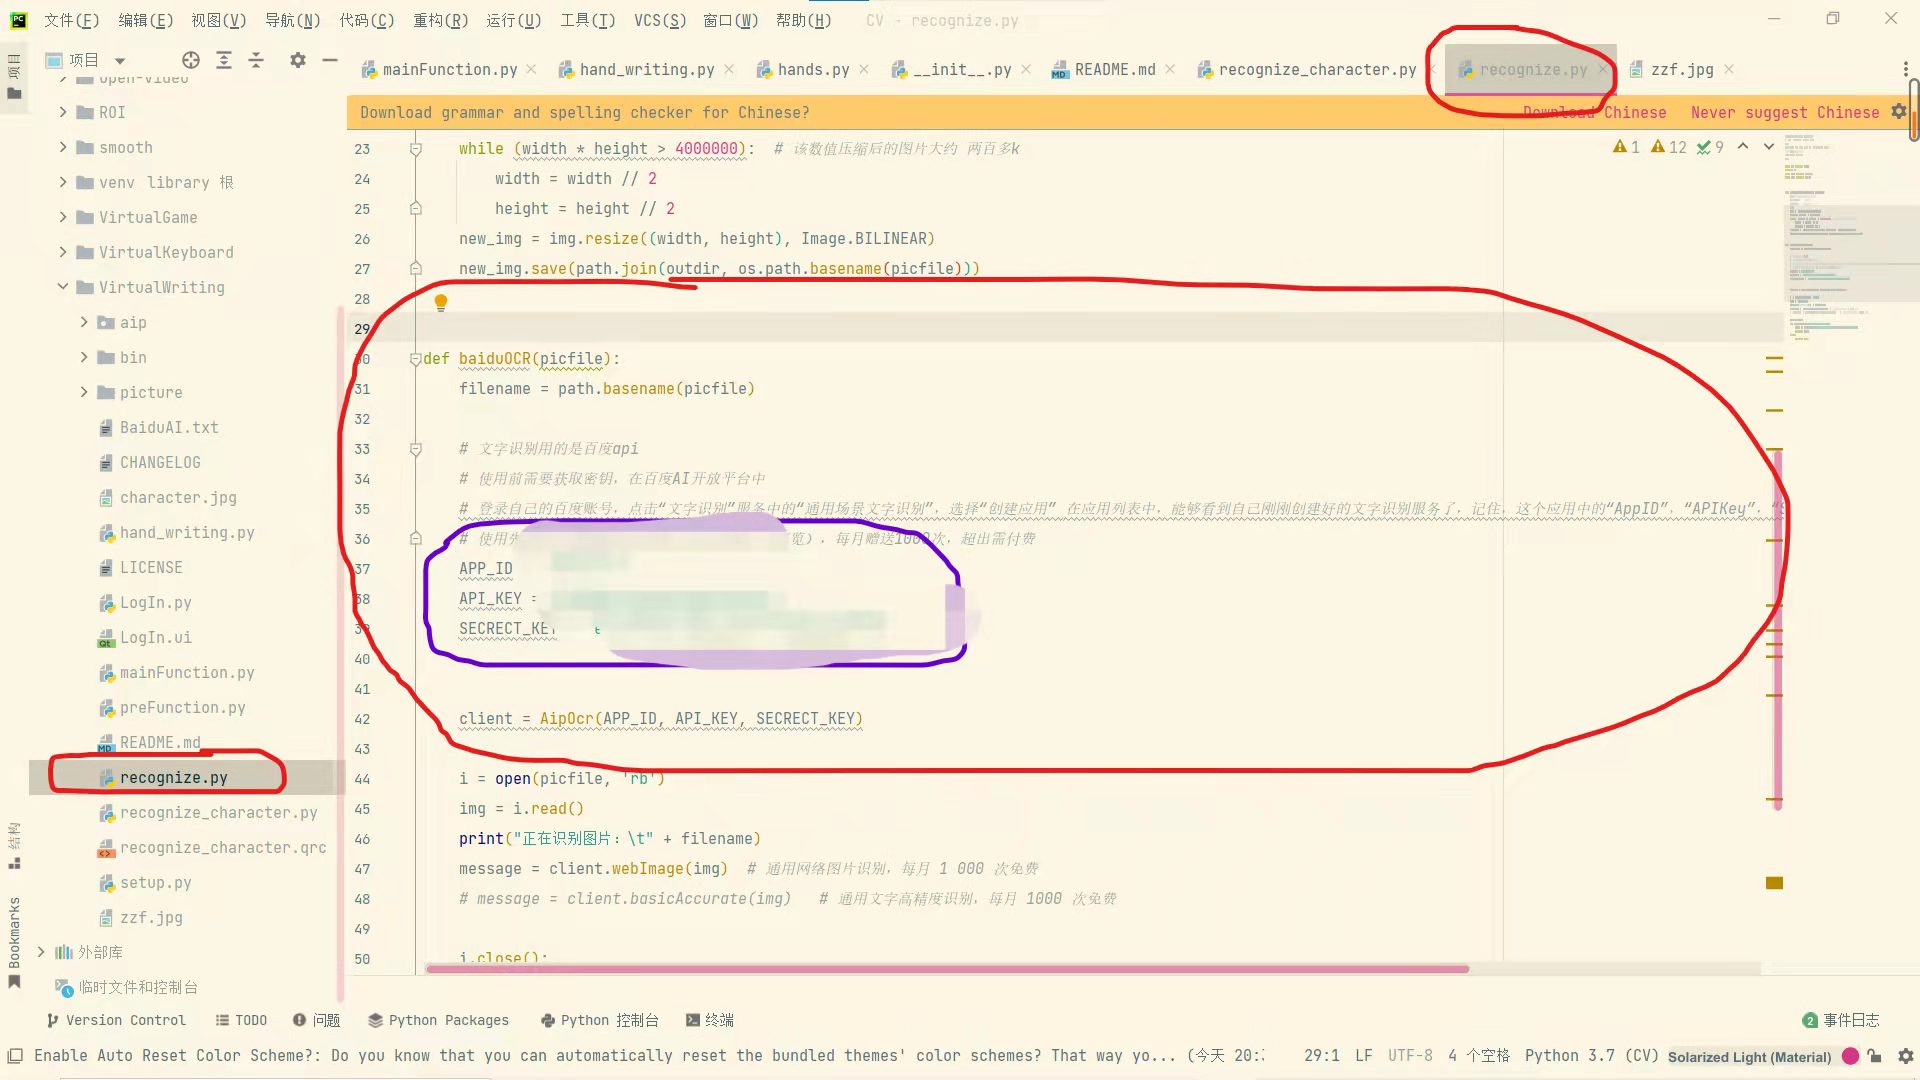
百度AI开放平台使用
文字识别用的是百度api ,使用前需要获取密钥
在百度AI开放平台中 登录自己的百度账号,点击“文字识别”服务中的“通用场景文字识别”,选择“创建应用” 在应用列表中,能够看到自己刚刚创建好的文字识别服务了,记住,这个应用中的“AppID”,“API Key”,“Secret Key”,填到recognize.py的对应位置中 使用先需先开通网络图片识别(文字识别/概览),每月赠送1000次,超出需付费
注意修改这几个参数就能调用百度AI开放平台的api
代码仓库
里面包含了VirtualKeyboard,VirtualWriting两个虚拟项目
结语
开学了,视觉虽然有趣,但估计以后只能忙里偷闲挤点时间做自己喜欢做的事了

希望自己能按照下面这条路线坚持走下去

.
.
.
.
.
.
借此谨纪念我充实且梦幻的寒假生活


 2375
2375


 被折叠的 条评论
为什么被折叠?
被折叠的 条评论
为什么被折叠?
 到【灌水乐园】发言


