CLIP模型学习笔记——Zero-Shot推理

论文:Learning Transferable Visual Models From Natural Language Supervision

代码:https://github.com/OpenAI/CLIP

CLIP(Constrastive Language-Image Pre-training)

        利用自然语言处理的监督信号训练一个迁移性能好的视觉模型,是一个涉及文本、图片的多模态工作。通过学习一个泛化性能好的模型,从而在各种任务和数据集上不需要训练,直接推理(Zero-Shot)就能获得一个不错的结果。

输入:配对的图像和文本

数据集:4亿高质量的图像文本配对(WIT)。

        与分类模型不同,CLIP不需要预先定义的类别标签,而是从文本中获取监督信号,通过一个预训练的对比学习模型,提取到多模态的特征,从而得到任意一种类别的结果(泛化性高)。

        通过将视觉特征和语义特征联系起来,可以学习到语义特征很强的信息。CLIP已经成功应用于图像生成、检测分割、视频检索等任务中。
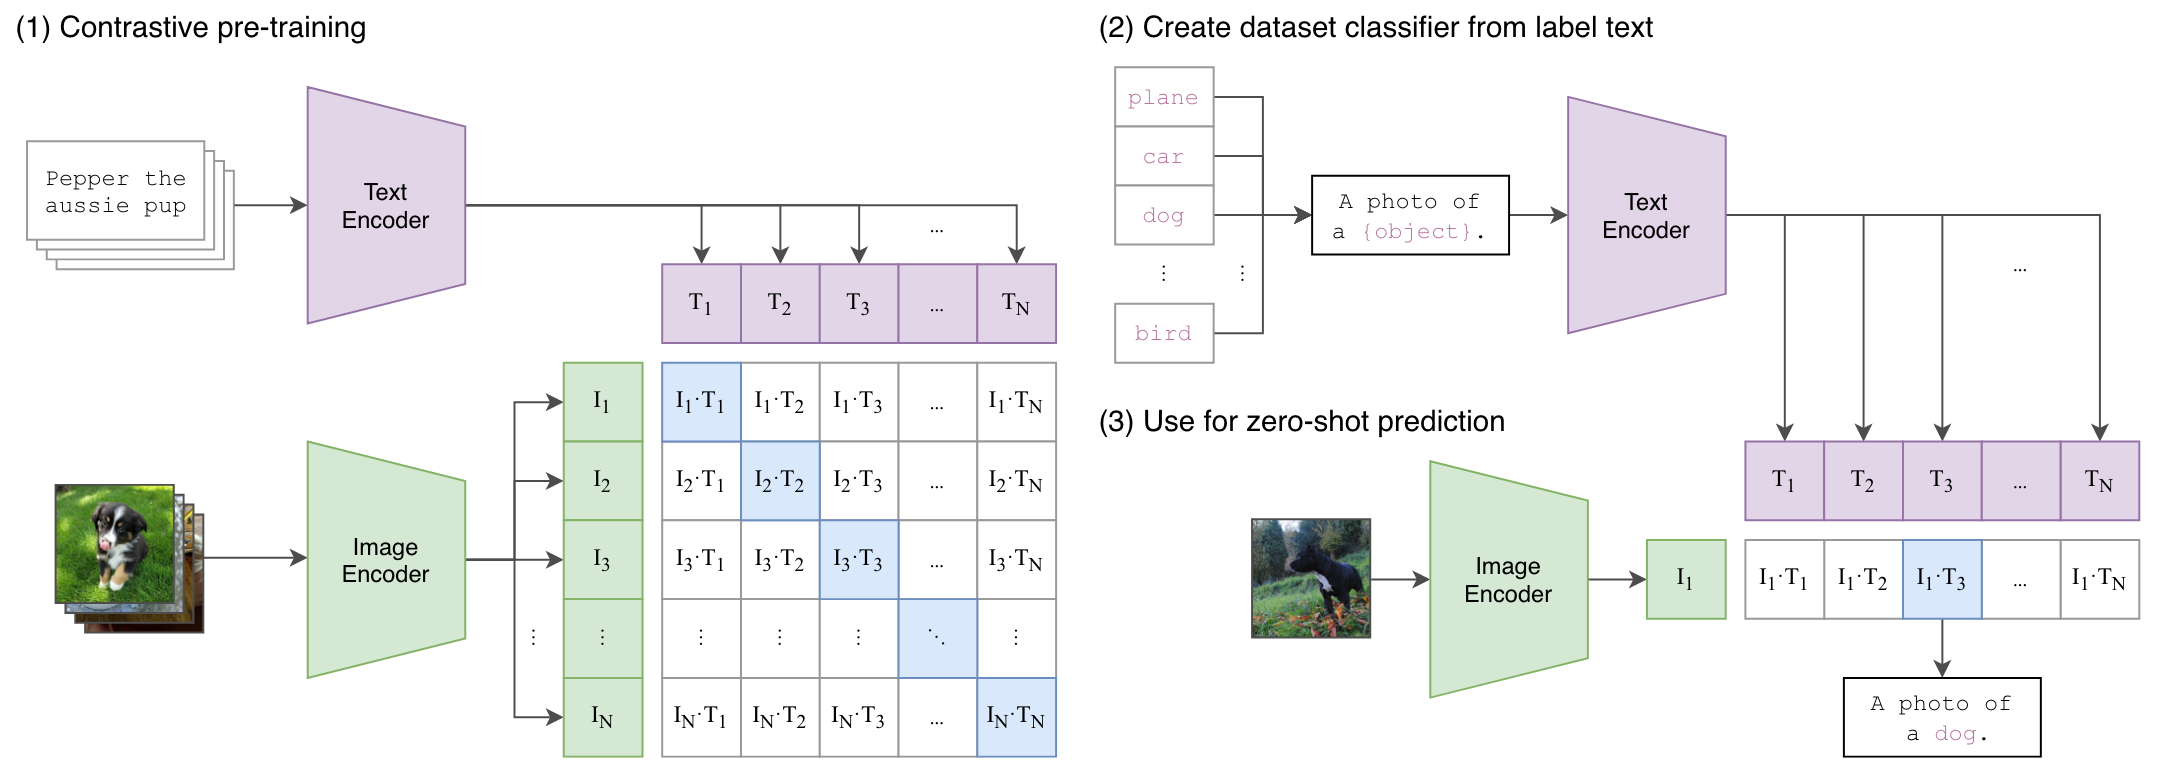
1、预训练阶段

        提取图像和文本的特征,企图获得图像对应的文本描述,但主观性强,训练困难;

        为了放宽约束信号,通过对比学习判断图像和文本的特征是否相似(配对),极大地提升了训练效率。
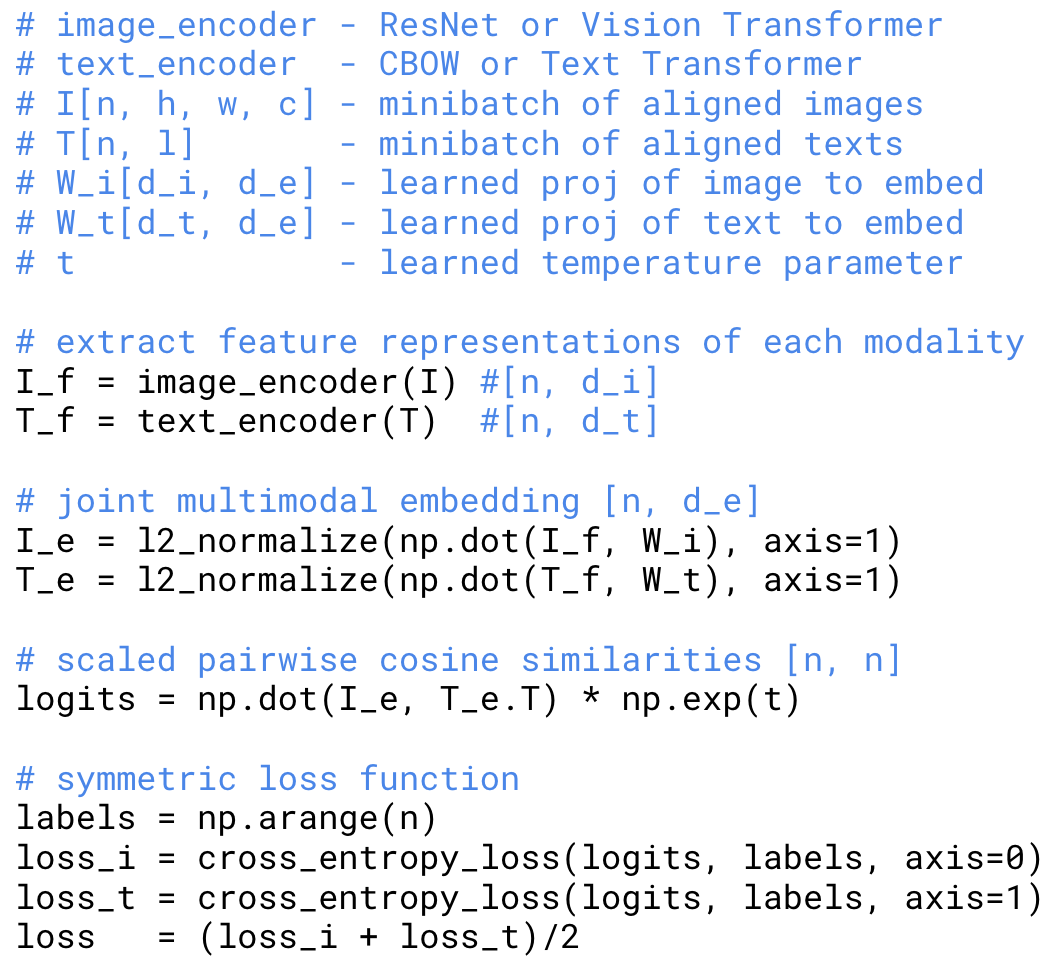
        其中文本编码器使用CBOW/Transformer,图像编码器使用ResNet/VIT,投射层将不同模态的数据转换成相同维度的向量,计算余弦相似度。对比学习中共n个正样本(对角线元素配对),n^2-n个负样本(非对角线元素不配对),从而做交叉熵损失进行训练。预训练好之后,就会获得一个性能较好的文本和图像的编码器。

为什么使用Zero-Shot?

——希望只训练一个模型,提取到良好的特征,之后应用于下游任务时就不需要再进行微调了。

2、推理阶段

        每一个感兴趣的类别标签都通过prompt engineering生成一个文本描述,和输入图片一样,分别经过对应的编码器后提取到特征,计算余弦相似度后,再经过一个softmax输出最有可能的类别。如果要更换数据集,只需要根据下游任务的标签进行微调即可。

为什么要用prompt engineering?

——提示,起到文本引导作用。将标签表示为句子,避免仅仅输入一个单词带来的歧义性问题,也可以根据先验信息更换prompt模板,缩小解的空间。

3、代码分析

图像编码:标准ResNet / VisionTransformer

if isinstance(vision_layers, (tuple, list)):
    vision_heads = vision_width * 32 // 64
    self.visual = ModifiedResNet(
        layers=vision_layers,
        output_dim=embed_dim,
        heads=vision_heads,
        input_resolution=image_resolution,
        width=vision_width
    )
else:
    vision_heads = vision_width // 64
    self.visual = VisionTransformer(
        input_resolution=image_resolution,
        patch_size=vision_patch_size,
        width=vision_width,
        layers=vision_layers,
        heads=vision_heads,
        output_dim=embed_dim
    )

VIT:

class VisionTransformer(nn.Module):
    def __init__(self, input_resolution: int, patch_size: int, width: int, layers: int, heads: int, output_dim: int):
        super().__init__()
        self.input_resolution = input_resolution
        self.output_dim = output_dim
        self.conv1 = nn.Conv2d(in_channels=3, out_channels=width, kernel_size=patch_size, stride=patch_size, bias=False)
        # width相当于transform中的d_model
        scale = width ** -0.5
        self.class_embedding = nn.Parameter(scale * torch.randn(width))
        self.positional_embedding = nn.Parameter(scale * torch.randn((input_resolution // patch_size) ** 2 + 1, width))
        self.ln_pre = LayerNorm(width)

        self.transformer = Transformer(width, layers, heads)

        self.ln_post = LayerNorm(width)
        self.proj = nn.Parameter(scale * torch.randn(width, output_dim))

    def forward(self, x: torch.Tensor):
        # x:[1,3,224,224]
        x = self.conv1(x)  # shape = [*, width, grid, grid] # 将图片分成[32,32]个patch [1,768,7,7]
        x = x.reshape(x.shape[0], x.shape[1], -1)  # shape = [*, width, grid ** 2],合并高宽 [1,768,49]
        x = x.permute(0, 2, 1)  # shape = [*, grid ** 2, width] ,更换位置 [1,49,768]
        x = torch.cat([self.class_embedding.to(x.dtype) + torch.zeros(x.shape[0], 1, x.shape[-1], dtype=x.dtype, device=x.device), x], dim=1)  # shape = [*, grid ** 2 + 1, width],添加cls token[1,50,768]
        x = x + self.positional_embedding.to(x.dtype)  # 这里位置编码是可学习的参数,可能是切了path顺序让模型自己学习吧  [1,50,768]
        x = self.ln_pre(x)  # [1,50,768]

        x = x.permute(1, 0, 2)  # NLD -> LND  # [pixel,b,d_model]=[50,1,768]
        x = self.transformer(x)  # 多头transformer [50,1,768]
        x = x.permute(1, 0, 2)  # LND -> NLD  # [1,50,768]

        x = self.ln_post(x[:, 0, :])  # x[:, 0, :] 将所有信息汇聚到cls token中,只需前面来做下游任务 [1,768]

        if self.proj is not None:  # self.proj是可学习参数,维度为[768,512]
            x = x @ self.proj  # 通过学习参数将维度再次融合变成512特征,最终为[1,512]

        return x

文本编码:BERT

def __init__():
    self.token_embedding = nn.Embedding(vocab_size, transformer_width)   # 将单词(token)转换为密集的词嵌入向量
    self.positional_embedding = nn.Parameter(torch.empty(self.context_length, transformer_width))
    self.ln_final = LayerNorm(transformer_width)

    self.text_projection = nn.Parameter(torch.empty(transformer_width, embed_dim))   # 文本特征转换,可学习的参数

def encode_text(self, text):   # 文本编码 [batch_size(句子数), n_ctx(句子中的单词数,不够补0)] [3, 77]
    # x 每个句子前面有[CLS],最后有[Seq]
    x = self.token_embedding(text).type(self.dtype)  # [batch_siz(句子数), n_ctx(句子中的单词数,不够补0), d_model(嵌入层维度)] [3, 77, 512]

    x = x + self.positional_embedding.type(self.dtype)   # 可学习的位置编码,[3, 77, 512] 
    x = x.permute(1, 0, 2)  # NLD -> LND [77, 3, 512]
    x = self.transformer(x)   # Transformer encoder [77, 3, 512]
    x = x.permute(1, 0, 2)  # LND -> NLD  [3, 77, 512]
    x = self.ln_final(x).type(self.dtype)  # LN层

    # x.shape = [batch_size, n_ctx, transformer.width]
    # take features from the eot embedding (eot_token is the highest number in each sequence)
    # 获取每个句子最后一个seq字段,seq是最大的,因此能获得句子中的单词数
    x = x[torch.arange(x.shape[0]), text.argmax(dim=-1)] @ self.text_projection   # 矩阵乘法

    return x

x: [3,77,512]

torch.arange(x.shape[0]): [0, 1, 2]

text.argmax(dim=-1): [3, 3, 4]

取x中索引为[0,3],[1,3],[2,4],得到三个句子512维度特征表达。每个句子都是取第二个维度77个单词中最大那一个,也就是每句话都从第一个文字[CLS]叠加到最后一个文字[Seq],因此使用最后一个就有时序表达该句话的特征。

主函数:

def forward(self, image, text):
    image_features = self.encode_image(image)
    text_features = self.encode_text(text)

    # normalized features
    image_features = image_features / image_features.norm(dim=1, keepdim=True)   # [1(一张图片), 512]
    text_features = text_features / text_features.norm(dim=1, keepdim=True)    # [3(3个句子), 512]

    # cosine similarity as logits
    logit_scale = self.logit_scale.exp()   # 可学习参数
    logits_per_image = logit_scale * image_features @ text_features.t()   # 特征相乘获得相似度
    logits_per_text = logits_per_image.t()   # 变成文本

    # shape = [global_batch_size, global_batch_size] 图像和每个文本的相似度,文本和每个图像的相似度
    return logits_per_image, logits_per_text   # [1, 3], [3, 1]

推理代码:

def class_demo():
    # 测试分类的demo
    device = "cuda" if torch.cuda.is_available() else "cpu"
    # 模型选择['RN50', 'RN101', 'RN50x4', 'RN50x16', 'ViT-B/32', 'ViT-B/16'],对应不同权重
    model, preprocess = clip.load("../ViT-B-32.pt", device=device)  # 载入模型
    image = preprocess(Image.open("../CLIP.png")).unsqueeze(0).to(device)
    text_language = ["a diagram", "a dog", "a black cat"]
    text = clip.tokenize(text_language).to(device)

    with torch.no_grad():
        logits_per_image, logits_per_text = model(image, text)  # 第一个值是图像,第二个是第一个的转置
        probs = logits_per_image.softmax(dim=-1).cpu().numpy()   # 图像对应每一个prompt的概率

        idx = np.argmax(probs, axis=1)
        for i in range(image.shape[0]):
            id = idx[i]
            print('image {}\tlabel\t{}:\t{}'.format(i, text_language[id],probs[i,id]))
            print('image {}:\t{}'.format(i, [v for v in zip(text_language,probs[i])]))

训练代码:

with torch.no_grad():
for i, batch in enumerate(dataloader):
    images, texts = batch
    images = images.to(device=device, non_blocking=True)
    texts = texts.to(device=device, non_blocking=True)

    with autocast():
        image_features, text_features, logit_scale = model(images, texts)
        # features are accumulated in CPU tensors, otherwise GPU memory exhausted quickly
        # however, system RAM is easily exceeded and compute time becomes problematic
        all_image_features.append(image_features.cpu())
        all_text_features.append(text_features.cpu())
        logit_scale = logit_scale.mean()
        logits_per_image = logit_scale * image_features @ text_features.t()
        logits_per_text = logits_per_image.t()

        batch_size = images.shape[0]
        labels = torch.arange(batch_size, device=device).long()
        total_loss = (
            F.cross_entropy(logits_per_image, labels) +
            F.cross_entropy(logits_per_text, labels)
        ) / 2
  • 5
    点赞
  • 8
    收藏
    觉得还不错? 一键收藏
  • 0
    评论

“相关推荐”对你有帮助么?

  • 非常没帮助
  • 没帮助
  • 一般
  • 有帮助
  • 非常有帮助
提交
评论
添加红包

请填写红包祝福语或标题

红包个数最小为10个

红包金额最低5元

当前余额3.43前往充值 >
需支付:10.00
成就一亿技术人!
领取后你会自动成为博主和红包主的粉丝 规则
hope_wisdom
发出的红包
实付
使用余额支付
点击重新获取
扫码支付
钱包余额 0

抵扣说明:

1.余额是钱包充值的虚拟货币,按照1:1的比例进行支付金额的抵扣。
2.余额无法直接购买下载,可以购买VIP、付费专栏及课程。

余额充值