


c++版使用opencv中的dnn模块部署yolov5
1使用python demo验证模型是否能正常推理
1.1 开发环境
win11、opencv4.7、vs2022
1.2 模型准备
使用的yolov5-6.1版本,调用export.py导出onnx模型。注:一定要开启简化–simplify,不然使用dnn模块运行时会报错。
1.3 python demo测试代码
验证导出的onnx格式的模型是否能正常推理。
import time
import cv2
import numpy as np
import argparse
class Yolov5():
    def __init__(self,model_path,class_file_path,obj_thres,conf_thres,nms_thres):
        with open(class_file_path,'rt') as f:
            self.classes=f.read().rstrip('\n').split('\n')
        self.num_classes=len(self.classes)
        self.net=cv2.dnn.readNet(model_path)
        self._inputNames=''
        self.obj_thres=obj_thres
        self.conf_thres=conf_thres
        self.nms_thres=nms_thres

    def letterbox(self,image, resize_shape=640, pad=True, stride=32, color=(114, 114, 114)):
        shape = image.shape[:2]
        if isinstance(resize_shape, int):  # resize_shape=640和resize_shape=(640,640)都可以
            resize_shape = (resize_shape, resize_shape)
        r = min(resize_shape[0] / shape[0], resize_shape[1] / shape[1])  # 比例
        ratio = r, r
        new_shape = int(round(shape[1] * r)), int(round(shape[0] * r))
        dw, dh = resize_shape[1] - new_shape[0], resize_shape[0] - new_shape[1]
        # 是否填充灰条 True表示是
        if not pad:
            dw, dh = np.mod(dw, stride), np.mod(dh, stride)
        dw /= 2
        dh /= 2
        if shape[::-1] != new_shape:
            image = cv2.resize(image, new_shape, interpolation=cv2.INTER_LINEAR)
        top, bottom = int(round(dh - 0.1)), int(round(dh + 0.1))
        left, right = int(round(dw - 0.1)), int(round(dw + 0.1))
        image = cv2.copyMakeBorder(image, top, bottom, left, right, cv2.BORDER_CONSTANT, value=color)
        return image, ratio, (dw, dh)

    #归一化处理
    def pre_process(self,image):
        # image=cv2.imread(image_path)
        image=cv2.cvtColor(image,cv2.COLOR_BGR2RGB)
        image=image.astype(np.float32)/255.0
        return image
    #非极大抑制
    def pynms(self,dets,nms_thres):
        x1 = dets[:, 0]
        y1 = dets[:, 1]
        x2 = dets[:, 2]
        y2 = dets[:, 3]
        areas = (y2 - y1 + 1) * (x2 - x1 + 1)
        scores = dets[:, 4]
        keep = []
        index = scores.argsort()[::-1]  # 置信度从大到小排序(下标)

        while index.size > 0:
            i = index[0]
            keep.append(i)

            x11 = np.maximum(x1[i], x1[index[1:]])  # 计算相交面积
            y11 = np.maximum(y1[i], y1[index[1:]])
            x22 = np.minimum(x2[i], x2[index[1:]])
            y22 = np.minimum(y2[i], y2[index[1:]])

            w = np.maximum(0, x22 - x11 + 1)  # 当两个框不想交时x22 - x11或y22 - y11 为负数,
            # 两框不相交时把相交面积置0
            h = np.maximum(0, y22 - y11 + 1)  #

            overlaps = w * h
            ious = overlaps / (areas[i] + areas[index[1:]] - overlaps)  # 计算IOU

            idx = np.where(ious <= nms_thres)[0]  # IOU小于thresh的框保留下来
            index = index[idx + 1]  # 下标以1开始
            # print(index)

        return keep
    #后处理部分,还原letterbox的坐标
    def post_process(self,outputs,ratio,padding_size,obj_thres,conf_thres,nms_thres):

        outputs=np.squeeze(outputs)
        box_confs=[]
        for output in outputs:
            if output[4]>=obj_thres:
                scores=output[5:]
                class_index=np.argmax(scores)
                confidence=output[4]*scores[class_index]
                if confidence>conf_thres:
                    x_center=int((output[0]-padding_size[0])/ratio[0])
                    y_center=int((output[1]-padding_size[1])/ratio[1])
                    width=int(output[2]/ratio[0])
                    height=int(output[3]/ratio[1])
                    left=int(x_center-width*0.5)
                    top=int(y_center-height*0.5)
                    right=left+width
                    bottom=top+height
                    box_conf=[left,top,right,bottom,confidence,class_index]
                    box_confs.append(box_conf)

        out_box_confs=[]
        box_confs=np.array(box_confs)
        # print(box_confs.shape)
        nms_index=self.pynms(box_confs,nms_thres)
        # print("nms_index",nms_index)
        for k in nms_index:
            out_box_confs.append(box_confs[k])
        # print(out_box_confs)

        return np.array(out_box_confs)

    def draw(self,image,box_conf_score):
        boxes = box_conf_score[..., :4].astype(np.int32)  # 取整方便画框
        scores = box_conf_score[..., 4]
        classes = box_conf_score[..., 5].astype(np.int32)  # 下标取整

        for box, score, cl in zip(boxes, scores, classes):
            top, left, right, bottom = box
            # print('class: {}, score: {}'.format(self.classes[cl], score))
            # print('box coordinate left,top,right,down: [{}, {}, {}, {}]'.format(top, left, right, bottom))

            cv2.rectangle(image, (top, left), (right, bottom), (255, 0, 0), 2)
            cv2.putText(image, '{0} {1:.2f}'.format(self.classes[cl], score),
                        (top, left),
                        cv2.FONT_HERSHEY_SIMPLEX,
                        0.6, (0, 0, 255), 2)
    def detect(self,image):
        input,ratio,pading_size=self.letterbox(image)
        input=self.pre_process(input)
        blob = cv2.dnn.blobFromImage(input, scalefactor=1, swapRB=True)
        self.net.setInput(blob, self._inputNames)
        outs = self.net.forward(self.net.getUnconnectedOutLayersNames())[-1].squeeze(axis=0)
        out_box_confs=self.post_process(outs,ratio,pading_size,self.obj_thres,self.conf_thres,self.nms_thres)
        model.draw(image,out_box_confs)
        return image

if __name__ == "__main__":
    parser = argparse.ArgumentParser()
    parser.add_argument('--imagepath', type=str, default='./image/bus.jpg', help="图片路径")
    parser.add_argument('--modelpath', type=str, default='./model/sim_yolov5s.onnx')
    parser.add_argument('--class_file', type=str, default='./model/class.names', help="标签类别")
    parser.add_argument('--obj_thres', default=0.3, type=float, help='obj confidence')
    parser.add_argument('--conf_thres', default=0.3, type=float, help='conf score')
    parser.add_argument('--nms_thres', default=0.5, type=float, help='nms iou thresh')
    args = parser.parse_args()

    model=Yolov5(args.modelpath,args.class_file,args.obj_thres,args.conf_thres,args.nms_thres)
    #视频推理
    cap=cv2.VideoCapture(0)
    if not cap.isOpened():
        print("Error opening video stream")
        exit()
    frame_count = 0
    stat_time=time.time()
    pre_time=stat_time
    fps=0
    while (cap.isOpened()):
        ret, frame = cap.read()
        if ret == True:

            res_image = model.detect(frame)

            frame_count += 1
            current_time = time.time()
            if (current_time - pre_time) >= 1:
                fps = frame_count / (current_time - pre_time)
                print(f"估算的每秒帧数: {fps:.2f}")
                frame_count = 0
                pre_time = current_time

            cv2.putText(res_image, 'Fps: {}'.format(round(fps)), (10, 50), cv2.FONT_HERSHEY_SIMPLEX, 0.8, (255, 0, 0), 2,
                        cv2.LINE_AA)
            # 显示结果帧
            cv2.imshow('Frame', res_image)
            # 等待键盘输入,如果按下'q'键则退出循环
            if cv2.waitKey(1) & 0xFF == ord('q'):
                break
        else:
            break
    cap.release()
    cv2.destroyAllWindows()

    # model=Yolov5(args.modelpath,args.class_file,args.obj_thres,args.conf_thres,args.nms_thres)
    # image=cv2.imread(args.imagepath)
    # res_image = model.detect(image)
    # cv2.imshow("res", res_image)
    # cv2.waitKey(0)
2.使用c++完成模型部署
2.1 VS2022配置opencv
(1) opencv下载地址opecv,根据自己的操作系统下载安装。

(2) 本文使用win11系统,双击下载下来的exe文件,修改安装路径(一般安装在D盘),其他保持默认直到完成安装。

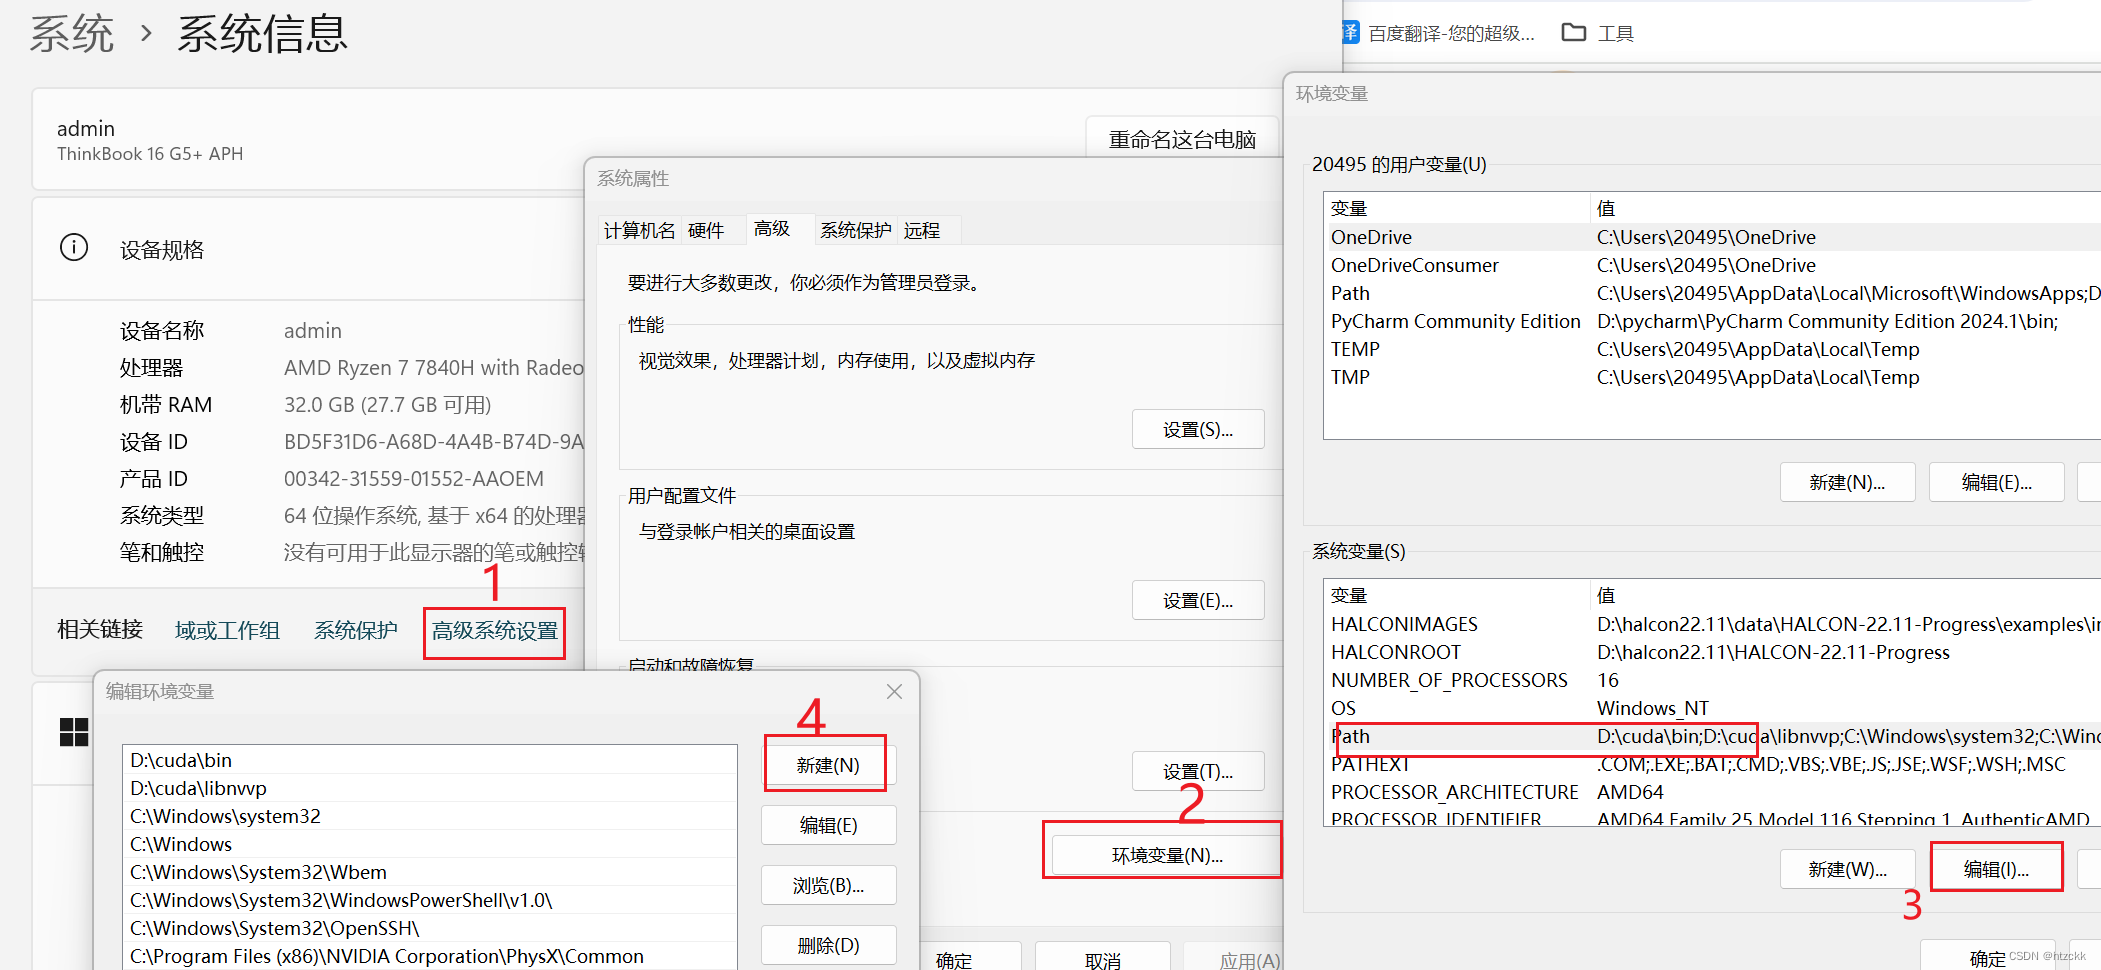
(3)配置系统环境变量,添加D:\opencv\opencv\build\x64\vc16\bin和D:\opencv\opencv\build\x64\vc16\lib(改成自己的opencv安装路径)
(4)启动VS2022创建一个c++空项目,创建yolo.h、yolo.cpp、main.cpp。

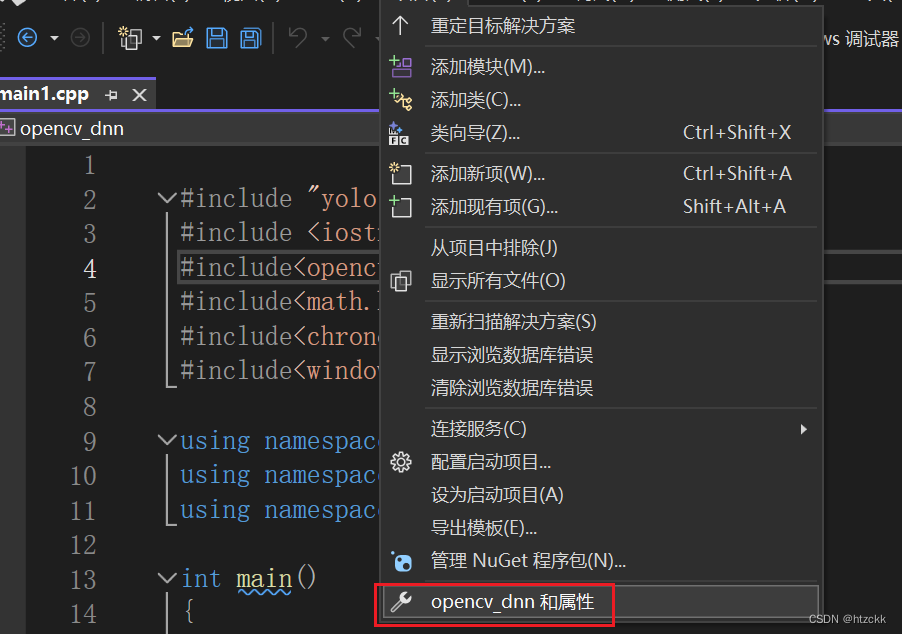
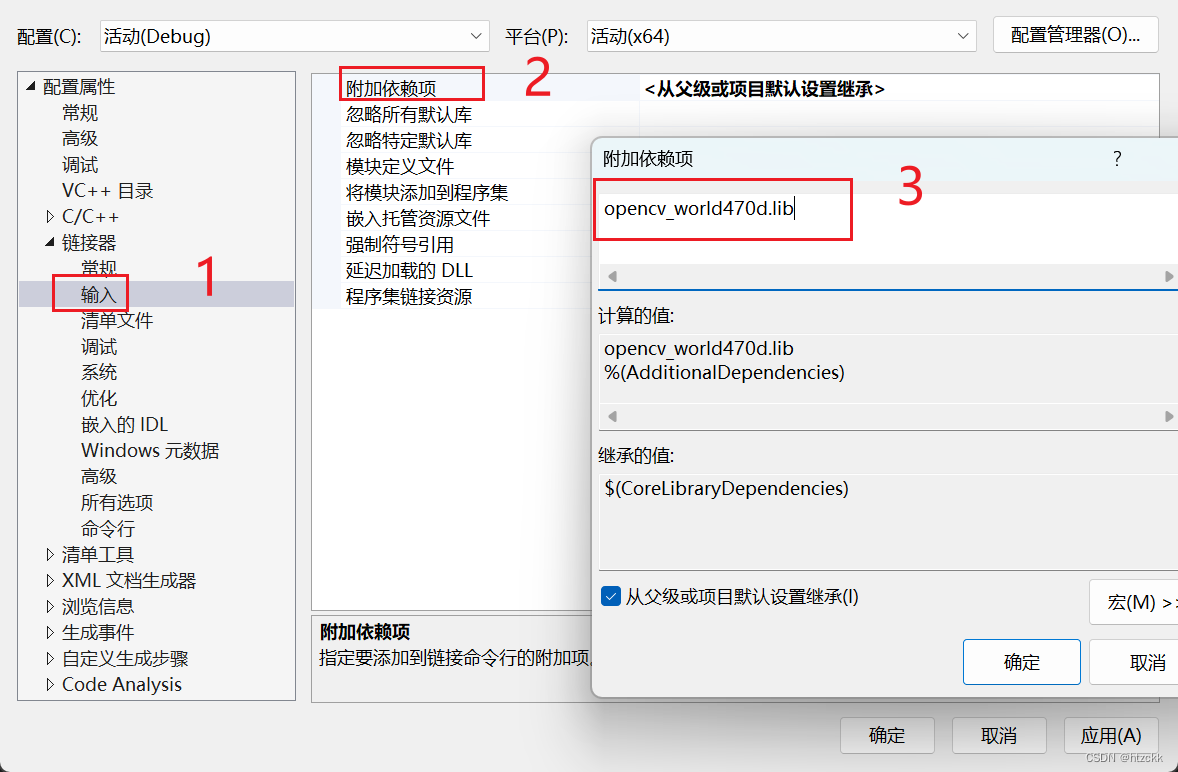
(5)配置vs2022项目属性。
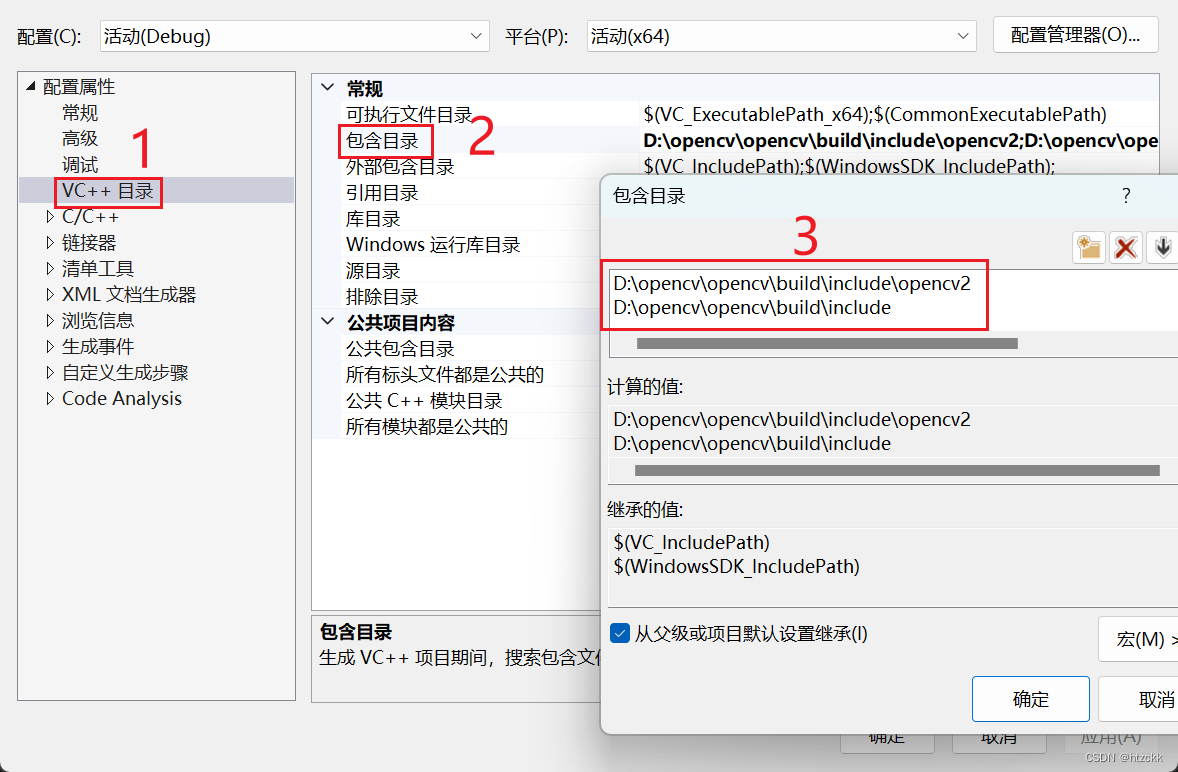
(6)配置包含目录,一般为include目录路径
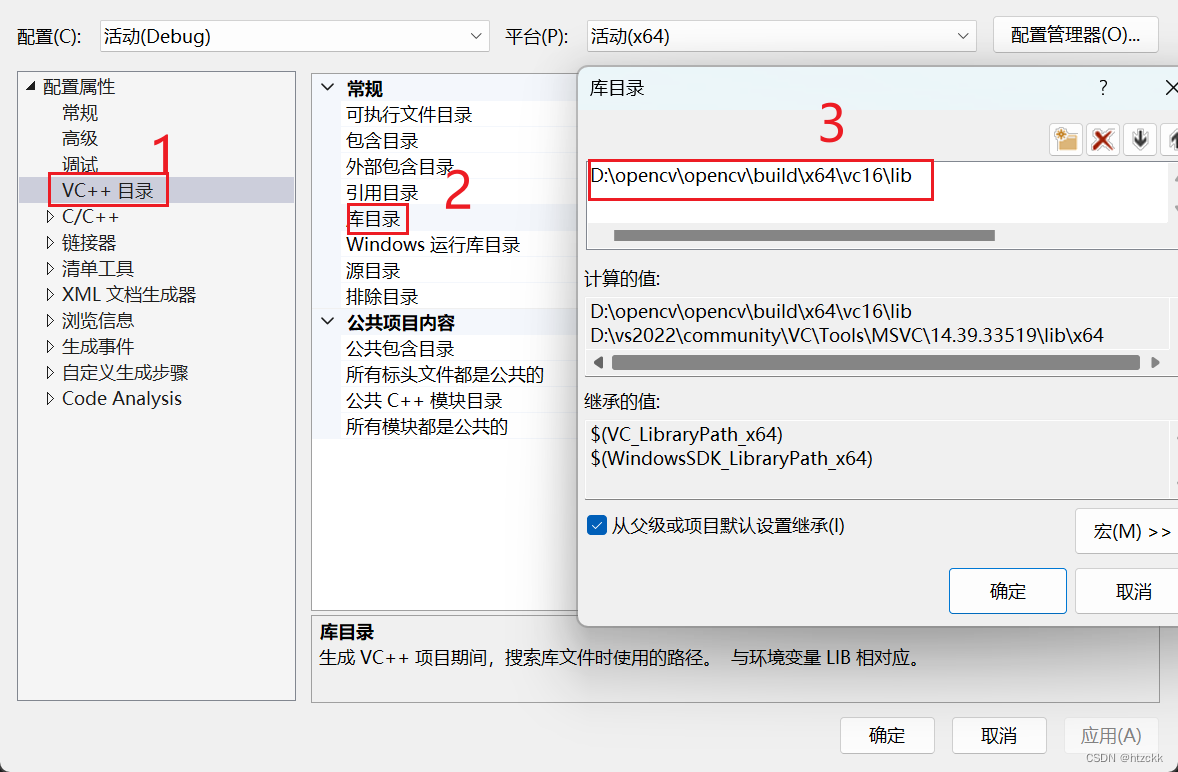
(7)配置库目录,一般为动态库的目录路径
(8)配置链接器,将OpenCV中lib库里的opencv_world470d.lib文件名复制到附加依赖项中。(要进行debug要选择带d的lib库,不然会报错)
2.2c++模型推理代码
头文件yolo.h
#pragma once
#include<iostream>
#include<opencv2/opencv.hpp>

struct Output {
	int id;             //目标类别下表
	float confidence;   //结果置信度分数
	cv::Rect box;       //矩形框坐标
};

class Yolov5 {
public:
	Yolov5() {}
	~Yolov5() {}
	bool readModel(cv::dnn::Net& net, std::string& netPath, bool isCuda);
	bool Detect(cv::Mat& SrcImg, cv::dnn::Net& net, std::vector<Output>& output);
	void drawPred(cv::Mat& img, std::vector<Output> result, std::vector<cv::Scalar> color);

	std::vector<std::string> _className = { "person", "bicycle", "car", "motorcycle", "airplane", "bus", "train", "truck", "boat", "traffic light",
	"fire hydrant", "stop sign", "parking meter", "bench", "bird", "cat", "dog", "horse", "sheep", "cow",
	"elephant", "bear", "zebra", "giraffe", "backpack", "umbrella", "handbag", "tie", "suitcase", "frisbee",
	"skis", "snowboard", "sports ball", "kite", "baseball bat", "baseball glove", "skateboard", "surfboard",
	"tennis racket", "bottle", "wine glass", "cup", "fork", "knife", "spoon", "bowl", "banana", "apple",
	"sandwich", "orange", "broccoli", "carrot", "hot dog", "pizza", "donut", "cake", "chair", "couch",
	"potted plant", "bed", "dining table", "toilet", "tv", "laptop", "mouse", "remote", "keyboard", "cell phone",
	"microwave", "oven", "toaster", "sink", "refrigerator", "book", "clock", "vase", "scissors", "teddy bear",
	"hair drier", "toothbrush" };

private:

	void LetterBox(const cv::Mat& image, cv::Mat& outImage,
		cv::Vec4d& params, //[ratiox,ratioy,dw,dh]
		const cv::Size& newShape = cv::Size(640, 640),
		bool autoShape = false,
		bool scaleFill = false,
		bool scaleUp = true,
		int stride = 32,
		const cv::Scalar& color = cv::Scalar(114, 114, 114));

	const int _netWidth = 640;
	const int _netHeight = 640;
	float _classThreshold = 0.25;
	float _nmsThreshold = 0.45;
};
源文件yolov5.cpp
	#include"yolo1.h"
using namespace std;
using namespace cv;
using namespace cv::dnn;

void Yolov5::LetterBox(const cv::Mat& image, cv::Mat& outImage, cv::Vec4d& params, const cv::Size& newShape,
	bool autoShape, bool scaleFill, bool scaleUp, int stride, const cv::Scalar& color)
{
	cv::Size shape = image.size();
	float r = std::min((float)newShape.height / (float)shape.height,
					(float)newShape.width / (float)shape.width);
	if (!scaleUp)
		r = std::min(r, 1.0f);

	float ratio[2]{ r, r };
	int new_un_pad[2] = { (int)std::round((float)shape.width * r),(int)std::round((float)shape.height * r) };

	auto dw = (float)(newShape.width - new_un_pad[0]);
	auto dh = (float)(newShape.height - new_un_pad[1]);

	if (autoShape)
	{
		dw = (float)((int)dw % stride);
		dh = (float)((int)dh % stride);
	}
	else if (scaleFill)
	{
		dw = 0.0f;
		dh = 0.0f;
		new_un_pad[0] = newShape.width;
		new_un_pad[1] = newShape.height;
		ratio[0] = (float)newShape.width / (float)shape.width;
		ratio[1] = (float)newShape.height / (float)shape.height;
	}

	dw /= 2.0f;
	dh /= 2.0f;

	if (shape.width != new_un_pad[0] && shape.height != new_un_pad[1])
	{
		cv::resize(image, outImage, cv::Size(new_un_pad[0], new_un_pad[1]));
	}
	else {
		outImage = image.clone();
	}

	int top = int(std::round(dh - 0.1f));
	int bottom = int(std::round(dh + 0.1f));
	int left = int(std::round(dw - 0.1f));
	int right = int(std::round(dw + 0.1f));
	params[0] = ratio[0];
	params[1] = ratio[1];
	params[2] = left;
	params[3] = top;
	cv::copyMakeBorder(outImage, outImage, top, bottom, left, right, cv::BORDER_CONSTANT, color);
}


bool Yolov5::readModel(Net& net, string& netPath, bool isCuda = false) {
	try {

		net = readNet(netPath);
		net.enableWinograd(false);  //目前opencv4.7.0的版本有问题(https://github.com/opencv/opencv/issues/23080)
		//如果你的CPU不支持AVX2指令集,则需要在net.forward() 前面加上net.enableWinograd(false);来关闭Winograd加速
	}
	catch (const std::exception&) {
		return false;
	}
	//cuda
	if (isCuda) {
		net.setPreferableBackend(cv::dnn::DNN_BACKEND_CUDA);
		net.setPreferableTarget(cv::dnn::DNN_TARGET_CUDA);
	}
	//cpu
	else {
		net.setPreferableBackend(cv::dnn::DNN_BACKEND_DEFAULT);
		net.setPreferableTarget(cv::dnn::DNN_TARGET_CPU);
	}
	return true;
}
bool Yolov5::Detect(Mat& SrcImg, Net& net, vector<Output>& output) {
	Mat blob;
	int col = SrcImg.cols;
	int row = SrcImg.rows;
	int maxLen = MAX(col, row);
	Mat netInputImg = SrcImg.clone();
	Vec4d params;
	LetterBox(SrcImg, netInputImg, params, cv::Size(_netWidth, _netHeight));
	//图像归一化处理
	blobFromImage(netInputImg, blob, 1 / 255.0, cv::Size(_netWidth, _netHeight), cv::Scalar(0, 0, 0), true, false);

	net.setInput(blob);
	std::vector<cv::Mat> netOutputImg;
	std::vector<cv::String> names=net.getUnconnectedOutLayersNames();	//输出节点name={"345","403", "461","output" }
	//cout << "================================" << names[3] << endl;
	//模型推理,模型推理时间
	auto start = std::chrono::high_resolution_clock::now();
	net.forward(netOutputImg, names[3]);
	auto end = std::chrono::high_resolution_clock::now();
	auto duration = std::chrono::duration_cast<std::chrono::milliseconds>(end - start).count();
	std::cout << "单张图片模型推理时间:" << duration << "ms" << std::endl;

	std::vector<int> classIds;//目标类别数组
	std::vector<float> confidences;//结果每个目标类别对应置信度数组
	std::vector<cv::Rect> boxes;//每个目标的矩形框位置信息[x,y,w,h]
	int net_width = _className.size() + 5; //输出维度[25200,85]
	float* pdata = (float*)netOutputImg[0].data;
	for (int r = 0; r < netOutputImg[0].size[1]; ++r) { //25200
		float box_score = pdata[4]; ;//获取每一行的box框中含有某个物体的概率
		if (box_score >= _classThreshold) {
			cv::Mat scores(1, _className.size(), CV_32FC1, pdata + 5);
			Point classIdPoint;
			double max_class_socre;
			minMaxLoc(scores, 0, &max_class_socre, 0, &classIdPoint);
			max_class_socre = max_class_socre * box_score;
			if (max_class_socre >= _classThreshold) {
				//坐标还原
				float x = (pdata[0] - params[2]) / params[0];
				float y = (pdata[1] - params[3]) / params[1];
				float w = pdata[2] / params[0];
				float h = pdata[3] / params[1];
				int left = MAX(round(x - 0.5 * w + 0.5), 0);
				int top = MAX(round(y - 0.5 * h + 0.5), 0);
				classIds.push_back(classIdPoint.x);
				confidences.push_back(max_class_socre);
				boxes.push_back(Rect(left, top, int(w + 0.5), int(h + 0.5)));
			}
		}
		pdata += net_width;

	}

	//非最大抑制(NMS)
	vector<int> nms_result;
	NMSBoxes(boxes, confidences, _classThreshold, _nmsThreshold, nms_result);
	for (int i = 0; i < nms_result.size(); i++) {
		int idx = nms_result[i];
		Output result;
		result.id = classIds[idx];
		result.confidence = confidences[idx];
		result.box = boxes[idx];
		output.push_back(result);
	}
	if (output.size())
		return true;
	else
		return false;
}

void Yolov5::drawPred(Mat& img, vector<Output> result, vector<Scalar> color) {
	for (int i = 0; i < result.size(); i++) {
		int left, top;
		left = result[i].box.x;
		top = result[i].box.y;
		int color_num = i;
		rectangle(img, result[i].box, color[result[i].id], 2, 8);
		//conf保留两位小数显示
		int conf = (int)std::round(result[i].confidence * 100);
		string label = _className[result[i].id] + ":0." + to_string(conf);

		int baseLine;
		Size labelSize = getTextSize(label, FONT_HERSHEY_SIMPLEX, 0.5, 1, &baseLine);
		top = max(top, labelSize.height);
		putText(img, label, Point(left, top), FONT_HERSHEY_SIMPLEX, 1, color[result[i].id], 2);
	}
	//imshow("detect_img", img);
	//waitKey(0);
}
主程序main.cpp
#include "yolo1.h"
#include <iostream>
#include<opencv2//opencv.hpp>
#include<math.h>
#include<chrono>
#include<windows.h>

using namespace std;
using namespace cv;
using namespace dnn;

int main()
{
	string img_path = "bus.jpg";
	string model_path = "sim_yolov5s.onnx";
	bool is_cuda = false;
	int num_devices = cv::cuda::getCudaEnabledDeviceCount();
	if (num_devices <= 0) {
		cerr << "no cuda,use cpu" << endl;
		is_cuda = false;
		//return -1;
	}
	else {
		cout << "use cuda:" << num_devices << endl;
		is_cuda = true;
	}

	Yolov5 yolo;
	Net net;
	if (yolo.readModel(net, model_path, is_cuda)) {
		cout << "read net ok!" << endl;
	}
	else {
		return -1;
	}

	//随机颜色
	vector<Scalar> color;
	srand(time(0));
	for (int i = 0; i < 80; i++) {
		int b = rand() % 256;
		int g = rand() % 256;
		int r = rand() % 256;
		color.push_back(Scalar(b, g, r));
	}
	//单张图片推理
	//vector<Output> result;
	//Mat img = imread(img_path);

	//if (yolo.Detect(img, net, result)) {
	//	yolo.drawPred(img, result, color);
	//	imshow("detect_img", img);
	//	waitKey(0);
	//}
	//else {
	//	cout << "Detect Failed!" << endl;
	//}

	//使用自己的摄像头
	cv::VideoCapture capture(0);
	if (!capture.isOpened())
	{
		std::cerr << "Error opening video file\n";
		return -1;
	}

    auto start = std::chrono::high_resolution_clock::now();
    int frame_count = 0;
    float fps = 0;

    while (true)
    {
		cv::Mat frame;
        capture.read(frame);
        if (frame.empty())
        {
            std::cout << "End of stream\n";
            break;
        }
		vector<Output> result;
		if (yolo.Detect(frame, net, result)) {
			yolo.drawPred(frame, result, color);
		}
        frame_count++;
		//计算FPS
        if (frame_count >= 30)
        {
            auto end = std::chrono::high_resolution_clock::now();
            fps = frame_count * 1000.0 / std::chrono::duration_cast<std::chrono::milliseconds>(end - start).count();

            frame_count = 0;
            start = std::chrono::high_resolution_clock::now();
        }
		//显示推理FPS
        if (fps > 0)
        {
            std::ostringstream fps_label;
            fps_label << std::fixed << std::setprecision(2);
            fps_label << "FPS: " << fps;
            std::string fps_label_str = fps_label.str();
            cv::putText(frame, fps_label_str.c_str(), cv::Point(10, 25), cv::FONT_HERSHEY_SIMPLEX, 1, cv::Scalar(0, 0, 255), 2);
        }
        cv::imshow("output", frame);
        if (cv::waitKey(1) != -1)
        {
            capture.release();
            std::cout << "finished by user\n";
            break;
        }
    }
	system("pause");
	return 0;
}
问题总结
在自己win11电脑运行时,发现同样的模型python demo比c++ demo快很多,问题未知,望大佬指点。
python demo推理一张图片耗时150ms
c++ demo推理一张图片耗时 560ms


 986
986


 被折叠的 条评论
为什么被折叠?
被折叠的 条评论
为什么被折叠?
 到【灌水乐园】发言


