


Mini6410上最简单的LED点灯裸机程序 :
实验环境:
根据友善教程,要用ADS,据说现在都不用这个了,但是为了打开友善给的mcp工程,就下了一个,Win7下弄上兼容模式和管理员权限,再下一个SecureCRT代替超级终端。
一定要,把AXD也设置上。
secureCRT的配置:选择Serial串口,波特率115200,端口号:USB转串(去驱动程序查端口号,今天插了一个COM4,一个COM5)
实验步骤:
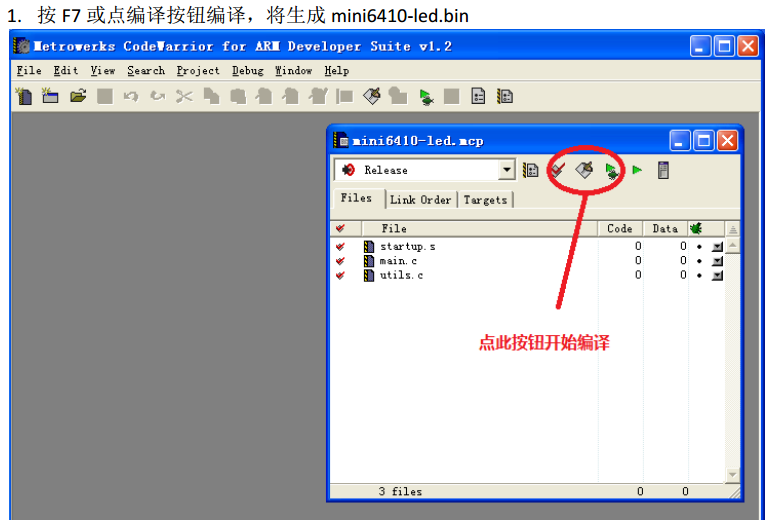
配置好了以后,打开CodeWarrior编译mini6410-led.bin文件
将bin文件直接复制到SD卡的images文件夹就行了, 然后配置FriendlyARM.ini文件
6410有两种运行机制:一种是将程序直接从SD卡加载到内存运行,一种是将SD的镜像烧到NAND FLASH上启动,因为我的FLASH上系统有用,就先不覆盖了。
第一种方法是烧到NAND FLASH上
Action=install
OS= UserBin
UserBin‐Image=mini6410‐led.bin
借助已经安装了SuperbootSD卡,可以把把mini6410‐led.bin 加载到内存中运行,步骤如下:
把mini6410‐led.bin 拷贝到SD卡的images 目录下,
打开FriendlyARM.ini配文件,修改如下关键定义:
第二种方法是直接在SD卡加载运行
Action=run
OS= UserBin
UserBin‐Image=mini6410‐led.bin
UserBin‐StartAddress=50000000
通过读卡器拷贝到SD卡中——失败。。
通过查找,发现配置文件FriendlyARM.int搞错了——不是直接添加,是修改已有的东西(尤其UserBin)
修改红色部分就行了,Action设置一下,安装还是运行?OS,换成UserBin,UserBin不能自己添加,是修改底部红色部分(要自己发现,友善的说明书真糙。。。。。)
#This line cannot be removed. by FriendlyARM(www.arm9.net)

LCD-Mode = Yes
LCD-Type = S70

CheckOneButton=No
Action=install
OS= Linux

VerifyNandWrite=No

StatusType = Beeper| LED

#################### Linux #####################
Linux-BootLoader = superboot-6410.bin
Linux-Kernel = Linux/zImage
Linux-CommandLine = root=ubi0:FriendlyARM-root ubi.mtd=2 rootfstype=ubifs init=nuxrc console=ttySAC0,115200
Linux-RootFs-InstallImage = Linux/rootfs_qtopia_qt4-SLC.ubi
Linux-RootFs-RunImage = Linux/rootfs_qtopia_qt4.ext3

################### Android ####################
Android-BootLoader = superboot-6410.bin
Android-Kernel = Android/azImage
Android-CommandLine = root=ubi0:FriendlyARM-root ubi.mtd=2 rootfstype=ubifs  init=nuxrc console=ttySAC0,115200 androidboot.console=s3c2410_serial0
Android-RootFs-InstallImage = Android/rootfs_android-SLC.ubi
Android-RootFs-RunImage = Android/rootfs_android.ext3

################### WindowsCE6 #################
WindowsCE6-Bootloader= superboot-6410.bin
WindowsCE6-BootLogo = WindowsCE6\bootlogo.bmp
WindowsCE6-InstallImage = WindowsCE6\en\NK-i.bin
WindowsCE6-RunImage = WindowsCE6\en\NK-i.bin

#################### Ubuntu #####################
Ubuntu-BootLoader = superboot-6410.bin
Ubuntu-Kernel = Ubuntu/uzImage
Ubuntu-CommandLine = root=ubi0:FriendlyARM-root ubi.mtd=2 rootfstype=ubifs  init=nuxrc console=ttySAC0,115200
Ubuntu-RootFs-InstallImage = Ubuntu/rootfs_ubuntu-SLC.ubi
Ubuntu-RootFs-RunImage = Ubuntu/rootfs_ubuntu.ext3

############### UserBin #################
UserBin-Image=WindowsCE/NK-i.nb0
userBin-StartAddress=50100000
main.c文件如下
#include "utils.h"

static void LedDelay(void)
{
      volatile unsigned int k;
      for(k = 0; k < 20000000; k++);
}

int main(void)
{

    Uart_Init();
    Port_Init();
    Uart_SendString("\r\nHello, Mini6410\r\n");

    for(;;) {
      Led_Display(0x9); // 1001
  LedDelay();
      Led_Display(0x6); // 0110
  LedDelay();
    }

    return 0;

} 比较简单,一看就懂,直接靠bit控制4个LED灯。for循环里LED灯先两边后中间,一个”LED灯对对碰“,可以修改一下玩,比如改成流水线,改成跳跃,或者交替闪烁,可以分别使用,嫌来回插拔SD卡麻烦我就一次试了。
事实证明,最好分开测试:发现这个位操作的LED,0才是亮,1是灭;且LED4是低位,LED1是高位
 void Led_Display(int data)
{
    rGPKDAT = (rGPKDAT & ~(0xf<<4)) | ((data & 0xf)<<4);
}
#include "utils.h" static void LedDelay(void) { volatile unsigned int k; for(k = 0; k < 20000000; k++); } int main(void) { Uart_Init(); Port_Init(); Uart_SendString("\r\nHello, Mini6410\r\n"); for(;;) { //LED对对碰 Led_Display(0x9); // 1001 LedDelay(); Led_Display(0x6); // 0110 LedDelay(); //流水灭灯 LedDelay(); LedDelay(); Led_Display(0x1);//0001 LedDelay(); Led_Display(0x2);//0010 LedDelay(); Led_Display(0x4);//0100 LedDelay(); Led_Display(0x8);//1000 LedDelay(); LedDelay(); //流水亮灯//交替闪烁:1、3同闪,2、4同闪 Led_Display(0x5); // 0101Led_Display(0xe);//1110 LedDelay(); Led_Display(0xd);//1101 LedDelay(); Led_Display(0xb);//1011 LedDelay(); Led_Display(0x7);//0111 LedDelay(); LedDelay();
Led_Display(0xa); // 1010LedDelay();
LedDelay();LedDelay();} return 0;}LedDelay();
再来个mini6410-led-v2.bin,或者v3,再给ini设置一下就ok了。

完成效果


 1579
1579

 被折叠的 条评论
为什么被折叠?
被折叠的 条评论
为什么被折叠?
 到【灌水乐园】发言


