


一、前言
Jetson nano不同于其他Linux系统,不能直接pip install torch。也不建议使用conda环境,因为有的库是系统自带的,使用sudo apt-get安装,不会直接安装到虚拟环境。
前后端实现:基于Yolov5使用Jetson nano车牌检测前后端实现
二、安装环境
查看当前系统版本,python3.8, jetpack4.6
jetson@nano:~$ jtop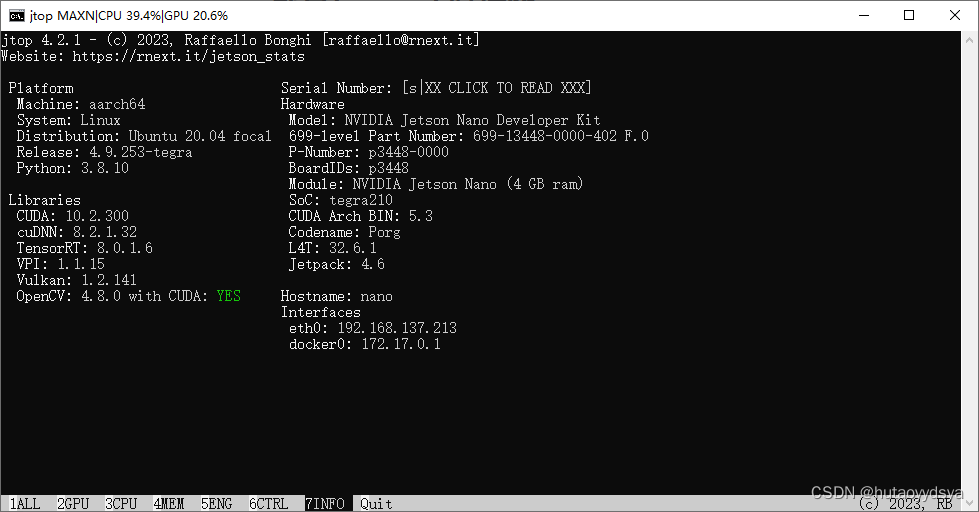
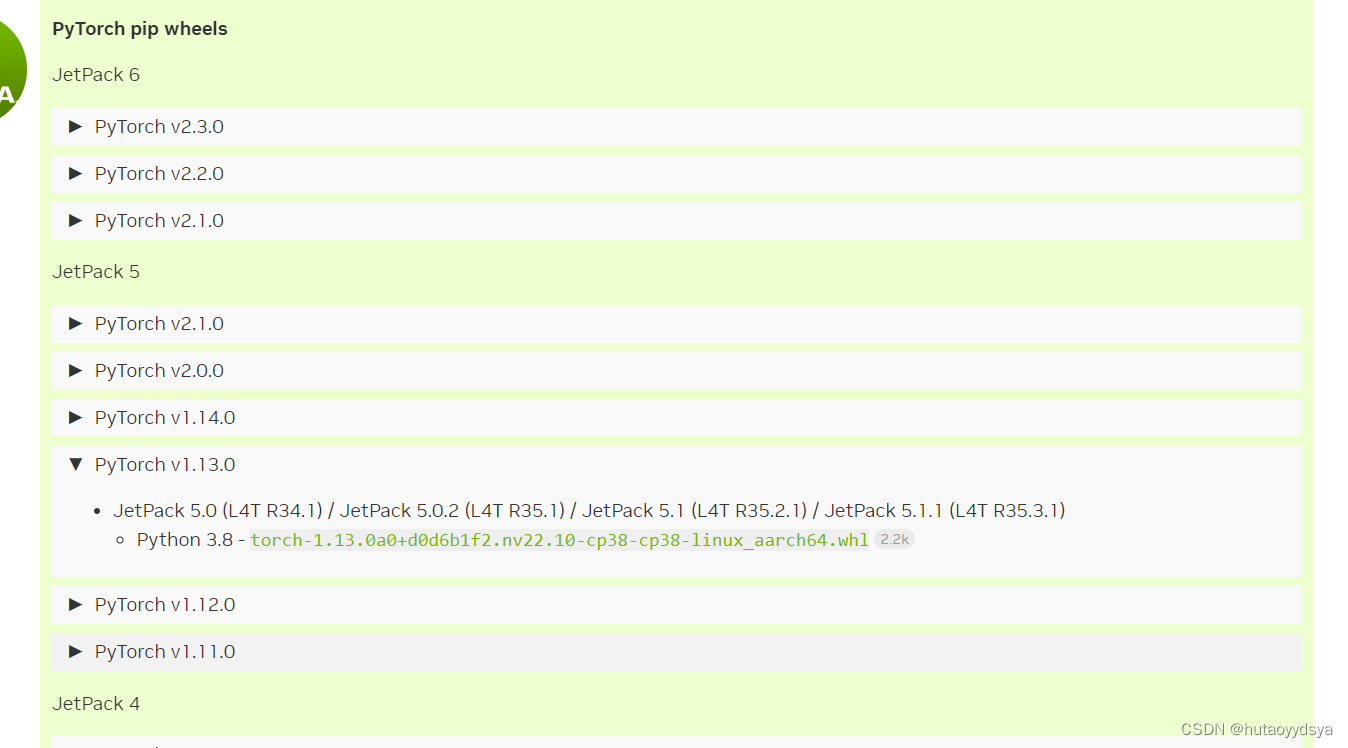
到nvidia 官网下载对应的torch版本传送门
下载完成后,就可以通过scp命令将下载的文件传到板子上了,因为是共享网络,用arp -a查看板子的ip,就可以传输文件啦。
切换到板子,安装torch先把numpy更新到1.19版本以上,然后就可以pip install torch-1.13.0a0+d0d6b1f2.nv22.10-cp38-cp38-linux_aarch64.whl,静静等待安装即可。系统自带opencv,可以不用安装,但是没有pillow库,需要手动安装。
sudo apt install libfreetype6-dev
sudo apt install libtbb-dev libjpeg-dev libtiff-dev libwebp-dev libpng-dev
sudo pip3 install pillow==8.4
目前opencv版本对于yolov5是足够的,有需求可以自行升级,升级挺麻烦的,又费时间。
然后把电脑能运行的yolov5项目传到板子上,缺哪个库就装哪个。
三、数据集训练
使用CCPD数据集进行训练,数据集主要在合肥市某停车场采集得来,采集时间早上7:30到晚上10:00,手工标注车牌位置。拍摄的车牌照片涉及多种复杂环境,包括模糊、倾斜、阴雨天、雪天等等。CCPD数据集一共包含将近30万张图片。数据集链接
配置car.yaml
train: ./dataset/train/images
val: ./dataset/val/images
# number of classes
nc: 2

# class names
names: [ 'single_plate','double_plate']
配置yolov5.yaml, nc改为2
python train.py --img 640 --batch 4 --epoch 50 --data data/car.yaml --cfg models/yolov5n.yaml 训练完成后,在./runs/detect/exp里面有训练结果,也有训练后的权重。
四、模型推理
def get_plate_rec_landmark(img, xyxy, conf, landmarks, class_num,device,plate_rec_model,is_color=False):  #获取车牌坐标以及四个角点坐标并获取车牌号
    h,w,c = img.shape
    result_dict={}
    tl = 1 or round(0.002 * (h + w) / 2) + 1  # line/font thickness

    x1 = int(xyxy[0])
    y1 = int(xyxy[1])
    x2 = int(xyxy[2])
    y2 = int(xyxy[3])
    height=y2-y1
    landmarks_np=np.zeros((4,2))
    rect=[x1,y1,x2,y2]
    for i in range(4):
        point_x = int(landmarks[2 * i])
        point_y = int(landmarks[2 * i + 1])
        landmarks_np[i]=np.array([point_x,point_y])

    class_label= int(class_num)  #车牌的的类型0代表单牌,1代表双层车牌
    roi_img = four_point_transform(img,landmarks_np)   #透视变换得到车牌小图
    if class_label:        #判断是否是双层车牌,是双牌的话进行分割后然后拼接
        roi_img=get_split_merge(roi_img)
    if not is_color:
        plate_number,rec_prob = get_plate_result(roi_img,device,plate_rec_model,is_color=is_color)                 #对车牌小图进行识别
    else:
        plate_number,rec_prob,plate_color,color_conf=get_plate_result(roi_img,device,plate_rec_model,is_color=is_color)
    # cv2.imwrite("roi.jpg",roi_img)
    result_dict['rect']=rect                      #车牌roi区域
    result_dict['detect_conf']=conf              #检测区域得分
    result_dict['landmarks']=landmarks_np.tolist() #车牌角点坐标
    result_dict['plate_no']=plate_number   #车牌号
    result_dict['rec_conf']=rec_prob   #每个字符的概率
    result_dict['roi_height']=roi_img.shape[0]  #车牌高度
    result_dict['plate_color']=""
    if is_color:
        result_dict['plate_color']=plate_color   #车牌颜色
        result_dict['color_conf']=color_conf    #颜色得分
    result_dict['plate_type']=class_label   #单双层 0单层 1双层

    return result_dict
def detect_Recognition_plate(model, orgimg, device,plate_rec_model,img_size,is_color=False):#获取车牌信息
# Load model
# img_size = opt_img_size
conf_thres = 0.3 #得分阈值
iou_thres = 0.5 #nms的iou值
dict_list=[]
# orgimg = cv2.imread(image_path) # BGR
img0 = copy.deepcopy(orgimg)
assert orgimg is not None, 'Image Not Found '
h0, w0 = orgimg.shape[:2] # orig hw
r = img_size / max(h0, w0) # resize image to img_size
if r != 1: # always resize down, only resize up if training with augmentation
interp = cv2.INTER_AREA if r < 1 else cv2.INTER_LINEAR
img0 = cv2.resize(img0, (int(w0 * r), int(h0 * r)), interpolation=interp)
imgsz = check_img_size(img_size, s=model.stride.max()) # check img_size
img = letterbox(img0, new_shape=imgsz)[0] #检测前处理,图片长宽变为32倍数,比如变为640X640
# img =process_data(img0)
# Convert
img = img[:, :, ::-1].transpose(2, 0, 1).copy() # BGR to RGB, to 3x416x416 图片的BGR排列转为RGB,然后将图片的H,W,C排列变为C,H,W排列
# Run inference
t0 = time.time()
img = torch.from_numpy(img).to(device)
img = img.float() # uint8 to fp16/32
img /= 255.0 # 0 - 255 to 0.0 - 1.0
if img.ndimension() == 3:
img = img.unsqueeze(0)
# Inference
# t1 = time_synchronized()/
pred = model(img)[0]
# t2=time_synchronized()
# print(f"infer time is {(t2-t1)*1000} ms")
# Apply NMS
pred = non_max_suppression_face(pred, conf_thres, iou_thres)
# print('img.shape: ', img.shape)
# print('orgimg.shape: ', orgimg.shape)
# Process detections
for i, det in enumerate(pred): # detections per image
if len(det):
# Rescale boxes from img_size to im0 size
det[:, :4] = scale_coords(img.shape[2:], det[:, :4], orgimg.shape).round()
# Print results
for c in det[:, -1].unique():
n = (det[:, -1] == c).sum() # detections per class
det[:, 5:13] = scale_coords_landmarks(img.shape[2:], det[:, 5:13], orgimg.shape).round()
for j in range(det.size()[0]):
xyxy = det[j, :4].view(-1).tolist()
conf = det[j, 4].cpu().numpy()
landmarks = det[j, 5:13].view(-1).tolist()
class_num = det[j, 13].cpu().numpy()
result_dict = get_plate_rec_landmark(orgimg, xyxy, conf, landmarks, class_num,device,plate_rec_model,is_color=is_color)
dict_list.append(result_dict)
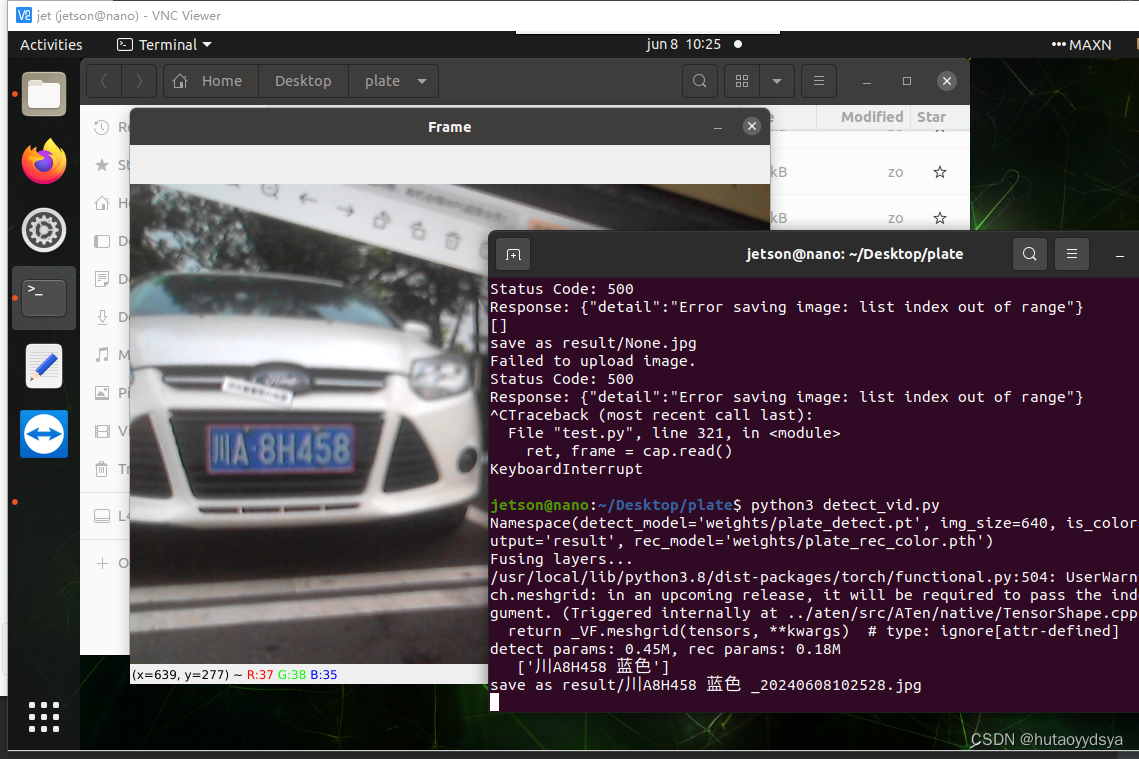
return dict_list运行效果
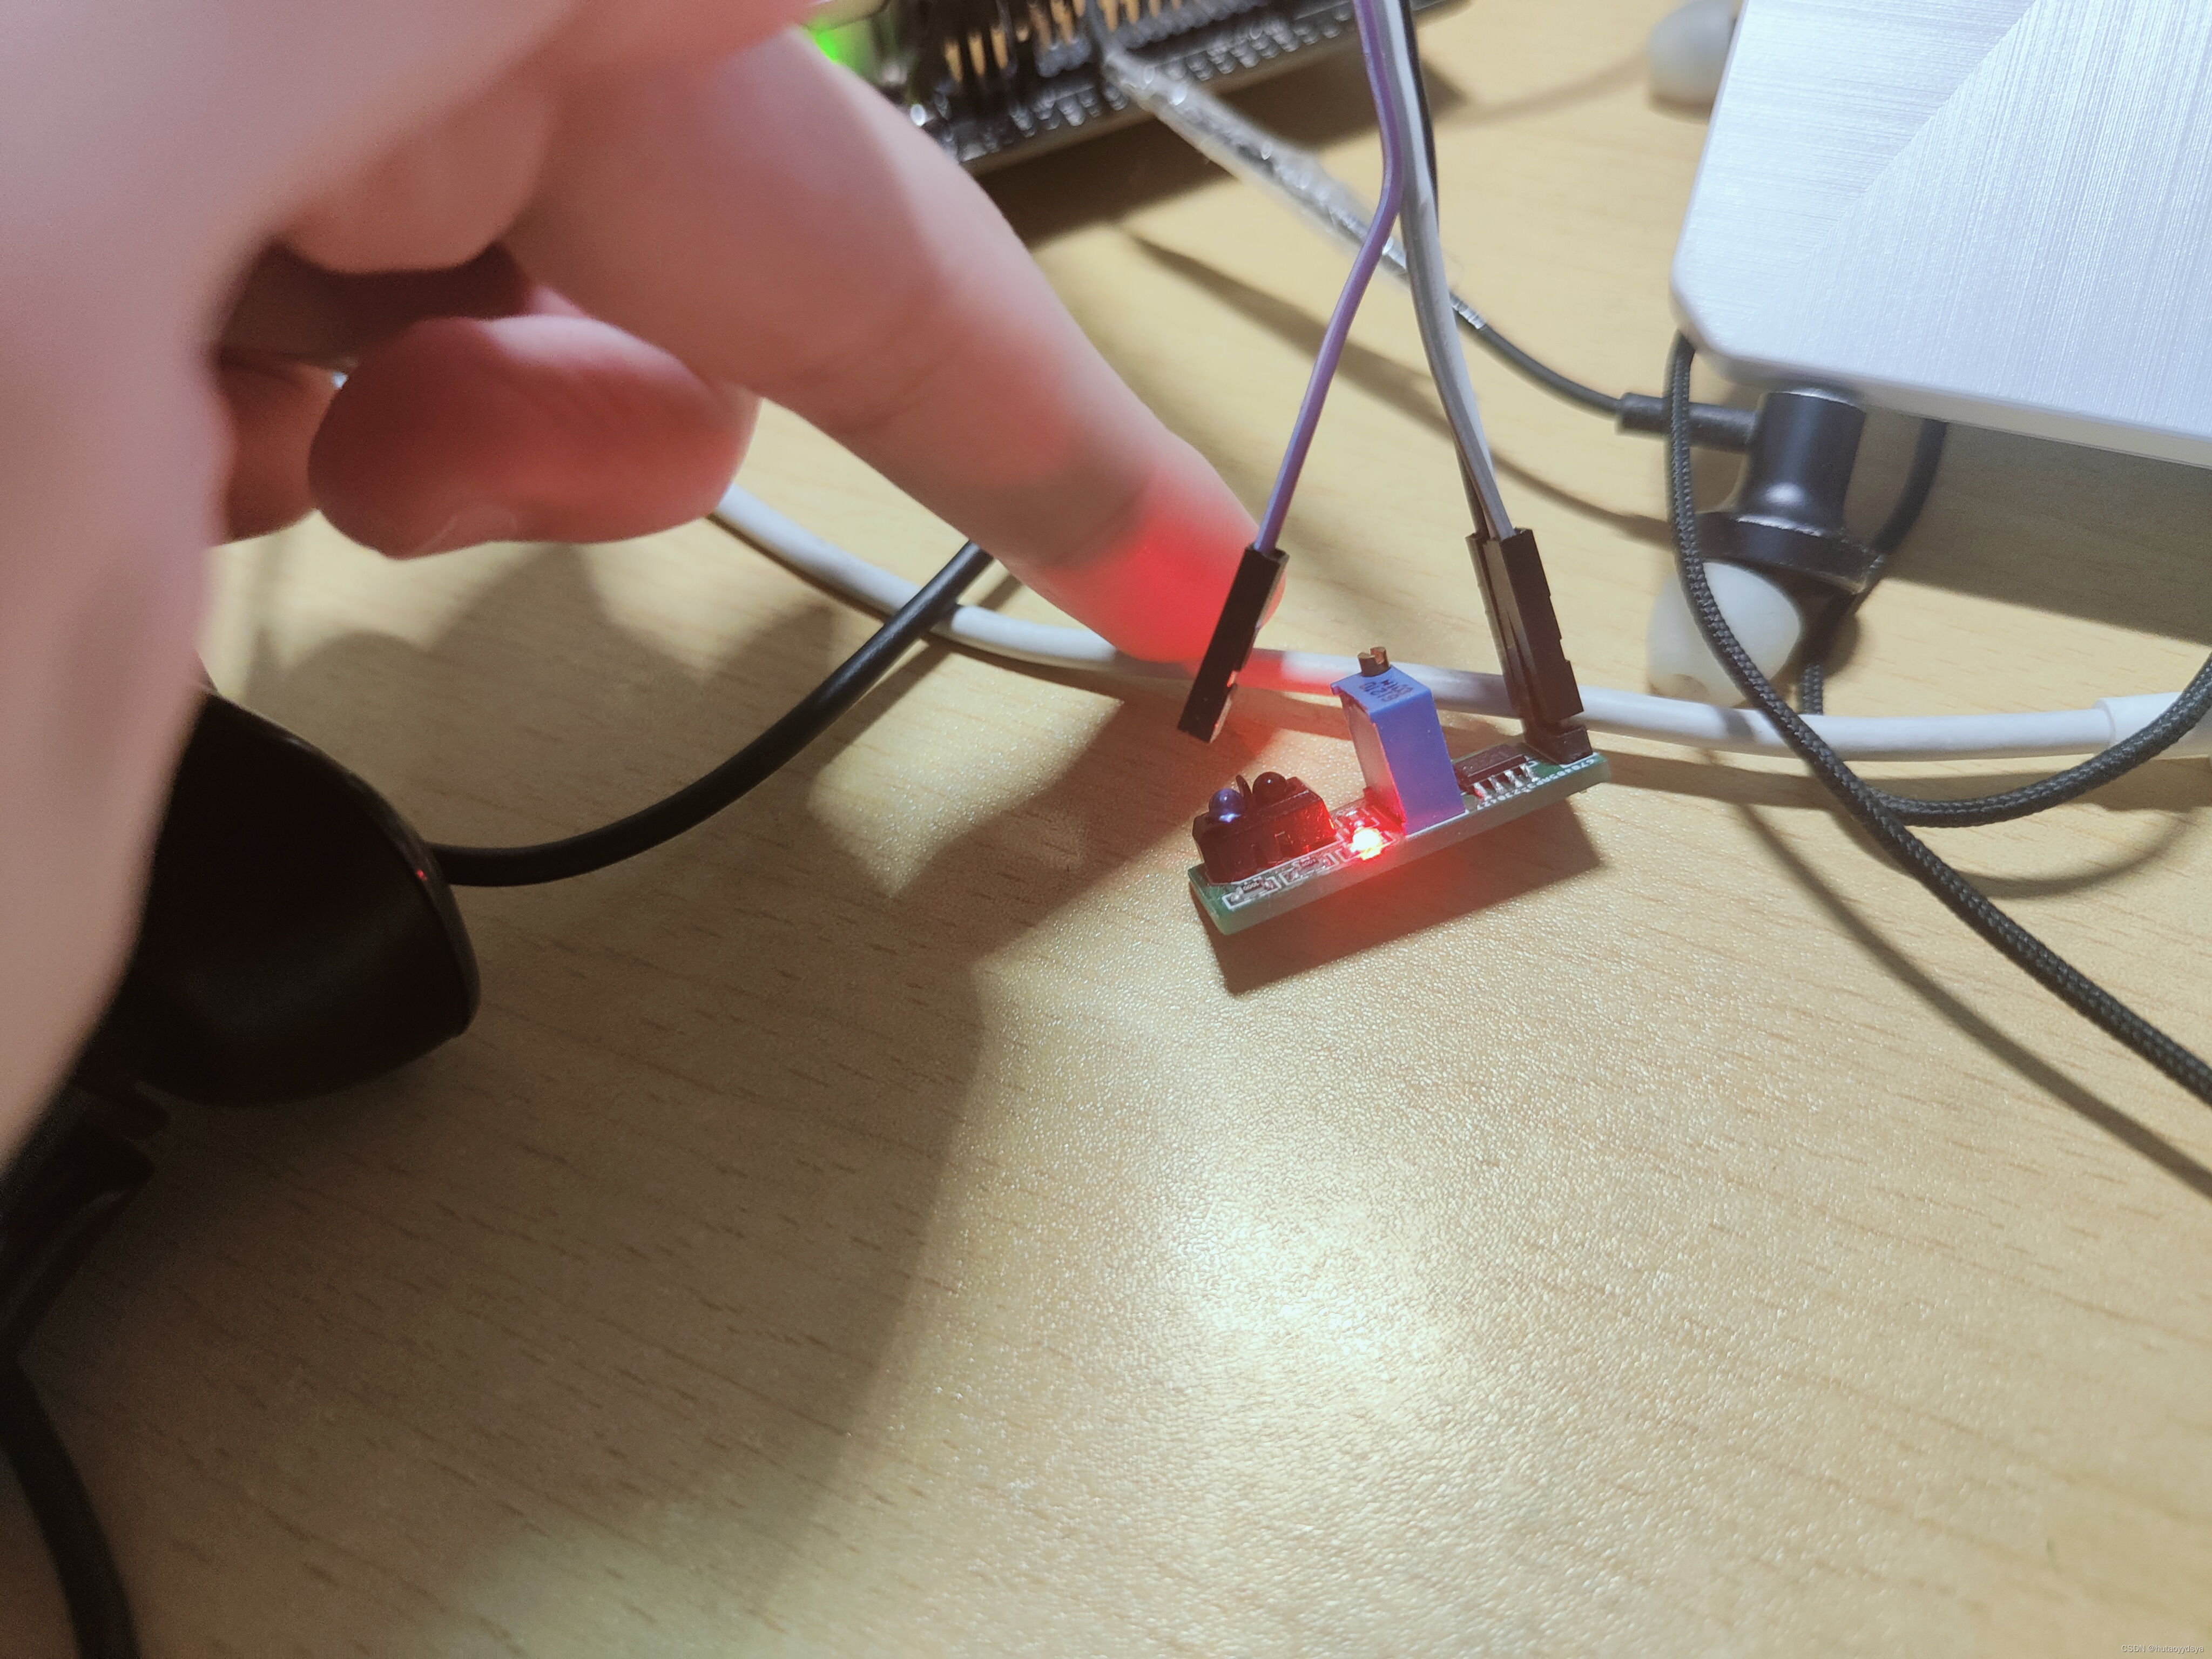
五、模拟停车场识别
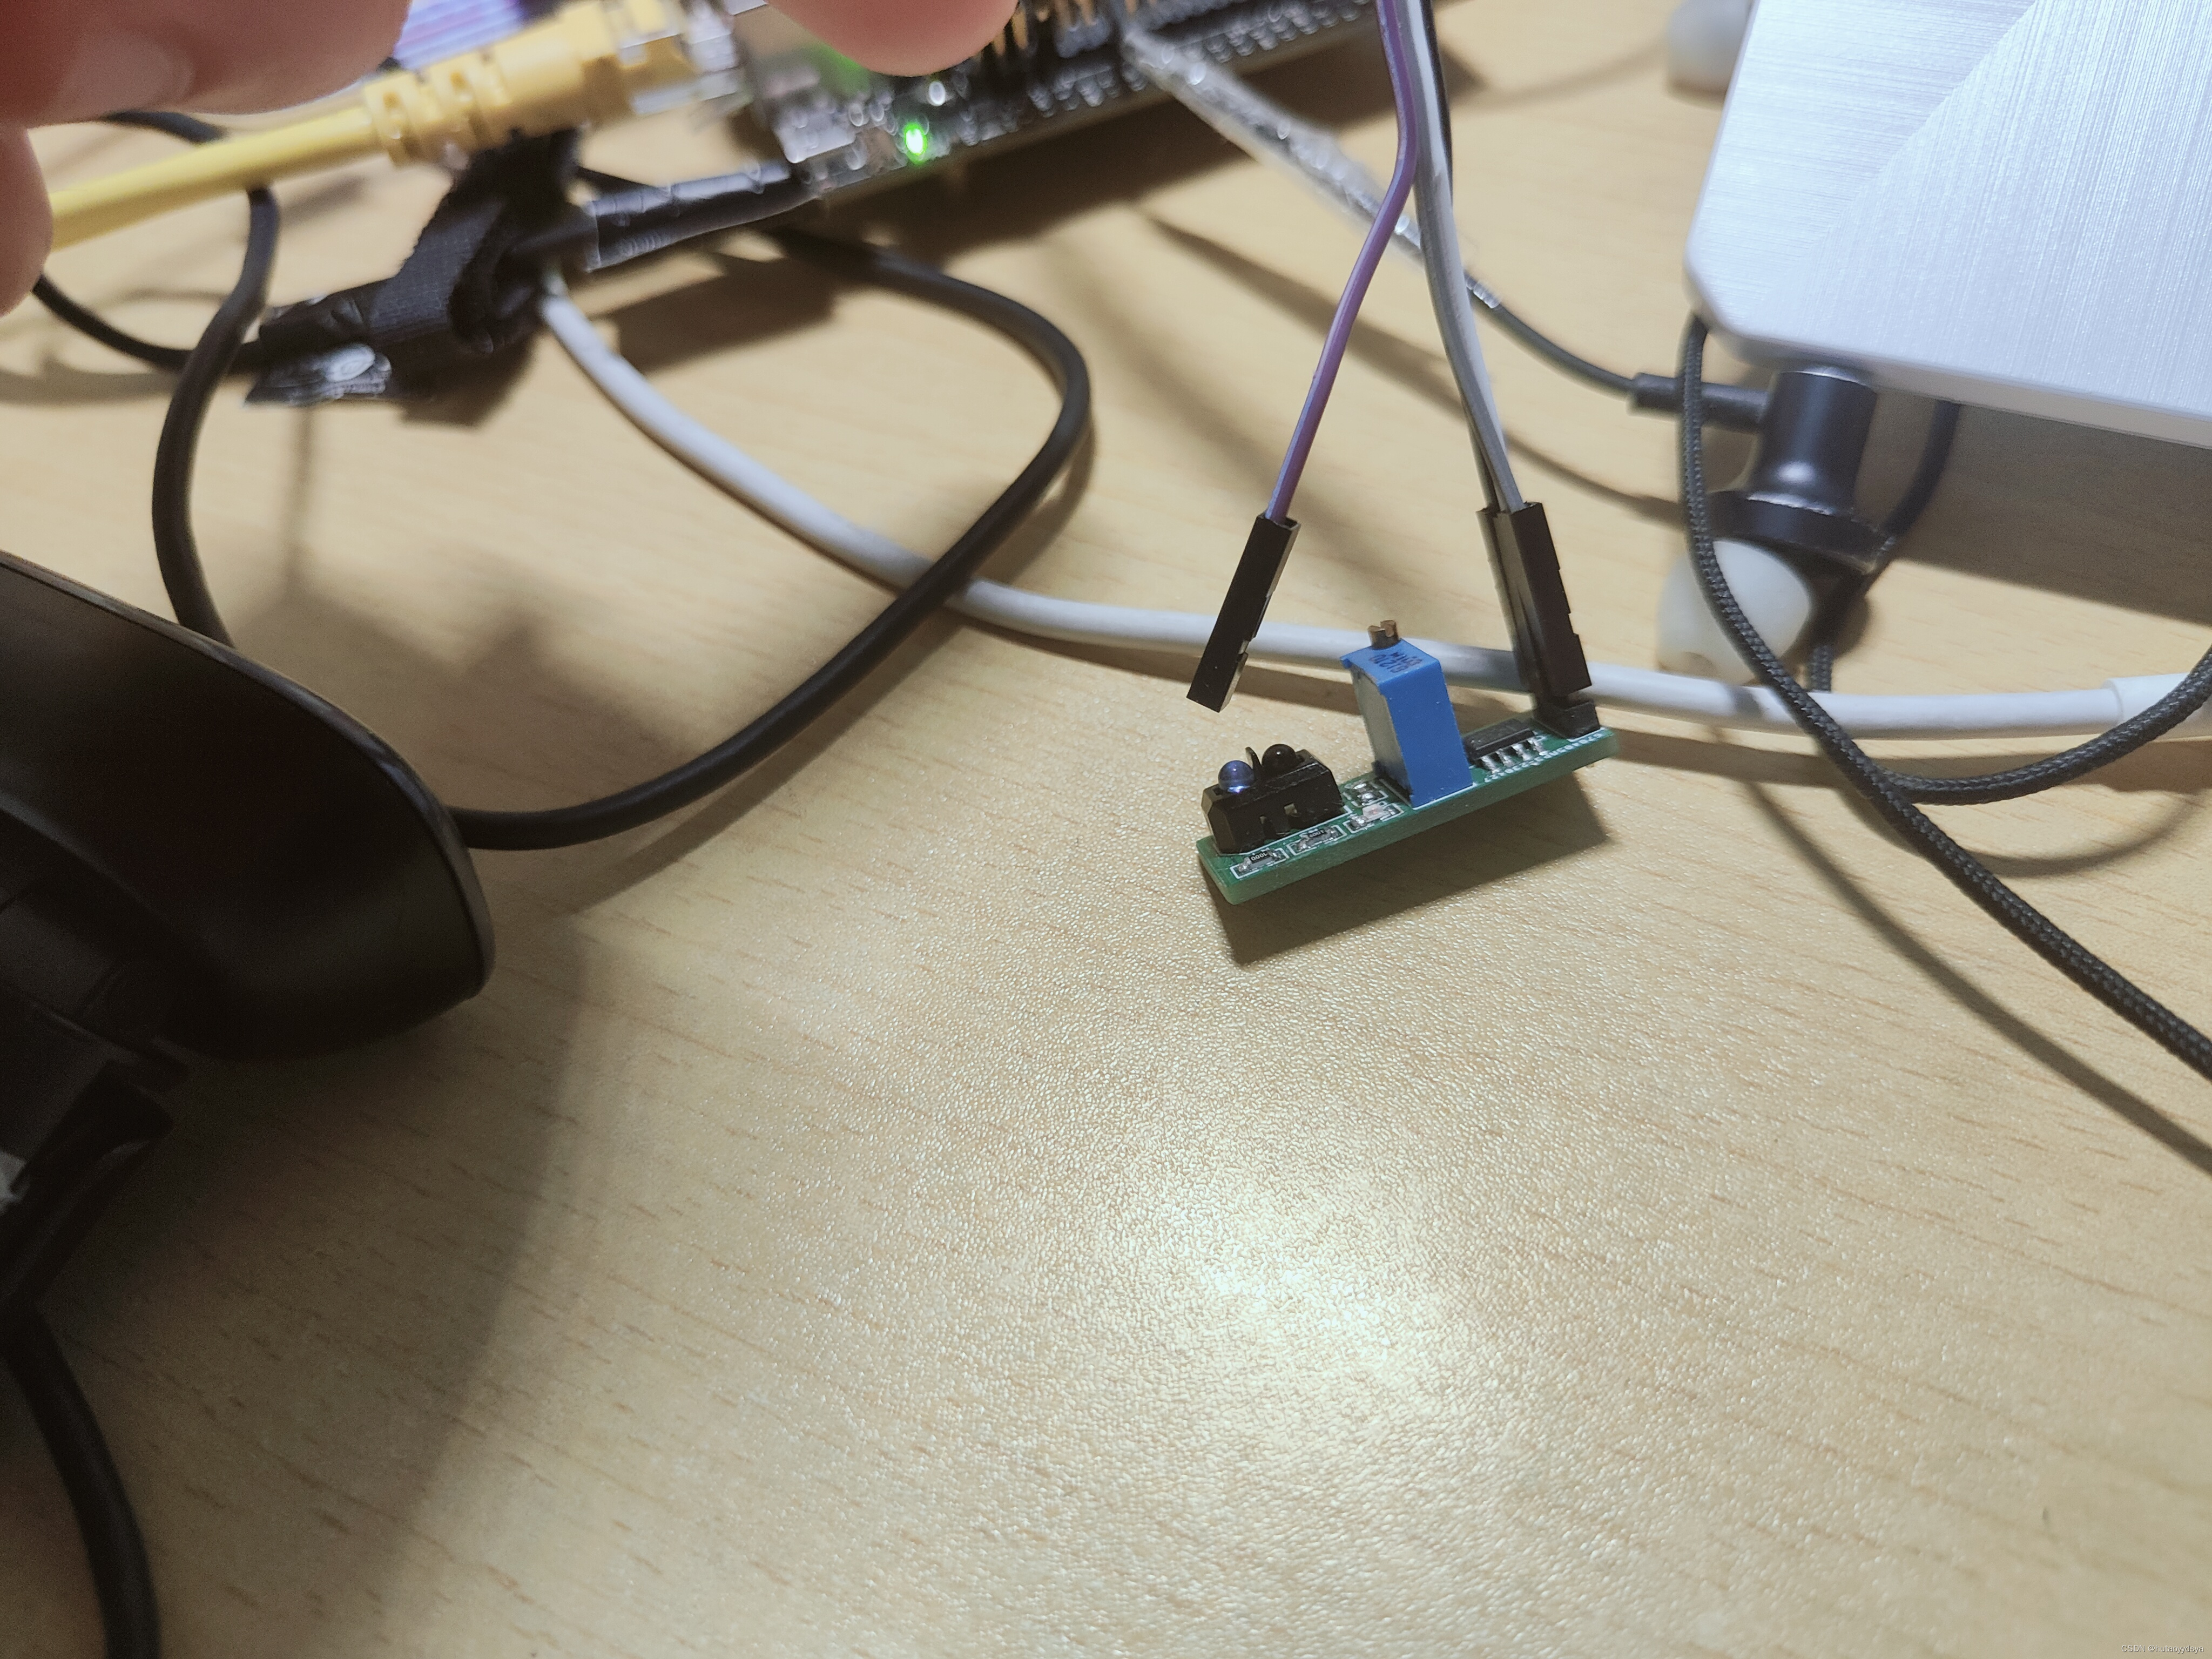
将红外感应传感器out引脚接在Pin7口,另外两个脚接在5V和GND,当前面有物体时,输出低电平。这就模拟汽车接近时,才会拍照检测。
 检测部分代码
cap = cv2.VideoCapture(0)
if not cap.isOpened():
print("Error: Could not open video.")
exit()
previous_result = []
while cap.isOpened():
ret, frame = cap.read()
if not ret:
break
flag = 0
if frame.shape[-1] == 4: # 如果图片是4个通道的,将其转为3个通道
frame = cv2.cvtColor(frame, cv2.COLOR_BGRA2BGR)
cv2.imshow('Frame', frame) # 显示当前帧
key = cv2.waitKey(1) & 0xFF
if GPIO.input(but_pin) == GPIO.LOW: # 当红外检测到有车
time.sleep(0.3) # 消抖
if GPIO.input(but_pin) == GPIO.LOW:
if flag != 1:
if frame.shape[-1] == 4: # 如果图片是4个通道的,将其转为3个通道
frame = cv2.cvtColor(frame, cv2.COLOR_BGRA2BGR)
dict_list = detect_Recognition_plate(detect_model, frame, device, plate_rec_model, opt.img_size,
opt.is_color) # 检测及识别车牌
ori_img, result = draw_result(frame, dict_list) # 将结果画在图上
save_img_path = "result/None.jpg"
for i in result:
if len(i) > 8:
current_time = datetime.now().strftime("%Y%m%d%H%M%S")
save_img_path = os.path.join(save_path, i + " " + current_time + '.jpg')
# sanitized_restr = re.sub(r'[\\/:*?"<>|]', '_', restr) # 替换非法字符
# save_img_path = os.path.join(save_path, f"{sanitized_restr}_{current_time}.jpg")
print("save as", save_img_path)
pil_img = Image.fromarray(cv2.cvtColor(ori_img, cv2.COLOR_BGR2RGB))
pil_img.save(save_img_path)
send_image(save_img_path, url)
flag = 1
while GPIO.input(but_pin) == GPIO.LOW:
continue
# cv2.imshow('Captured Frame', ori_img) # 显示处理后的帧
flag = 0 # 清除标志位
if key == ord('q'): # 按下'q'键退出
break
cap.release()
cv2.destroyAllWindows()
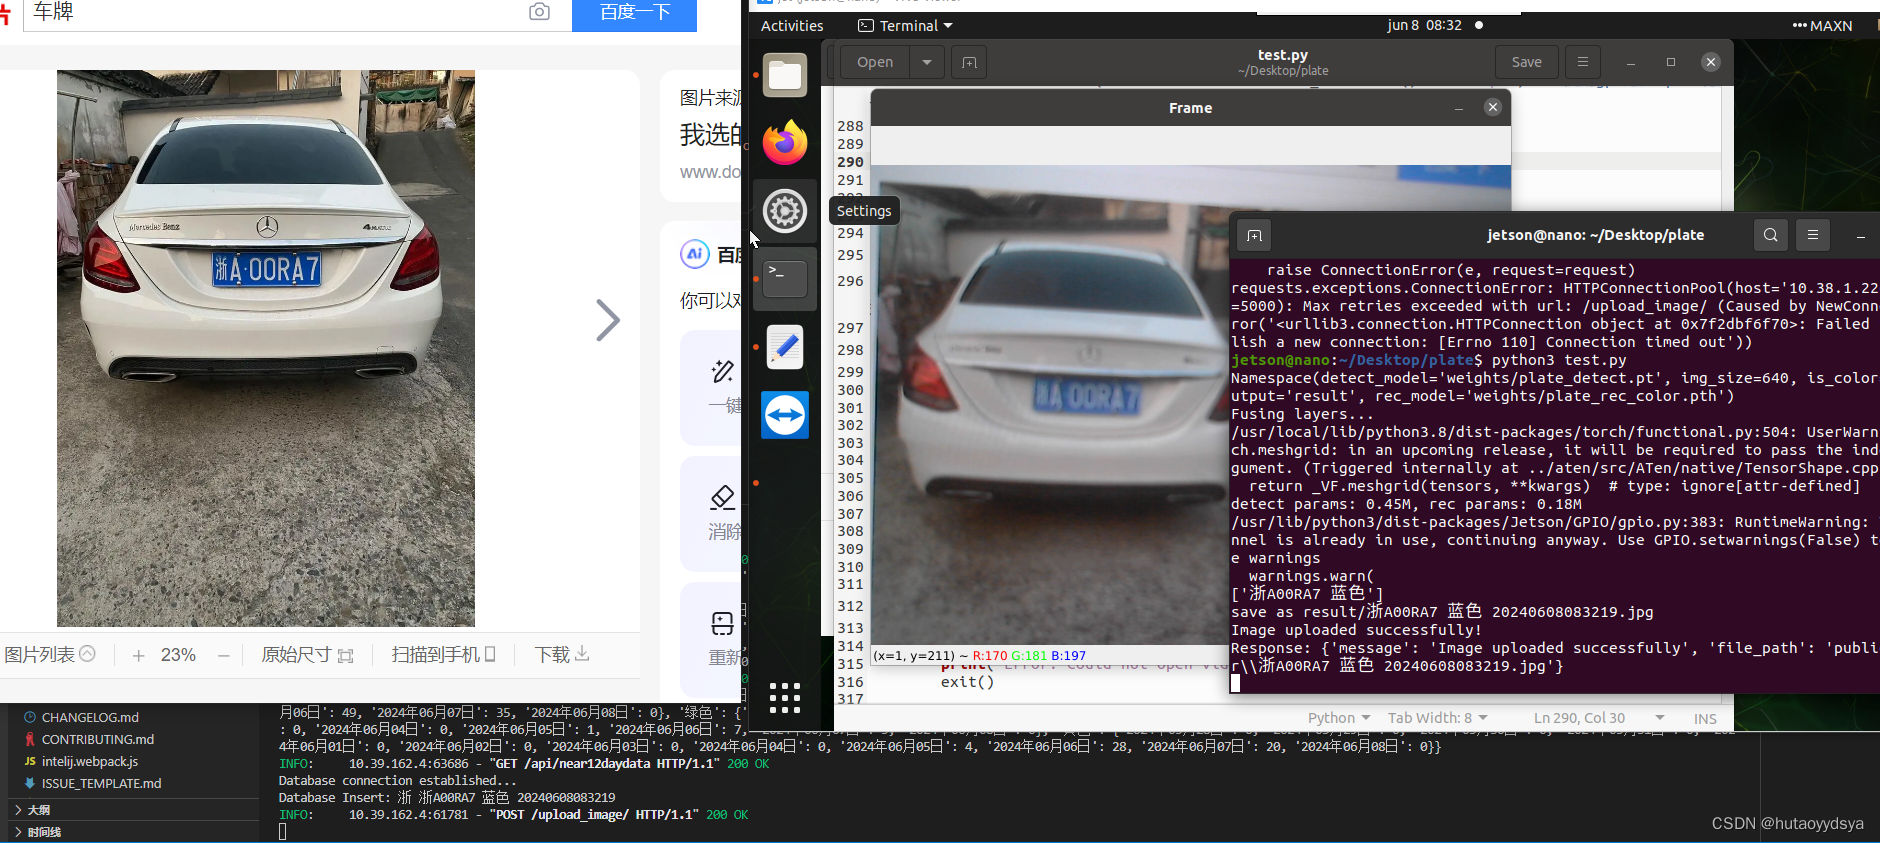
GPIO.cleanup() # cleanup all GPIOs逻辑:检测到有物体,也就是低电平,延迟0.3秒,防止误触,再读取是否是低电平,是的话,检测当前帧,保存,发送到后端;死循环等待低电平结束。也就是单片机检测按键的逻辑。
发送到后端的代码:
def send_image(image_path, url):
    # 读取图像文件并编码为Base64
    with open(image_path, "rb") as image_file:
        encoded_string = base64.b64encode(image_file.read()).decode('utf-8')

    # 构建请求数据
    data = {
        "index": image_path.split("/")[-1],  # 使用文件名作为index
        "img": encoded_string
    }

    # 发送POST请求
    headers = {'Content-Type': 'application/json'}
    response = requests.post(url, headers=headers, data=json.dumps(data))

    # 打印响应
    if response.status_code == 200:
        print("Image uploaded successfully!")
        print("Response:", response.json())
    else:
        print("Failed to upload image.")
        print("Status Code:", response.status_code)
        print("Response:", response.text)
运行结果:


 718
718

 被折叠的 条评论
为什么被折叠?
被折叠的 条评论
为什么被折叠?
 到【灌水乐园】发言


