【AIGC】Mac Intel 本地 LLM 部署经验汇总(CPU Only)

书接上文,在《【AIGC】本地部署 ollama(gguf) 与项目整合》章节的最后,我在 ollama 中部署 qwen1_5-14b-chat-q4_k_m.gguf 预量化模型,在非 Stream 模式下需要 89 秒才完成一轮问答,响应速度实在是太慢,后续需要想办法进行优化…
PS:本人使用的是 2020 年 Intel 版本的 Macbook Pro(以下简称“MBP”)。如下图:
image.png

1. Ollama 模型性能对比

为了解决这个问题,找很多 ollama 的资料,基本上可以确定 3 点信息:

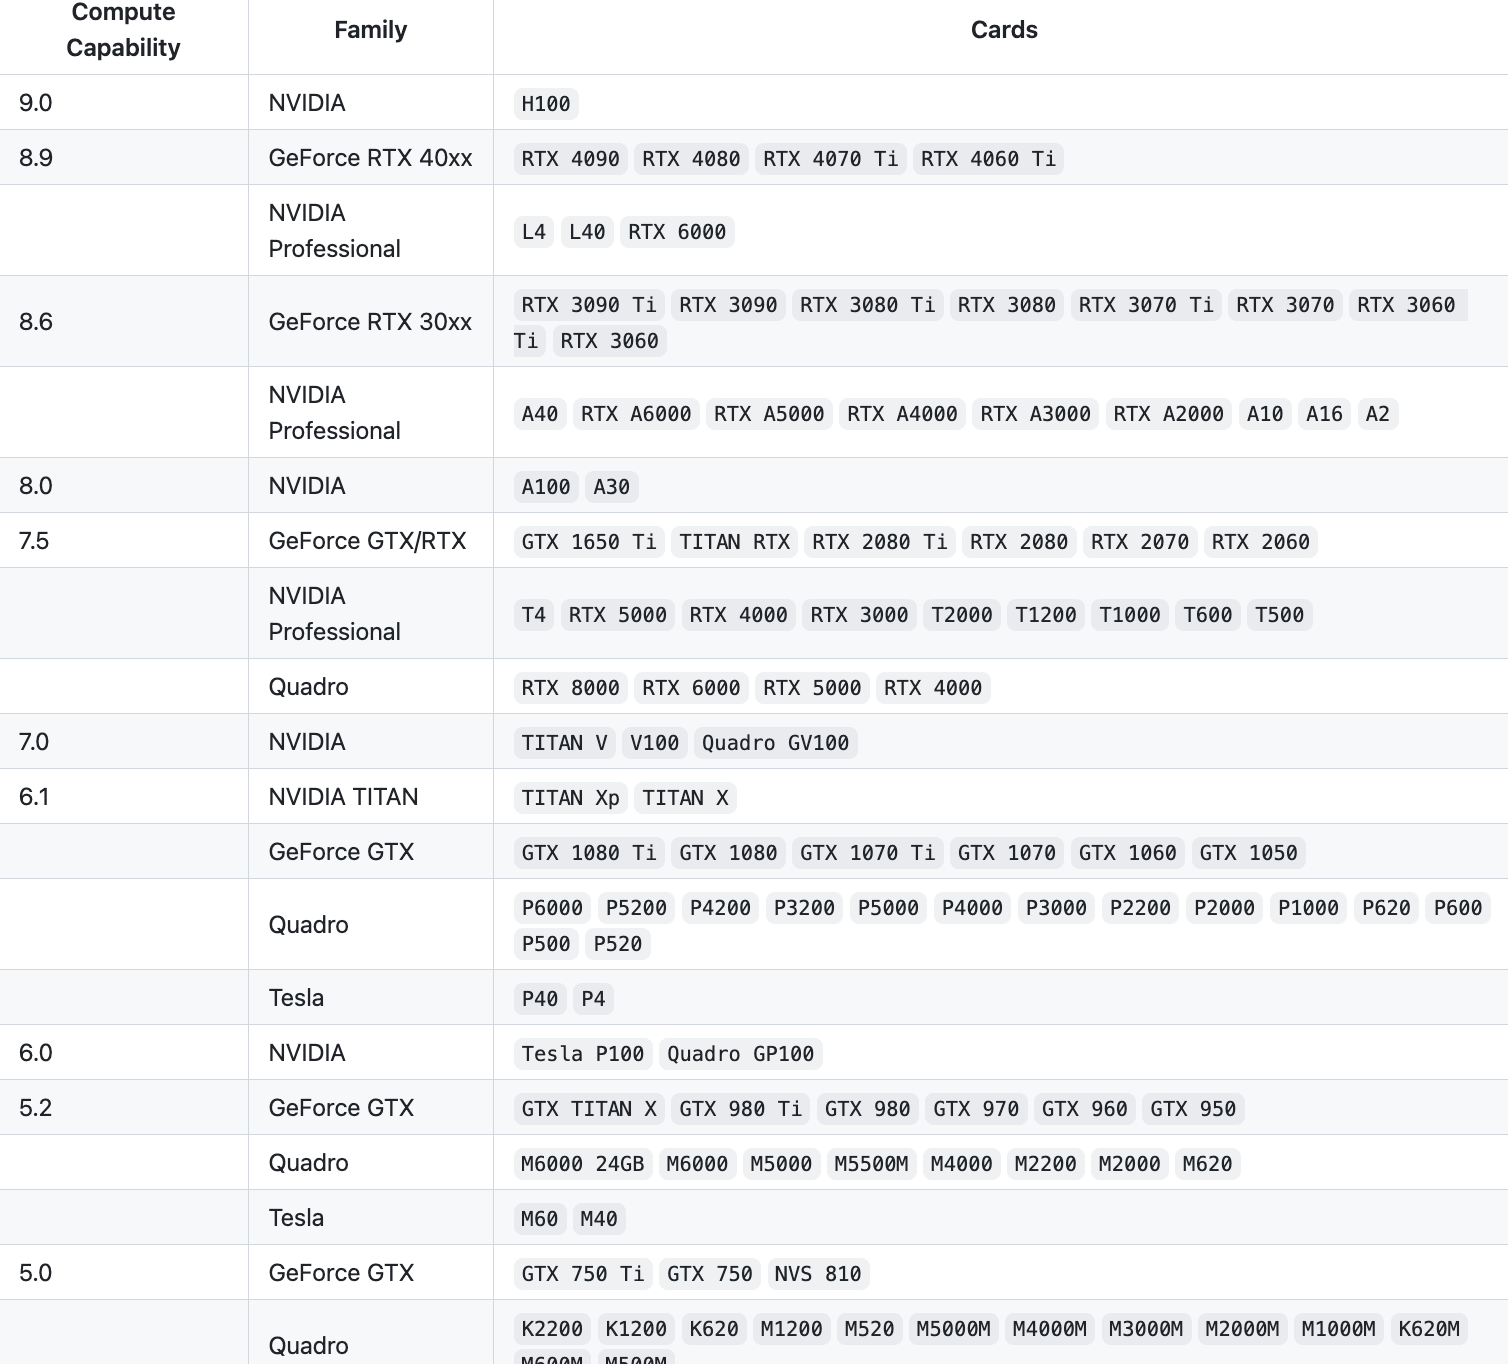
  1. ollama 会自动适配可用英伟达(NVIDIA)显卡。若显卡资源没有被用上应该是显卡型号不支持导致的。如下图:

image.png

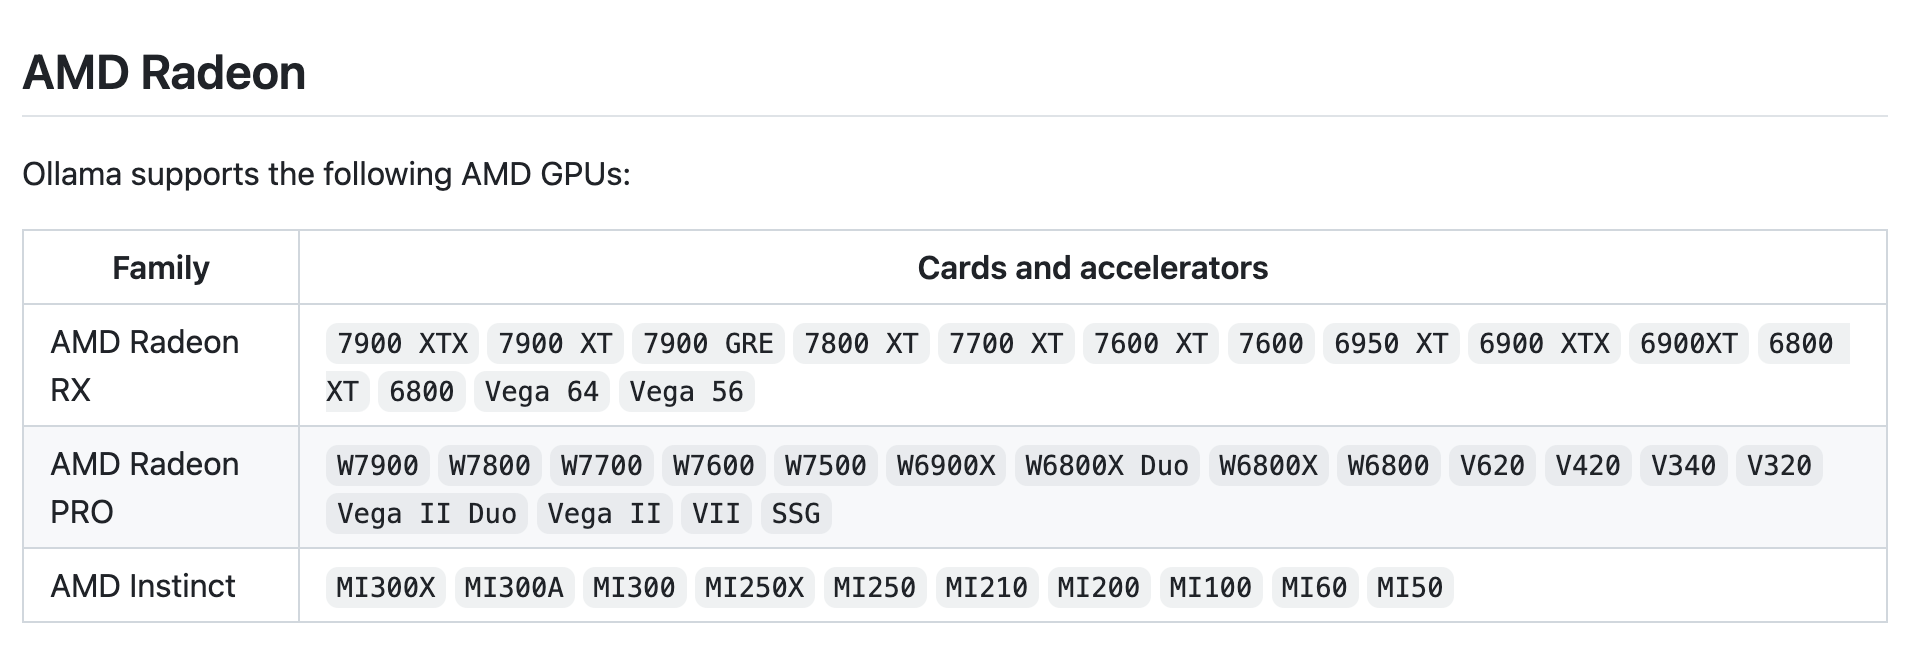
  1. ollama 支持 AMD 显卡的使用,如下图:

image.png

  1. 至于 Apple 用户 ollama 也开始支持 Metal GPUs 方案

image.png
欸…看到这里好像又有点希望了,我的 MBP 估计也支持 Metal 方案吧🤔,接着我就到 Apple 官网查了一下 Metal 的支持情况。如下图:
image.png
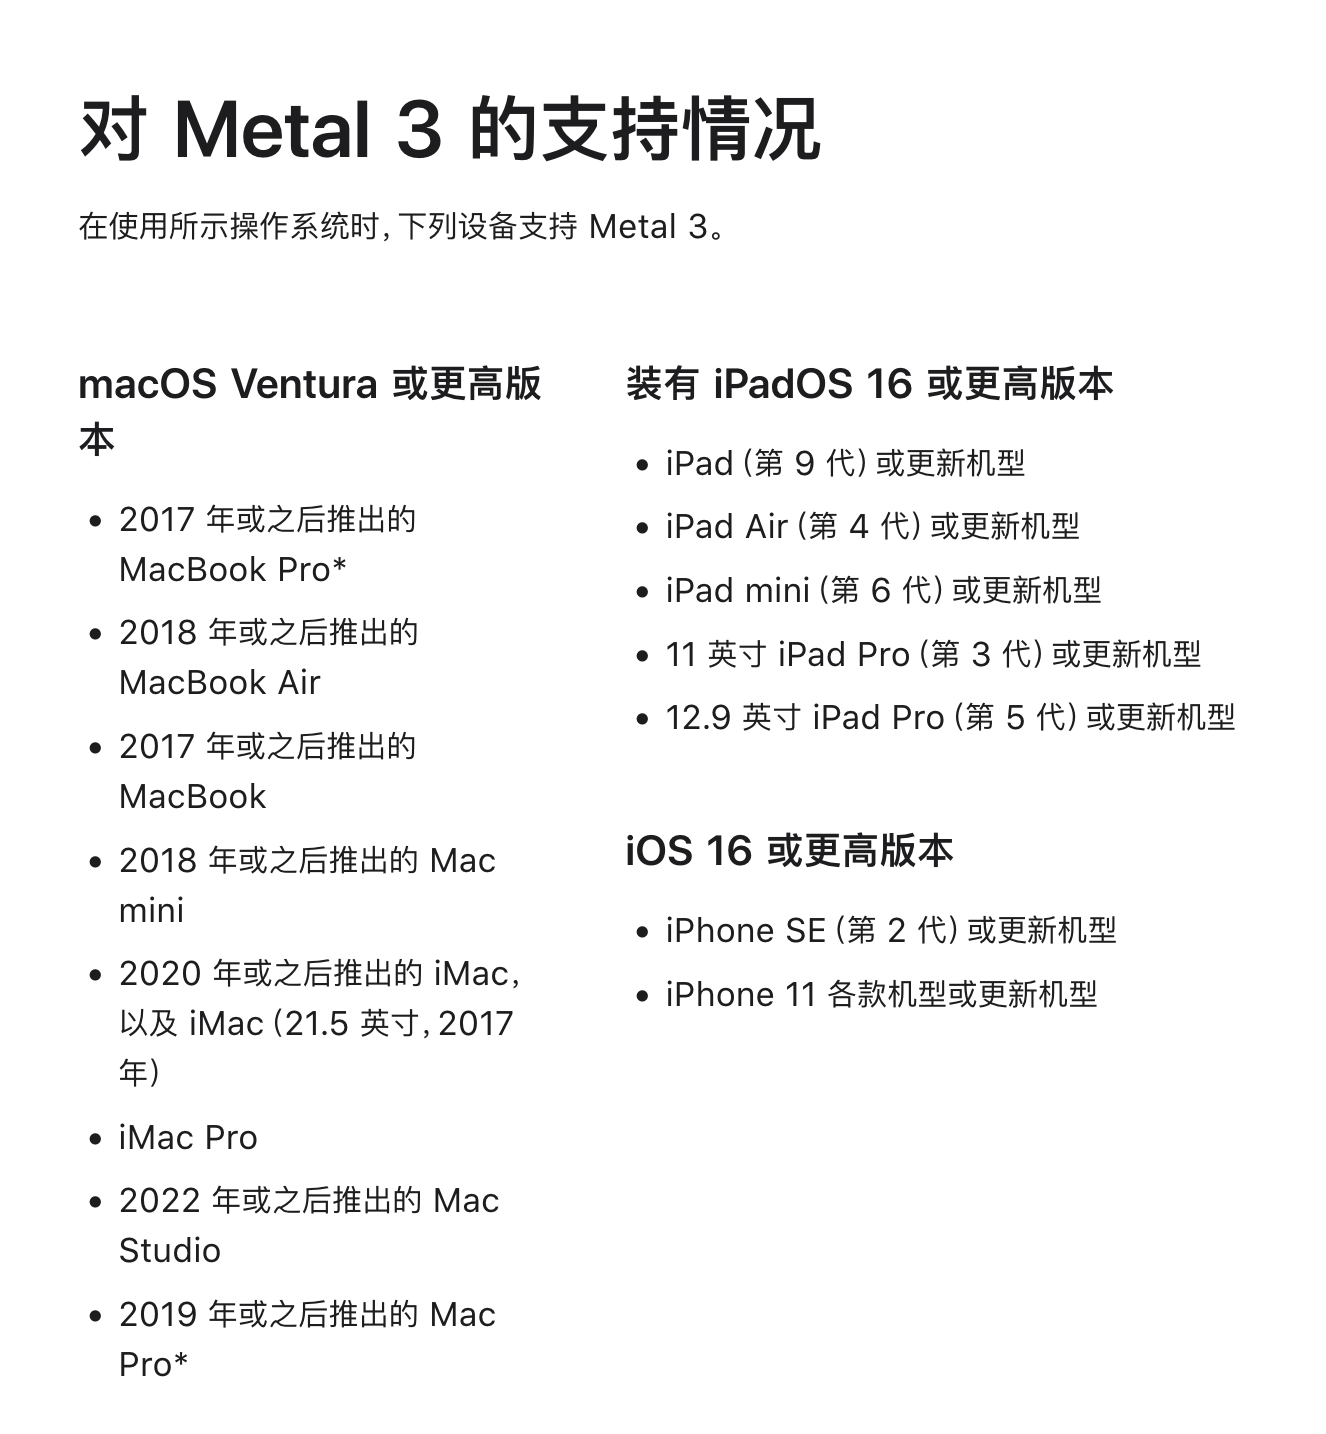
(其实 ollama 上说的支持 Metal GPUs 的方案指的是使用 M 系列芯片的 Apple 用户,像我这种 Intel 芯的是不支持的。可惜这个我是后来才知道的,现在的这个 moment 我还抱有一丝的幻想😭…)

当时我就陷入自我怀疑了,难道是预量化模型的缘故只能适配到 CPU ?带着这个疑问又下载了一个 Qwen chat 版本进行了同环境的对比验证,如下图:

# 使用 ollama 调取 chat 版本模型(qwen:14b-chat-q4_K_M),耗时 69 秒

(transformer) (base) MacBook-Pro:python yuanzhenhui$ /Users/yuanzhenhui/anaconda3/envs/transformer/bin/python /Users/yuanzhenhui/Documents/code_space/git/processing/python/tcm_assistant/learning/local_model.py
>>> function ollama_transfor_msg totally use 69.74513030052185 seconds
>>> 是的,中医理论可以解释并尝试解决这些症状。
全身乏力和心跳过速可能是由多种原因引起的。在中医看来,这可能与脏腑功能失调、气血不畅、阴阳失衡等因素有关。
例如,心气不足可能导致心跳过速,而脾虚则可能导致全身乏力。另外,如果肝脏的功能不好,也可能导致这种症状。
因此,治疗方案可能会根据你的具体情况进行调整,可能包括中药、针灸、推拿等方法。同时,中医强调调养身体的整体健康,包括饮食习惯、生活方式等方面,也会对改善这些症状有帮助。


# 使用 ollama 调取 gguf 版本模型(qwen:14b-chat-q4_K_M),耗时 90 秒

(transformer) (base) MacBook-Pro:python yuanzhenhui$ /Users/yuanzhenhui/anaconda3/envs/transformer/bin/python /Users/yuanzhenhui/Documents/code_space/git/processing/python/tcm_assistant/learning/local_model.py
>>> function ollama_transfor_msg totally use 90.6007969379425 seconds
>>>  中国传统医学,也就是中医,对于全身乏力和心跳过速等症状有自己的理论解释和治疗方案。
1. 全身乏力:中医认为这是“气虚”或者“阳虚”的表现。气是维持人体生命活动的物质基础,如果气不足,就会出现乏力、疲劳等症状。可能的原因包括饮食不当、劳累过度、久病体弱等。中医会通过调理饮食,增加营养,适当运动,以及服用补气的药物来改善。
2. 心跳过速:中医将其称为“心悸”或“心动过速”,可能与心脏气血不足、心阴亏损或者有某些病理因素如痰饮、瘀血等有关。中医治疗会根据具体病因采用益气养阴、化痰活血的方法,有时还会使用中药如炙甘草汤、归脾汤等。
然而,值得注意的是,虽然中医理论能够解释和在一定程度上处理这些症状,但在现代医学中,全身乏力伴随心跳过速也可能是心脏疾病(如心律失常)或其他疾病的症状。如果患者持续出现这些症状,应尽快就医,由专业医生进行诊断和治疗。

两者相差 20 秒,并且两次调用均未使用系统 GPU 资源进行推理。
使用一般 chat 版本在仅使用 CPU 算力的情况下比 gguf 版本响应速度更快?这貌似不太合理,但无论怎么样 69 秒还是有点慢了。到这一步可能有人会说,你穷就不要要求那么高了,本来人工智能就是要花钱的,有钱你上个外置显卡不就可以快了吗。

2. 基于 transformers 实现

难道只能这样结束了吗?No!

到目前为止能够确定的是:

  1. Metal 只支持 M系列芯片与 Intel 无缘
  2. 受限于硬件性能大参数模型无法在短时间内响应

为了满足以上条件,我这里选用 Qwen/Qwen1.5-0.5B-Chat 模型直接通过 transformers 进行部署,如下图:

...
import torch
from transformers import AutoModelForCausalLM, AutoTokenizer

pt_device = torch.device("cpu")
# 模型名称
pt_model_name = "Qwen/Qwen1.5-0.5B-Chat"
# 使用 pytorch 方式加载模型
pt_model = AutoModelForCausalLM.from_pretrained(
    pt_model_name,
    torch_dtype="auto",
    device_map="auto"
)
# 加载分词器
pt_tokenizer = AutoTokenizer.from_pretrained(pt_model_name)

# 给模型一个人设定位
sys_content = "You are a helpful assistant and also a senior expert in the traditional Chinese medicine industry. You are very willing to provide me with detailed opinions to help me grow."

"""
为PyTorch模型生成输入。

此函数以消息列表和批处理大小为输入。它使用pt_tokenizer将聊天模板应用于消息,禁用标记化并添加生成提示。然后使用pt_tokenizer对生成的文本进行标记化,并将其填充到指定的批处理大小。标记化的输入随后被转换为PyTorch张量并移动到pt_device。

Parameters:
    messages (List[Dict[str, str]]): 表示对话历史的字典列表。每个字典应该有键“角色”和“内容”。
    batch_size (int): 输入所需的批量大小。

Returns:
    torch.Tensor: PyTorch模型的输入张量,形状为(批量大小,序列长度)。
"""


def pt_model_input(messages):
    text = pt_tokenizer.apply_chat_template(
        messages,
        tokenize=False,
        add_generation_prompt=True
    )
    return pt_tokenizer([text], return_tensors="pt").to(pt_device)


"""
将给定的消息转换为PyTorch模型输入,并使用该模型生成文本。

Parameters:
    messages (List[Dict[str, str]]): 表示对话历史的字典列表。每个字典应该有键“角色”和“内容”。
    batch_size (int, optional): 输入所需的批量大小。默认为4。

Returns:
    str: 从 PyTorch 模型生成的文本。

Note:
    - 此函数使用pt_tokenizer将聊天模板应用于消息,禁用标记化并添加生成提示。
    - 然后使用pt_tokenizer对得到的文本进行标记,并填充到指定的批量大小。
    - 将标记化的输入转换为PyTorch张量并移动到pt_device。
    - PyTorch模型根据输入生成文本。
    - 生成的文本使用pt_tokenizer进行解码,并跳过特殊标记。
    - 仅返回第一个生成的文本。
"""


def pt_transfor_msg(messages):
    start_time = time.time()
    response_text = ''
    try:
        model_inputs = pt_model_input(messages)
        generated_ids = pt_model.generate(model_inputs.input_ids,max_new_tokens=1024)
        generated_ids = [
            output_ids[len(input_ids):] for input_ids, output_ids in zip(model_inputs.input_ids, generated_ids)
        ]
        response_text = pt_tokenizer.batch_decode(generated_ids, skip_special_tokens=True)[0]
    except Exception as e:
        print(f"Error: {e}")
    finally:
        execution_time = time.time() - start_time
        print(f">>> function pt_transfor_msg totally use {execution_time} seconds")
    return response_text


# 预执行一次去加载模型到内存
_ = pt_transfor_msg([{"role": "user", "content": "Hello"}])

"""
根据给定的提示,使用PyTorch和Qwen模型生成响应。

Parameters:
    prompt (str): 生成响应的用户输入提示。

Returns:
    str: 生成的响应文本。

Note:
    - 此函数使用pt_tokenizer将聊天模板应用于消息,禁用标记化并添加生成提示。
    - 然后使用pt_tokenizer对得到的文本进行标记,并填充到指定的批量大小。
    - 将标记化的输入转换为PyTorch张量并移动到pt_device。
    - PyTorch模型根据输入生成文本。
    - 生成的文本使用pt_tokenizer进行解码,并跳过特殊标记。
    - 仅返回第一个生成的文本。
"""


def pt_qwen_text(prompt):
    messages = [
        {"role": "system", "content": sys_content},
        {"role": "user", "content": prompt}
    ]
    return pt_transfor_msg(messages)


if __name__ == '__main__':
    prompt = "中医药理论是否能解释并解决全身乏力伴随心跳过速的症状?"
    response = pt_qwen_text(prompt)
    print(">>> "+response)

这段代码跟之前的代码没有太大的区别,还是用一般的 chat 模型,但是为了加快响应速度,这里预先做了一次“提问”预热。

_ = pt_transfor_msg([{"role": "user", "content": "Hello"}])

通过提问将模型加载到内存里面,之后再进行问题提问就会稍微快一些,如下图:

(transformer) (base) MacBook-Pro:python yuanzhenhui$ /Users/yuanzhenhui/anaconda3/envs/transformer/bin/python /Users/yuanzhenhui/Documents/code_space/git/processing/python/tcm_assistant/learning/local_model.py
Special tokens have been added in the vocabulary, make sure the associated word embeddings are fine-tuned or trained.
>>> function pt_transfor_msg totally use 30.924490928649902 seconds
>>> 中医药理论中的一些概念,如阴阳五行、脏腑经络等,可能在理解这些症状的根源上有一定的帮助。但是,具体的病因和治疗方案需要通过中医医生的专业判断来确定。
一般来说,全身乏力伴心跳过速可能是由于多种原因引起的,包括心肌梗死、心脏疾病、高血压、心脏病发作等。因此,中医理论不能简单地应用到所有的病症上,只能提供一些基本的诊断和治疗方法。
如果想要找出具体的病因,可以考虑通过检查血液中的糖水平、血压、血脂等指标,或者通过专业的医疗影像学检查,如心电图、X光片等。如果诊断结果显示没有心脏问题,那么可能是由其他原因引起的心力衰竭或糖尿病等慢性病所导致。
总的来说,虽然中医理论在一定程度上可能有助于理解一些疾病的发病机制,但并不是所有的问题都可以用中医方法解决。同时,中医治疗通常需要个体化的调整,不能代替药物治疗。

耗时 30 秒,通过缩减模型参数的方式将响应时间缩减到原来的一半。这种方式直接用于文本生成(text-generation)还是有点勉强的,但是如果只是用来做语意分析的话因为问题不大。
此外,有尝试过使用 ctransformers 来部署 gguf 模型,结果发现并不是所有的 gguf 模型都能够正常地部署。由于一直没有尝试到想要的结果因此先暂时放弃。

基于 OpenVINO 实现

OpenVINO 是一个开源工具包,用于优化和部署从云端到边缘的深度学习模型。开源公司是 Intel…是的,没有看错就是 Intel。详细的介绍如下我就不多说了:

OpenVINO 2024.1 — OpenVINO™ documentation

OpenVINO(以下简称“vino”)不能直接使用 transformers 实现,在 huggingface 中我们可以直接在 Libraries 分类中选择“OpenVINO”来筛选出别人已经编译好的模型,但是中文模型实在太少了(只有一个)。接下来给我们的就只有两条路,一个是通过 save_pretrained 先将模型下载到本地,然后再通过 OpenVINO Toolkit 进行转换:

https://www.intel.cn/content/www/cn/zh/developer/tools/openvino-toolkit/overview.html

但这样过于麻烦了,折腾到现在我只想将整个实现达到可容忍的范围内就可以了。于是我选择了另一种方案,采用 Optimum Intel 插件来调用 OpenVINO Runtime 运行推理。
先安装 optimum 插件,如下图:

(transformer) (base) MacBook-Pro:python yuanzhenhui$ pip install optimum[openvino]
Requirement already satisfied: optimum[openvino] in /Users/yuanzhenhui/anaconda3/envs/transformer/lib/python3.11/site-packages (1.19.1)
...
Installing collected packages: ninja, jstyleson, grapheme, wrapt, threadpoolctl, tabulate, rpds-py, pyparsing, pygments, openvino, natsort, mdurl, kiwisolver, future, fonttools, cycler, contourpy, cma, about-time, tiktoken, scikit-learn, referencing, pydot, openvino-tokenizers, matplotlib, markdown-it-py, Deprecated, autograd, alive-progress, rich, pymoo, jsonschema-specifications, jsonschema, nncf
  Attempting uninstall: openvino
    Found existing installation: openvino 2023.3.0
    Uninstalling openvino-2023.3.0:
      Successfully uninstalled openvino-2023.3.0
Successfully installed Deprecated-1.2.14 about-time-4.2.1 alive-progress-3.1.5 autograd-1.6.2 cma-3.2.2 contourpy-1.2.1 cycler-0.12.1 fonttools-4.51.0 future-1.0.0 grapheme-0.6.0 jsonschema-4.22.0 jsonschema-specifications-2023.12.1 jstyleson-0.0.2 kiwisolver-1.4.5 markdown-it-py-3.0.0 matplotlib-3.8.4 mdurl-0.1.2 natsort-8.4.0 ninja-1.11.1.1 nncf-2.10.0 openvino-2024.1.0 openvino-tokenizers-2024.1.0.0 pydot-2.0.0 pygments-2.18.0 pymoo-0.6.1.1 pyparsing-3.1.2 referencing-0.35.1 rich-13.7.1 rpds-py-0.18.1 scikit-learn-1.4.2 tabulate-0.9.0 threadpoolctl-3.5.0 tiktoken-0.6.0 wrapt-1.16.0

由于在其他尝试的时候已经将部分依赖安装了,所以整个 optimum 安装非常的快。接下来就可以编写调用代码了,如下图:

import time

import torch
from optimum.intel.openvino import OVModelForCausalLM
from transformers import AutoModelForCausalLM, AutoTokenizer

# 模型名称
pt_model_name = "Qwen/Qwen1.5-0.5B-Chat"

# 给模型一个人设定位
sys_content = "You are a helpful assistant and also a senior expert in the traditional Chinese medicine industry. You are very willing to provide me with detailed opinions to help me grow."


# 判断当前是否有 GPU,如果有则使用 GPU,否则使用 CPU
if torch.cuda.is_available():
    pt_device = torch.device("cuda")
else:
    pt_device = torch.device("cpu")


"""
为因果语言模型初始化 OpenVINO 优化模型和标记器。
此函数为“pt_model_name”指定的因果语言模型加载 OpenVINO 优化模型和标记器。它将全局变量“opt_model”和“opt_tokenizer”分别设置为初始化的模型和标记器。

Parameters:
    None

Returns:
    None

Side Effects:
    - 修改全局变量“opt_model”和“opt_tokenizer”。
    - 使用默认消息调用函数“opt_transform_msg”。

Raises:
    None
"""
def opt_init_model():
    global opt_model, opt_tokenizer
    opt_model = OVModelForCausalLM.from_pretrained(
        pt_model_name, 
        export=True, 
        trust_remote_code=True,
        offload_folder="offload", 
        offload_state_dict=True, 
        torch_dtype="auto",
        device_map="auto"
        )
    opt_tokenizer = AutoTokenizer.from_pretrained(pt_model_name)
    
    _ = opt_transfor_msg([{"role": "user", "content": "Hello"}])


def opt_model_input(messages):
    text = opt_tokenizer.apply_chat_template(messages, tokenize=False, add_generation_prompt=True)
    model_inputs = opt_tokenizer([text], return_tensors="pt").to(pt_device)
    input_ids = opt_tokenizer.encode(text, return_tensors='pt')
    attention_mask = torch.ones(input_ids.shape, dtype=torch.long, device=pt_device)
    return model_inputs, attention_mask

"""
根据给定的消息生成 OpenVINO 模型的输入。

Parameters:
    messages (List[Dict[str, str]]): 表示消息的字典列表。每个字典应该有“角色”和“内容”键。

Returns:
    Tuple[Dict[str, torch.Tensor], torch.Tensor]: 一个包含模型输入和注意力掩码的元组。
        - 模型输入是一个包含以下键的字典:
            - "input_ids": 一个形状为(批量大小,序列长度)的张量,包含分词后的输入id。
        - 注意力掩码是一个形状为(批量大小,序列长度)的张量,其中包含注意力掩码值。

Raises:
    None
"""

def opt_transfor_msg(messages):
    start_time = time.time()
    response_text = ''
    try:
        model_inputs, attention_mask = opt_model_input(messages)
        generated_ids = opt_model.generate(
            model_inputs.input_ids,
            attention_mask=attention_mask,
            max_new_tokens=1024,
            pad_token_id=opt_tokenizer.eos_token_id
        )
        generated_ids = [output_ids[len(input_ids):] for input_ids, output_ids in zip(model_inputs.input_ids, generated_ids)]
        response_text = opt_tokenizer.batch_decode(generated_ids, skip_special_tokens=True)[0]
    except Exception as e:
        print(f"Error: {e}")
    finally:
        execution_time = time.time() - start_time
        print(f">>> function opt_transfor_msg totally use {execution_time} seconds")
    return response_text


"""
使用OpenAI文本生成模型生成文本响应。

Parameters:
    prompt (str): 用于生成响应的输入文本提示。

Returns:
    str: 生成的文本响应。

Raises:
    None
"""

def opt_qwen_text(prompt):
    messages = [
        {"role": "system", "content": sys_content},
        {"role": "user", "content": prompt}
    ]
    return opt_transfor_msg(messages)


if __name__ == '__main__':
    prompt = "中医药理论是否能解释并解决全身乏力伴随心跳过速的症状?"
    opt_init_model()
    response = opt_qwen_text(prompt)
    print(">>> "+response)

以下是执行的情况,如下图:

(base) MacBook-Pro:python yuanzhenhui$ /Users/yuanzhenhui/anaconda3/envs/transformer/bin/python /Users/yuanzhenhui/Documents/code_space/git/processing/python/tcm_assistant/learning/local_model.py

# 首先系统会监测我是否安装好必须的插件
INFO:nncf:NNCF initialized successfully. Supported frameworks detected: torch, onnx, openvino

# 发现我并没有GPU的资源可用,这个是警告可以不用管
/Users/yuanzhenhui/anaconda3/envs/transformer/lib/python3.11/site-packages/bitsandbytes/cextension.py:34: UserWarning: The installed version of bitsandbytes was compiled without GPU support. 8-bit optimizers, 8-bit multiplication, and GPU quantization are unavailable.
  warn("The installed version of bitsandbytes was compiled without GPU support. "
'NoneType' object has no attribute 'cadam32bit_grad_fp32'

# 采用 export 参数将模型导出
Framework not specified. Using pt to export the model.
Special tokens have been added in the vocabulary, make sure the associated word embeddings are fine-tuned or trained.

# 使用 pytorch 2.1.2 进行导出,以下的都是警告可以忽略,不影响使用
Using framework PyTorch: 2.1.2
Overriding 1 configuration item(s)
        - use_cache -> True
/Users/yuanzhenhui/anaconda3/envs/transformer/lib/python3.11/site-packages/transformers/modeling_utils.py:4371: FutureWarning: `_is_quantized_training_enabled` is going to be deprecated in transformers 4.39.0. Please use `model.hf_quantizer.is_trainable` instead
  warnings.warn(
/Users/yuanzhenhui/anaconda3/envs/transformer/lib/python3.11/site-packages/transformers/modeling_attn_mask_utils.py:114: TracerWarning: Converting a tensor to a Python boolean might cause the trace to be incorrect. We can't record the data flow of Python values, so this value will be treated as a constant in the future. This means that the trace might not generalize to other inputs!
  if (input_shape[-1] > 1 or self.sliding_window is not None) and self.is_causal:
/Users/yuanzhenhui/anaconda3/envs/transformer/lib/python3.11/site-packages/optimum/exporters/onnx/model_patcher.py:300: TracerWarning: Converting a tensor to a Python boolean might cause the trace to be incorrect. We can't record the data flow of Python values, so this value will be treated as a constant in the future. This means that the trace might not generalize to other inputs!
  if past_key_values_length > 0:
/Users/yuanzhenhui/anaconda3/envs/transformer/lib/python3.11/site-packages/transformers/models/qwen2/modeling_qwen2.py:121: TracerWarning: Converting a tensor to a Python boolean might cause the trace to be incorrect. We can't record the data flow of Python values, so this value will be treated as a constant in the future. This means that the trace might not generalize to other inputs!
  if seq_len > self.max_seq_len_cached:
/Users/yuanzhenhui/anaconda3/envs/transformer/lib/python3.11/site-packages/transformers/models/qwen2/modeling_qwen2.py:681: TracerWarning: Converting a tensor to a Python boolean might cause the trace to be incorrect. We can't record the data flow of Python values, so this value will be treated as a constant in the future. This means that the trace might not generalize to other inputs!
  if attention_mask.size() != (bsz, 1, q_len, kv_seq_len):

# 通过 CPU 进行编译
Compiling the model to CPU ...
Special tokens have been added in the vocabulary, make sure the associated word embeddings are fine-tuned or trained.
>>> function opt_transfor_msg totally use 0.9080860614776611 seconds
>>> function opt_transfor_msg totally use 12.55846905708313 seconds
>>> 中医药理论认为,全身乏力伴随心跳过速的症状可能与多种因素有关,包括体质、环境、疾病等。以下是一些可能的原因:
1. 身质因素:体质虚弱的人群,如老年人、慢性疾病患者、免疫力低下的人等,可能会出现全身乏力、心跳过速等症状。
2. 环境因素:环境因素如过度劳累、情绪波动、饮食不规律等,也可能导致全身乏力、心跳过速等症状。
3. 疾病因素:某些疾病,如心脏病、糖尿病、高血压等,可能会导致全身乏力、心跳过速等症状。
4. 其他因素:如药物副作用、药物过敏、药物滥用等,也可能导致全身乏力、心跳过速等症状。
因此,中医理论不能简单地解释并解决全身乏力伴随心跳过速的症状,需要结合具体的体质、环境、疾病等多方面因素进行综合分析和治疗。同时,中医治疗也强调调整生活习惯,如保持良好的饮食习惯、规律的作息、适量的运动等,以改善身体状况。

通过使用 vino 居然将响应速度提升到 13 秒内。又在 transformers 的基础上提升了 50% 以上,在只有纯 CPU 资源的情况下还算是可以的了。但我又稍微将代码进行以下调整:

...

# 通过使用 padding 和 truncation 参数,可以确保输入文本在传递给模型之前具有统一的长度。这对于批处理和并行计算非常重要,因为模型需要接收形状一致的输入。
def opt_model_input(messages):
    text = opt_tokenizer.apply_chat_template(messages, tokenize=False, add_generation_prompt=True)
    model_inputs = opt_tokenizer(text, return_tensors="pt", padding=True, truncation=True).to(pt_device)
    return model_inputs

...

def opt_transfor_msg(messages):
    start_time = time.time()
    response_text = ''
    try:
        model_inputs = opt_model_input(messages)
        generated_ids = opt_model.generate(
            model_inputs.input_ids,
            attention_mask=model_inputs.attention_mask,
            max_new_tokens=512,
            num_beams=1, # 这里设置为1以加快推理速度
            pad_token_id=opt_tokenizer.eos_token_id
        )
        response_text = opt_tokenizer.batch_decode(generated_ids, skip_special_tokens=True)[0]
    except Exception as e:
        print(f"Error: {e}")
    finally:
        execution_time = time.time() - start_time
        print(f">>> function opt_transfor_msg totally use {execution_time} seconds")
    return response_text

执行的效果如下:

...
Compiling the model to CPU ...
Special tokens have been added in the vocabulary, make sure the associated word embeddings are fine-tuned or trained.
>>> function opt_transfor_msg totally use 0.9006850719451904 seconds
>>> function opt_transfor_msg totally use 11.58049988746643 seconds
>>> system
You are a helpful assistant and also a senior expert in the traditional Chinese medicine industry. You are very willing to provide me with detailed opinions to help me grow.
user
中医药理论是否能解释并解决全身乏力伴随心跳过速的症状?
assistant
中医药理论认为,全身乏力伴随心跳过速的症状可能与多种因素有关,包括体质、环境、疾病等。以下是一些可能的原因:
1. 身质因素:体质虚弱的人群,如老年人、慢性疾病患者、免疫力低下的人等,可能会出现全身乏力、心跳过速等症状。
2. 环境因素:环境因素如过度劳累、情绪波动、饮食不规律等,也可能导致全身乏力、心跳过速等症状。
3. 疾病因素:某些疾病,如心脏病、糖尿病、高血压等,可能会导致全身乏力、心跳过速等症状。
4. 其他因素:如药物副作用、药物过敏、药物滥用等,也可能导致全身乏力、心跳过速等症状。
因此,中医理论不能简单地解释并解决全身乏力伴随心跳过速的症状,需要结合具体的体质、环境、疾病等多方面因素进行综合分析和治疗。同时,中医治疗也强调调整生活习惯,如保持良好的饮食习惯、规律的作息、适量的运动等,以改善身体状况。

可以将执行时间压缩到 12 秒内。至此,基于 Intel 的 CPU Only 方案基本上结束了。由于最终也是使用 Qwen/Qwen1.5-0.5B-Chat 模型,因此就以 Qwen/Qwen1.5-0.5B-Chat 进行一下总结,为此我又用 ollama 重新下载了 Qwen/Qwen1.5-0.5B-Chat 进行对比,如下图:

(base) yuanzhenhui@MacBook-Pro ~ % ollama pull qwen:0.5b-chat
pulling manifest 
pulling fad2a06e4cc7... 100% ▕███████████████████████████████████████████████████████████████████████████████████▏ 394 MB                         
pulling 41c2cf8c272f... 100% ▕███████████████████████████████████████████████████████████████████████████████████▏ 7.3 KB                         
pulling 1da0581fd4ce... 100% ▕███████████████████████████████████████████████████████████████████████████████████▏  130 B                         
pulling f02dd72bb242... 100% ▕███████████████████████████████████████████████████████████████████████████████████▏   59 B                         
pulling ea0a531a015b... 100% ▕███████████████████████████████████████████████████████████████████████████████████▏  485 B                         
verifying sha256 digest 
writing manifest 
removing any unused layers 
success 

---

(base) MacBook-Pro:python yuanzhenhui$ /Users/yuanzhenhui/anaconda3/envs/transformer/bin/python /Users/yuanzhenhui/Documents/code_space/git/processing/python/tcm_assistant/learning/local_model.py
INFO:nncf:NNCF initialized successfully. Supported frameworks detected: torch, onnx, openvino
/Users/yuanzhenhui/anaconda3/envs/transformer/lib/python3.11/site-packages/bitsandbytes/cextension.py:34: UserWarning: The installed version of bitsandbytes was compiled without GPU support. 8-bit optimizers, 8-bit multiplication, and GPU quantization are unavailable.
  warn("The installed version of bitsandbytes was compiled without GPU support. "
'NoneType' object has no attribute 'cadam32bit_grad_fp32'
>>> function ollama_transfor_msg totally use 4.856121063232422 seconds
>>> 中医药理论认为,人体的生理功能是相互影响和调节的。因此,对于全身乏力伴心跳过速等症状的治疗,应该从整体上考虑中医理论中的各种元素。
具体来说,针对全身乏力伴心跳过速等症状,可能需要通过调整治疗方案来达到效果。
总的来说,中医药理论可以用来解释并解决全身乏力伴心跳过速等症状。

呃…在 ollama 中重新调用发现只需要 4 秒就完成了输出,但是回答的内容就相当敷衍。vino 方案中输出的结果明显比 ollama 方案数据的结果要来得完整,但是 0.5B 模型输出的效果我觉得 ollama 的输出才算是正常的(毕竟 0.5B 参数少不能要求太高,而 vino 方案输出的感觉更超越上面提到的 14b-chat-q4_K_M 的输出,难道我也出现“幻觉”了?)。

anyway,现在用 vino 方案再换个 1.8B 或者 gamme 2B 应该问题不大了吧。

4. 后记(其他试验)

4.1 基于 llama-cpp-python 试验

llama-cpp-python 是基于 python 的 llama.cpp 解决方案。

Getting Started - llama-cpp-python

上面的 cookbook 中也有说明如何配置 Metal GPUs ,事不宜迟马上开干。
首先下载一个miniforge3 并重新配置一个 python 环境,如下图:

Release Release 24.3.0-0 · conda-forge/miniforge

自己选择合适的脚本。接着就可以开始安装了。如下图:

(base) yuanzhenhui@MacBook-Pro Documents % bash Miniforge3-MacOSX-x86_64.sh    

Welcome to Miniforge3 24.3.0-0

In order to continue the installation process, please review the license
agreement.
Please, press ENTER to continue
>>> 
Miniforge installer code uses BSD-3-Clause license as stated below.

Binary packages that come with it have their own licensing terms
and by installing miniforge you agree to the licensing terms of individual
packages as well. They include different OSI-approved licenses including
the GNU General Public License and can be found in pkgs/<pkg-name>/info/licenses
folders.

...
CAUSED AND ON ANY THEORY OF LIABILITY, WHETHER IN CONTRACT, STRICT LIABILITY,
OR TORT (INCLUDING NEGLIGENCE OR OTHERWISE) ARISING IN ANY WAY OUT OF THE USE
OF THIS SOFTWARE, EVEN IF ADVISED OF THE POSSIBILITY OF SUCH DAMAGE.


Do you accept the license terms? [yes|no]
>>> yes

Miniforge3 will now be installed into this location:
...
Extracting mamba-1.5.8-py310h6bde348_0.conda

Installing base environment...

Transaction

  Prefix: /Users/yuanzhenhui/miniforge3

  Updating specs:

   - conda-forge/osx-64::bzip2==1.0.8=h10d778d_5[md5=6097a6ca9ada32699b5fc4312dd6ef18]
...
   - conda-forge/osx-64::conda==24.3.0=py310h2ec42d9_0[md5=edeb7e98b7b2ff05133c584aa2c732ca]
   - conda-forge/osx-64::mamba==1.5.8=py310h6bde348_0[md5=d8f96626a2a8515c9e51b90001345db6]


  Package                         Version  Build               Channel         Size
─────────────────────────────────────────────────────────────────────────────────────
  Install:
─────────────────────────────────────────────────────────────────────────────────────

  + bzip2                           1.0.8  h10d778d_5          conda-forge         
  ...        
  + conda                          24.3.0  py310h2ec42d9_0     conda-forge         
  + mamba                           1.5.8  py310h6bde348_0     conda-forge         

  Summary:

  Install: 69 packages

  Total download: 0 B

─────────────────────────────────────────────────────────────────────────────────────


Transaction starting
Linking bzip2-1.0.8-h10d778d_5
...
Linking mamba-1.5.8-py310h6bde348_0

Transaction finished

To activate this environment, use:

    micromamba activate /Users/yuanzhenhui/miniforge3

Or to execute a single command in this environment, use:

    micromamba run -p /Users/yuanzhenhui/miniforge3 mycommand

installation finished.
Do you wish to update your shell profile to automatically initialize conda?
This will activate conda on startup and change the command prompt when activated.
If you'd prefer that conda's base environment not be activated on startup,
   run the following command when conda is activated:

conda config --set auto_activate_base false

You can undo this by running `conda init --reverse $SHELL`? [yes|no]
[no] >>> yes
no change     /Users/yuanzhenhui/miniforge3/condabin/conda
no change     /Users/yuanzhenhui/miniforge3/bin/conda
...
no change     /Users/yuanzhenhui/miniforge3/etc/profile.d/conda.csh
modified      /Users/yuanzhenhui/.zshrc

==> For changes to take effect, close and re-open your current shell. <==

/Users/yuanzhenhui/miniforge3/lib/python3.10/site-packages/mamba/mamba.py:889: DeprecationWarning: conda.cli.main.generate_parser is deprecated and will be removed in 24.9. Use `conda.cli.conda_argparse.generate_parser` instead.
  p = generate_parser()
no change     /Users/yuanzhenhui/miniforge3/condabin/conda
no change     /Users/yuanzhenhui/miniforge3/bin/conda
...
no change     /Users/yuanzhenhui/miniforge3/etc/profile.d/conda.csh
no change     /Users/yuanzhenhui/.zshrc
No action taken.
Added mamba to /Users/yuanzhenhui/.zshrc

==> For changes to take effect, close and re-open your current shell. <==

Thank you for installing Miniforge3!

安装 miniforge3 之后重建一个新的开发环境吧(以免之前的环境收到污染),如下图:

(base) yuanzhenhui@MacBook-Pro ~ % conda info --envs
# conda environments:
#
                         /Users/yuanzhenhui/anaconda3
                         /Users/yuanzhenhui/anaconda3/envs/autokeras
                         /Users/yuanzhenhui/anaconda3/envs/transformer
base                  *  /Users/yuanzhenhui/miniforge3
(base) yuanzhenhui@MacBook-Pro ~ % conda create -n llama python=3.11.7
Retrieving notices: ...working... done
Channels:
 - defaults
 - conda-forge
Platform: osx-64
Collecting package metadata (repodata.json): done
Solving environment: done


==> WARNING: A newer version of conda exists. <==
    current version: 24.3.0
    latest version: 24.4.0

Please update conda by running

    $ conda update -n base -c conda-forge conda

## Package Plan ##

  environment location: /Users/yuanzhenhui/miniforge3/envs/llama

  added / updated specs:
    - python=3.11.7


The following packages will be downloaded:

    package                    |            build
    ---------------------------|-----------------
    bzip2-1.0.8                |       h6c40b1e_5         151 KB
 ...
    zlib-1.2.13                |       h4dc903c_0          96 KB
    ------------------------------------------------------------
                                           Total:        31.4 MB

The following NEW packages will be INSTALLED:

  bzip2              pkgs/main/osx-64::bzip2-1.0.8-h6c40b1e_5 
...
  zlib               pkgs/main/osx-64::zlib-1.2.13-h4dc903c_0 

Proceed ([y]/n)? y

Downloading and Extracting Packages:

Preparing transaction: done
Verifying transaction: done
Executing transaction: done
#                                                      
# To activate this environment, use
#
#     $ conda activate llama
#
# To deactivate an active environment, use
#     $ conda deactivate
(base) yuanzhenhui@MacBook-Pro ~ % conda activate llama
(llama) yuanzhenhui@MacBook-Pro ~ %

接下来就可以安装 llama-cpp-python 了。由于我不确定是否能够用 Metal 作为模型的推理算力,因此我 CMAKE_ARGS 参数添加了变量 "-DLLAMA_METAL=on"进行编译。如下图:

(llama) yuanzhenhui@MacBook-Pro ~ % CMAKE_ARGS="-DLLAMA_METAL=on" pip install -U llama-cpp-python --no-cache-dir
...
Building wheels for collected packages: llama-cpp-python
  Building wheel for llama-cpp-python (pyproject.toml) ... error
  error: subprocess-exited-with-error
  
  × Building wheel for llama-cpp-python (pyproject.toml) did not run successfully.
  │ exit code: 1
  ╰─> [357 lines of output]
      *** scikit-build-core 0.9.3 using CMake 3.28.2 (wheel)
      *** Configuring CMake...
      2024-04-30 10:25:02,785 - scikit_build_core - WARNING - Can't find a Python library, got libdir=/Users/yuanzhenhui/miniforge3/envs/llama/lib, ldlibrary=libpython3.11.a, multiarch=darwin, masd=None
     ...
      ninja: build stopped: subcommand failed.

      *** CMake build failed
      [end of output]
  
  note: This error originates from a subprocess, and is likely not a problem with pip.
  ERROR: Failed building wheel for llama-cpp-python
Failed to build llama-cpp-python
ERROR: Could not build wheels for llama-cpp-python, which is required to install pyproject.toml-based projects

如上图所示,在 cmake 的时候出现了错误,这个时候检查自己电脑里面的 xcode 是否已经安装完成,没有的话就重置一次。如下图:

(llama) yuanzhenhui@MacBook-Pro ~ % sudo xcode-select -r
Password:
(llama) yuanzhenhui@MacBook-Pro ~ % xcode-select -p       
/Applications/Xcode.app/Contents/Developer

xcode 问题解决了之后基本上就能够顺利完成安装,如下图:

(llama) yuanzhenhui@MacBook-Pro ~ % CMAKE_ARGS="-DLLAMA_METAL=on" pip install -U llama-cpp-python --no-cache-dir
...
Successfully built llama-cpp-python
Installing collected packages: typing-extensions, numpy, MarkupSafe, diskcache, jinja2, llama-cpp-python
Successfully installed MarkupSafe-2.1.5 diskcache-5.6.3 jinja2-3.1.3 llama-cpp-python-0.2.65 numpy-1.26.4 typing-extensions-4.11.0

最后安装一下 llama-cpp-python 的 server 版本,如下图:

(llama) yuanzhenhui@MacBook-Pro ~ % pip install 'llama-cpp-python[server]'
Requirement already satisfied: llama-cpp-python[server] in ./miniforge3/envs/llama/lib/python3.11/site-packages (0.2.65)
...
Installing collected packages: sniffio, PyYAML, python-dotenv, pydantic-core, idna, h11, click, annotated-types, uvicorn, pydantic, anyio, starlette, pydantic-settings, starlette-context, sse-starlette, fastapi
Successfully installed PyYAML-6.0.1 annotated-types-0.6.0 anyio-4.3.0 click-8.1.7 fastapi-0.110.3 h11-0.14.0 idna-3.7 pydantic-2.7.1 pydantic-core-2.18.2 pydantic-settings-2.2.1 python-dotenv-1.0.1 sniffio-1.3.1 sse-starlette-2.1.0 starlette-0.37.2 starlette-context-0.3.6 uvicorn-0.29.0

完成之后就能够启动 gguf 模型了。由于 llama_cpp_python 是 python 应用,因此采用 python3 关键字启动,如下图:

(llama) yuanzhenhui@MacBook-Pro 1e2e136ec2ff4e5ea297d4da75581b6bd4b40ca8 % python3 -m llama_cpp.server --model /Users/yuanzhenhui/.cache/huggingface/hub/models--Qwen--Qwen1.5-14B-Chat-GGUF/snapshots/1e2e136ec2ff4e5ea297d4da75581b6bd4b40ca8/qwen1_5-14b-chat-q4_k_m.gguf --n_gpu_layers 1
llama_model_loader: loaded meta data with 21 key-value pairs and 483 tensors from /Users/yuanzhenhui/.cache/huggingface/hub/models--Qwen--Qwen1.5-14B-Chat-GGUF/snapshots/1e2e136ec2ff4e5ea297d4da75581b6bd4b40ca8/qwen1_5-14b-chat-q4_k_m.gguf (version GGUF V3 (latest))
llama_model_loader: Dumping metadata keys/values. Note: KV overrides do not apply in this output.
llama_model_loader: - kv   0:                       general.architecture str              = qwen2
...
llama_model_loader: - type  f32:  201 tensors
...
llm_load_vocab: missing pre-tokenizer type, using: 'default'
llm_load_vocab:                                             
llm_load_vocab: ************************************        
llm_load_vocab: GENERATION QUALITY WILL BE DEGRADED!        
llm_load_vocab: CONSIDER REGENERATING THE MODEL             
llm_load_vocab: ************************************        
llm_load_vocab:                                             
llm_load_vocab: special tokens definition check successful ( 421/152064 ).
llm_load_print_meta: format           = GGUF V3 (latest)
...
llm_load_tensors: ggml ctx size =    0.46 MiB
ggml_backend_metal_log_allocated_size: allocated buffer, size =   209.09 MiB, (  213.38 /  1536.00)
llm_load_tensors: offloading 1 repeating layers to GPU
llm_load_tensors: offloaded 1/41 layers to GPU
llm_load_tensors:        CPU buffer size =  8759.57 MiB
llm_load_tensors:      Metal buffer size =   209.09 MiB
...........................................................................................
llama_new_context_with_model: n_ctx      = 2048
llama_new_context_with_model: n_batch    = 512
llama_new_context_with_model: n_ubatch   = 512
llama_new_context_with_model: flash_attn = 0
llama_new_context_with_model: freq_base  = 1000000.0
llama_new_context_with_model: freq_scale = 1
ggml_metal_init: allocating
ggml_metal_init: found device: Intel(R) Iris(TM) Plus Graphics
ggml_metal_init: picking default device: Intel(R) Iris(TM) Plus Graphics
ggml_metal_init: using embedded metal library
ggml_metal_init: error: Error Domain=MTLLibraryErrorDomain Code=3 "program_source:1879:9: error: invalid type 'const constant int64_t &' (aka 'const constant long &') for buffer declaration
        constant  int64_t & ne00,
        ^~~~~~~~~~~~~~~~~~~~~~~~
program_source:1879:19: note: type 'int64_t' (aka 'long') cannot be used in buffer pointee type
        constant  int64_t & ne00,
                  ^
...                                                                                                 ^
llama_new_context_with_model: failed to initialize Metal backend
...
ValueError: Failed to create llama_context
warning: failed to munlock buffer: Cannot allocate memory
(llama) yuanzhenhui@MacBook-Pro 1e2e136ec2ff4e5ea297d4da75581b6bd4b40ca8 % 

上面在执行指令中传入“–n_gpu_layers 1”参数将一层处理交给 GPU 来推理,主要是用于验证 Metal 是否生效。但通过输出可知,显卡是已经检测到了,无奈在初始化 Metal 的时候出现问题了(在连续下载几个其他的模型进行验证后发现,还是 Intel 显卡不兼容的问题),这个时候不得不放弃使用 Metal 进行推理的这个想法了。
但还是不死心… 在 github 中找到了另外一个解决方案,如下图:
image.png
既然 Metal 不行,那用 clblast 来试试(死马当活马医)。

先安装 clblast ,如下图:

(llama) yuanzhenhui@MacBook-Pro ~ % brew update && brew install clblast
==> Downloading https://mirrors.aliyun.com/homebrew/homebrew-bottles/bottles-portable-ruby/portable-ruby-3.1.4.el_capitan.bottle.tar.gz
########################################################################################################################################### 100.0%
==> Pouring portable-ruby-3.1.4.el_capitan.bottle.tar.gz
Updated 2 taps (homebrew/core and homebrew/cask).
...
==> Fetching clblast
==> Downloading https://mirrors.aliyun.com/homebrew/homebrew-bottles/clblast-1.6.2.ventura.bottle.tar.gz
########################################################################################################################################### 100.0%
==> Pouring clblast-1.6.2.ventura.bottle.tar.gz
🍺  /usr/local/Cellar/clblast/1.6.2: 41 files, 13.2MB
==> Running `brew cleanup clblast`...
...
Removing: /Users/yuanzhenhui/Library/Caches/Homebrew/wget--1.21.4.ventura.bottle.tar.gz... (1.5MB)

接下来就删除原来的 llama-cpp-python 并重新安装。同理,这次加上 CMAKE_ARGS 参数 “-DLLAMA_CLBLAST=on” ,如下图:

(llama) yuanzhenhui@MacBook-Pro ~ % pip uninstall llama-cpp-python -y
Found existing installation: llama_cpp_python 0.2.69
Uninstalling llama_cpp_python-0.2.69:
  Successfully uninstalled llama_cpp_python-0.2.69
(llama) yuanzhenhui@MacBook-Pro ~ % CMAKE_ARGS="-DLLAMA_CLBLAST=on" FORCE_CMAKE=1 pip install -U llama-cpp-python --no-cache-dir 
...
Building wheels for collected packages: llama-cpp-python
  Building wheel for llama-cpp-python (pyproject.toml) ... error
  error: subprocess-exited-with-error
  
  × Building wheel for llama-cpp-python (pyproject.toml) did not run successfully.
  │ exit code: 1
  ╰─> [93 lines of output]
      *** scikit-build-core 0.9.3 using CMake 3.28.2 (wheel)
      *** Configuring CMake...
      2024-05-04 16:29:27,291 - scikit_build_core - WARNING - Can't find a Python library, got libdir=/Users/yuanzhenhui/miniforge3/envs/llama/lib, ldlibrary=libpython3.11.a, multiarch=darwin, masd=None
      loading initial cache file /var/folders/74/mmb55nf927x36pb3bv43_zd40000gn/T/tmp1w3bk5cq/build/CMakeInit.txt
      -- The C compiler identification is AppleClang 14.0.3.14030022
      -- The CXX compiler identification is AppleClang 14.0.3.14030022
...
      
      CMake Error in vendor/llama.cpp/CMakeLists.txt:
        Imported target "clblast" includes non-existent path
      
          "/Library/Developer/CommandLineTools/SDKs/MacOSX13.sdk/System/Library/Frameworks/OpenCL.framework"
      
        in its INTERFACE_INCLUDE_DIRECTORIES.  Possible reasons include:
      
        * The path was deleted, renamed, or moved to another location.
      
        * An install or uninstall procedure did not complete successfully.
      
        * The installation package was faulty and references files it does not
        provide.

      -- Generating done (0.0s)
      CMake Generate step failed.  Build files cannot be regenerated correctly.
      
      *** CMake configuration failed
      [end of output]
  
  note: This error originates from a subprocess, and is likely not a problem with pip.
  ERROR: Failed building wheel for llama-cpp-python
Failed to build llama-cpp-python
ERROR: Could not build wheels for llama-cpp-python, which is required to install pyproject.toml-based projects

额… 又报错了,但可以看出主要是因为 “/Library/Developer/CommandLineTools/SDKs/MacOSX13.sdk/System/Library/Frameworks/OpenCL.framework” 路径缺失,通过 ls 得知在“/Library/Developer/CommandLineTools/SDKs/”路径下只存在MacOSX.sdk、MacOSX10.14.sdk 和 MacOSX10.15.sdk 并没有 MacOSX13.sdk 的身影。

(llama) yuanzhenhui@MacBook-Pro bin % cd /Library/Developer/CommandLineTools/SDKs/            
(llama) yuanzhenhui@MacBook-Pro SDKs % ls
MacOSX.sdk      MacOSX10.14.sdk MacOSX10.15.sdk
(llama) yuanzhenhui@MacBook-Pro SDKs % cd ../..
(llama) yuanzhenhui@MacBook-Pro Developer % sudo rm -rf CommandLineTools
Password:
(llama) yuanzhenhui@MacBook-Pro Developer % xcode-select --install
xcode-select: note: install requested for command line developer tools
(llama) yuanzhenhui@MacBook-Pro Developer % ls /Library/Developer/CommandLineTools/SDKs/
MacOSX.sdk      MacOSX12.3.sdk  MacOSX12.sdk    MacOSX13.1.sdk  MacOSX13.3.sdk  MacOSX13.sdk

尝试了很多办法都不奏效,于是把心一横就将“CommandLineTools”目录删除重新安装一次,结果发现还真的可以。接着就重新下载并编译 llama-cpp-python,如下图:

(llama) yuanzhenhui@MacBook-Pro Developer % CMAKE_ARGS="-DLLAMA_CLBLAST=on" FORCE_CMAKE=1 pip install -U llama-cpp-python --no-cache-dir
...
Successfully built llama-cpp-python
Installing collected packages: llama-cpp-python
Successfully installed llama-cpp-python-0.2.69

但是…在运行模型后发现跟之前 Metal 结果是一样的(这里就不展示了),那么剩下的就只能 CPU Only。
同理,先删除 llama-cpp-python 再重新安装,这次使用 “-DLLAMA_BLAS=ON -DLLAMA_BLAS_VENDOR=OpenBLAS” 作为编译参数,如下图:

(llama) yuanzhenhui@MacBook-Pro ~ % CMAKE_ARGS="-DLLAMA_BLAS=ON -DLLAMA_BLAS_VENDOR=OpenBLAS" FORCE_CMAKE=1 pip install -U llama-cpp-python --no-cache-dir pip install 'llama-cpp-python[server]'
...
Successfully built llama-cpp-python
Installing collected packages: pip, install, llama-cpp-python
  Attempting uninstall: pip
    Found existing installation: pip 23.3.1
    Uninstalling pip-23.3.1:
      Successfully uninstalled pip-23.3.1
Successfully installed install-1.3.5 llama-cpp-python-0.2.69 pip-24.0

成功运行模型,但是…

(llama) yuanzhenhui@MacBook-Pro ~ % python3 -m llama_cpp.server --model /Users/yuanzhenhui/.cache/huggingface/hub/models--Qwen--Qwen1.5-14B-Chat-GGUF/snapshots/1e2e136ec2ff4e5ea297d4da75581b6bd4b40ca8/qwen1_5-14b-chat-q4_k_m.gguf --n_gpu_layers 0 --n_batch 32 --n_ctx 512
llama_model_loader: loaded meta data with 21 key-value pairs and 483 tensors from /Users/yuanzhenhui/.cache/huggingface/hub/models--Qwen--Qwen1.5-14B-Chat-GGUF/snapshots/1e2e136ec2ff4e5ea297d4da75581b6bd4b40ca8/qwen1_5-14b-chat-q4_k_m.gguf (version GGUF V3 (latest))
llama_model_loader: Dumping metadata keys/values. Note: KV overrides do not apply in this output.
llama_model_loader: - kv   0:                       general.architecture str              = qwen2
...
llama_model_loader: - type  f32:  201 tensors
llama_model_loader: - type q5_0:   20 tensors
llama_model_loader: - type q8_0:   20 tensors
llama_model_loader: - type q4_K:  221 tensors
llama_model_loader: - type q6_K:   21 tensors
llm_load_vocab: missing pre-tokenizer type, using: 'default'
llm_load_vocab:                                             
llm_load_vocab: ************************************        
llm_load_vocab: GENERATION QUALITY WILL BE DEGRADED!        
llm_load_vocab: CONSIDER REGENERATING THE MODEL             
llm_load_vocab: ************************************        
llm_load_vocab:                                             
llm_load_vocab: special tokens definition check successful ( 421/152064 ).
llm_load_print_meta: format           = GGUF V3 (latest)
...
llm_load_tensors: ggml ctx size =    0.23 MiB
llm_load_tensors: offloading 0 repeating layers to GPU
llm_load_tensors: offloaded 0/41 layers to GPU
llm_load_tensors:        CPU buffer size =  8759.57 MiB
...........................................................................................
llama_new_context_with_model: n_ctx      = 512
llama_new_context_with_model: n_batch    = 32
llama_new_context_with_model: n_ubatch   = 32
llama_new_context_with_model: flash_attn = 0
llama_new_context_with_model: freq_base  = 1000000.0
llama_new_context_with_model: freq_scale = 1
llama_kv_cache_init:        CPU KV buffer size =   400.00 MiB
llama_new_context_with_model: KV self size  =  400.00 MiB, K (f16):  200.00 MiB, V (f16):  200.00 MiB
llama_new_context_with_model:        CPU  output buffer size =     0.60 MiB
llama_new_context_with_model:        CPU compute buffer size =    19.19 MiB
llama_new_context_with_model: graph nodes  = 1406
llama_new_context_with_model: graph splits = 1
AVX = 1 | AVX_VNNI = 0 | AVX2 = 1 | AVX512 = 1 | AVX512_VBMI = 1 | AVX512_VNNI = 1 | FMA = 1 | NEON = 0 | ARM_FMA = 0 | F16C = 1 | FP16_VA = 0 | WASM_SIMD = 0 | BLAS = 1 | SSE3 = 1 | SSSE3 = 1 | VSX = 0 | MATMUL_INT8 = 0 | LLAMAFILE = 1 | 
Model metadata: {'general.file_type': '15', 'general.quantization_version': '2', 'tokenizer.chat_template': "{% for message in messages %}{{'<|im_start|>' + message['role'] + '\n' + message['content'] + '<|im_end|>' + '\n'}}{% endfor %}{% if add_generation_prompt %}{{ '<|im_start|>assistant\n' }}{% endif %}", 'tokenizer.ggml.bos_token_id': '151643', 'tokenizer.ggml.padding_token_id': '151643', 'tokenizer.ggml.eos_token_id': '151645', 'tokenizer.ggml.model': 'gpt2', 'qwen2.use_parallel_residual': 'true', 'qwen2.rope.freq_base': '1000000.000000', 'qwen2.attention.layer_norm_rms_epsilon': '0.000001', 'qwen2.embedding_length': '5120', 'qwen2.attention.head_count_kv': '40', 'qwen2.context_length': '32768', 'qwen2.attention.head_count': '40', 'general.architecture': 'qwen2', 'qwen2.block_count': '40', 'qwen2.feed_forward_length': '13696', 'general.name': 'Qwen1.5-14B-Chat-AWQ-fp16'}
Guessed chat format: chatml
INFO:     Started server process [75940]
INFO:     Waiting for application startup.
INFO:     Application startup complete.
INFO:     Uvicorn running on http://localhost:8000 (Press CTRL+C to quit)
zsh: segmentation fault  python3 -m llama_cpp.server --model  --n_gpu_layers 0 --n_batch 32 --n_ctx 51

在 python 调用时出现这个错误并且整个 llama-cpp-python 自动 shutdown 了。直到最后我坚信应该是这 3 个问题导致的:

  1. 本机资源不够;
  2. llama.cpp、llama-cpp-python 相关参数不够熟悉,估计是不是那个地方还没有参透;
  3. 下载的 gguf 模型有问题;

虽然 llama-cpp-python 方案最终也没有部署成功,但还是让我学习了很多东西的。后面有显卡的时候再研究一下吧,国外还是有不少人在用的,社区活跃度也很好。

4.2 关于 GPTQ 使用问题

其实我还试过“Qwen/Qwen1.5-MoE-A2.7B-Chat-GPTQ-Int4”模型。可能是因为 GPTQ 的问题,在运行之后发现以下的问题(虽然没用到但是记录一下)。

4.2.1 No package metadata was found for optimum
  File "/Users/yuanzhenhui/anaconda3/envs/transformer/lib/python3.11/importlib/metadata/__init__.py", line 565, in from_name
    raise PackageNotFoundError(name)
importlib.metadata.PackageNotFoundError: No package metadata was found for optimum

这个问题可以通过“pip install datasets transformers optimum[graphcore]”来解决。

4.2.2 No package metadata was found for auto-gptq
  File "/Users/yuanzhenhui/anaconda3/envs/transformer/lib/python3.11/importlib/metadata/__init__.py", line 565, in from_name
    raise PackageNotFoundError(name)
importlib.metadata.PackageNotFoundError: No package metadata was found for auto-gptq
(transformer) (base) MacBook-Pro:python yuanzhenhui$ pip install auto-gptq
Collecting auto-gptq
  Downloading auto_gptq-0.7.1.tar.gz (126 kB)
     ━━━━━━━━━━━━━━━━━━━━━━━━━━━━━━━━━━━━━━━━ 126.1/126.1 kB 303.9 kB/s eta 0:00:00
  Preparing metadata (setup.py) ... error
  error: subprocess-exited-with-error
  
  × python setup.py egg_info did not run successfully.
  │ exit code: 1
  ╰─> [7 lines of output]
      Traceback (most recent call last):
        File "<string>", line 2, in <module>
        File "<pip-setuptools-caller>", line 34, in <module>
        File "/private/var/folders/74/mmb55nf927x36pb3bv43_zd40000gn/T/pip-install-t9gd_tqp/auto-gptq_c7ea0b93cf434a01b10e841b562b886a/setup.py", line 62, in <module>
          CUDA_VERSION = "".join(os.environ.get("CUDA_VERSION", default_cuda_version).split("."))
                                 ^^^^^^^^^^^^^^^^^^^^^^^^^^^^^^^^^^^^^^^^^^^^^^^^^^^^^^^^^^
      AttributeError: 'NoneType' object has no attribute 'split'
      [end of output]
  
  note: This error originates from a subprocess, and is likely not a problem with pip.
error: metadata-generation-failed

× Encountered error while generating package metadata.
╰─> See above for output.

note: This is an issue with the package mentioned above, not pip.
hint: See above for details.

由于我没有 Nvidia 显卡自然也没有 CUDA 核心,因此需要使用“BUILD_CUDA_EXT=0 pip install auto-gptq”来进行安装。

  • 26
    点赞
  • 22
    收藏
    觉得还不错? 一键收藏
  • 打赏
    打赏
  • 0
    评论

“相关推荐”对你有帮助么?

  • 非常没帮助
  • 没帮助
  • 一般
  • 有帮助
  • 非常有帮助
提交
评论
添加红包

请填写红包祝福语或标题

红包个数最小为10个

红包金额最低5元

当前余额3.43前往充值 >
需支付:10.00
成就一亿技术人!
领取后你会自动成为博主和红包主的粉丝 规则
hope_wisdom
发出的红包

打赏作者

Kida 的技术小屋

你的鼓励将是我创作的最大动力

¥1 ¥2 ¥4 ¥6 ¥10 ¥20
扫码支付:¥1
获取中
扫码支付

您的余额不足,请更换扫码支付或充值

打赏作者

实付
使用余额支付
点击重新获取
扫码支付
钱包余额 0

抵扣说明:

1.余额是钱包充值的虚拟货币,按照1:1的比例进行支付金额的抵扣。
2.余额无法直接购买下载,可以购买VIP、付费专栏及课程。

余额充值