


项目场景:
记录chatglm-130b的部署过程
本地服务器环境:A40 (48G) *4 Ubuntu 20.04.3 LTS
安装过程
建立虚拟环境
conda create -n glm_130b python=3.9.16
给服务器安装CUDA
nvidia-smi

由于torch没有和cuda12.0相匹配的版本,并且本项目后续需要安装apex(这个包特别关键),这个包需要torch的cuda版本和服务器的cuda版本保持一致,因此本项目需要给服务器装上另外一个低版本的cuda。
如果自己服务器上的cuda能够与torch官网上的cuda可以匹配的话,可以跳过这一步。
步骤1. 在NVIDIA官网找到需要安装的CUDA版本
https://developer.nvidia.com/cuda-toolkit-archive

步骤2. 选择适合自己机器的版本进行安装
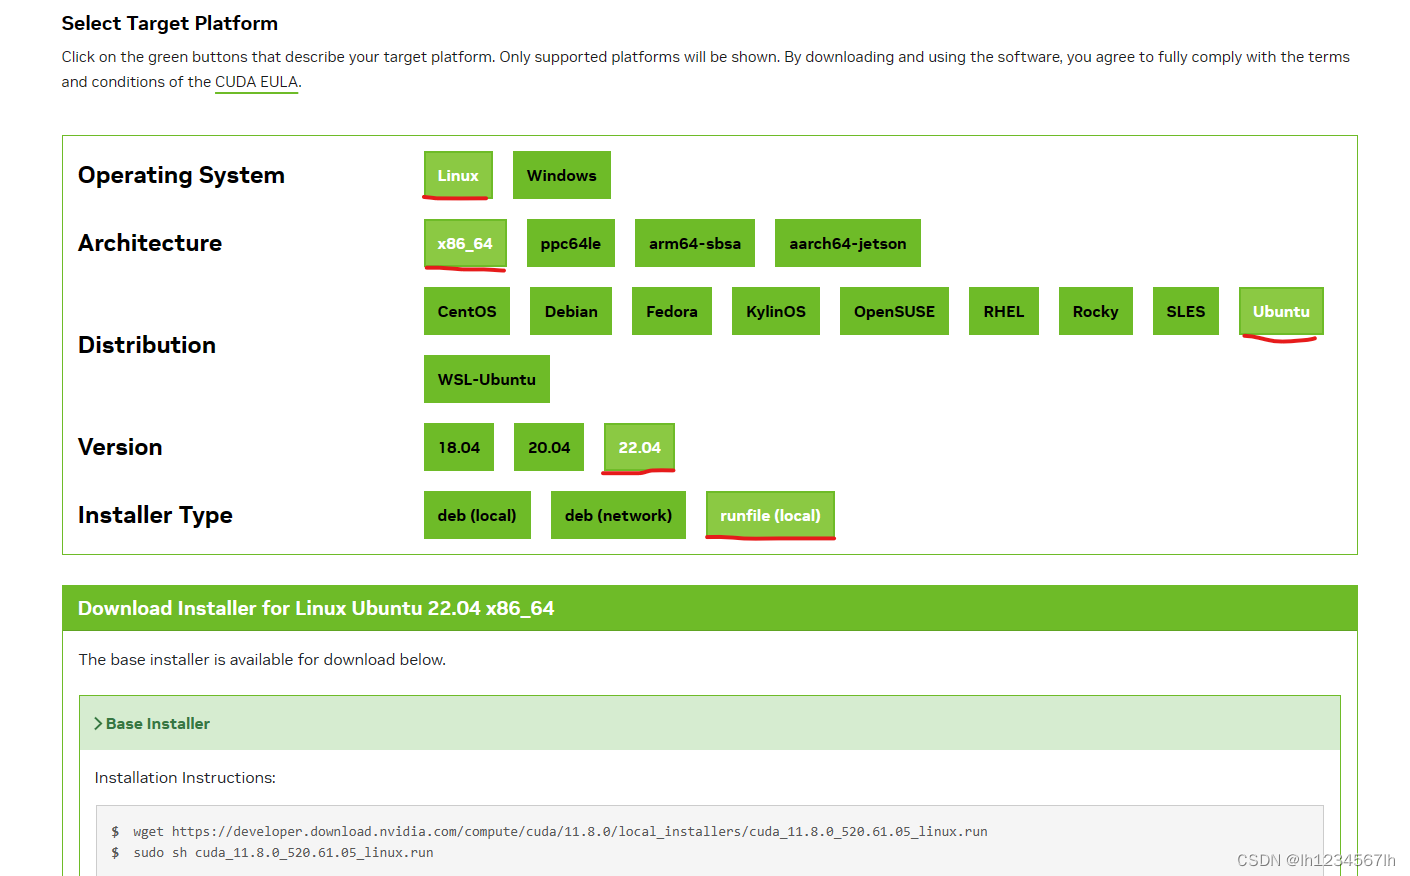
根据自己机器的配置选择安装,本项目安装的是CUDA11.8 ,Ubuntu 20.04。在linux服务器上执行下面两段代码:
wget https://developer.download.nvidia.com/compute/cuda/11.8.0/local_installers/cuda_11.8.0_520.61.05_linux.run
sudo sh cuda_11.8.0_520.61.05_linux.run
手动输入accept之后会弹出另一个安装界面,在这里选择需要安装的安装项。在这里由于本机已安装Driver(12.0 显卡驱动),所以本次安装取消Driver(取消方法通过上下按键选中Driver,然后按回车取消),然后Installl即可
步骤3.切换cuda版本,建立软连接
提供一段大佬写的脚本
	#!/usr/bin/env bash

	# Copyright (c) 2018 Patrick Hohenecker
	#
	# Permission is hereby granted, free of charge, to any person obtaining a copy
	# of this software and associated documentation files (the "Software"), to deal
	# in the Software without restriction, including without limitation the rights
	# to use, copy, modify, merge, publish, distribute, sublicense, and/or sell
	# copies of the Software, and to permit persons to whom the Software is
	# furnished to do so, subject to the following conditions:
	#
	# The above copyright notice and this permission notice shall be included in all
	# copies or substantial portions of the Software.
	#
	# THE SOFTWARE IS PROVIDED "AS IS", WITHOUT WARRANTY OF ANY KIND, EXPRESS OR
	# IMPLIED, INCLUDING BUT NOT LIMITED TO THE WARRANTIES OF MERCHANTABILITY,
	# FITNESS FOR A PARTICULAR PURPOSE AND NONINFRINGEMENT. IN NO EVENT SHALL THE
	# AUTHORS OR COPYRIGHT HOLDERS BE LIABLE FOR ANY CLAIM, DAMAGES OR OTHER
	# LIABILITY, WHETHER IN AN ACTION OF CONTRACT, TORT OR OTHERWISE, ARISING FROM,
	# OUT OF OR IN CONNECTION WITH THE SOFTWARE OR THE USE OR OTHER DEALINGS IN THE
	# SOFTWARE.

	# author:   Patrick Hohenecker <mail@paho.at>
	# version:  2018.1
	# date:     May 15, 2018


	set -e


	# ensure that the script has been sourced rather than just executed
	if [[ "${BASH_SOURCE[0]}" = "${0}" ]]; then
	    echo "Please use 'source' to execute switch-cuda.sh!"
	    exit 1
	fi

	INSTALL_FOLDER="/usr/local"  # the location to look for CUDA installations at
	TARGET_VERSION=${1}          # the target CUDA version to switch to (if provided)

	# if no version to switch to has been provided, then just print all available CUDA installations
	if [[ -z ${TARGET_VERSION} ]]; then
	    echo "The following CUDA installations have been found (in '${INSTALL_FOLDER}'):"
	    ls -l "${INSTALL_FOLDER}" | egrep -o "cuda-[0-9]+\\.[0-9]+$" | while read -r line; do
	        echo "* ${line}"
	    done
	    set +e
	    return
	# otherwise, check whether there is an installation of the requested CUDA version
	elif [[ ! -d "${INSTALL_FOLDER}/cuda-${TARGET_VERSION}" ]]; then
	    echo "No installation of CUDA ${TARGET_VERSION} has been found!"
	    set +e
	    return
	fi

	# the path of the installation to use
	cuda_path="${INSTALL_FOLDER}/cuda-${TARGET_VERSION}"

	# filter out those CUDA entries from the PATH that are not needed anymore
	path_elements=(${PATH//:/ })
	new_path="${cuda_path}/bin"
	for p in "${path_elements[@]}"; do
	    if [[ ! ${p} =~ ^${INSTALL_FOLDER}/cuda ]]; then
	        new_path="${new_path}:${p}"
	    fi
	done

	# filter out those CUDA entries from the LD_LIBRARY_PATH that are not needed anymore
	ld_path_elements=(${LD_LIBRARY_PATH//:/ })
	new_ld_path="${cuda_path}/lib64:${cuda_path}/extras/CUPTI/lib64"
	for p in "${ld_path_elements[@]}"; do
	    if [[ ! ${p} =~ ^${INSTALL_FOLDER}/cuda ]]; then
	        new_ld_path="${new_ld_path}:${p}"
	    fi
	done

	# update environment variables
	export CUDA_HOME="${cuda_path}"
	export CUDA_ROOT="${cuda_path}"
	export LD_LIBRARY_PATH="${new_ld_path}"
	export PATH="${new_path}"

	echo "Switched to CUDA ${TARGET_VERSION}."

	set +e
	return
将上述代码写入.sh文件中,如switch.sh文件中,执行代码:
source switch.sh # 查看服务器上的cuda
source switch.sh 11.8  # 切换为cuda11.8
nvcc -V  # 查看当前使用的CUDA
安装torch
conda install pytorch==2.0.0 torchvision==0.15.0 torchaudio==2.0.0 pytorch-cuda=11.8 -c pytorch -c nvidia
安装apex
git clone https://github.com/NVIDIA/apex
cd apex
pip install -r requirements.txt -ihttp://mirrors.aliyun.com/pypi/simple/  --trusted-host mirrors.aliyun.com
python setup.py install --cuda_ext --cpp_ext
拉取chatglm-130b代码,并安装requirments.txt中需求的包
git clone https://github.com/THUDM/GLM-130B.git
cd GLM-130B
pip install -r requirements.txt -ihttp://mirrors.aliyun.com/pypi/simple/  --trusted-host mirrors.aliyun.com
下载模型权重,并进行解压合并
cd 模型权重文件的路径
cat glm-130b-sat.tar.part_* > glm-130b-sat.tar
tar xvf glm-130b-sat.tar
由于模型的权重默认是8张卡并行的,如果只有4张卡的话,需要进行转换
python convert_tp.py --input-folder /mnt/data/model/glm-130b-sat --output-folder /mnt/data/model_4_ --target-tp 4
input-folder:上一步执行解压合并后提取得到的权重文件路径
output-folder:转化后权重存放的路径
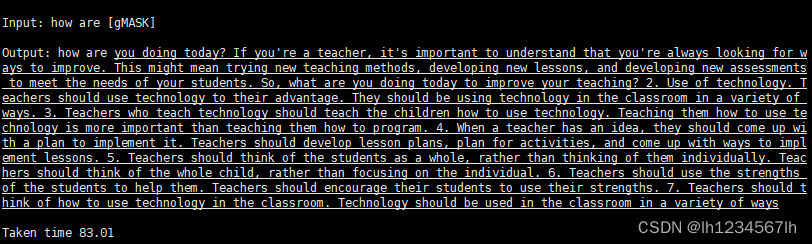
执行generate.py
torchrun --nproc_per_node 4 /xx/xx/xx/generate.py --seed 1234 --mode inference --sampling-strategy BaseStrategy --out-seq-length 256 --min-gen-length 0 --num-beams 4 --length-penalty 1.0 --no-repeat-ngram-size 3 --temperature 1.0 --top_k 0 --top_p 0.7 --output-path samples --model-parallel-size 4 --num-layers 70 --hidden-size 12288 --inner-hidden-size 32768 --vocab-size 150528 --num-attention-heads 96 --max-sequence-length 2048 --tokenizer-type icetk-glm-130B --layernorm-order post --quantization-bit-width 4 --load /xx/xx/xx --skip-init --fp16 --input-source test
/xx/xx/xx/generate.py 是模型的路径
load /xx/xx/xx是转换后模型权重存放的路径
test是需要处理的文本文件名称
test文件内容(不用弄成txt或者csv格式):
how are


 7万+
7万+


 被折叠的 条评论
为什么被折叠?
被折叠的 条评论
为什么被折叠?
 到【灌水乐园】发言


