


注意:
使用官方的 sama5d3_xplained demo板进行移植。
当前版本号:
内核:Linuxversion 4.1.0-linux4sam_5.3
Bootstrap:AT91Bootstrap 3.8.6
uboot:U-Boot2015.01-linux4sam_5.2
最新源码下载地址:
https://github.com/linux4sam/linux-at91/tree/linux-4.1-at91
https://github.com/linux4sam/u-boot-at91/tree/u-boot-2015.01-at91
https://github.com/linux4sam/at91bootstrap一、移植bootstrap
1. 需要在at91bootstrap-master\board\sama5d3_xplained\下制作sama5d3_xplaineddf_uboot_defconfig文件:
CONFIG_SAMA5D3_XPLAINED=y
CONFIG_CPU_CLK_528MHZ=y
CONFIG_RAM_256MB=y
#CONFIG_PMECC_AUTO_DETECT is not set
CONFIG_SPI=y
CONFIG_DATAFLASH=y
CONFIG_DEBUG=y
CONFIG_SCLK=y
CONFIG_PM_EXTERNAL_DEVICES=y
CONFIG_MAC0_PHY=y
CONFIG_MAC1_PHY=y
CONFIG_ACT8865=y
CONFIG_PMIC_ON_TWI1=y
2. 修改at91bootstrap-master\board\sama5d3_xplained\Config.in.board文件,使其支持有关dataflash的配置
红色字体为修改部分:
config CONFIG_SAMA5D3_XPLAINED
bool"sama5d3_xplained"
select SAMA5D3X
select CONFIG_DDRC
select ALLOW_NANDFLASH
select ALLOW_SDCARD
selectALLOW_DATAFLASH
selectDATAFLASHCARD_ON_CS0
selectALLOW_BOOT_FROM_DATAFLASH_CS0
select ALLOW_CPU_CLK_266MHZ
select ALLOW_CPU_CLK_332MHZ
select ALLOW_CPU_CLK_396MHZ
select ALLOW_CPU_CLK_498MHZ
select ALLOW_CPU_CLK_528MHZ
select ALLOW_CRYSTAL_12_000MHZ
select CONFIG_SUPPORT_PM
select CONFIG_HAS_EHT0_PHY
select CONFIG_HAS_EHT1_PHY
select CONFIG_HAS_PMIC_ACT8865
selectSUPPORT_BUS_SPEED_133MHZ
selectSUPPORT_BUS_SPEED_166MHZ
help
Use the SAMA5D3 Xplained development board
3. 利用sama5d3_xplaineddf_uboot_defconfig和相关编译文档说明进行bootstrap编译。
注:期间可利用usart_puts()进行调试操作
二、uboot移植
为sama5d3_xplained板支持data flash启动进行移植
1. 用-boot-at91-u-boot-2015.01-at91\configs\sama5d3_xplained_nandflash_defconfig作为模板进行修,使其适合serialflash,命名为sama5d3_xplained_serialflash_defconfig
内容如下:
CONFIG_SPL=y
CONFIG_SYS_EXTRA_OPTIONS="SAMA5D3,SYS_USE_SERIALFLASH"
+S:CONFIG_ARM=y
+S:CONFIG_TARGET_SAMA5D3_XPLAINED=y
2. 修改u-boot-at91-u-boot-2015.01-at91\include\configs\sama5d3_xplained.h,注意此处不要使用//作为注释,否则会导致u-boot.lds含有非法字符。
主要添加对serial flash支持的宏,可对照atmel其他板卡的对应头文件进行修改
以下是我添加的部分:
1)
/* SerialFlash */
#defineCONFIG_CMD_SF
#ifdefCONFIG_CMD_SF
#defineCONFIG_ATMEL_SPI
#defineCONFIG_SPI_FLASH
#defineCONFIG_SPI_FLASH_ATMEL
#defineCONFIG_SPI_FLASH_STMICRO /*为了支持其他厂家芯片,我用的是N25Q256A*/
#defineCONFIG_SPI_FLASH_BAR /*访问16M以上*/
#defineCONFIG_SF_DEFAULT_BUS 0
#defineCONFIG_SF_DEFAULT_CS 0
#defineCONFIG_SF_DEFAULT_SPEED 30000000
#endif
2) 注释此句:/*#define CONFIG_ENV_IS_NOWHERE*/
3. 修改u-boot-at91-u-boot-2015.01-at91\include\configs\at91-sama5_common.h,以适合需要的启动参数。但就单纯移植serial flash而言,此文件可不修改。不在此处列出我修改的部分代码。
4. 修改u-boot-at91-u-boot-2015.01-at91\board\atmel\sama5d3_xplained\sama5d3_xplained.c
增加:
#ifdefCONFIG_ATMEL_SPI
intspi_cs_is_valid(unsigned int bus, unsigned int cs)
{
return bus == 0 && cs <= 1;
}
structspi_slave;
voidspi_cs_activate(struct spi_slave *slave)
{
at91_set_pio_output(AT91_PIO_PORTD, 13, 0);
}
voidspi_cs_deactivate(struct spi_slave *slave)
{
at91_set_pio_output(AT91_PIO_PORTD, 13, 1);
}
#endif
三、kernel移植
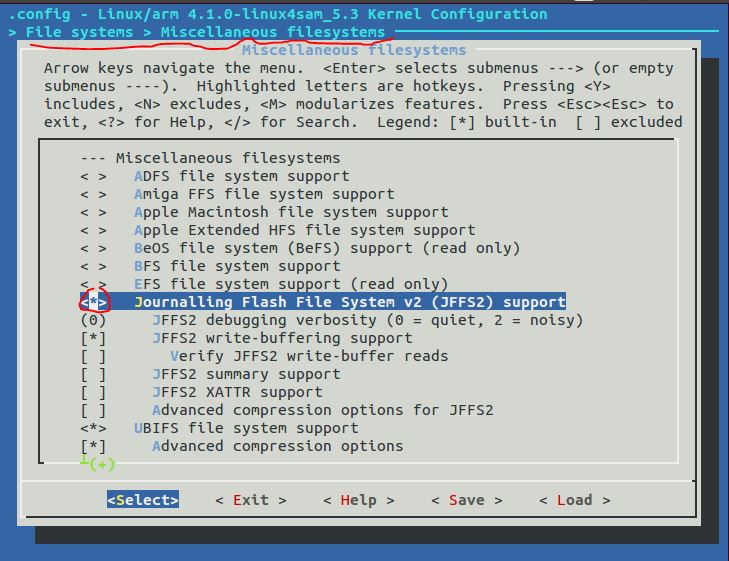
1. 配置内核选项,menuconfig,使得支持jffs2文件系统
2. 在at91-sama5d3_xplained.dts设备树文件上添加新增的spinor flash型号,此处的名字会在linux-at91-master\drivers\mtd\spi-nor的spi_nor_scan()会获取取跟里面预定义的各厂家spi flash表进行再一次的对比,事实上无论匹不匹配最终是采用表里描述的信息(擦除块大小等)。
spi0:spi@f0004000 {
cs-gpios =<&pioD 13 0>, <0>, <0>, <&pioD 16 0>;
status ="okay";
flash@0 {
compatible = "n25q256a";
reg = <0x0>;
spi-max-frequency = <50000000>;
#address-cells = <1>;
#size-cells = <1>;
};
};
四、文件系统制作
制作jffs2文件系统命令,因为n25q256的擦除块大小为64KiB,在上述启动参数的前提下,指定文件系统大小为12M不够用0xff填充:
mkfs.jffs2 -r ./rootfs --eraseblock=0x10000--pad=0xc00000 -n -l -o jffs2
五、注意事项
1. 分区必须为擦除块的整数倍,现在这款芯片是64KiB的整数倍。
譬如,1* Sector_erase (bootstrap),8* Sector_erase (uboot), 4* Sector_erase(env), 8* Sector_erase (dtb), 96* Sector_erase (kernrl), 192* Sector_erase (rootfs)
2.uboot启动参数为如下:
setenvbootargs 'console=ttyS0,115200 earlyprintk mtdparts=spi32766.0:64K(bootstrap),512K(uboot),256K(env),512K(devicetree),6M(kernel),12M(rootfs)rw init=/linuxrc root=/dev/mtdblock5 rootfstype=jffs2'
setenv bootcmd 'sf probe 0; sf read 21000000 d0000 80000;sfread 0x22000000 0x150000 0x600000;bootz 0x22000000 - 0x21000000'
其中,mtdids(spi32766.0)从linux-at91-master\drivers\mtd\devices\m25p80.c的m25p_probe()函数的spi_nor_scan()的mtd->name = dev_name(dev);获知!!
3.需要擦除spi flash的roofs分区,不要留有脏数据,以及制作jffs2时需要正确指定擦除块大小(--eraseblock=SIZE)和填充0xff(--pad=SIZE),否则出现挂载错误,譬如:
类似如下的打印:“Magic bitmask 0x%04x not found at 0x%08x: 0x%04xinstead”在启动文件系统出现问题调试花费时间比较多,主要是因为32MB的spi nor flash烧写就如同FPGA综合/布局布线这般慢,这份教程是心血之作,希望帮到有需要的人!
4.最后,上述移植的前提条件仅仅是nand flash没有焊接或者JP5没有短接,否则出现类似“jffs2: jffs2_scan_eraseblock(): Magic bitmask 0x1985 not found at 0x00370014: 0xc405 instead”这样的打印,同时文件系统挂载不成功。要spi flash和nand flash同时工作还需额外工作。譬如将uboot的bootargs设置为“setenv bootargs 'console=ttyS0,115200 earlyprintk mtdparts=atmel_nand:128k(bootflag),6M(kernel)ro,-(rootfs);spi32766.0:64K(bootstrap),512K(uboot),256K(env),512K(dtb),6M(kernel),12M(rootfs) rw init=/linuxrc root=/dev/mtdblock8 rootfstype=jffs2'”等


 2万+
2万+

 被折叠的 条评论
为什么被折叠?
被折叠的 条评论
为什么被折叠?
 到【灌水乐园】发言


