


简介
在计算机图形学中,光照模型是渲染3D场景时的重要组成部分。通过模拟光线与物体表面的交互,可以实现逼真的视觉效果。在本文中,我们将探讨如何使用WebGL实现基于Blinn-Phong光照模型的着色器,从而模拟光线与3D物体表面的反射效果。
Blinn-Phong模型的公式:
其中:
是最终的光照强度。
是环境光的强度 。
是漫反射光的强度。
是镜面反射光的强度。
环境光(Ambient Light)
在环境中各个方向的光都相同,为环境提供一个基础的光,为物体提供一个基本的亮度。
-
是环境光反射系数(环境光颜色)。
是环境光的强度。
漫反射光(Diffuse Light)
漫反射光是指光线照射在粗糙表面时向各个方向反射的光。漫反射光的强度取决于光线与表面法线之间的夹角。
是漫反射光反射系数
光源的强度
指向光源的向量
表面的法线向量
dis着色点与光源的距离
镜面反射光(Specular Light)
镜面反射光是指光线照射在光滑表面时产生的高光效果。Blinn-Phong模型通过使用半程向量来计算镜面反射光的强度,这比传统的Phong模型更加高效。
镜面反射光反射系数
光源的强度
半程向量,光源和观察点的相加,归一化
物体表面的法向量
通过webgl进行实现
顶点着色器
const v = `
precision mediump float;
attribute vec3 a_position;
attribute vec3 a_normal;
uniform mat4 u_model;
uniform mat4 u_view;
uniform mat4 u_project;
varying vec3 vNormal;
varying vec3 vPos;

void main() {
  vNormal = a_normal;
  vPos = a_position;
  vec4 position = u_project * u_view * u_model * vec4(a_position, 1.0);
  gl_Position = position;
}
`
片元着色器
const f = `
precision mediump float;
uniform vec3 kd;
uniform vec3 am;
uniform vec3 eye;
uniform vec3 ks;
uniform float p;
uniform float intensity;
uniform vec3 light;
varying vec3 vNormal;
varying vec3 vPos;
void main() {
vec3 dir = normalize(eye - vPos);
vec3 lightDir = normalize(light - vPos);
float dist = length(light - vPos);
vec3 halfDir = normalize((lightDir + dir) / 2.0);
vec3 normal = normalize(vNormal);
vec3 color = am + kd * (intensity / dist) * max(0.0, dot(lightDir, normal)) + ks * (intensity / dist) * pow(max(0.0, dot(halfDir, normal)), p);
gl_FragColor = vec4(pow(color, vec3(1.0 / 2.2)), 1.0);
}
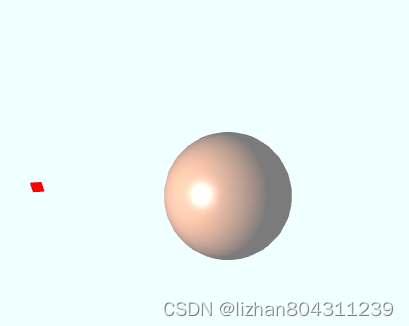
`创建光源位置标记方便观察
function createLightPosition(gl: WebGLRenderingContext,) {
  const v = `
    precision mediump float;
    attribute vec3 a_position;
    uniform mat4 u_model;
    uniform mat4 u_view;
    uniform mat4 u_project;
    void main() {
      gl_Position = u_project * u_view * u_model * vec4(a_position, 1.0);
    }
  `
  const f = `
    precision mediump float;
    void main() {
      gl_FragColor = vec4(1.0,0.0, 0.0,1.0);
    }
  `
  const programInfo = glUtil.creatProgramInfo(gl, v, f);
  const box = new BoxGeometry(5, 5)
  const attributes = box.attributes
  const buffer = glUtil.createBuffer(gl, attributes.position.array as any)
  return function (perspectiveMatrix: Matrix4, viewMatrix: Matrix4, light: Vector3) {
    gl.useProgram(programInfo.program)
    glUtil.setAttr(gl, programInfo.program, "a_position", buffer, 3)
    const modelMatrix = getModeMatrix(1, light, 0)
    glUtil.setUniforms(gl, programInfo.program, {
      u_model: modelMatrix.elements,
      u_view: viewMatrix.elements,
      u_project: perspectiveMatrix.elements,
    })
    glUtil.createIndexBuffer(gl, box.index?.array as any,)
    gl.drawElements(gl.TRIANGLES, box.index?.count as any, gl.UNSIGNED_SHORT, 0)

  }

}
js部分
  const guiParams = {
    modelTransX: 0,
    modelTransY: 0,
    modelTransZ: 0,
    modelScaleX: 1,
    modelScaleY: 1,
    modelScaleZ: 1,
    modelRotateX: 0,
    modelRotateY: 0,
    modelRotateZ: 0,
  }
  // 观察点位置
  const eye = new Vector3(-20, 180, 250)
  // 漫反射颜色
  const kd = new Vector3(1, 0.5, 0.3)
  // 高光颜色
  const ks = new Vector3(1, 1, 1)
  // Blinn-Phong 系数
  const pow = 100;
  //光源位置
  let light = new Vector3(100, 100, 100)
  // 环境光
  const am = new Vector3(0.2, 0.2, 0.2)
  // 光源强度
  const intensity = 100;

  gl.enable(gl.DEPTH_TEST);
  // 通过threejs球
  const shpere = new SphereGeometry(50)
  // 透视矩阵
  const perspectiveMatrix = getProjectMatrix(75, canvas.width / canvas.height, 0.1, 1000)
  // 视图矩阵
  const viewMatrix = getViewMatrix(eye)

  const programInfo = glUtil.creatProgramInfo(gl, v, f);
  const attributes = shpere.attributes
  const buffer = glUtil.createBuffer(gl, attributes.position.array as any)
  const buffer1 = glUtil.createBuffer(gl, attributes.normal.array as any)
  //光源的位置
  const updateLightPosFn = createLightPosition(gl)
  //动态更新函数
function update() {
    const timer = Date.now() * 0.00025;
    light.set(
      Math.sin(timer * 6) * 100,
      Math.cos(timer * 4) * 150,
      Math.cos(timer * 2) * 100,

    )
    // 球形变换信息
    const modelMatrix = getModeMatrix(
      new Vector3(guiParams.modelScaleX, guiParams.modelScaleY, guiParams.modelScaleZ),
      new Vector3(guiParams.modelTransX, guiParams.modelTransY, guiParams.modelTransZ),
      new Vector3(guiParams.modelRotateX, guiParams.modelRotateY, guiParams.modelRotateZ),
    )
    gl.clear(gl.COLOR_BUFFER_BIT | gl.DEPTH_BUFFER_BIT);
    gl.useProgram(programInfo.program)
    // 设置球的位置和光照模型
    glUtil.setUniforms(gl, programInfo.program, {
      u_model: modelMatrix.elements,
      u_view: viewMatrix.elements,
      u_project: perspectiveMatrix.elements,
      kd: kd.toArray(),
      eye: eye.toArray(),
      am: am.toArray(),
      light: light.toArray(),
      ks: ks.toArray(),
      intensity: intensity,
      p: pow,
    })
    glUtil.setAttr(gl, programInfo.program, "a_position", buffer, 3)
    glUtil.setAttr(gl, programInfo.program, "a_normal", buffer1, 3)
    glUtil.createIndexBuffer(gl, shpere.index?.array as any,)
    gl.drawElements(gl.TRIANGLES, shpere.index?.count as any, gl.UNSIGNED_SHORT, 0)
    // 更新位置
    updateLightPosFn(perspectiveMatrix, viewMatrix, light)
    requestAnimationFrame(update)
  }
结果
通过上面的代码运行的结果
文章内容使用的变换矩阵参考此篇文章


 178
178

 被折叠的 条评论
为什么被折叠?
被折叠的 条评论
为什么被折叠?
 到【灌水乐园】发言


