


阴影生成的原理
阴影贴图是一种基于深度缓冲区(Depth Buffer)的阴影生成技术,其基本思想是通过从光源视角生成一个深度图,然后在场景渲染时利用该深度图判断像素是否在阴影中。具体步骤如下:
- 深度图生成:首先,从光源视角渲染场景,并将每个片段的深度值存储在深度贴图中。
- 场景渲染:然后,从摄像机视角渲染场景。对于每个片段,将其转换到光源视角,并与深度贴图中的值进行比较。如果片段的深度值大于深度贴图中的值,则该片段在阴影中。
代码实现
基础代码
// 定义 Light 类,包含光照的强度、颜色、位置、目标和上向量
class Light {
  lightIntensity: number;
  lightColor: Vector3;
  pos: Vector3;
  target: Vector3;
  up: Vector3;

  constructor(lightIntensity: number, lightColor: Vector3, pos: Vector3, target: Vector3, up: Vector3) {
    this.lightIntensity = lightIntensity;
    this.lightColor = lightColor;
    this.pos = pos;
    this.target = target;
    this.up = up;
  }

  // 计算光源的MVP矩阵
  calMVP(translate: Vector3, scale: Vector3, rotate: Vector3): Matrix4 {
    const lightMvp = new Matrix4();
    const modelMatrix = getModeMatrix(scale, translate, rotate);
    const viewMatrix = getViewMatrix(this.pos, this.target, this.up);

    // 定义投影矩阵的参数
    const r = 450, l = -r, t = 300, b = -t, n = 0.01, f = 500;
    const projMatrix = getOrhMatrix(l, r, t, b, n, f);

    lightMvp.multiply(projMatrix)
            .multiply(viewMatrix)
            .multiply(modelMatrix);
    return lightMvp;
  }
}

// 定义 Obj 类,表示一个3D对象
class Obj {
  modelMatrix: Matrix4;
  programInfo: { program: WebGLProgram; uniforms: any; attributes: any; };
  vertices: WebGLBuffer | null = null;
  normals: WebGLBuffer | null = null;
  indices: any[] = [];
  uniforms: any;
  gl: WebGLRenderingContext;
  light!: Light;
  scale: Vector3 = new Vector3(1, 1, 1);
  translate: Vector3 = new Vector3(0, 0, 0);
  rotate: Vector3 = new Vector3(0, 0, 0);

  constructor(modelMatrix: Matrix4, gl: WebGLRenderingContext, v: string, f: string, uniforms: any) {
    this.modelMatrix = modelMatrix;
    this.gl = gl;
    this.uniforms = uniforms;
    this.programInfo = glUtil.creatProgramInfo(gl, v, f);
  }

  // 绑定纹理
  bindTxt(texture: WebGLTexture) {
    glUtil.setTextureAndLoc(this.programInfo.program, this.gl, texture, "uShadowMap");
  }

  // 设置对象的变换矩阵
  setTransform(scale: Vector3, translate?: Vector3, rotate?: Vector3) {
    this.scale = scale;
    if (translate) this.translate = translate;
    if (rotate) this.rotate = rotate;
  }

  // 设置对象的材质
  setMaterial(diffuse: Vector3) {
    this.uniforms.diffuseColor = diffuse.toArray();
  }

  // 设置对象的网格数据
  setMesh(geometry: BoxGeometry) {
    const { attributes, index } = geometry;
    const { position, normal } = attributes;
    this.vertices = glUtil.createBuffer(this.gl, position.array as unknown as number[]);
    this.normals = glUtil.createBuffer(this.gl, normal.array as unknown as number[]);
    this.indices = index?.array as unknown as number[];
  }

  // 设置光照
  setLight(light: Light) {
    this.light = light;
  }

  // 创建对象
  create() {
    const mvp = this.light.calMVP(this.translate, this.scale, this.rotate);
    this.uniforms.uLightMvp = mvp.clone().elements;
    glUtil.setUniforms(this.gl, this.programInfo.program, this.uniforms);
    glUtil.setAttr(this.gl, this.programInfo.program, "aPosition", this.vertices!, 3);
    glUtil.createIndexBuffer(this.gl, this.indices);
    this.gl.drawElements(this.gl.TRIANGLES, this.indices.length, this.gl.UNSIGNED_SHORT, 0);
  }

  // 绘制对象
  draw(camera?: PerspectiveCamera, texture?: WebGLTexture) {
    this.gl.useProgram(this.programInfo.program);
    if (camera) {
      this.gl.viewport(0, 0, config.width, config.height);
      const viewMatrix = camera.matrixWorld.clone().invert();
      const projectMatrix = camera.projectionMatrix.clone();
      const modelMatrix = getModeMatrix(this.scale, this.translate, this.rotate);
      this.uniforms.uViewMatrix = viewMatrix.elements;
      this.uniforms.uProjectionMatrix = projectMatrix.elements;
      this.uniforms.uModelMatrix = modelMatrix.elements;
      this.uniforms.uLightPos = this.light.pos.toArray();
      this.bindTxt(texture!);
      glUtil.setAttr(this.gl, this.programInfo.program, "aNormalPosition", this.normals!, 3);
    } else {
      this.gl.viewport(0, 0, 1024, 1024);
    }
    this.create();
  }
}
基础变量定义
let cameraControls: any = null;
const shadowMeshes: Obj[] = [];
const meshes: Obj[] = [];
let prevTime = 0;
const config = {
  width: 900,
  height: 600,
};
// 设置网格对象并添加到渲染队列中
function setMesh(box: any, light: Light, gl: WebGLRenderingContext, transform = {
  translate: new Vector3(),
  scale: new Vector3(1, 1, 1),
  rotate: new Vector3()
}, diffuseColor: Vector3) {
  const obj = new Obj(new Matrix4(), gl, phongVertex, phongFrag, {});
  obj.setMesh(box);
  obj.setLight(light);
  obj.setTransform(transform.scale.clone(), transform.translate.clone(), transform.rotate.clone());
  obj.setMaterial(diffuseColor);
  meshes.push(obj);
}

// 设置阴影网格对象并添加到渲染队列中
function setShadowMesh(box: any, light: Light, gl: WebGLRenderingContext, transform = {
  translate: new Vector3(),
  scale: new Vector3(1, 1, 1),
  rotate: new Vector3()
}) {
  const obj = new Obj(new Matrix4(), gl, shadowVertex, shadowFrag, {});
  obj.setMesh(box);
  obj.setLight(light);
  obj.setTransform(transform.scale.clone(), transform.translate.clone(), transform.rotate.clone());
  shadowMeshes.push(obj);
}
阴影着色器
const shadowVertex = `#ifdef GL_ES
precision highp float;
#endif

attribute vec3 aPosition;
uniform mat4 uLightMvp;

void main() {
    gl_Position = uLightMvp * vec4(aPosition, 1.0);
}`

const shadowFrag = `#ifdef GL_ES
precision highp float;
#endif

void main() {
    gl_FragColor = vec4(gl_FragCoord.z, 0.0, 0.0, 1.0);
}


`
渲染着色器
const phongVertex = `#ifdef GL_ES
precision highp float;
#endif
attribute vec3 aPosition;
attribute vec3 aNormalPosition;
attribute vec2 aTextureCoord;
uniform mat4 uModelMatrix;
uniform mat4 uViewMatrix;
uniform mat4 uProjectionMatrix;
uniform mat4 uLightMvp;
varying vec4 vPositionFromLight;
varying vec3 vNormal;
varying vec3 vFragPos;

void main() {
    vPositionFromLight = uLightMvp * vec4(aPosition, 1.0);
    vFragPos = (uModelMatrix * vec4(aPosition, 1.0)).xyz;
    vNormal = (uModelMatrix * vec4(aNormalPosition, 0.0)).xyz;
    gl_Position = uProjectionMatrix * uViewMatrix * uModelMatrix * vec4(aPosition, 1.0);
}
`

const phongFrag = `#ifdef GL_ES
precision highp float;
#endif

#define EPS 1e-3
#define SHADOW_MAP_SIZE 2048.
#define FRUSTUM_SIZE 400.

uniform sampler2D uShadowMap;
uniform vec3 uLightPos;
uniform vec3 diffuseColor;
varying vec4 vPositionFromLight;
varying vec3 vNormal;
varying vec3 vFragPos;

float getShadowBias(float c, float filterRadiusUV){
  vec3 normal = normalize(vNormal);
  vec3 lightDir = normalize(uLightPos - vFragPos);
  float fragSize = (1.) * (FRUSTUM_SIZE / SHADOW_MAP_SIZE / 2.);
  return max(fragSize, fragSize * (1.0 - dot(normal, lightDir))) * c;
}


void main() {
    vec3 shadowCoord = vPositionFromLight.xyz / vPositionFromLight.w;
    shadowCoord.xyz = (shadowCoord.xyz + 1.0) / 2.0;
    float cur_depth = shadowCoord.z;
    float depth = texture2D(uShadowMap, shadowCoord.xy).r;
    float visibility = 1.0;
    if(cur_depth-getShadowBias(0.4,0.0) >= depth + EPS ) {
        visibility = 0.0;
    }
    gl_FragColor = vec4(diffuseColor * visibility, 1.0);
}

`
基础数据的设置
  const gl = canvas.getContext("webgl")!;
  gl.enable(gl.DEPTH_TEST);

  // 设置相机
  const camera = new PerspectiveCamera(75, config.width / config.height, 0.01, 1000);
  cameraControls = new OrbitControls(camera, canvas);
  cameraControls.enableZoom = true;
  cameraControls.enableRotate = true;
  cameraControls.enablePan = true;
  cameraControls.rotateSpeed = 0.3;
  cameraControls.zoomSpeed = 1.0;
  cameraControls.panSpeed = 2.0;
  cameraControls.target.set(0, 0, 0);
  camera.position.set(100, 100, 100);

  // 设置对象的变换
  const planeTransform = { scale: new Vector3(1, 1, 1), translate: new Vector3(0, -30, 0), rotate: new Vector3(degrees2Radians(90), 0, 0) };
  const sphereTransform = { scale: new Vector3(10, 10, 10), translate: new Vector3(), rotate: new Vector3() };
  const light = new Light(500, new Vector3(0, 100, 0), new Vector3(0, 30, 30), new Vector3(), new Vector3(0, 1, 0));

  // 添加阴影网格对象和普通网格对象
  setShadowMesh(new SphereGeometry(), light, gl, sphereTransform);
  setShadowMesh(new PlaneGeometry(100, 100, 1, 1), light, gl, planeTransform);
  setMesh(new SphereGeometry(), light, gl, sphereTransform, new Vector3(0.5, 0.5, 0.5));
  setMesh(new PlaneGeometry(100, 100, 1, 1), light, gl, planeTransform, new Vector3(0.6, 0.6, 0));

  // 创建帧缓冲区和纹理
  const texture = glUtil.createTexture(gl, null, [1024, 1024, 0], 0);
  const framebuffer = glUtil.createFramebuffer(gl, texture)!;
  glUtil.creatDepthFramebuufer(gl, framebuffer, 1024, 1024);
  gl.bindFramebuffer(gl.FRAMEBUFFER, null);
  gl.bindTexture(gl.TEXTURE_2D, null);
  gl.bindRenderbuffer(gl.RENDERBUFFER, null);
循环函数
function mainLoop(now: number) {
    gl.clearColor(0.0, 0.0, 0.0, 1.0);
    gl.clearDepth(1.0);
    gl.enable(gl.DEPTH_TEST);
    gl.depthFunc(gl.LEQUAL);

    // 渲染阴影到帧缓冲区
    gl.bindFramebuffer(gl.FRAMEBUFFER, framebuffer);
    gl.clearColor(1.0, 1.0, 1.0, 1.0);
    gl.clear(gl.COLOR_BUFFER_BIT | gl.DEPTH_BUFFER_BIT);

    let deltaTime = (now - prevTime) / 1000;
    let lightPos = light.pos.clone();
    const matrix = new Matrix4().makeRotationY(degrees2Radians(10 * deltaTime));
    lightPos.applyMatrix4(matrix);
    light.pos = lightPos.clone();

    cameraControls.update();
    camera.updateMatrixWorld();

    // 绘制阴影网格对象
    shadowMeshes.forEach(item => {
      item.draw();
    });

    // 渲染场景到默认帧缓冲区
    gl.bindFramebuffer(gl.FRAMEBUFFER, null);
    meshes.forEach(item => {
      item.draw(camera, texture);
    });

    gl.disable(gl.BLEND);
    prevTime = now;

    requestAnimationFrame(mainLoop);
  }
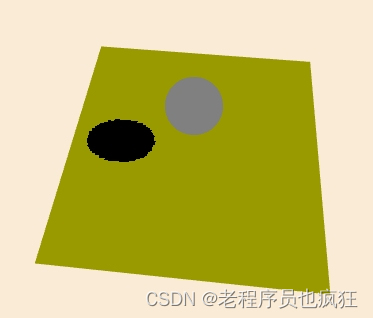
产生效果
总结
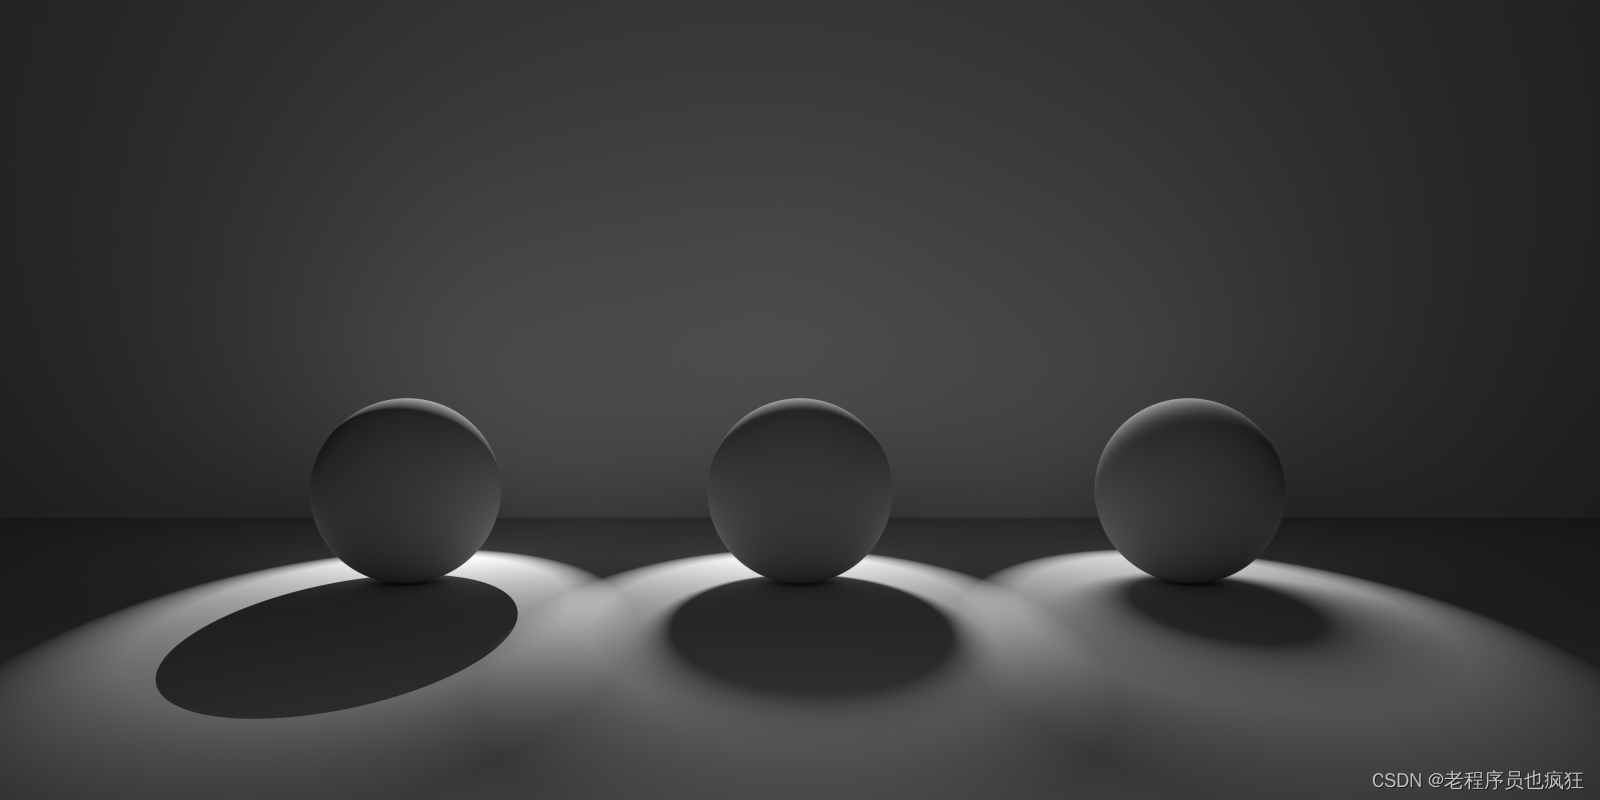
从上面的图片中,我们可以看到阴影边缘出现锯齿现象, 并且阴影也并不像现实生活中的阴影那样,边缘有点模糊的感觉,我们通过这种方式产生的阴影为硬阴影,现实生活中产生的阴影为软阴影,如下图所示软硬阴影的对比。
说明
项目使用的threejs产生的相机,点击下载glUtil工具


 1159
1159

 被折叠的 条评论
为什么被折叠?
被折叠的 条评论
为什么被折叠?
 到【灌水乐园】发言


