


内置工具
使用内置工具,如网络搜索和文件搜索,以扩展模型的功能。
https://platform.openai.com/docs/guides/tools
在生成模型响应时,您可以使用内置的 工具 来扩展模型功能。这些工具帮助模型从网络或您的文件中访问额外的上下文和信息。以下示例使用 网络搜索工具 来使用网络上的最新信息生成模型响应。
包含用于完成的网页搜索结果
from openai import OpenAI
client = OpenAI()

completion = client.chat.completions.create(
    model="gpt-4o-search-preview",
    web_search_options={},
    messages=[
        {
            "role": "user",
            "content": "What was a positive news story from today?",
        }
    ],
)

print(completion.choices[0].message.content)
可用工具
以下是对 OpenAI 平台可用工具的概述——选择其中之一以获取使用方法的进一步指导。请注意,目前文件搜索和计算机使用工具仅可通过新的 Responses API 使用。
Web 搜索
在模型响应生成中包含来自互联网的数据。
函数调用
使模型能够调用您定义的定制代码,从而使其能够访问更多数据和功能。
API 中的用法
当发起生成 聊天完成 的请求时,您可以通过使用 web_search 参数来启用网络搜索。这允许模型在生成响应期间访问当前互联网信息。有关更多信息,请参阅 网络搜索指南。
网络搜索
允许模型在生成响应之前搜索最新的网络信息。
https://platform.openai.com/docs/guides/tools-web-search
使用Chat Completions API,您可以直接访问Search in ChatGPT中使用的微调模型和工具。
使用聊天完成功能时,模型总是在回复您的查询之前从网络中检索信息。为了将 web_search_preview 作为仅在必要时由 gpt-4o 和 gpt-4o-mini 模型调用的工具,切换到使用 Responses API。
当前,您需要使用以下这些模型之一来在聊天完成中使用网络搜索:
gpt-4o-search-previewgpt-4o-mini-search-preview
网页搜索参数示例
from openai import OpenAI
client = OpenAI()

completion = client.chat.completions.create(
    model="gpt-4o-search-preview",
    web_search_options={},
    messages=[
        {
            "role": "user",
            "content": "What was a positive news story from today?",
        }
    ],
)

print(completion.choices[0].message.content)
输出和引用
choices 数组中的 API 响应项将包括:
message.content,包含模型输出的文本结果,包括任何内联引用annotations,包含引用的 URL 列表
默认情况下,模型的响应将包括在网页搜索结果中找到的 URL 的内联引用。除此之外,url_citation 注释对象还将包含引用源的 URL 和标题,以及这些源在模型响应中使用时的起始和结束索引字符。
当向最终用户显示网页结果或网页结果中的信息时,内联引用必须在您的用户界面中清楚地可见并可点击。
[
  {
    "index": 0,
    "message": {
      "role": "assistant",
      "content": "the model response is here...",
      "refusal": null,
      "annotations": [
        {
          "type": "url_citation",
          "url_citation": {
            "end_index": 985,
            "start_index": 764,
            "title": "Page title...",
            "url": "https://..."
          }
        }
      ]
    },
    "finish_reason": "stop"
  }
]
用户位置
为了根据地理位置细化搜索结果,您可以使用国家、城市、地区和/或时区来指定一个大致的用户位置。
城市和地区字段是自由文本字符串,例如Minneapolis和Minnesota分别。国家字段是两位字母的 ISO 国家代码,例如US。时区字段是 IANA 时区 例如America/Chicago。
自定义用户位置
from openai import OpenAI
client = OpenAI()

completion = client.chat.completions.create(
    model="gpt-4o-search-preview",
    web_search_options={
        "user_location": {
            "type": "approximate",
            "approximate": {
                "country": "GB",
                "city": "London",
                "region": "London",
            }
        },
    },
    messages=[{
        "role": "user",
        "content": "What are the best restaurants around Granary Square?",
    }],
)

print(completion.choices[0].message.content)
搜索上下文大小
当使用此工具时,search_context_size 参数控制从网络中检索多少上下文以帮助工具制定响应。搜索工具使用的标记 不会 影响您在响应创建请求中指定的 model 参数中指定的主模型的上下文窗口。这些标记 也不会 从一个回合带到另一个回合——它们只是用来制定工具响应然后就被丢弃。
选择上下文大小会影响:
- 成本:我们的搜索工具的价格根据此参数的值而变化。上下文大小越高,价格越贵。请参阅工具定价 此处。
- 质量:较高的搜索上下文大小通常提供更丰富的上下文,从而产生更准确、更全面的答案。
- 延迟:较大的上下文大小需要处理更多的标记,这可能会减慢工具的响应时间。
可用值:
high:最全面的上下文,最高成本,响应较慢。medium(默认):平衡的上下文、成本和延迟。low:最少的上下文,最低成本,响应最快,但答案质量可能较低。
再次强调,搜索工具使用的标记 不会 影响主模型的标记使用,也不会从一个回合带到另一个回合。有关每个上下文大小的相关成本详情,请查看 定价页面。
自定义搜索上下文大小
from openai import OpenAI
client = OpenAI()

completion = client.chat.completions.create(
    model="gpt-4o-search-preview",
    web_search_options={
        "search_context_size": "low",
    },
    messages=[{
        "role": "user",
        "content": "What movie won best picture in 2025?",
    }],
)

print(completion.choices[0].message.content)
限制
以下是使用网络搜索时的一些值得注意的实施注意事项。
- 聊天完成中使用的
gpt-4o-search-preview和gpt-4o-mini-search-preview模型 仅支持部分 API 参数 - 查看其模型数据页面以获取有关速率限制和功能支持的具体信息。 - 当用作 Responses API 中的工具时,网络搜索具有与上述模型相同的分层速率限制。
- 请参阅本指南 了解数据处理、驻留和保留信息。
文件搜索
允许模型在生成响应之前搜索您的文件以获取相关信息。
https://platform.openai.com/docs/guides/tools-file-search
概述
文件搜索是 Responses API 中提供的一个工具。它使模型能够通过语义和关键词搜索从之前上传文件的数据库中检索信息。通过创建向量存储并将文件上传到其中,您可以通过赋予模型访问这些知识库或 vector_stores 的权限来增强模型固有的知识。
要了解更多关于向量存储和语义搜索如何工作,请参阅我们的 检索指南。
这是一个由 OpenAI 管理的托管工具,这意味着您不需要在您的端实现代码来处理其执行。当模型决定使用它时,它将自动调用工具,从您的文件中检索信息,并返回输出。
如何使用
在使用 Responses API 进行文件搜索之前,您需要在向量化存储中设置一个知识库并将文件上传到其中。
创建向量化存储并上传文件
一旦您的知识库设置完成,您可以将 file_search 工具包含在模型可用的工具列表中,以及要搜索的向量化存储列表中。
目前,您只能在一个向量化存储中进行搜索,因此在调用文件搜索工具时,您只能包含一个向量化存储 ID。
文件搜索工具
from openai import OpenAI
client = OpenAI()

response = client.responses.create(
    model="gpt-4o-mini",
    input="What is deep research by OpenAI?",
    tools=[{
        "type": "file_search",
        "vector_store_ids": ["<vector_store_id>"]
    }]
)
print(response)
当模型调用此工具时,您将收到包含多个输出的响应:
- 一个
file_search_call输出项,其中包含文件搜索调用的 ID。 - 一个
message输出项,其中包含模型响应以及文件引用。
文件搜索响应
{
  "output": [
    {
      "type": "file_search_call",
      "id": "fs_67c09ccea8c48191ade9367e3ba71515",
      "status": "completed",
      "queries": ["What is deep research?"],
      "search_results": null
    },
    {
      "id": "msg_67c09cd3091c819185af2be5d13d87de",
      "type": "message",
      "role": "assistant",
      "content": [
        {
          "type": "output_text",
          "text": "Deep research is a sophisticated capability that allows for extensive inquiry and synthesis of information across various domains. It is designed to conduct multi-step research tasks, gather data from multiple online sources, and provide comprehensive reports similar to what a research analyst would produce. This functionality is particularly useful in fields requiring detailed and accurate information...",
          "annotations": [
            {
              "type": "file_citation",
              "index": 992,
              "file_id": "file-2dtbBZdjtDKS8eqWxqbgDi",
              "filename": "deep_research_blog.pdf"
            },
            {
              "type": "file_citation",
              "index": 992,
              "file_id": "file-2dtbBZdjtDKS8eqWxqbgDi",
              "filename": "deep_research_blog.pdf"
            },
            {
              "type": "file_citation",
              "index": 1176,
              "file_id": "file-2dtbBZdjtDKS8eqWxqbgDi",
              "filename": "deep_research_blog.pdf"
            },
            {
              "type": "file_citation",
              "index": 1176,
              "file_id": "file-2dtbBZdjtDKS8eqWxqbgDi",
              "filename": "deep_research_blog.pdf"
            }
          ]
        }
      ]
    }
  ]
}
检索定制
限制结果数量
使用 Responses API 中的文件搜索工具,您可以自定义要从向量存储中检索的结果数量。这有助于减少token 使用量和延迟,但可能会以降低答案质量为代价。
限制结果数量
response = client.responses.create(
    model="gpt-4o-mini",
    input="What is deep research by OpenAI?",
    tools=[{
        "type": "file_search",
        "vector_store_ids": ["<vector_store_id>"],
        "max_num_results": 2
    }]
)
print(response)
在响应中包含搜索结果
虽然您可以在输出文本中看到注释(对文件的引用),但默认情况下,文件搜索调用不会返回搜索结果。
要包含搜索结果在响应中,您可以在创建响应时使用 include 参数。
包含搜索结果
response = client.responses.create(
    model="gpt-4o-mini",
    input="What is deep research by OpenAI?",
    tools=[{
        "type": "file_search",
        "vector_store_ids": ["<vector_store_id>"]
    }],
    include=["file_search_call.results"]
)
print(response)
元数据过滤
您可以根据文件的元数据过滤搜索结果。有关更多详情,请参阅我们的检索指南,其中涵盖:
元数据过滤
response = client.responses.create(
    model="gpt-4o-mini",
    input="What is deep research by OpenAI?",
    tools=[{
        "type": "file_search",
        "vector_store_ids": ["<vector_store_id>"],
        "filters": {
            "type": "eq",
            "key": "type",
            "value": "blog"
        }
    }]
)
print(response)
支持的文件
对于 text/ MIME 类型,编码必须为 utf-8、utf-16 或 ascii。
| 文件格式 | MIME 类型 |
|---|---|
.c | text/x-c |
.cpp | text/x-c++ |
.cs | text/x-csharp |
.css | text/css |
.doc | application/msword |
.docx | application/vnd.openxmlformats-officedocument.wordprocessingml.document |
.go | text/x-golang |
.html | text/html |
.java | text/x-java |
.js | text/javascript |
.json | application/json |
.md | text/markdown |
.pdf | application/pdf |
.php | text/x-php |
.pptx | application/vnd.openxmlformats-officedocument.presentationml.presentation |
.py | text/x-python |
.py | text/x-script.python |
.rb | text/x-ruby |
.sh | application/x-sh |
.tex | text/x-tex |
.ts | application/typescript |
.txt | text/plain |
限制
以下是实施者应注意的文件搜索的一些使用限制。
- 所有文件的项目总大小限制为 100GB
- 矢量存储的总文件数限制为 10k
- 单个文件的最大大小为 512MB(每个文件大约 5M 个令牌)
计算机使用
构建一个可以使用计算机的代理,它能代表你执行任务。
https://platform.openai.com/docs/guides/tools-computer-use
概述
计算机使用是我们计算机使用代理 (CUA)模型“computer-use-preview”的实用应用,该模型结合了GPT-4o的视觉能力与高级推理,以模拟控制计算机界面和执行任务。
计算机使用可通过响应API访问。它不可用于聊天完成。
计算机使用处于测试阶段。由于该模型仍处于预览状态,可能容易受到利用和意外错误的影响,我们不建议在完全认证的环境或高风险任务中信任它。请参阅下方的限制和风险和安全最佳实践。您必须按照OpenAI的使用政策和商业条款使用计算机使用工具。
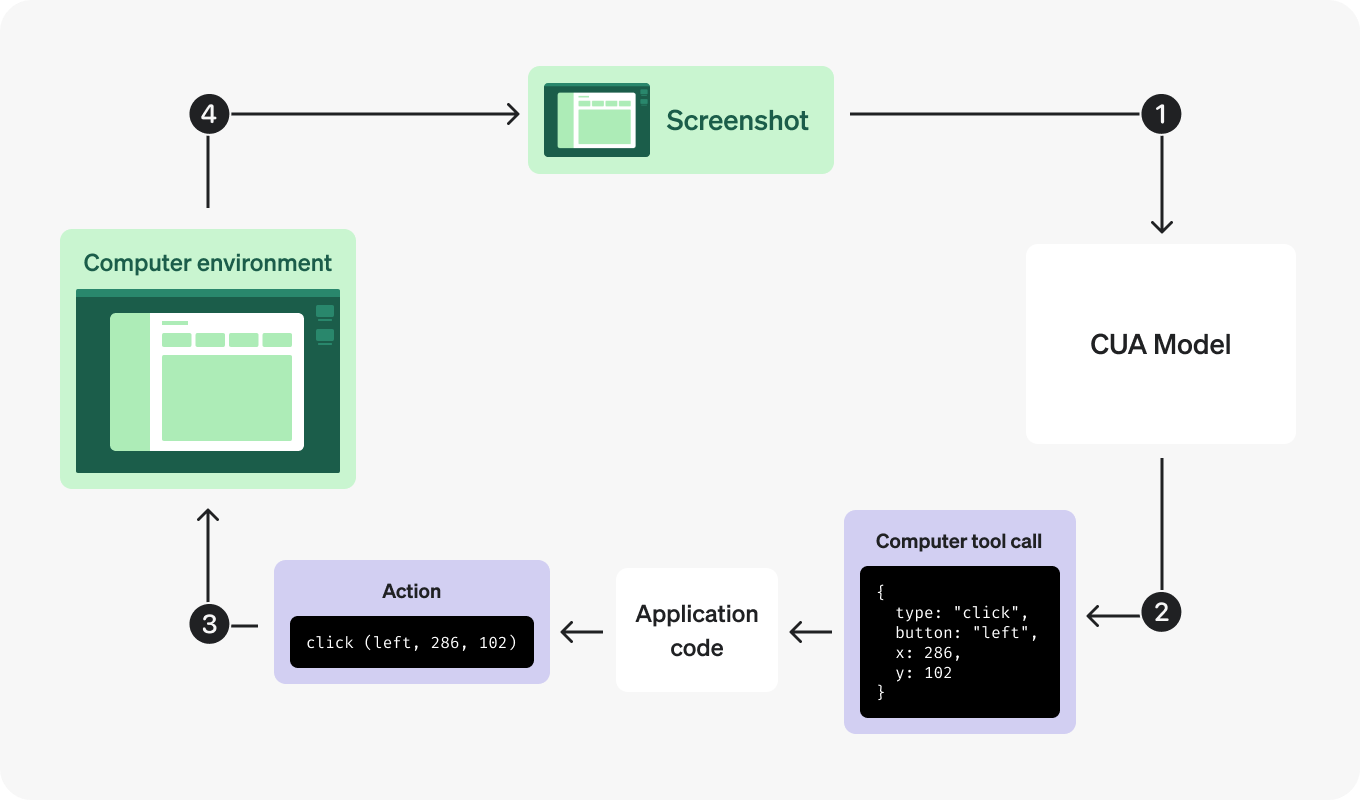
如何工作
计算机使用工具在一个连续的循环中运行。它发送计算机操作,如 click(x,y) 或 type(text),这些操作在计算机或浏览器环境中由您的代码执行,然后返回操作结果的截图回模型。
通过这种方式,您的代码模拟了人类使用计算机界面的操作,同时我们的模型使用截图来理解环境的状态并建议下一步操作。
这个循环让您能够自动化许多需要点击、输入、滚动等操作的任务。例如,预订航班、搜索产品或填写表格。
有关如何集成计算机使用工具的更多详细信息,请参阅下方的 集成部分,或查看我们的示例应用程序存储库以设置环境并尝试示例集成。
CUA 示例应用程序
如何在不同的环境中集成计算机使用工具的示例
https://github.com/openai/openai-cua-sample-app
设置您的环境
在集成此工具之前,请准备一个可以捕获截图并执行推荐操作的环境。出于安全原因,我们建议使用沙盒环境。
在本指南中,我们将向您展示使用本地浏览环境或本地虚拟机的示例,但我们的示例应用中还有更多示例计算机环境。
设置本地浏览环境
如果您想以最少的设置试用计算机使用工具,则可以使用浏览器自动化框架,例如 Playwright 或 Selenium。
在本地运行浏览器自动化框架可能会带来安全风险。我们建议使用以下设置来缓解这些风险:
- 使用沙盒环境
- 将
env设置为空对象,以避免将主机环境变量暴露给浏览器 - 设置标志以禁用扩展和文件系统
启动浏览器实例
您可以通过安装相应的 SDK 来使用首选语言启动浏览器实例。
例如,要启动 Playwright 浏览器实例,请安装 Playwright SDK:
- Python:
pip install playwright - JavaScript:
npm i playwrightthennpx playwright install
然后运行以下代码:
from playwright.sync_api import sync_playwright

with sync_playwright() as p:
    browser = p.chromium.launch(
        headless=False,
        chromium_sandbox=True,
        env={},
        args=[
            "--disable-extensions",
            "--disable-file-system"
        ]
    )
    page = browser.new_page()
    page.set_viewport_size({"width": 1024, "height": 768})
    page.goto("https://bing.com")

    page.wait_for_timeout(10000)
设置本地虚拟机
如果您希望使用计算机使用工具而不仅限于浏览器界面,则可以使用 Docker 等工具设置本地虚拟机。然后,您可以连接到此本地计算机以执行计算机使用操作。
启动 Docker
如果您尚未安装 Docker,可以从 他们的网站 安装它。安装后,请确保 Docker 在您的计算机上运行。
创建 Dockerfile
创建 Dockerfile 来定义虚拟机的配置。
以下是使用 VNC 服务器启动 Ubuntu 虚拟机的示例 Dockerfile:
FROM ubuntu:22.04
ENV DEBIAN_FRONTEND=noninteractive

# 1) Install Xfce, x11vnc, Xvfb, xdotool, etc., but remove any screen lockers or power managers
RUN apt-get update && apt-get install -y     xfce4     xfce4-goodies     x11vnc     xvfb     xdotool     imagemagick     x11-apps     sudo     software-properties-common     imagemagick  && apt-get remove -y light-locker xfce4-screensaver xfce4-power-manager || true  && apt-get clean && rm -rf /var/lib/apt/lists/*

# 2) Add the mozillateam PPA and install Firefox ESR
RUN add-apt-repository ppa:mozillateam/ppa  && apt-get update  && apt-get install -y --no-install-recommends firefox-esr  && update-alternatives --set x-www-browser /usr/bin/firefox-esr  && apt-get clean && rm -rf /var/lib/apt/lists/*

# 3) Create non-root user
RUN useradd -ms /bin/bash myuser     && echo "myuser ALL=(ALL) NOPASSWD:ALL" >> /etc/sudoers
USER myuser
WORKDIR /home/myuser

# 4) Set x11vnc password ("secret")
RUN x11vnc -storepasswd secret /home/myuser/.vncpass

# 5) Expose port 5900 and run Xvfb, x11vnc, Xfce (no login manager)
EXPOSE 5900
CMD ["/bin/sh", "-c", "    Xvfb :99 -screen 0 1280x800x24 >/dev/null 2>&1 &     x11vnc -display :99 -forever -rfbauth /home/myuser/.vncpass -listen 0.0.0.0 -rfbport 5900 >/dev/null 2>&1 &     export DISPLAY=:99 &&     startxfce4 >/dev/null 2>&1 &     sleep 2 && echo 'Container running!' &&     tail -f /dev/null "]
构建 Docker 映像
通过在包含 Dockerfile 的目录中运行以下命令来构建 Docker 映像:
docker build -t cua-image .
在本地运行 Docker 容器
使用以下命令启动 Docker 容器:
docker run --rm -it --name cua-image -p 5900:5900 -e DISPLAY=:99 cua-image
在容器上执行命令
现在您的容器正在运行,您可以在其上执行命令。例如,我们可以定义一个辅助函数来在容器上执行命令,这些命令将在后续步骤中使用。
在容器上执行命令
def docker_exec(cmd: str, container_name: str, decode=True) -> str:
    safe_cmd = cmd.replace('"', '\"')
    docker_cmd = f'docker exec {container_name} sh -c "{safe_cmd}"'
    output = subprocess.check_output(docker_cmd, shell=True)
    if decode:
        return output.decode("utf-8", errors="ignore")
    return output

class VM:
    def __init__(self, display, container_name):
        self.display = display
        self.container_name = container_name

vm = VM(display=":99", container_name="cua-image")
集成 CUA 循环
以下是您需要遵循的步骤,以便将计算机使用工具集成到您的应用程序中:
- 向模型发送请求:将
computer工具作为可用工具的一部分,指定显示大小和环境。您还可以在第一个请求中包含环境的初始状态的截图。 - 接收模型的响应:检查响应中是否有任何
computer_call项目。这个工具调用包含了一个建议采取的动作,以朝着指定的目标前进。这些动作可以是点击指定位置、输入文本、滚动,甚至是等待。 - 执行请求的动作:通过代码在您的计算机或浏览器环境中执行相应的动作。
- 捕获更新后的状态:在执行动作后,捕获环境的更新状态作为截图。
- 重复:使用更新后的状态作为
computer_call_output发送新的请求,并重复此循环,直到模型停止请求动作或您决定停止。
1. 向模型发送请求
向模型发送请求以创建一个配备 computer-use-preview 模型和 computer_use_preview 工具的响应。此请求应包括有关您环境的详细信息,以及一个初始输入提示。
如果您想显示模型执行的推理摘要,可以在请求中包含 generate_summary 参数。这有助于您调试或显示界面背后的情况。摘要可以是 concise 或 detailed。
可选地,您可以包含环境的初始状态的截图。
要使用 computer_use_preview 工具,您需要将 truncation 参数设置为 "auto"(默认情况下,截断是禁用的)。
发送一个 CUA 请求
from openai import OpenAI
client = OpenAI()

response = client.responses.create(
    model="computer-use-preview",
    tools=[{
        "type": "computer_use_preview",
        "display_width": 1024,
        "display_height": 768,
        "environment": "browser" # other possible values: "mac", "windows", "ubuntu"
    }],
    input=[
        {
            "role": "user",
            "content": "Check the latest OpenAI news on bing.com."
        }
        # Optional: include a screenshot of the initial state of the environment
        # {
        #     type: "input_image",
        #     image_url: f"data:image/png;base64,{screenshot_base64}"
        # }
    ],
    reasoning={
        "generate_summary": "concise",
    },
    truncation="auto"
)

print(response.output)
2. 接收建议操作
模型返回一个输出,其中包含一个 computer_call 项、纯文本或其他工具调用,具体取决于对话的状态。
computer_call 项的示例包括点击、滚动、按键或任何在 API参考 中定义的事件。在我们的示例中,项是一个点击操作:
CUA 建议操作
"output": [
    {
        "type": "reasoning",
        "id": "rs_67cc...",
        "summary": [
            {
                "type": "summary_text",
                "text": "Clicking on the browser address bar."
            }
        ]
    },
    {
        "type": "computer_call",
        "id": "cu_67cc...",
        "call_id": "call_zw3...",
        "action": {
            "type": "click",
            "button": "left",
            "x": 156,
            "y": 50
        },
        "pending_safety_checks": [],
        "status": "completed"
    }
]
理由项
模型在响应输出中可能为某些操作返回一个 reasoning 理由项。如果您没有像 步骤 5 中所示使用 previous_response_id 参数,并在您的一端管理输入数组,确保在向 CUA 模型发送下一个请求时包括这些理由项,否则请求将失败。
理由项仅与其产生的相同模型兼容(在这种情况下,为 computer-use-preview)。如果您实现了一个使用具有相同对话历史的多个模型的流程,您应该从发送给其他模型的输入数组中过滤掉这些理由项。
安全检查
模型可能返回带有 pending_safety_check 参数的安全检查。有关更多详细信息,请参阅下文关于如何 承认安全检查 的部分。
3. 在您的环境中执行操作
在您的计算机或浏览器上执行相应的操作。如何通过代码将计算机上的操作映射到动作取决于您的环境。以下代码展示了最常见的计算机操作的示例实现。
Playwright
执行操作
def handle_model_action(page, action):
    """
    Given a computer action (e.g., click, double_click, scroll, etc.),
    execute the corresponding operation on the Playwright page.
    """
    action_type = action.type

    try:
        match action_type:

            case "click":
                x, y = action.x, action.y
                button = action.button
                print(f"Action: click at ({x}, {y}) with button '{button}'")
                # Not handling things like middle click, etc.
                if button != "left" and button != "right":
                    button = "left"
                page.mouse.click(x, y, button=button)

            case "scroll":
                x, y = action.x, action.y
                scroll_x, scroll_y = action.scroll_x, action.scroll_y
                print(f"Action: scroll at ({x}, {y}) with offsets (scroll_x={scroll_x}, scroll_y={scroll_y})")
                page.mouse.move(x, y)
                page.evaluate(f"window.scrollBy({scroll_x}, {scroll_y})")

            case "keypress":
                keys = action.keys
                for k in keys:
                    print(f"Action: keypress '{k}'")
                    # A simple mapping for common keys; expand as needed.
                    if k.lower() == "enter":
                        page.keyboard.press("Enter")
                    elif k.lower() == "space":
                        page.keyboard.press(" ")
                    else:
                        page.keyboard.press(k)

            case "type":
                text = action.text
                print(f"Action: type text: {text}")
                page.keyboard.type(text)

            case "wait":
                print(f"Action: wait")
                time.sleep(2)

            case "screenshot":
                # Nothing to do as screenshot is taken at each turn
                print(f"Action: screenshot")

            # Handle other actions here

            case _:
                print(f"Unrecognized action: {action}")

    except Exception as e:
        print(f"Error handling action {action}: {e}")
Docker
def handle_model_action(vm, action):
    """
    Given a computer action (e.g., click, double_click, scroll, etc.),
    execute the corresponding operation on the Docker environment.
    """
    action_type = action.type

    try:
        match action_type:

            case "click":
                x, y = int(action.x), int(action.y)
                button_map = {"left": 1, "middle": 2, "right": 3}
                b = button_map.get(action.button, 1)
                print(f"Action: click at ({x}, {y}) with button '{action.button}'")
                docker_exec(f"DISPLAY={vm.display} xdotool mousemove {x} {y} click {b}", vm.container_name)

            case "scroll":
                x, y = int(action.x), int(action.y)
                scroll_x, scroll_y = int(action.scroll_x), int(action.scroll_y)
                print(f"Action: scroll at ({x}, {y}) with offsets (scroll_x={scroll_x}, scroll_y={scroll_y})")
                docker_exec(f"DISPLAY={vm.display} xdotool mousemove {x} {y}", vm.container_name)

                # For vertical scrolling, use button 4 (scroll up) or button 5 (scroll down)
                if scroll_y != 0:
                    button = 4 if scroll_y < 0 else 5
                    clicks = abs(scroll_y)
                    for _ in range(clicks):
                        docker_exec(f"DISPLAY={vm.display} xdotool click {button}", vm.container_name)

            case "keypress":
                keys = action.keys
                for k in keys:
                    print(f"Action: keypress '{k}'")
                    # A simple mapping for common keys; expand as needed.
                    if k.lower() == "enter":
                        docker_exec(f"DISPLAY={vm.display} xdotool key 'Return'", vm.container_name)
                    elif k.lower() == "space":
                        docker_exec(f"DISPLAY={vm.display} xdotool key 'space'", vm.container_name)
                    else:
                        docker_exec(f"DISPLAY={vm.display} xdotool key '{k}'", vm.container_name)

            case "type":
                text = action.text
                print(f"Action: type text: {text}")
                docker_exec(f"DISPLAY={vm.display} xdotool type '{text}'", vm.container_name)

            case "wait":
                print(f"Action: wait")
                time.sleep(2)

            case "screenshot":
                # Nothing to do as screenshot is taken at each turn
                print(f"Action: screenshot")

            # Handle other actions here

            case _:
                print(f"Unrecognized action: {action}")

    except Exception as e:
        print(f"Error handling action {action}: {e}")
4. 捕获更新后的屏幕截图
执行操作后,捕获环境的更新状态作为屏幕截图,这同样取决于你的环境。
Playwright
捕获并发送更新后的屏幕截图
def get_screenshot(page):
    """
    Take a full-page screenshot using Playwright and return the image bytes.
    """
    return page.screenshot()
Docker
def get_screenshot(vm):
    """
    Takes a screenshot, returning raw bytes.
    """
    cmd = (
        f"export DISPLAY={vm.display} && "
        "import -window root png:-"
    )
    screenshot_bytes = docker_exec(cmd, vm.container_name, decode=False)
    return screenshot_bytes
5. 重复
一旦您获取了截图,您可以将它作为 computer_call_output 发回给模型以获取下一个动作。只要响应中包含 computer_call 项,就重复这些步骤。
在循环中重复步骤
import time
import base64
from openai import OpenAI
client = OpenAI()

def computer_use_loop(instance, response):
    """
    Run the loop that executes computer actions until no 'computer_call' is found.
    """
    while True:
        computer_calls = [item for item in response.output if item.type == "computer_call"]
        if not computer_calls:
            print("No computer call found. Output from model:")
            for item in response.output:
                print(item)
            break  # Exit when no computer calls are issued.

        # We expect at most one computer call per response.
        computer_call = computer_calls[0]
        last_call_id = computer_call.call_id
        action = computer_call.action

        # Execute the action (function defined in step 3)
        handle_model_action(instance, action)
        time.sleep(1)  # Allow time for changes to take effect.

        # Take a screenshot after the action (function defined in step 4)
        screenshot_bytes = get_screenshot(instance)
        screenshot_base64 = base64.b64encode(screenshot_bytes).decode("utf-8")

        # Send the screenshot back as a computer_call_output
        response = client.responses.create(
            model="computer-use-preview",
            previous_response_id=response.id,
            tools=[
                {
                    "type": "computer_use_preview",
                    "display_width": 1024,
                    "display_height": 768,
                    "environment": "browser"
                }
            ],
            input=[
                {
                    "call_id": last_call_id,
                    "type": "computer_call_output",
                    "output": {
                        "type": "input_image",
                        "image_url": f"data:image/png;base64,{screenshot_base64}"
                    }
                }
            ],
            truncation="auto"
        )

    return response
处理对话历史
您可以使用 previous_response_id 参数将当前请求链接到之前的响应。如果您不想在您的端管理对话历史,我们建议使用此方法。
如果您不想使用此参数,您应该确保在您的输入数组中包含之前请求响应输出中返回的所有项目,包括如果有的话的推理项目。
安全检查
我们在API中实现了安全检查,以帮助防止提示注入和模型错误。这些检查包括:
- 恶意指令检测:我们评估截图图像,并检查其中是否包含可能改变模型行为的对抗性内容。
- 不相关领域检测:我们评估(如果提供)
current_url,并检查当前领域是否根据对话历史被认为是相关的。 - 敏感领域检测:我们检查(如果提供)
current_url,并在检测到用户位于敏感领域时发出警告。
如果上述检查之一或多个被触发,当模型返回下一个 computer_call 时,将使用 pending_safety_checks 参数触发安全检查。
待处理安全检查
"output": [
    {
        "type": "reasoning",
        "id": "rs_67cb...",
        "summary": [
            {
                "type": "summary_text",
                "text": "Exploring 'File' menu option."
            }
        ]
    },
    {
        "type": "computer_call",
        "id": "cu_67cb...",
        "call_id": "call_nEJ...",
        "action": {
            "type": "click",
            "button": "left",
            "x": 135,
            "y": 193
        },
        "pending_safety_checks": [
            {
                "id": "cu_sc_67cb...",
                "code": "malicious_instructions",
                "message": "We've detected instructions that may cause your application to perform malicious or unauthorized actions. Please acknowledge this warning if you'd like to proceed."
            }
        ],
        "status": "completed"
    }
]
您需要在下一个请求中将安全检查结果作为 acknowledged_safety_checks 返回,以便继续进行。在所有返回 pending_safety_checks 的情况下,应将操作交给最终用户以确认模型行为和准确性。
malicious_instructions和irrelevant_domain:最终用户应审查模型操作并确认模型的行为符合预期。sensitive_domain: 确保最终用户正在积极监控这些网站上模型的操作。此“监控模式”的确切实现方式可能因应用而异,但一个可能的示例可能是收集网站上的用户印象数据,以确保最终用户与应用程序有积极的互动。
from openai import OpenAI
client = OpenAI()

response = client.responses.create(
    model="computer-use-preview",
    previous_response_id="<previous_response_id>",
    tools=[{
        "type": "computer_use_preview",
        "display_width": 1024,
        "display_height": 768,
        "environment": "browser"
    }],
    input=[
        {
            "type": "computer_call_output",
            "call_id": "<call_id>",
            "acknowledged_safety_checks": [
                {
                    "id": "<safety_check_id>",
                    "code": "malicious_instructions",
                    "message": "We've detected instructions that may cause your application to perform malicious or unauthorized actions. Please acknowledge this warning if you'd like to proceed."
                }
            ],
            "output": {
                "type": "computer_screenshot",
                "image_url": "<image_url>"
            }
        }
    ],
    truncation="auto"
)
最终代码
将所有内容整合在一起,最终的代码应包括:
- 环境初始化
- 使用
computer工具向模型发送第一次请求 - 一个循环,在您的环境中执行建议的操作
- 一种方法来确认安全检查,并给最终用户提供确认操作的机会
要查看端到端的示例集成,请参阅我们的 CUA 示例应用程序仓库。
CUA 示例应用程序
展示如何在不同的环境中集成计算机使用工具的示例
局限性
我们推荐使用 computer-use-preview 模型进行基于浏览器的任务。该模型可能容易受到意外的模型错误的影响,尤其是在它不太熟悉的非浏览器环境中。
例如,computer-use-preview 在 OSWorld 上的性能目前为 38.1%,表明该模型在自动化操作系统任务方面尚未非常可靠。有关该模型和相关安全工作的更多详细信息,请参阅我们的更新版 系统卡。
以下是一些需要注意的其他行为限制:
computer-use-preview模型 具有限制性的速率限制和功能支持,详情请见其模型详细信息页面。- 此工具不支持零数据保留 (数据保留策略)。
风险与安全
计算机使用存在独特的风险,这些风险与标准API功能或聊天界面的风险不同,尤其是在与互联网交互时。
以下列出了一些最佳实践,您应遵循以减轻这些风险。
人工审核循环应用于高风险任务
避免执行高风险或需要高精度的工作。模型可能会犯下难以纠正的错误。如上所述,模型仍然容易出错,尤其是在非浏览器表面上。虽然我们期望模型在执行某些影响较大的决策之前请求用户确认,但这并不完全可靠。确保有人员在循环中确认模型的行为,这些行为具有现实世界的后果。
小心提示注入
提示注入发生在人工智能模型错误地遵循其输入中出现的未受信任的指令时。对于 computer-use-preview 模型,这可能表现为它看到提供的截图中的恶意网站或电子邮件,指示它执行用户不希望的操作,并且它照做了。为了避免提示注入风险,限制计算机使用访问权限,仅限于受信任的、隔离的环境,如沙箱浏览器或容器。
使用黑白名单
实现网站、操作和用户的黑白名单。例如,如果您正在使用计算机使用工具在网站上预订票务,创建一个只包含您预期在该工作流程中使用的网站的允许列表。
发送用户 ID
发送最终用户 ID(可选参数)以帮助 OpenAI 监控和检测滥用。
使用我们的安全检查
以下安全检查可用,以防止即时注入和模型错误:
- 恶意指令检测
- 不相关域检测
- 敏感域检测
当你收到一个 pending_safety_check 时,你应该增加对模型操作的监督,例如通过将任务明确告知最终用户以确认继续执行任务,并确保用户积极监控代理的行为(例如,通过实施类似Operator的监控模式)。本质上,当安全检查触发时,应该有人进入循环。
阅读上面关于如何处理 pending_safety_check 的 确认安全检查 部分,以获取更多详细信息。
在可能的情况下,强烈建议将可选参数 current_url 作为 computer_call_output 的一部分传递,因为它可以帮助提高我们的安全检查的准确性。
使用当前 URL
{
    "type": "computer_call_output",
    "call_id": "call_7OU...",
    "acknowledged_safety_checks": [],
    "output": {
        "type": "computer_screenshot",
        "image_url": "..."
    },
    "current_url": "https://openai.com"
}
额外的安全预防措施
根据您的应用程序,实施最合适的额外安全预防措施,例如实施与计算机使用循环并行运行的护栏。
遵守我们的使用政策
请记住,您有责任遵守 OpenAI 使用政策 和 业务条款 使用我们的服务,我们鼓励您使用我们的安全功能和工具来帮助确保遵守规定。
2025-03-29(六)


 1460
1460

 被折叠的 条评论
为什么被折叠?
被折叠的 条评论
为什么被折叠?
 到【灌水乐园】发言


