


本文是简要性的导览chipyard官方手册内容,以及安装开发环境需要注意的的一些地方,最后运行几个简单的官方Demo,希望能对RISC-V有兴趣的小伙伴有所启发帮助,官方网址为https://chipyard.readthedocs.io/en/latest/
注:文内大部分代码均复制粘贴整理自官方手册。
2 chipyard组件
Chipyard是用于敏捷开发基于Chisel的片上系统的开源框架。它将使您能够利用Chisel HDL,Rocket Chip SoC生成器和其他Berkeley项目来生产RISC-V SoC,该产品具有从MMIO映射的外设到定制加速器的所有功能。Chipyard包含:
- 处理器内核(Rocket,BOOM,Ariane);
- 加速器(Hwacha,Gemmini,NVDLA);
- 内存系统以及其他外围设备和工具,以帮助创建功能齐全的SoC。
2.1 Rocket
Rocket-core是标准的5级流水顺序执行标量处理器,支持RV64GC RISC-V 指令集,Chisel实现,下面是一个典型的双核实现
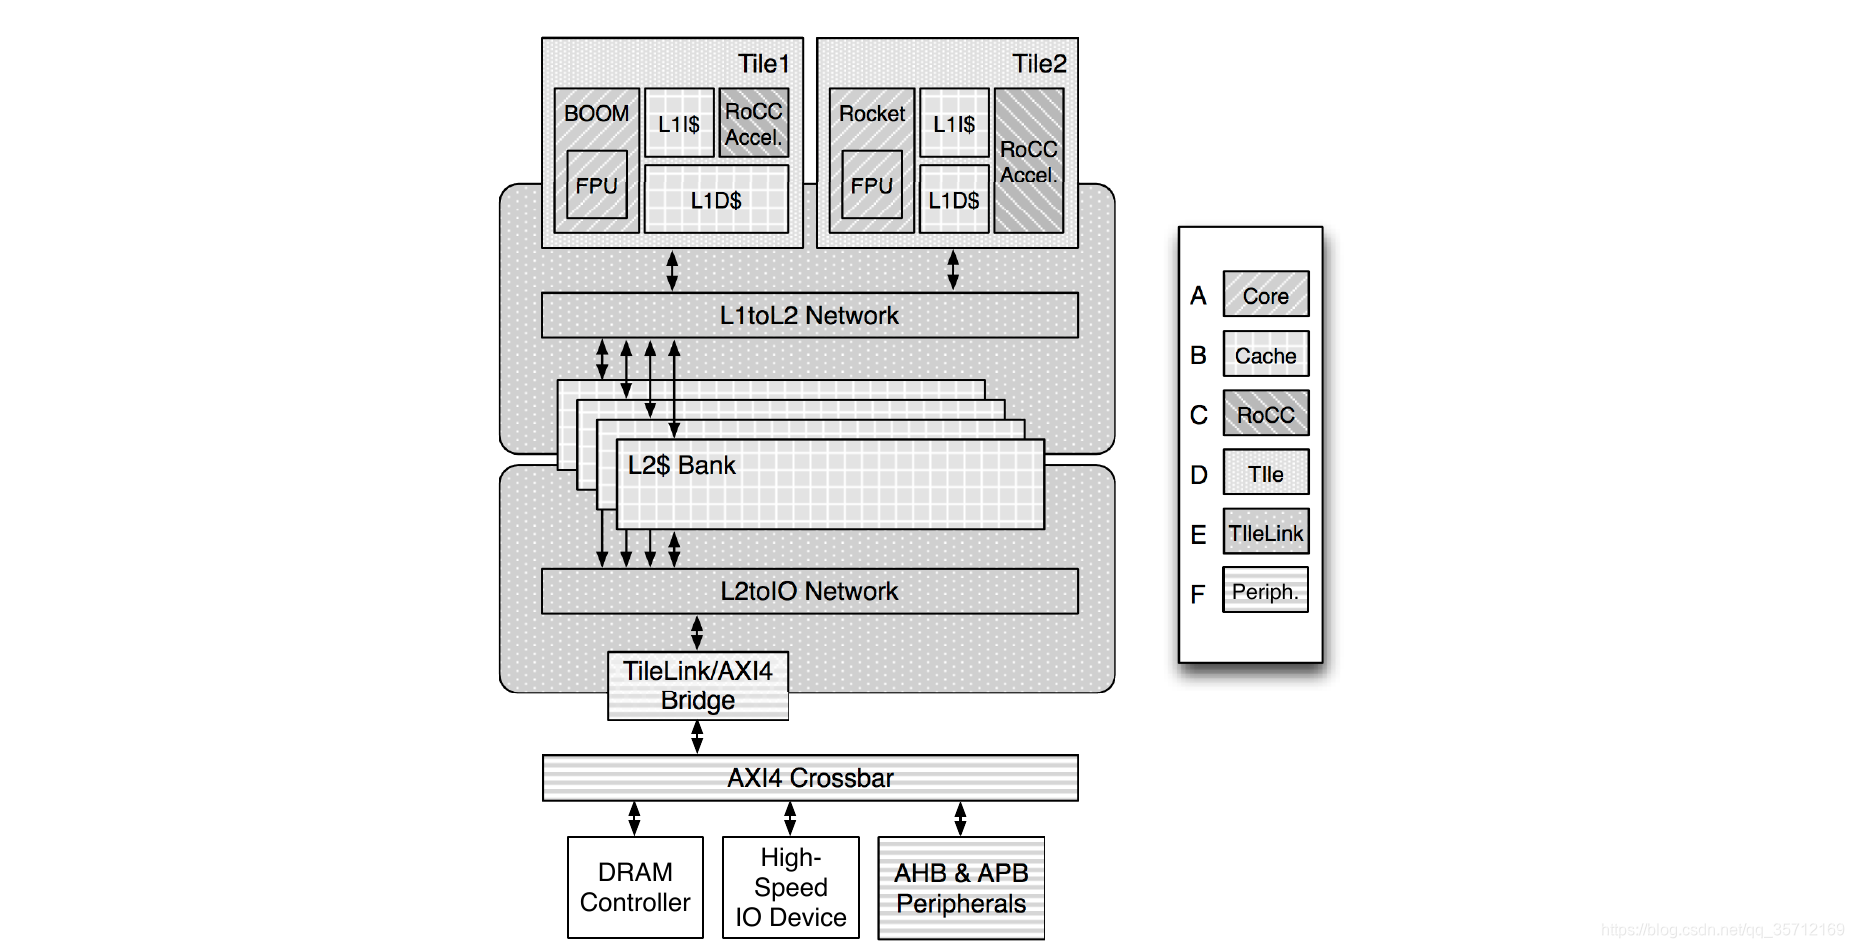
它的流水线结构为

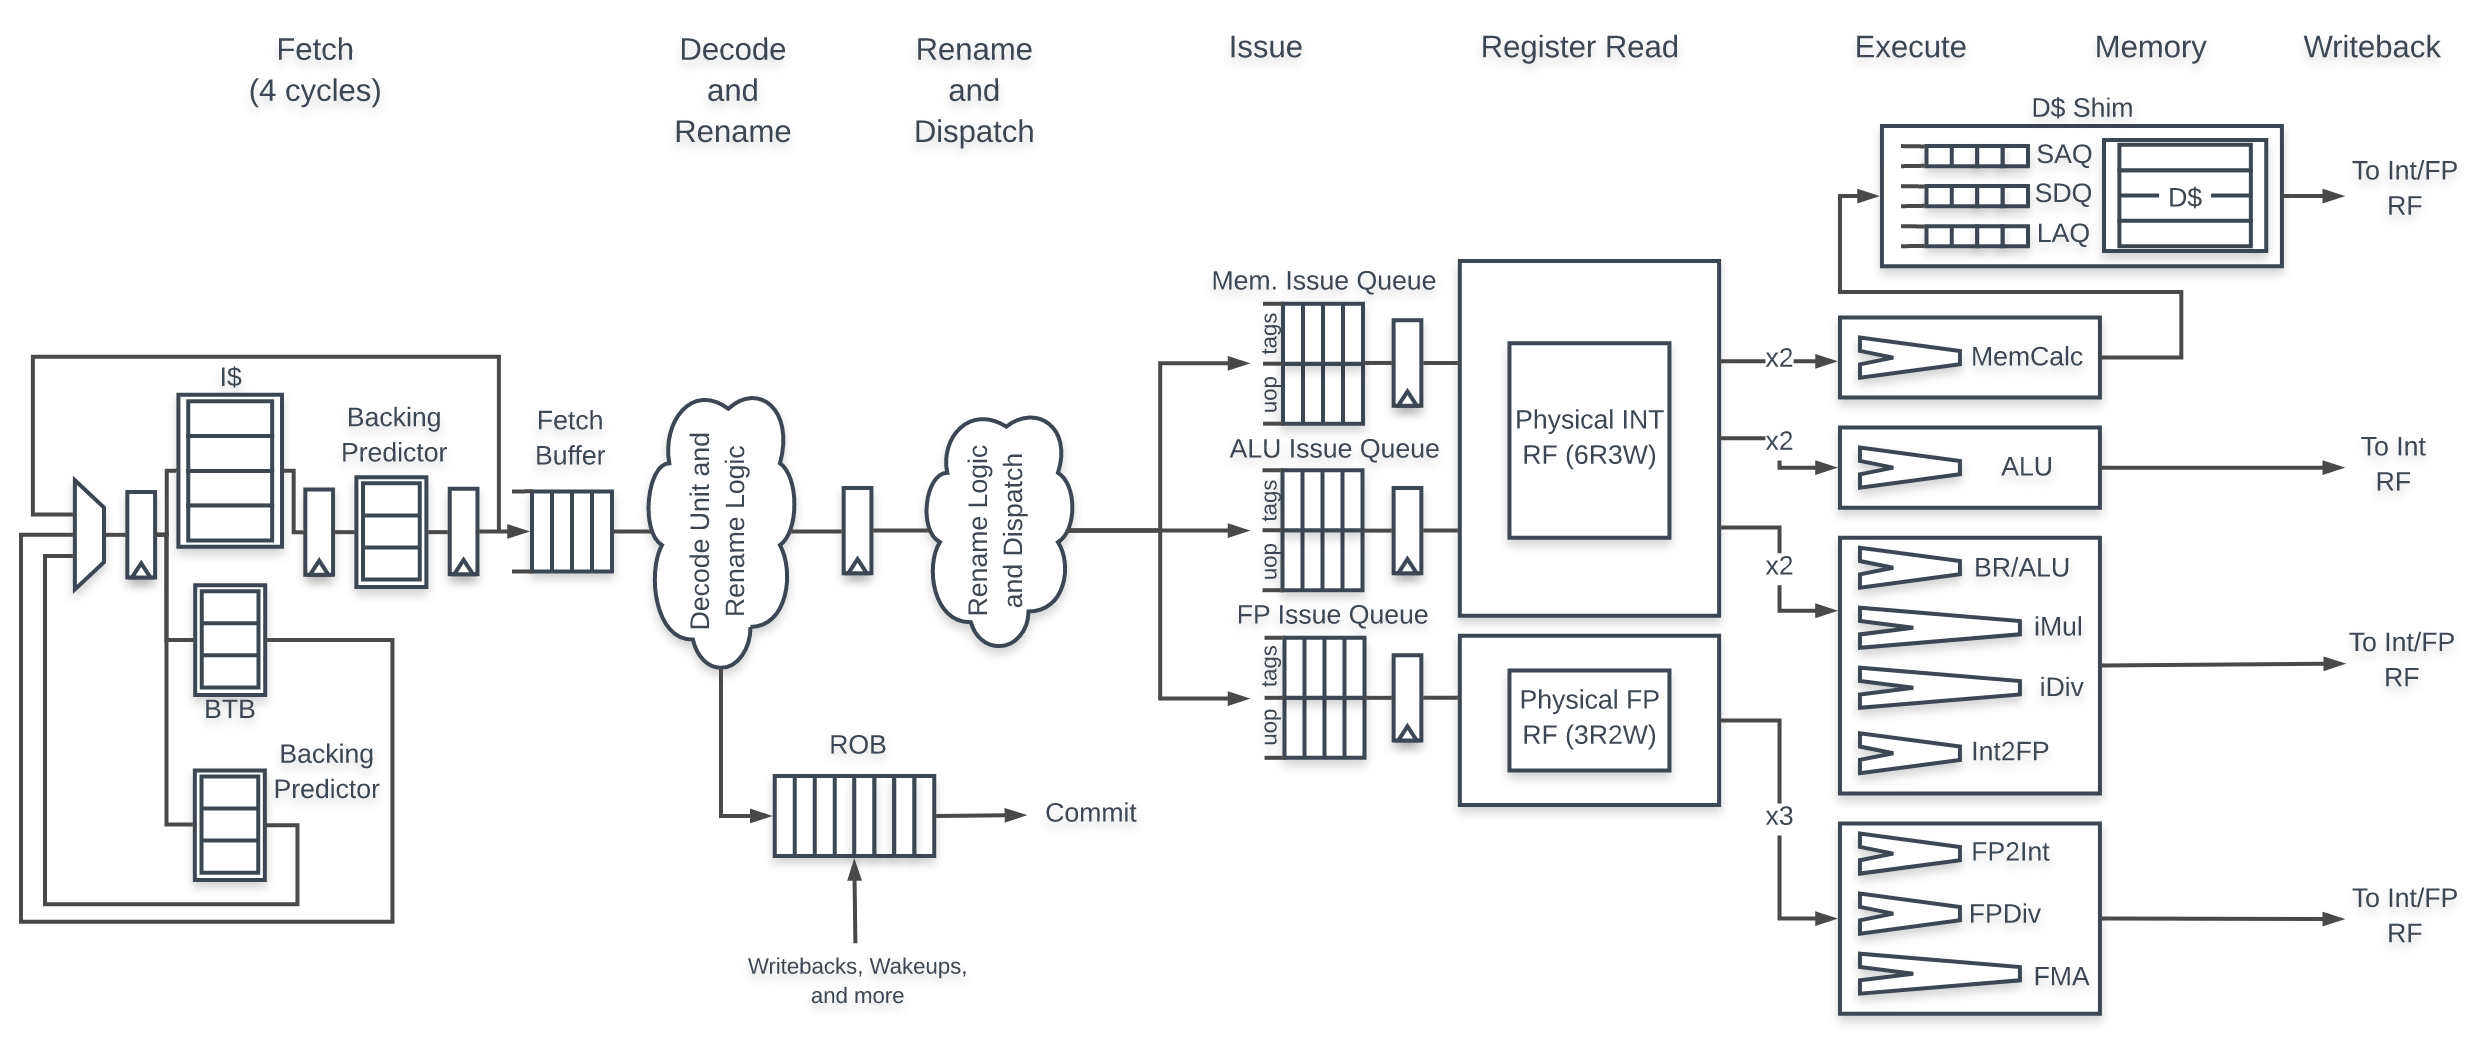
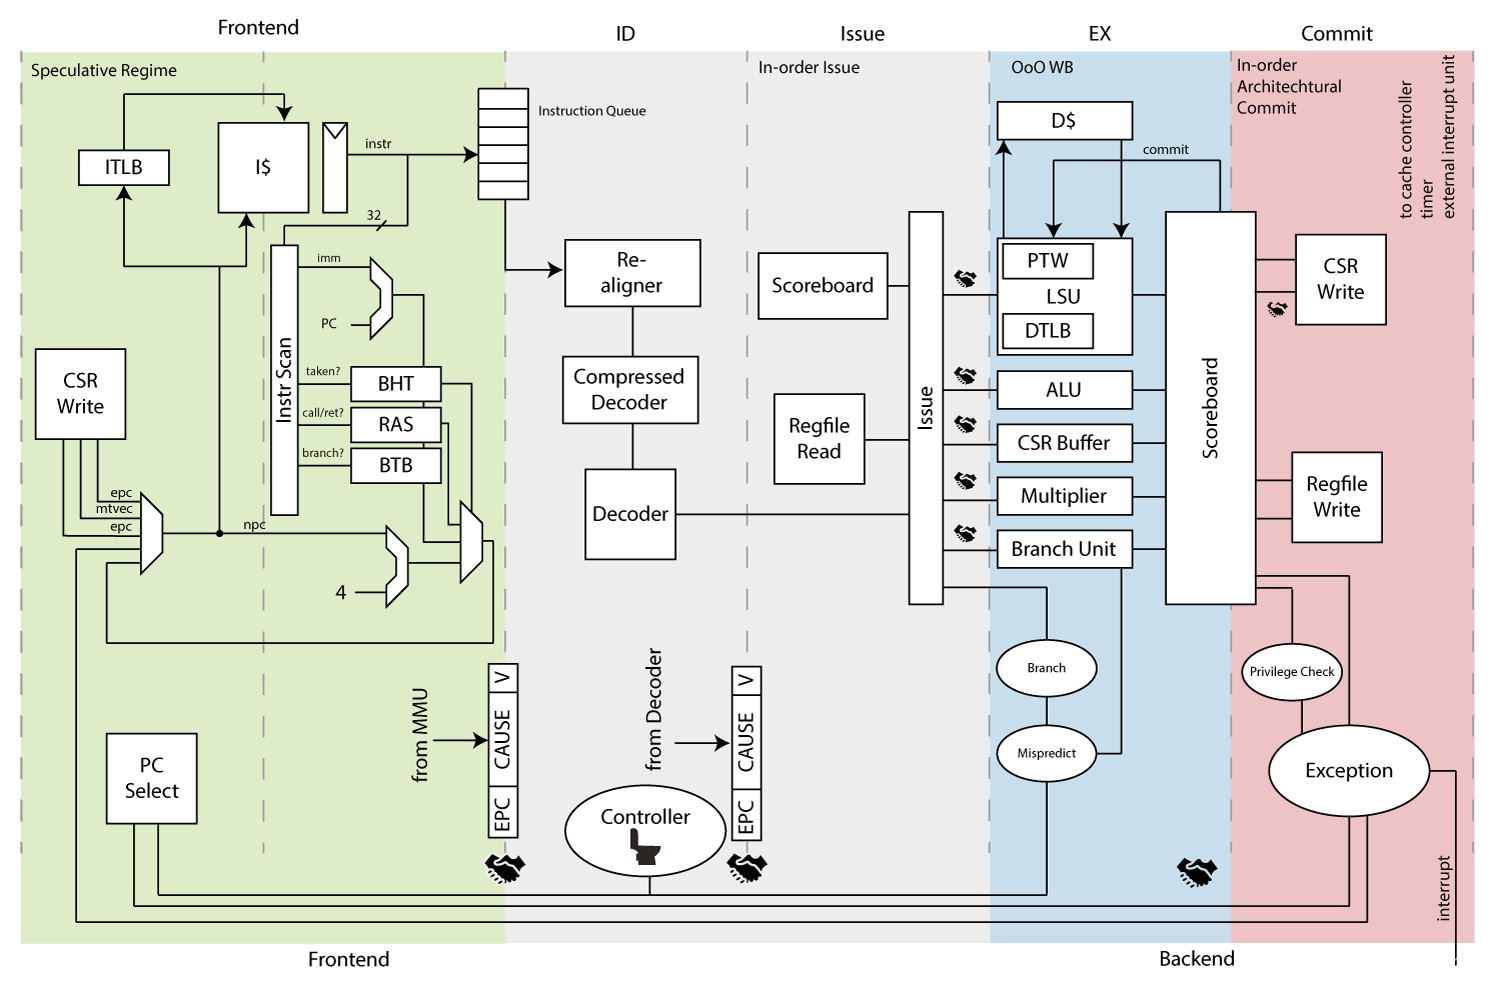
2.2 BOOM
BOOM全名为Berkeley Out-of-Order Machine,顾名思义是个乱序执行的core,为7级流水,支持RV64GC RISC-V 指令集,Chisel实现,如下是详细的流水线结构
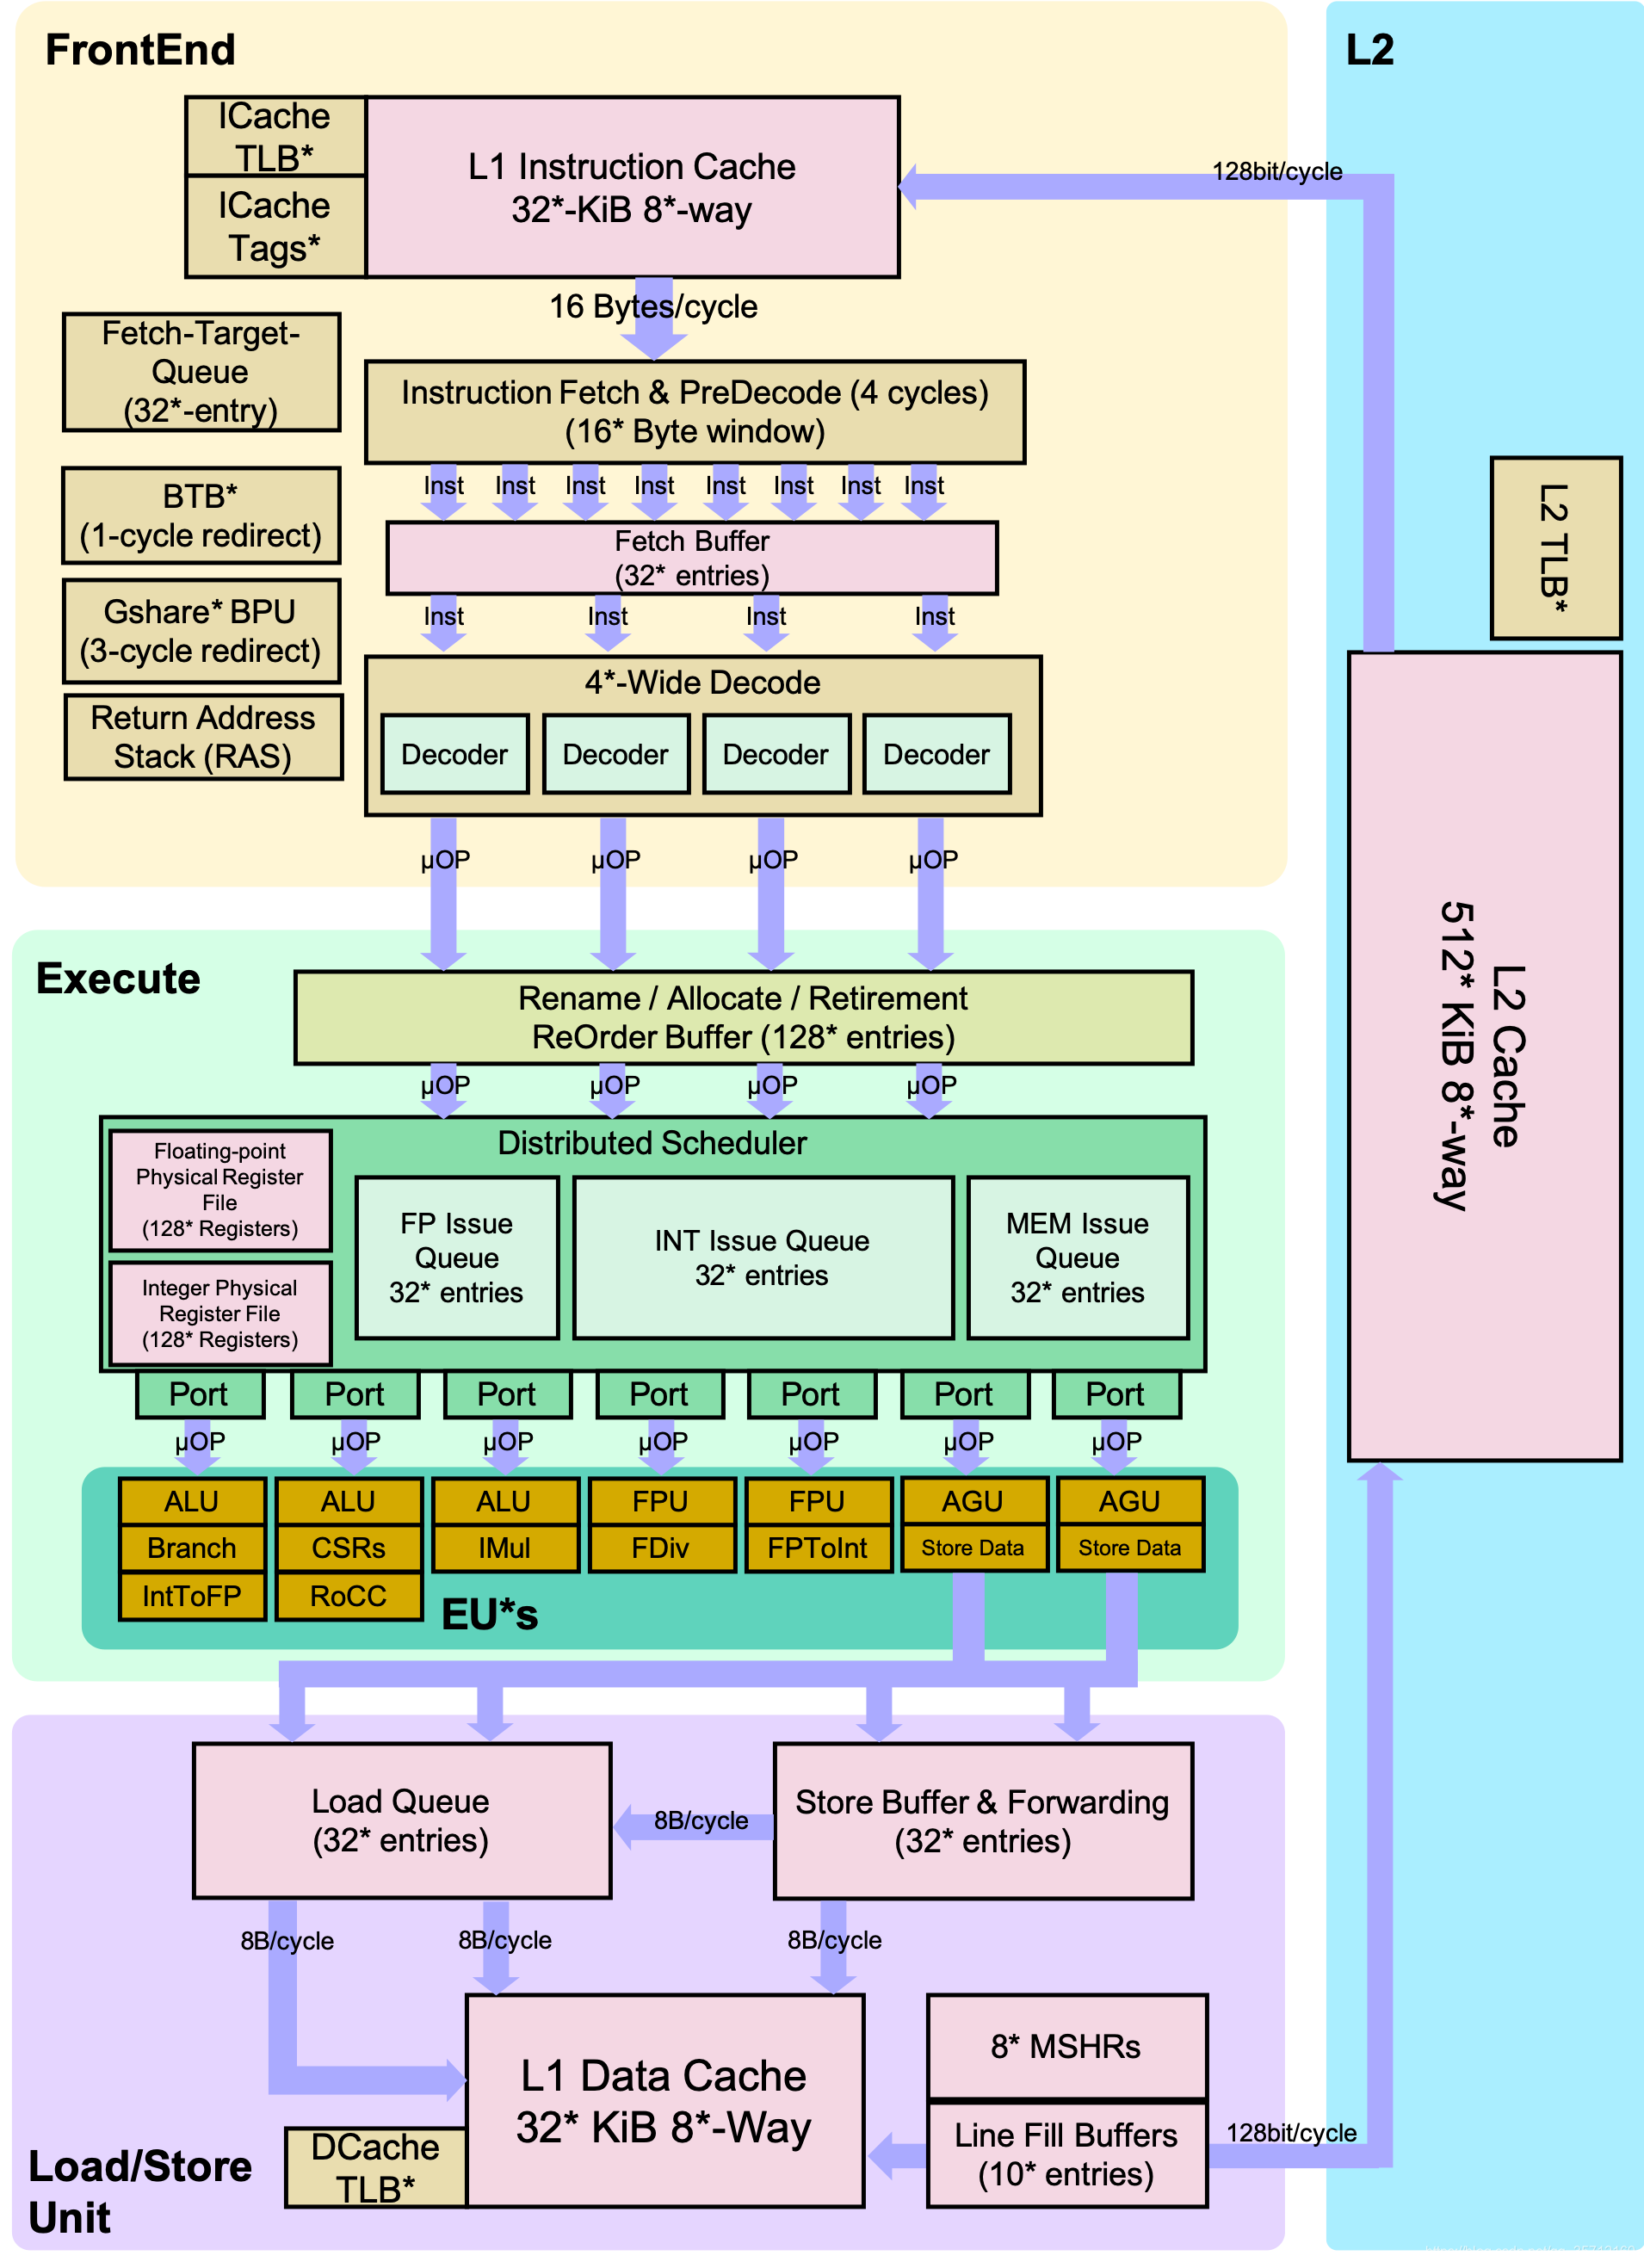
这个是简化的流水线结构
特性汇总如下表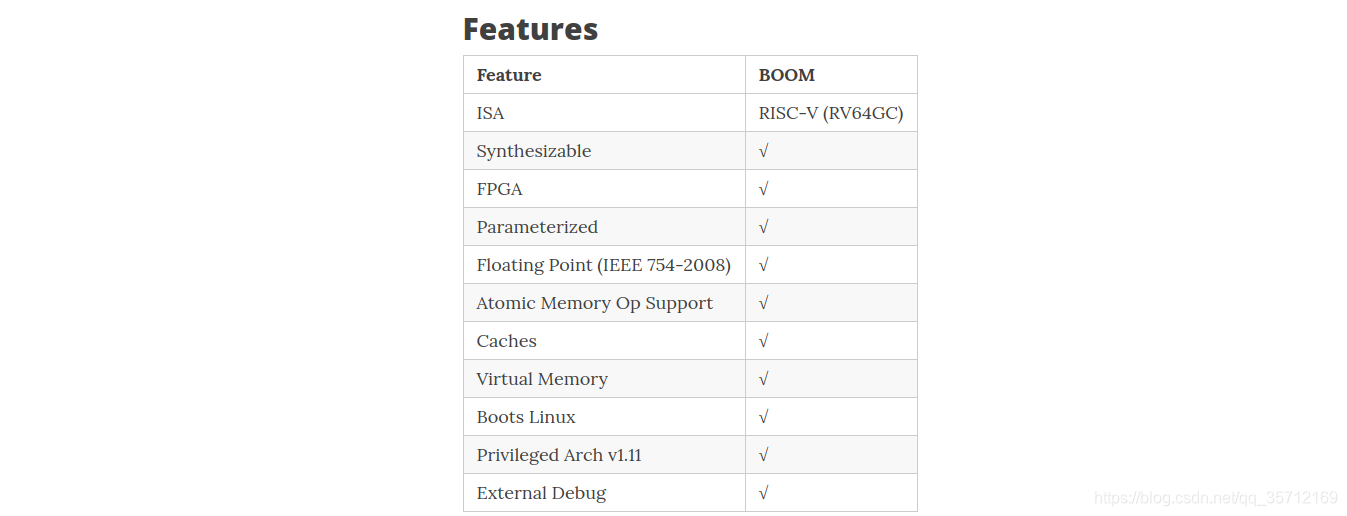
2.3 Ariane
Ariane是6级流水顺序执行标量core,SV实现,如下是它的流水线结构
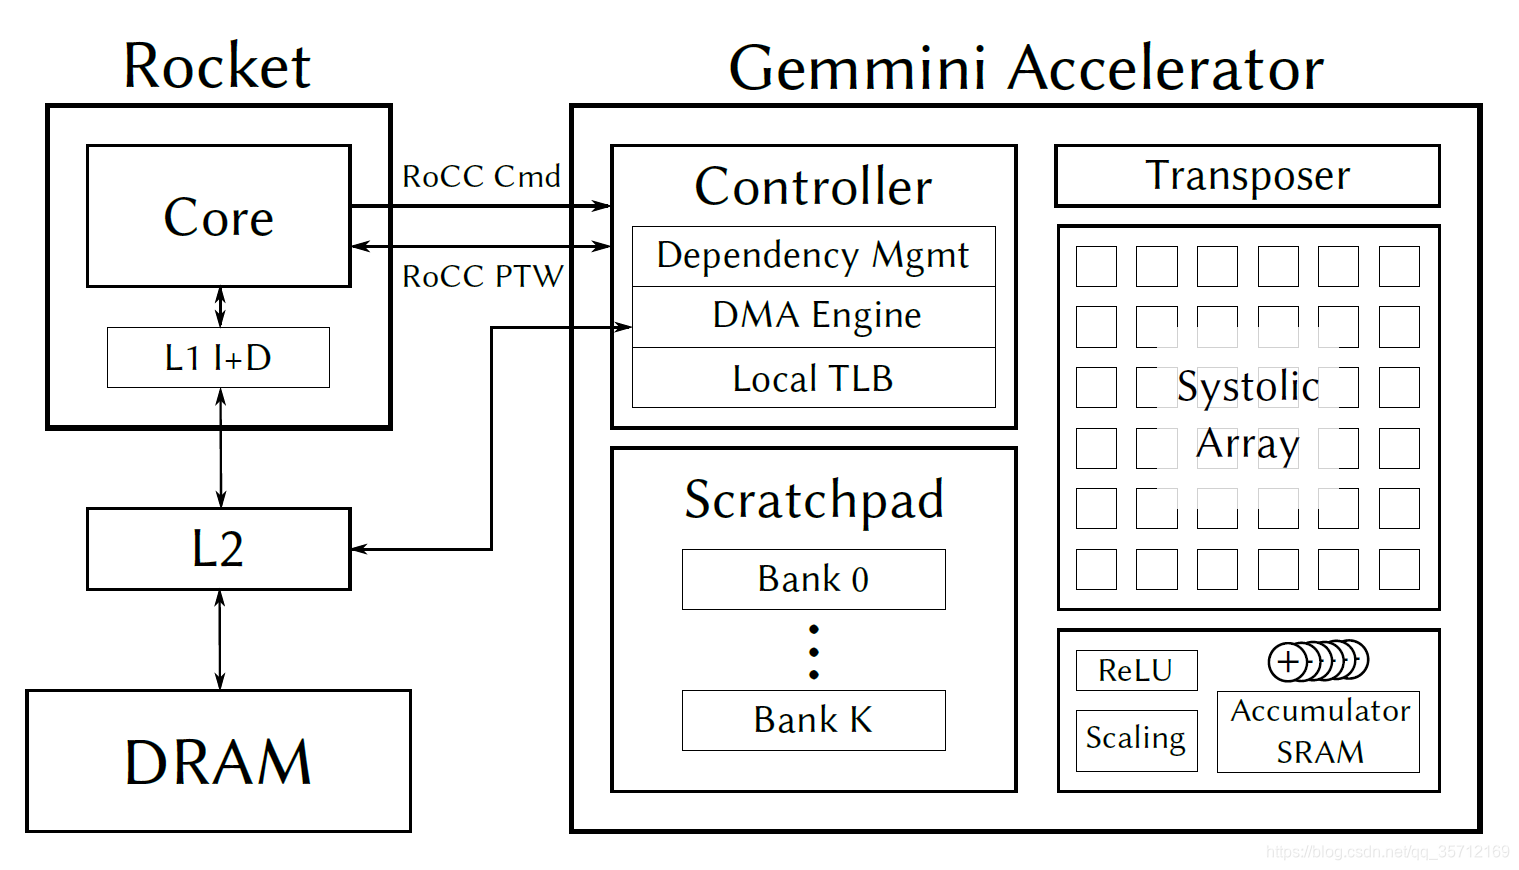
2.4 Gemmini
Gemmini项目是一种正在开发基于脉动阵列的矩阵乘法单元生成器。利用ROCC接口,用于与RISC-V Rocket / BOOM处理器集成的协处理器。
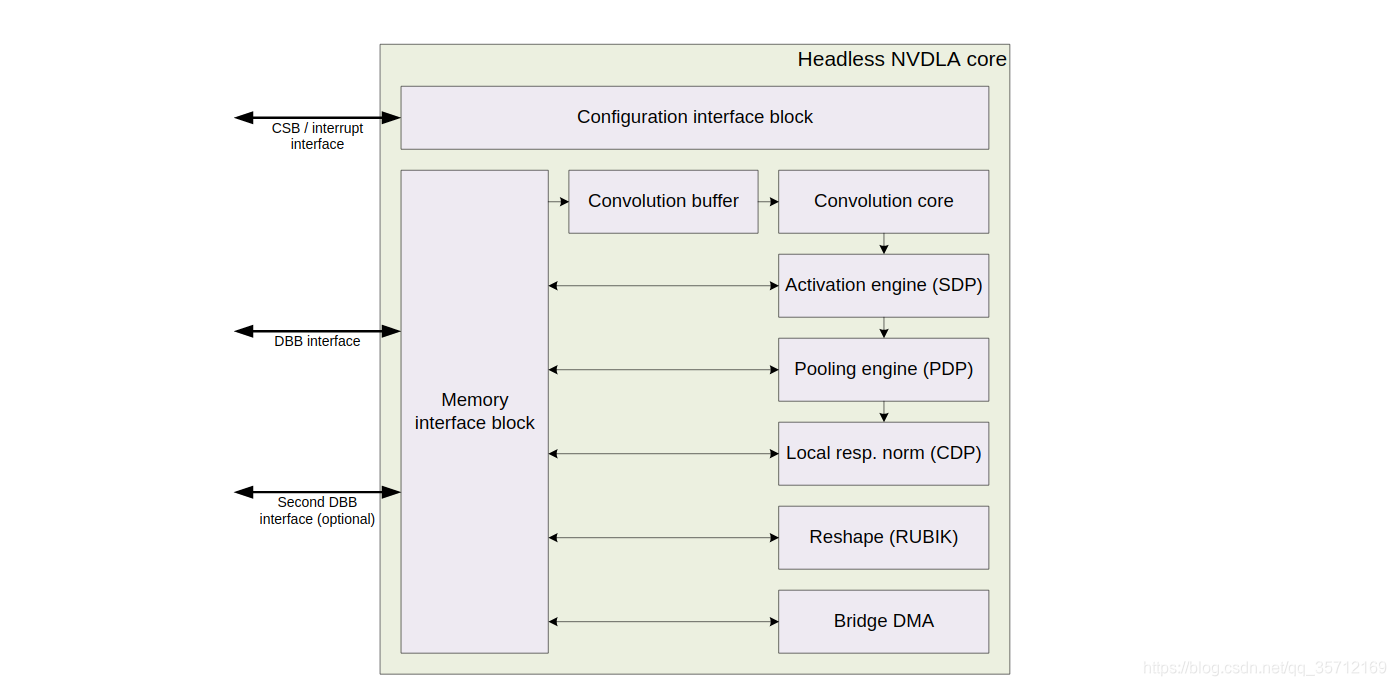
2.5 NVDLA
NVDLA是NVIDIA开发的开源深度学习加速器。可以通过TileLink总线挂载搭配Rocket Chip SoC 上。
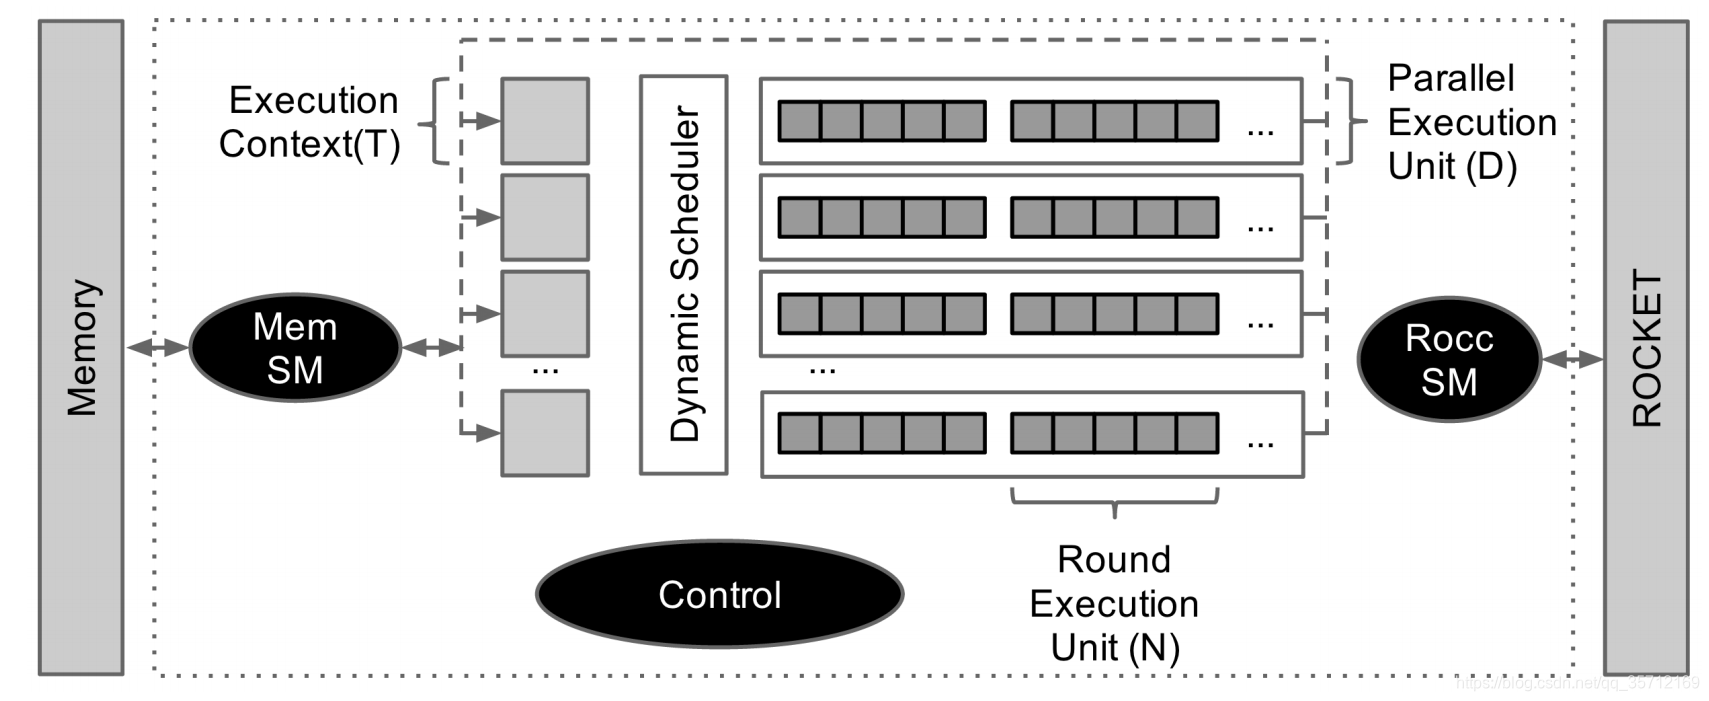
2.6 SHA3 RoCC 加速器
利用ROCC接口,用于与RISC-V Rocket / BOOM处理器集成的协处理器,专用于SHA3 Hash加速。
3 搭建环境
注:仅限于Linux系统!!!
下面以Ubuntu为例,其他的建议参考官方文档
首先要先安装必要的依赖环境
#!/bin/bash
set -ex
sudo apt-get install -y build-essential bison flex
sudo apt-get install -y libgmp-dev libmpfr-dev libmpc-dev zlib1g-dev vim git default-jdk default-jre
# install sbt: https://www.scala-sbt.org/release/docs/Installing-sbt-on-Linux.html
echo “deb https://dl.bintray.com/sbt/debian /” | sudo tee -a /etc/apt/sources.list.d/sbt.list
curl -sL “https://keyserver.ubuntu.com/pks/lookup?op=get&search=0x2EE0EA64E40A89B84B2DF73499E82A75642AC823” | sudo apt-key add
sudo apt-get update
sudo apt-get install -y sbt
sudo apt-get install -y texinfo gengetopt
sudo apt-get install -y libexpat1-dev libusb-dev libncurses5-dev cmake
# deps for poky
sudo apt-get install -y python3.6 patch diffstat texi2html texinfo subversion chrpath git wget
# deps for qemu
sudo apt-get install -y libgtk-3-dev gettext
# deps for firemarshal
sudo apt-get install -y python3-pip python3.6-dev rsync libguestfs-tools expat ctags
# install DTC
sudo apt-get install -y device-tree-compiler
# install verilator
git clone http://git.veripool.org/git/verilator
cd verilator
git checkout v4.034
autoconf && ./configure && make -j30 && sudo make install
下面利用git把chipyard以及包含的所有子模块全部下载下来。
git clone https://github.com/ucb-bar/chipyard.git
cd chipyard
./scripts/init-submodules-no-riscv-tools.sh
- 1
- 2
- 3
最后构建需要的工具链
# riscv-tools: if set, builds the riscv toolchain (this is also the default)
# esp-tools: if set, builds esp-tools toolchain used for the hwacha vector accelerator
# ec2fast: if set, pulls in a pre-compiled RISC-V toolchain for an EC2 manager instance
export MAKEFLAGS=-j30
./scripts/build-toolchains.sh riscv-tools # for a normal risc-v toolchain
source ./env.sh
如果上面的步骤经过了大半天也没有完成,甚至因为网络的原因出错,那么你可以有如下两种解决方案,如果还有更好的方案欢迎讨论:
- 利用代理或者梯子;
- 利用gitee镜像原仓库,然后后台一个一个下载,最后重复执行
./scripts/init-submodules-no-riscv-tools.sh与./scripts/build-toolchains.sh riscv-tools,直到最终完成工具链的构建。
4 几个示例
4.1 Rocket
首先进行一个典型的Rocket配置,更多有趣的配置可以直接访问源文件
//generators/chipyard/src/main/scala/config/RocketConfigs.scala
class RocketConfig extends Config(
  new chipyard.iobinders.WithUARTAdapter ++                      // display UART with a SimUARTAdapter
  new chipyard.iobinders.WithTieOffInterrupts ++                 // tie off top-level interrupts
  new chipyard.iobinders.WithBlackBoxSimMem ++                   // drive the master AXI4 memory with a blackbox DRAMSim model
  new chipyard.iobinders.WithTiedOffDebug ++                     // tie off debug (since we are using SimSerial for testing)
  new chipyard.iobinders.WithSimSerial ++                        // drive TSI with SimSerial for testing
  new testchipip.WithTSI ++                                      // use testchipip serial offchip link
  new chipyard.config.WithBootROM ++                             // use default bootrom
  new chipyard.config.WithUART ++                                // add a UART
  new chipyard.config.WithL2TLBs(1024) ++                        // use L2 TLBs
  new freechips.rocketchip.subsystem.WithNoMMIOPort ++           // no top-level MMIO master port (overrides default set in rocketchip)
  new freechips.rocketchip.subsystem.WithNoSlavePort ++          // no top-level MMIO slave port (overrides default set in rocketchip)
  new freechips.rocketchip.subsystem.WithInclusiveCache ++       // use Sifive L2 cache
  new freechips.rocketchip.subsystem.WithNExtTopInterrupts(0) ++ // no external interrupts
  new freechips.rocketchip.subsystem.WithNBigCores(1) ++         // single rocket-core
  new freechips.rocketchip.subsystem.WithCoherentBusTopology ++  // hierarchical buses including mbus+l2
  new freechips.rocketchip.system.BaseConfig)                    // "base" rocketchip system
- 1
- 2
- 3
- 4
- 5
- 6
- 7
- 8
- 9
- 10
- 11
- 12
- 13
- 14
- 15
- 16
- 17
- 18
构建core
cd sims/verilator
make CONFIG=RocketConfig -j
- 1
- 2
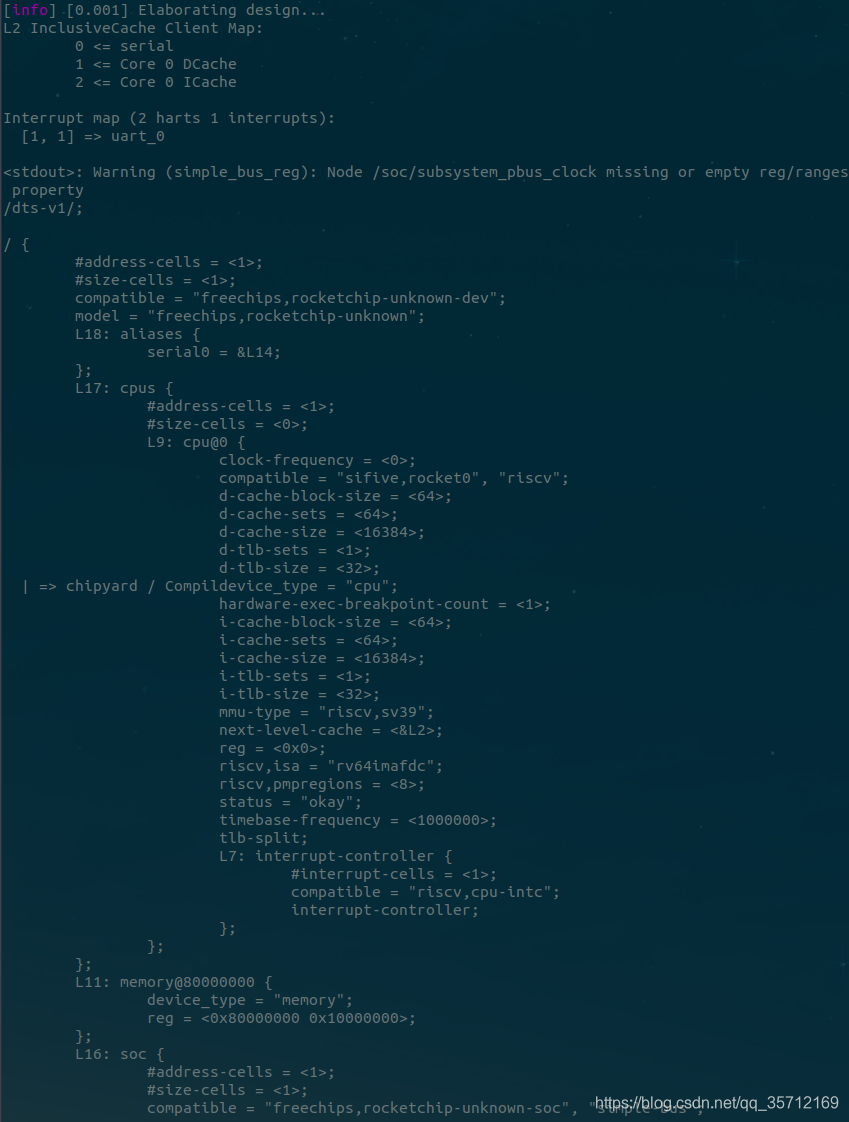
如下部分设备树log对应着上述的配置
然后运行个跑分程序看看性能
cd $RISCV/riscv64-unknown-elf/share/riscv-tests/benchmarks/
make -j
cd $RISCV/../sims/verilator
./simulator-chipyard-RocketConfig $RISCV/riscv64-unknown-elf/share/riscv-tests/benchmarks/dhrystone.riscv
- 1
- 2
- 3
- 4

4.2 BOOM
再来看看一个Small BOOM的配置
// generators/chipyard/src/main/scala/config/BoomConfigs.scala
class SmallBoomConfig extends Config(
  new chipyard.iobinders.WithUARTAdapter ++                      // display UART with a SimUARTAdapter
  new chipyard.iobinders.WithTieOffInterrupts ++                 // tie off top-level interrupts
  new chipyard.iobinders.WithBlackBoxSimMem ++                   // drive the master AXI4 memory with a SimAXIMem
  new chipyard.iobinders.WithTiedOffDebug ++                     // tie off debug (since we are using SimSerial for testing)
  new chipyard.iobinders.WithSimSerial ++                        // drive TSI with SimSerial for testing
  new testchipip.WithTSI ++                                      // use testchipip serial offchip link
  new chipyard.config.WithBootROM ++                             // use default bootrom
  new chipyard.config.WithUART ++                                // add a UART
  new chipyard.config.WithL2TLBs(1024) ++                        // use L2 TLBs
  new freechips.rocketchip.subsystem.WithNoMMIOPort ++           // no top-level MMIO master port (overrides default set in rocketchip)
  new freechips.rocketchip.subsystem.WithNoSlavePort ++          // no top-level MMIO slave port (overrides default set in rocketchip)
  new freechips.rocketchip.subsystem.WithInclusiveCache ++       // use Sifive L2 cache
  new freechips.rocketchip.subsystem.WithNExtTopInterrupts(0) ++ // no external interrupts
  new boom.common.WithSmallBooms ++                              // small boom config
  new boom.common.WithNBoomCores(1) ++                           // single-core boom
  new freechips.rocketchip.subsystem.WithCoherentBusTopology ++  // hierarchical buses including mbus+l2
  new freechips.rocketchip.system.BaseConfig)                    // "base" rocketchip system
- 1
- 2
- 3
- 4
- 5
- 6
- 7
- 8
- 9
- 10
- 11
- 12
- 13
- 14
- 15
- 16
- 17
- 18
- 19
运行如下命令进行构建内核
cd sims/verilator
make CONFIG=SmallBoomConfig -j
- 1
- 2
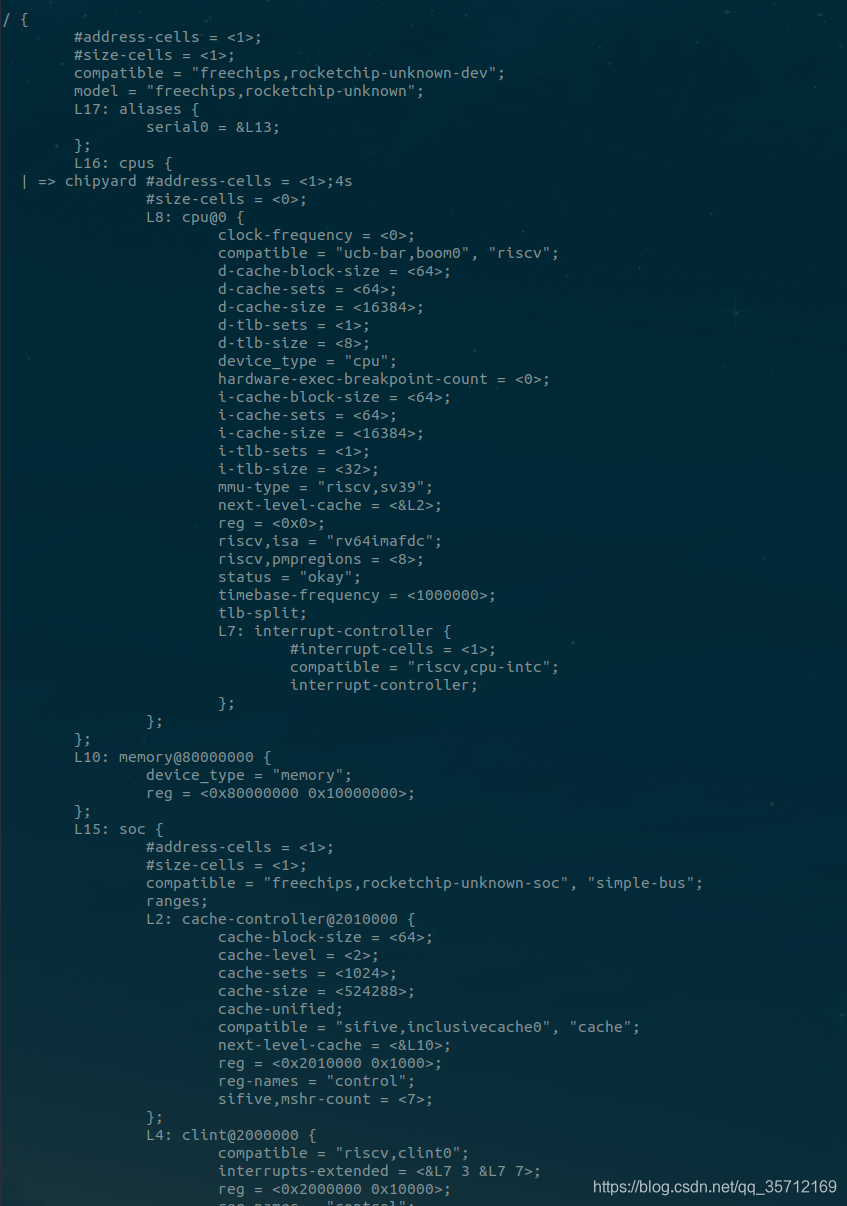
如下部分设备树log对应着上述的配置
然后运行个跑分程序看看性能
cd $RISCV/riscv64-unknown-elf/share/riscv-tests/benchmarks/
make -j
cd $RISCV/../sims/verilator
./simulator-chipyard-SmallBoomConfig $RISCV/riscv64-unknown-elf/share/riscv-tests/benchmarks/dhrystone.riscv
- 1
- 2
- 3
- 4

根据跑分,可以看出Mini Boom内核的乱序执行对比Rocket的顺序执行稍微提升了性能(假设内核频率)。
再来看看一个Large Boom的跑分,带来了两倍以上的性能提升。

注:更深入的跑分数据对比需要换算为DMIPS/MHz,与其他处理器进行对比,这里就不深入说明了。
4.3 初探定制硬件加速器SOC
最后来看一个带FIR硬件加速器的Rocket SOC,它的配置为
//generators/chipyard/src/main/scala/config/RocketConfigs.scala
class StreamingFIRRocketConfig extends Config (
  new chipyard.example.WithStreamingFIR ++ // use top with tilelink-controlled streaming FIR
  new chipyard.iobinders.WithUARTAdapter ++
  new chipyard.iobinders.WithTieOffInterrupts ++
  new chipyard.iobinders.WithBlackBoxSimMem ++
  new chipyard.iobinders.WithTiedOffDebug ++
  new chipyard.iobinders.WithSimSerial ++
  new testchipip.WithTSI ++
  new chipyard.config.WithBootROM ++
  new chipyard.config.WithUART ++
  new chipyard.config.WithL2TLBs(1024) ++
  new freechips.rocketchip.subsystem.WithNoMMIOPort ++
  new freechips.rocketchip.subsystem.WithNoSlavePort ++
  new freechips.rocketchip.subsystem.WithInclusiveCache ++
  new freechips.rocketchip.subsystem.WithNExtTopInterrupts(0) ++
  new freechips.rocketchip.subsystem.WithNBigCores(1) ++
  new freechips.rocketchip.subsystem.WithCoherentBusTopology ++
  new freechips.rocketchip.system.BaseConfig)
- 1
- 2
- 3
- 4
- 5
- 6
- 7
- 8
- 9
- 10
- 11
- 12
- 13
- 14
- 15
- 16
- 17
- 18
- 19
构建core,运行测试
cd tests/
make -j
cd ../sims/verilator
make CONFIG=StreamingFIRRocketConfig -j BINARY=../../tests/streaming-fir.riscv run-binary
- 1
- 2
- 3
- 4
根据log可以看出内存地址有该硬件加速器的一席之地,后面会利用MMIO进行控制访问
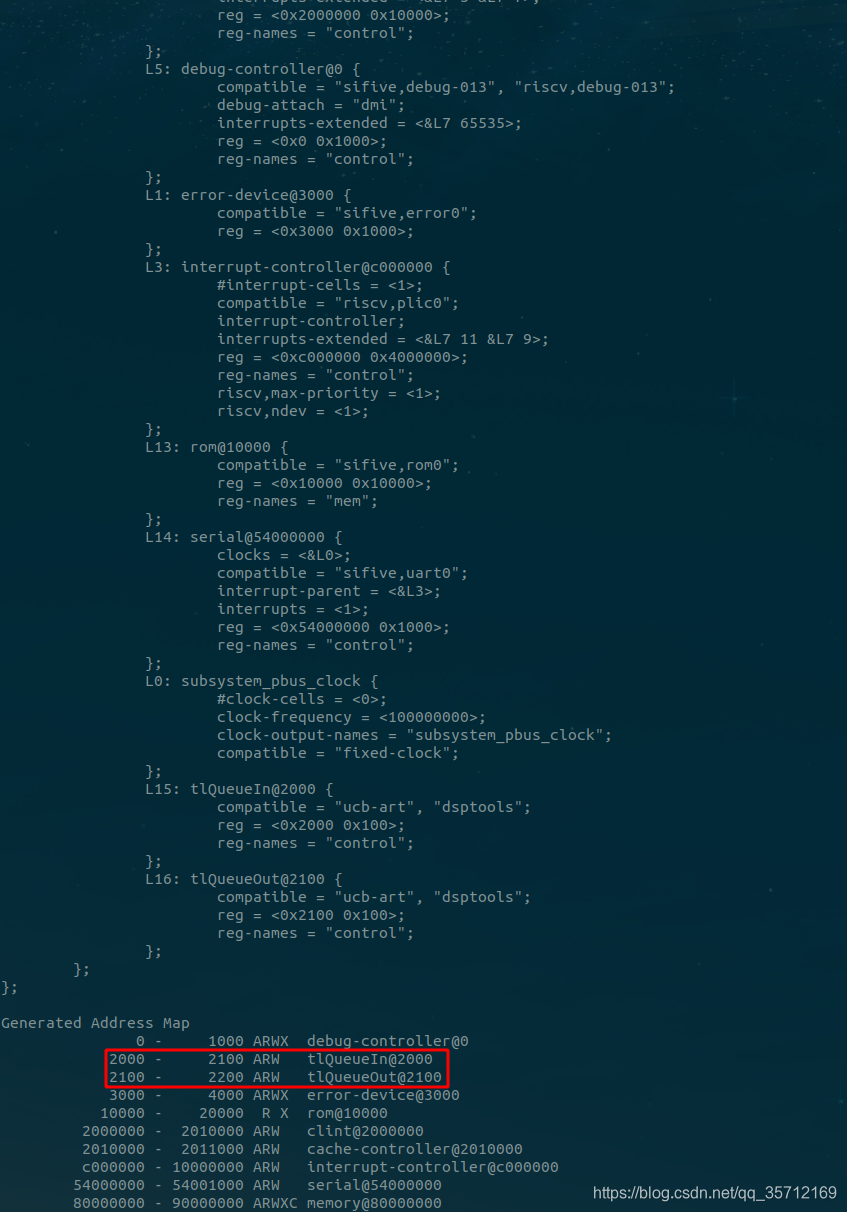
测试代码如下
#define PASSTHROUGH_WRITE 0x2000
#define PASSTHROUGH_WRITE_COUNT 0x2008
#define PASSTHROUGH_READ 0x2100
#define PASSTHROUGH_READ_COUNT 0x2108
#define BP 3
#define BP_SCALE ((double)(1 << BP))
#include “mmio.h”
#include <stdio.h>
#include <stdlib.h>
#include <string.h>
#include <stdint.h>
uint64_t roundi(double x)
{
if (x < 0.0) {
return (uint64_t)(x - 0.5);
} else {
return (uint64_t)(x + 0.5);
}
}
int main(void)
{
double test_vector[15] = {
1.0, 2.0, 3.0, 4.0, 5.0, 4.0, 3.0, 2.0, 1.0, 0.5, 0.25, 0.125, 0.125};
uint32_t num_tests = sizeof(test_vector) / sizeof(double);
printf(“Starting writing %d inputs\n”, num_tests);
for (int i = 0; i < num_tests; i++) {
reg_write64(PASSTHROUGH_WRITE, roundi(test_vector[i] * BP_SCALE));
}
printf(“Done writing\n”);
uint32_t rcnt = reg_read32(PASSTHROUGH_READ_COUNT);
printf(“Write count: %d\n”, reg_read32(PASSTHROUGH_WRITE_COUNT));
printf(“Read count: %d\n”, rcnt);
int failed = 0;
if (rcnt != 0) {
for (int i = 0; i < num_tests - 3; i++) {
uint32_t res = reg_read32(PASSTHROUGH_READ);
// double res = ((double)reg_read32(PASSTHROUGH_READ)) / BP_SCALE;
double expected_double = 3test_vector[i] + 2test_vector[i+1] + test_vector[i+2];
uint32_t expected = ((uint32_t)(expected_double * BP_SCALE + 0.5)) & 0xFF;
if (res == expected) {
printf(“\n\nPass: Got %u Expected %u\n\n”, res, expected);
} else {
failed = 1;
printf(“\n\nFail: Got %u Expected %u\n\n”, res, expected);
}
}
} else {
failed = 1;
}
if (failed) {
printf(“\n\nSome tests failed\n\n”);
} else {
printf(“\n\nAll tests passed\n\n”);
}
return 0;
}
- 1


 951
951

 被折叠的 条评论
为什么被折叠?
被折叠的 条评论
为什么被折叠?
 到【灌水乐园】发言


