【Unity3d】窗体透明

转载自dark00800的博客,原博文地址如下:http://blog.csdn.net/dark00800/article/details/70314432#comments

偶然在国外网站上看到的一个脚本,通过纯色背景抠像的方法,把windows的窗体透明化,可以用来做无背景的小头像、桌面精灵等。

首先新建一个叫TransparentWindow的CS脚本,输入如下代码:

using System;
using System.Runtime.InteropServices;
using UnityEngine;

public class TransparentWindow : MonoBehaviour
{
    [SerializeField]
    private Material m_Material;

    private struct MARGINS
    {
        public int cxLeftWidth;
        public int cxRightWidth;
        public int cyTopHeight;
        public int cyBottomHeight;
    }

    // Define function signatures to import from Windows APIs

    [DllImport("user32.dll")]
    private static extern IntPtr GetActiveWindow();

    [DllImport("user32.dll")]
    private static extern int SetWindowLong(IntPtr hWnd, int nIndex, uint dwNewLong);

    [DllImport("Dwmapi.dll")]
    private static extern uint DwmExtendFrameIntoClientArea(IntPtr hWnd, ref MARGINS margins);


    // Definitions of window styles
    const int GWL_STYLE = -16;
    const uint WS_POPUP = 0x80000000;
    const uint WS_VISIBLE = 0x10000000;

    void Start()
    {
#if !UNITY_EDITOR
        var margins = new MARGINS() { cxLeftWidth = -1 };

        // Get a handle to the window
        var hwnd = GetActiveWindow();

        // Set properties of the window
        // See: https://msdn.microsoft.com/en-us/library/windows/desktop/ms633591%28v=vs.85%29.aspx
        SetWindowLong(hwnd, GWL_STYLE, WS_POPUP | WS_VISIBLE);

        // Extend the window into the client area
        //See: https://msdn.microsoft.com/en-us/library/windows/desktop/aa969512%28v=vs.85%29.aspx 
        DwmExtendFrameIntoClientArea(hwnd, ref margins);
#endif
    }

    // Pass the output of the camera to the custom material
    // for chroma replacement
    void OnRenderImage(RenderTexture from, RenderTexture to)
    {
        Graphics.Blit(from, to, m_Material);
    }
}
 
 
  • 1
  • 2
  • 3
  • 4
  • 5
  • 6
  • 7
  • 8
  • 9
  • 10
  • 11
  • 12
  • 13
  • 14
  • 15
  • 16
  • 17
  • 18
  • 19
  • 20
  • 21
  • 22
  • 23
  • 24
  • 25
  • 26
  • 27
  • 28
  • 29
  • 30
  • 31
  • 32
  • 33
  • 34
  • 35
  • 36
  • 37
  • 38
  • 39
  • 40
  • 41
  • 42
  • 43
  • 44
  • 45
  • 46
  • 47
  • 48
  • 49
  • 50
  • 51
  • 52
  • 53
  • 54
  • 55
  • 56
  • 57
  • 58
  • 59

然后新建一个叫ChromakeyTransparent的Shader:

Shader "Custom/ChromakeyTransparent" {
    Properties{
        _MainTex("Base (RGB)", 2D) = "white" {}
        _TransparentColourKey("Transparent Colour Key", Color) = (0,0,0,1)
        _TransparencyTolerance("Transparency Tolerance", Float) = 0.01
    }

    SubShader{
        Pass{
            Tags{ "RenderType" = "Opaque" }
            LOD 200

            CGPROGRAM

            #pragma vertex vert
            #pragma fragment frag
            #include "UnityCG.cginc"

            struct a2v
            {
                float4 pos : POSITION;
                float2 uv : TEXCOORD0;
            };

            struct v2f
            {
                float4 pos : SV_POSITION;
                float2 uv : TEXCOORD0;
            };

            v2f vert(a2v input)
            {
                v2f output;
                output.pos = UnityObjectToClipPos(input.pos);
                output.uv = input.uv;
                return output;
            }

            sampler2D _MainTex;
            float3 _TransparentColourKey;
            float _TransparencyTolerance;

            float4 frag(v2f input) : SV_Target
            {
                // What is the colour that *would* be rendered here?
                float4 colour = tex2D(_MainTex, input.uv);

                // Calculate the different in each component from the chosen transparency colour
                float deltaR = abs(colour.r - _TransparentColourKey.r);
                float deltaG = abs(colour.g - _TransparentColourKey.g);
                float deltaB = abs(colour.b - _TransparentColourKey.b);

                // If colour is within tolerance, write a transparent pixel
                if (deltaR < _TransparencyTolerance && deltaG < _TransparencyTolerance && deltaB < _TransparencyTolerance)
                {
                    return float4(0.0f, 0.0f, 0.0f, 0.0f);
                }

                // Otherwise, return the regular colour
                return colour;
            }
            ENDCG
        }
    }
}
 
 
  • 1
  • 2
  • 3
  • 4
  • 5
  • 6
  • 7
  • 8
  • 9
  • 10
  • 11
  • 12
  • 13
  • 14
  • 15
  • 16
  • 17
  • 18
  • 19
  • 20
  • 21
  • 22
  • 23
  • 24
  • 25
  • 26
  • 27
  • 28
  • 29
  • 30
  • 31
  • 32
  • 33
  • 34
  • 35
  • 36
  • 37
  • 38
  • 39
  • 40
  • 41
  • 42
  • 43
  • 44
  • 45
  • 46
  • 47
  • 48
  • 49
  • 50
  • 51
  • 52
  • 53
  • 54
  • 55
  • 56
  • 57
  • 58
  • 59
  • 60
  • 61
  • 62
  • 63
  • 64
  • 65

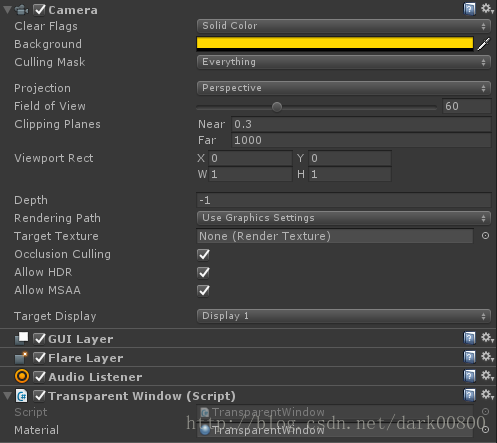
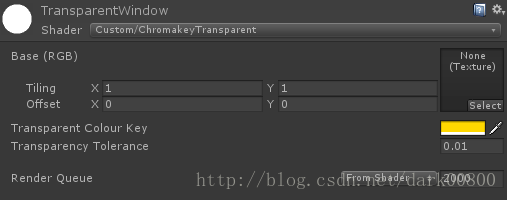
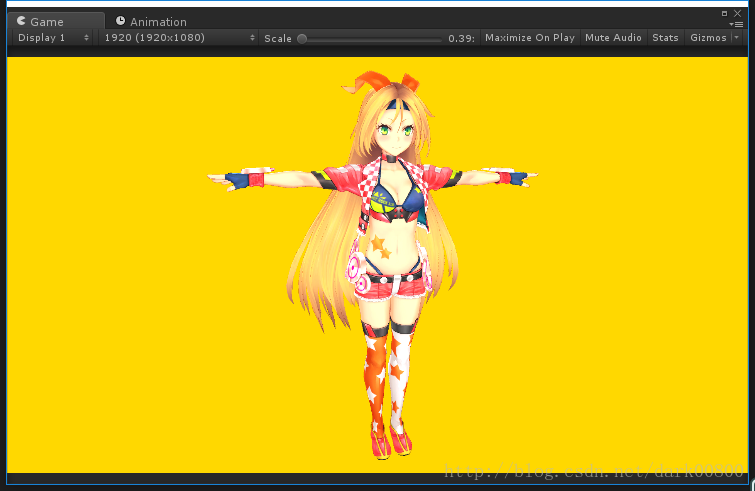
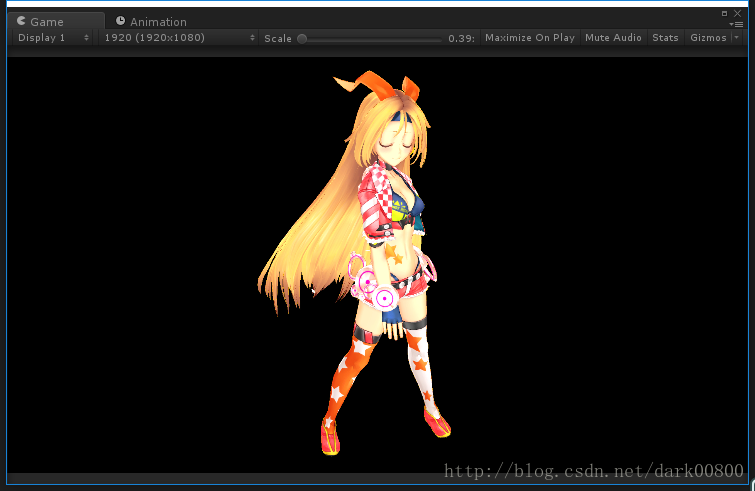
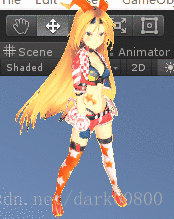
新建一个材质,选择我们刚刚写好的Shader,将TransparentWindow挂载到摄像机上,摄像机的Clear Flags选择Solid Color,Background选择和材质的Transparent Color Key相同的颜色(建议选择与模型边缘颜色相近的颜色,不然会出现较明显的毛边),将材质拖拽给TransparentWindow的Material变量。 
摄像机

材质

场景

运行之后可以看到背景颜色已经被扣掉(黑色其实是透明): 
这里写图片描述

Build一下之后我们就可以看到类似桌面精灵的一个程序了: 
效果

By:蒋志杰

  • 2
    点赞
  • 3
    收藏
    觉得还不错? 一键收藏
  • 0
    评论

“相关推荐”对你有帮助么?

  • 非常没帮助
  • 没帮助
  • 一般
  • 有帮助
  • 非常有帮助
提交
评论
添加红包

请填写红包祝福语或标题

红包个数最小为10个

红包金额最低5元

当前余额3.43前往充值 >
需支付:10.00
成就一亿技术人!
领取后你会自动成为博主和红包主的粉丝 规则
hope_wisdom
发出的红包
实付
使用余额支付
点击重新获取
扫码支付
钱包余额 0

抵扣说明:

1.余额是钱包充值的虚拟货币,按照1:1的比例进行支付金额的抵扣。
2.余额无法直接购买下载,可以购买VIP、付费专栏及课程。

余额充值