


概要
blog主要解决针对PAL8格式类型的图片处理问题,为了不影响进行裁剪以及映射后的图片格式设计针对性代码,针对性处理灰度图像等;
代码同样也支持常见图片格式如:Png、Jpg、Jpeg、bmp等;
此文档提供了对图像处理程序的详细说明,该程序允许用户通过选择图像上的四个点来执行透视变换,并将结果图像保存为不同的格式。此程序支持从命令行参数输入,允许用户指定图像源目录及最终图像的保存尺寸。
应用
应用场景:数据集处理、图像需要区域选中的异常角度矫正(非90°等)
功能
- 支持任意角度的旋转等情况校准
- 图像加载:从指定目录加载图像文件。
- 交互式点选择:用户可以通过鼠标点击选择图像上的四个点
- 透视变换:基于用户选择的四点进行透视变换,以矫正图像
图像保存:变换后的图像可以按照指定的尺寸保存,并支持保存为不同的文件格式
图像格式转换:支持将图像转换为8位带调色板的图像(PAL8)
实现效果

原始图像
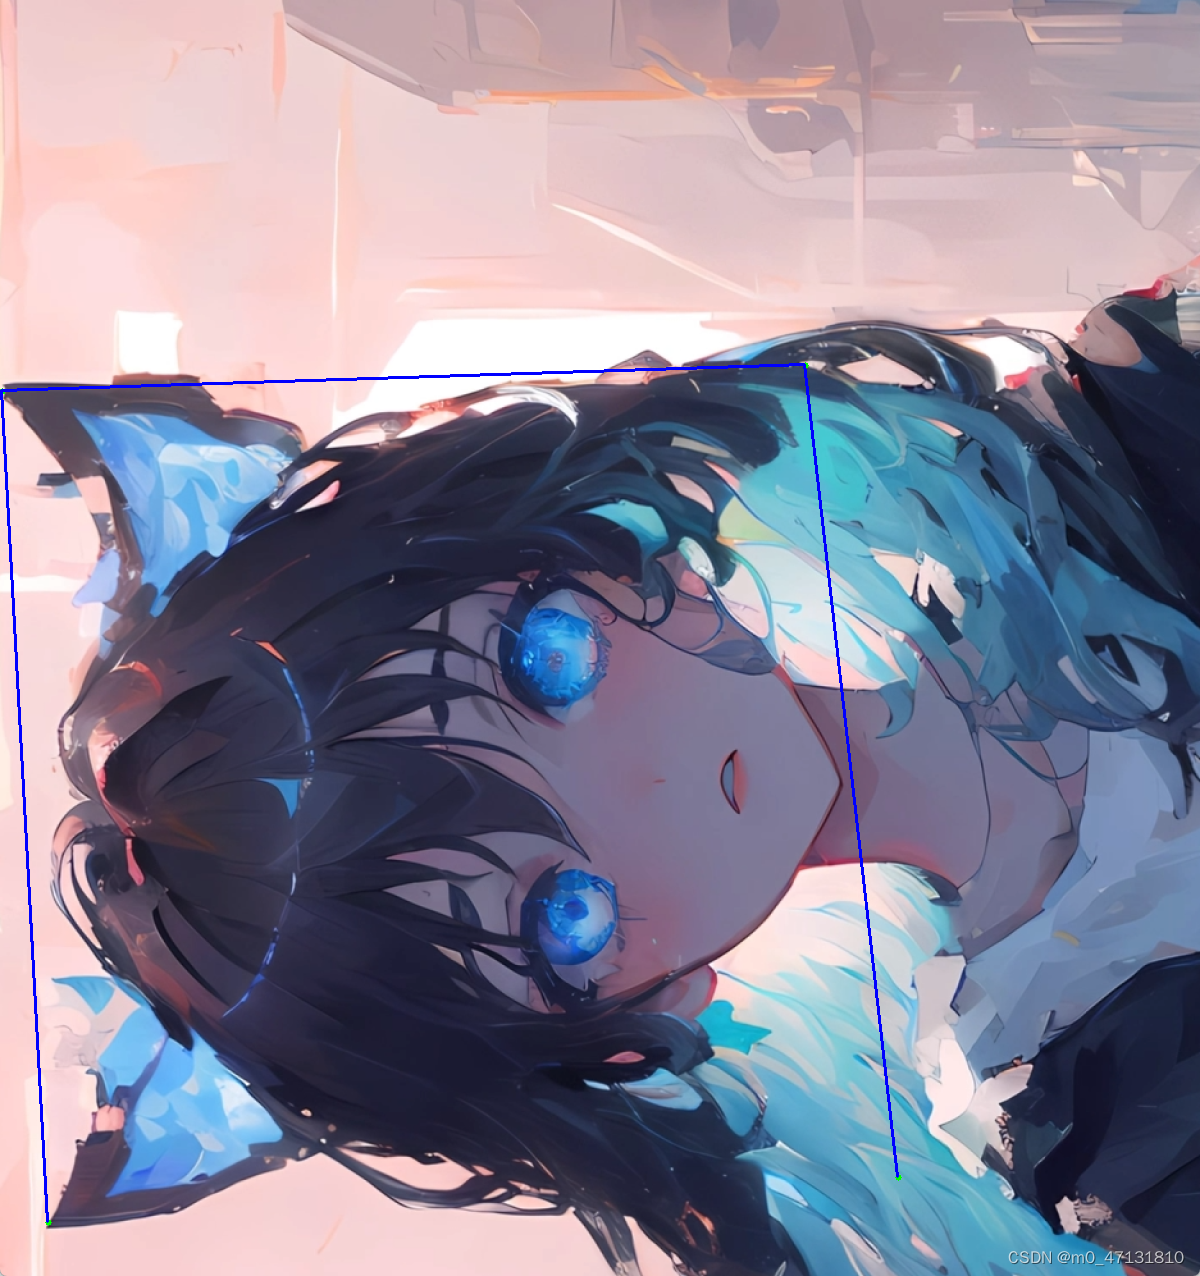
矫正区域
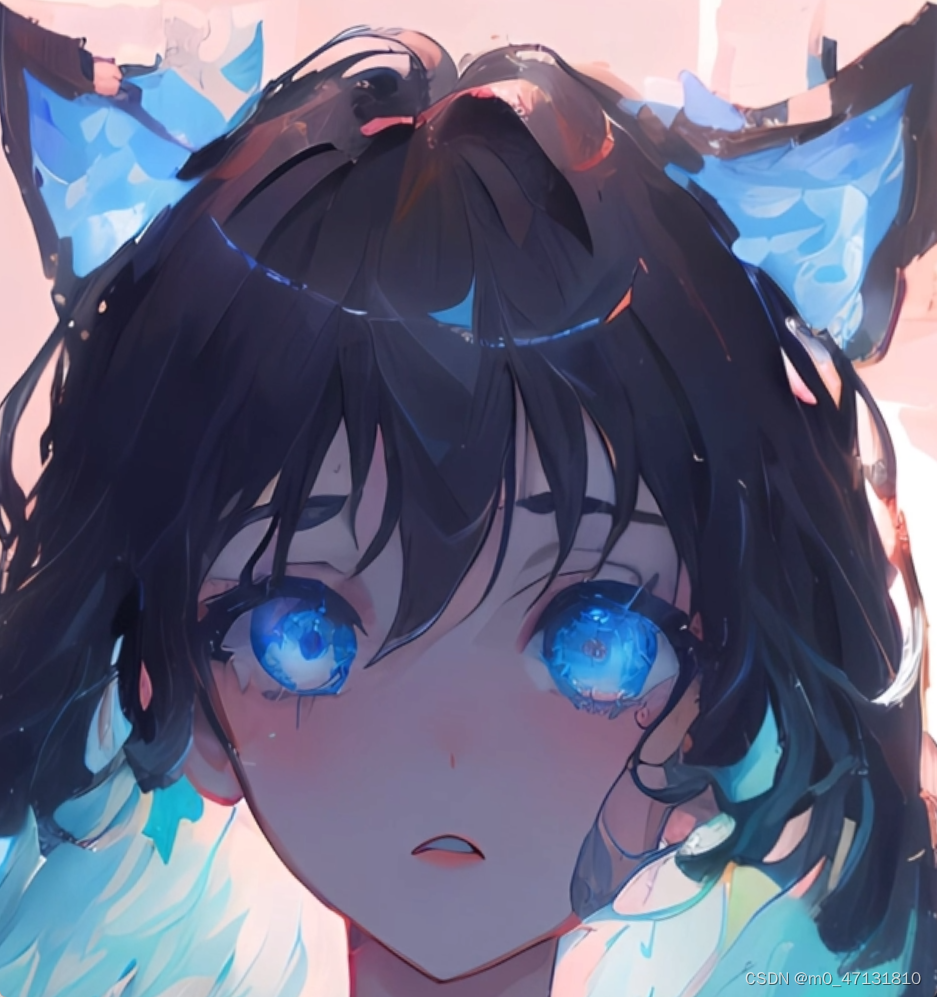
裁剪及矫正效果
使用方法
依赖库函数
import cv2
import numpy as np
from tkinter import filedialog, Tk
from PIL import Image
import os
进入脚本文件所在路径例如:
(opencv) D:\code\transferimg>
执行如下命令
python test.py --srcpath ./test --size 240,240
其中指定srcpath为待处理所有文件的目录,size为指定保存大小
执行过程中请使用英文输入法小写
界面中按照顺时针顺序标定四个点,代码将根据标点顺序映射(左上、右上、右下、左下)
执行过程中按c键保存文件,按q键退出界面
源代码
import cv2
import numpy as np
from tkinter import filedialog, Tk
from PIL import Image
import os
import argparse

def handle_click(event, x, y, flags, param):
    if event == cv2.EVENT_LBUTTONDOWN:
        original_x = int(x / scale)
        original_y = int(y / scale)
        param.append((original_x, original_y))
        cv2.circle(image, (x, y), 3, (0, 255, 0), -1)
        if len(param) > 1:
            cv2.line(image, (int(param[-2][0] * scale), int(param[-2][1] * scale)),
                     (int(param[-1][0] * scale), int(param[-1][1] * scale)),
                     (255, 0, 0), 2)
        cv2.imshow("Image", image)

def convert_rgb_to_pal8(rgb_image):
    pil_image = Image.fromarray(cv2.cvtColor(rgb_image, cv2.COLOR_BGR2RGB))

    pil_image_p = pil_image.convert('P', palette=Image.ADAPTIVE, colors=256)

    palette = pil_image_p.getpalette()

    indexed_data = np.array(pil_image_p)

    return indexed_data, palette

def process_image(file_path, rgbflag, size = (480, 480)):
    global image, pts, scale
    pts = []  # Initialize points list
    if not rgbflag:
        image = cv2.imread(file_path, cv2.IMREAD_GRAYSCALE)
    else:
        image = cv2.imread(file_path)

    if image is None:
        print(f"Failed to load image: {file_path}")
        return False


    original_height, original_width = image.shape[:2]
    new_width = 1200
    scale = new_width / original_width
    new_height = int(original_height * scale)
    image = cv2.resize(image, (new_width, new_height), interpolation=cv2.INTER_AREA)

    cv2.imshow('Image', image)
    cv2.setMouseCallback('Image', handle_click, param=pts)

    while True:
        key = cv2.waitKey(1) & 0xFF
        if key == ord('c'):
            if len(pts) != 4:
                print("Select exactly four points to form a quadrilateral.")
                continue

            # Perspective transformation
            original_image = cv2.imread(file_path)  # Reload the original image
            pts_src = np.array(pts, dtype=np.float32)
            pts_dst = np.array([[0, 0], [original_width - 1, 0], [original_width - 1, original_height - 1], [0, original_height - 1]], dtype=np.float32)
            matrix = cv2.getPerspectiveTransform(pts_src, pts_dst)
            result = cv2.warpPerspective(original_image, matrix, (original_width, original_height))

            # Display result
            cv2.imshow("Transformed Result", result)

            root = Tk()
            root.update()
            root.withdraw()
            default_file_name = os.path.splitext(os.path.basename(file_path))[0] + ".bmp"
            file_path = filedialog.asksaveasfilename(initialfile=default_file_name, defaultextension=".bmp",
                                                     filetypes=[("bmp files", "*.bmp"), ("PNG files", "*.png"), ("All files", "*.*")])
            if file_path:
                result = cv2.resize(result, size)
                # 转换结果回 PAL8
                if rgbflag:
                    cv2.imwrite(file_path, result)  # Save transformed image
                    return True
                else:
                    result, result_palette = convert_rgb_to_pal8(result)
                    pil_result_image = Image.fromarray(result, 'P')
                    pil_result_image.putpalette(result_palette)
                    pil_result_image.save(file_path)

                    print(f"Image saved to {file_path}")
                    root.destroy()
                    return True
            root.destroy()

        elif key == ord('q'):
            return False

def process_directory(directory_path, size):
    for filename in os.listdir(directory_path):
        if filename.lower().endswith((".bmp",".png",".jpg",".jpeg")):
            full_path = os.path.join(directory_path, filename)
            print(f"Processing {full_path}")
            if filename.lower().endswith((".png",".jpg",".jpeg")):
                rgbflag = True
            success = process_image(full_path, rgbflag, size)
            rgbflag = False
            if not success:
                print("Stopped processing.")
                break
            cv2.destroyAllWindows()

def args():
    parser = argparse.ArgumentParser()
    parser.add_argument('--srcpath', type=str, default='./test', help='the images dir path')
    parser.add_argument('--size', type=str, default='560, 560', help='the size of saved img')
    return parser.parse_args()

if __name__ == '__main__':
    arg = args()
    directory_path = arg.srcpath  # 指定目录
    size = tuple(map(int, arg.size.split(',')))
    process_directory(directory_path, size)
注意事项
- 确保在命令行参数中正确指定图像目录和尺寸。
- 在选择四个点进行透视变换时,需要确保点的顺序和位置正确。
- 使用Tkinter时,可能需要在某些系统上进行额外配置以确保其正常工作。
- 建议首先配置基本的虚拟环境,安装支持库
感谢阅读


 5081
5081


 被折叠的 条评论
为什么被折叠?
被折叠的 条评论
为什么被折叠?
 到【灌水乐园】发言


