


 自适应缩放技术Letterbox解决了传统固定尺寸缩放导致的图像扭曲问题。它通过计算缩放比例并填充灰边像素,将图片调整为所需尺寸,保持原始比例不变。在YOLOv5s等网络中,Letterbox保证了图像满足特定的网络输入要求,如32倍数的约束。代码示例展示了如何使用numpy和OpenCV实现这一过程。
✅💖⚠️▶️➡️🌿🍀🍄🌟⭐❄️✅💖⚠️▶️➡️🌿🍀🍄🌟⭐❄️✅💖⚠️▶️➡️🌿🍀🍄🌟⭐❄️✅💖⚠️
自适应缩放技术Letterbox介绍💖
由于数据集中存在多种不同和长宽比的样本图,传统的图片缩放方法按照固定尺寸来进行缩放会造成图片扭曲变形的问题。自适应缩放技术通过填充最少的灰边像素来将任意大小的图片调整为所需输入图片大小。
自适应缩放技术Letterbox流程💖
- 第一步:计算缩放比例。当原图的长宽不同时,将需要的尺寸大小除以原图的长宽,获得两种缩放比,选择较小的值作为缩放比例,因此图中选择的缩放比例为0.52。
- 第二步:分别计算缩放后的图像的长宽,原图的长宽分别乘以缩放比例,此时获得大小为 416×312。
- 第三步:计算填充的灰色像素。将需要的尺寸大小减去缩放后的短边大小,得到的值再采用 numpy 库中 np.mod 函数对 32 倍取余数的方式计算,然后通过平分得到对称两边需要填充的灰色像素。之所以用 32 取余,是因为 YOLOv5s 的网络需要对图像进行 5 次两倍下采样。
这段代码实现了一个名为letterbox的函数,用于对输入图像进行自适应缩放和填充,使其满足特定的尺寸和步长要求。以下是对代码的详细分析:
整体结构
- 导入模块:代码开头导入了
numpy和cv2两个常用的库,分别用于数值计算和图像处理。 - 定义
letterbox函数:这是核心函数,用于对图像进行缩放和填充。 - 测试代码:读取一张图像,调用
letterbox函数对其进行处理,然后显示并保存原始图像和处理后的图像。
letterbox 函数分析
函数定义和参数说明
def letterbox(im, new_shape=(448, 448), color=(114, 114, 114), auto=True, scaleFill=False, scaleup=True, stride=32):
im:输入的图像,通常是一个numpy.ndarray。new_shape:目标尺寸,默认为(448, 448)。可以是一个整数,表示正方形尺寸;也可以是一个元组,表示矩形尺寸。color:填充颜色,默认为(114, 114, 114),即灰色。auto:是否自动调整填充,使其满足步长要求,默认为True。scaleFill:是否拉伸图像以完全填充目标尺寸,默认为False。scaleup:是否允许放大图像,默认为True。stride:步长,用于自动调整填充,默认为32。
计算缩放比例和目标尺寸
shape = im.shape[:2]  # current shape [height, width]
if isinstance(new_shape, int):
    new_shape = (new_shape, new_shape)

# Scale ratio (new / old)
r = min(new_shape[0] / shape[0], new_shape[1] / shape[1])
if not scaleup:  # only scale down, do not scale up (for better val mAP)
    r = min(r, 1.0)
- 获取输入图像的当前尺寸
shape。 - 如果
new_shape是一个整数,将其转换为一个元组。 - 计算缩放比例
r,取宽度和高度方向上缩放比例的最小值。 - 如果
scaleup为False,则限制缩放比例r不大于 1,即只允许缩小图像。
计算填充量
ratio = r, r  # width, height ratios
new_unpad = int(round(shape[1] * r)), int(round(shape[0] * r))
dw, dh = new_shape[1] - new_unpad[0], new_shape[0] - new_unpad[1]  # wh padding
if auto:  # minimum rectangle
    dw, dh = np.mod(dw, stride), np.mod(dh, stride)  # wh padding
elif scaleFill:  # stretch
    dw, dh = 0.0, 0.0
    new_unpad = (new_shape[1], new_shape[0])
    ratio = new_shape[1] / shape[1], new_shape[0] / shape[0]  # width, height ratios
- 计算缩放后的宽度和高度比例
ratio。 - 计算缩放后不填充的尺寸
new_unpad。 - 计算需要填充的宽度
dw和高度dh。 - 如果
auto为True,则将dw和dh调整为stride的倍数,以满足步长要求。 - 如果
scaleFill为True,则不进行填充,直接将图像拉伸到目标尺寸。
调整填充量并进行缩放和填充
dw /= 2  # divide padding into 2 sides
dh /= 2

if shape[::-1]!= new_unpad:  # resize
    im = cv2.resize(im, new_unpad, interpolation=cv2.INTER_LINEAR)
top, bottom = int(round(dh - 0.1)), int(round(dh + 0.1))
left, right = int(round(dw - 0.1)), int(round(dw + 0.1))
im = cv2.copyMakeBorder(im, top, bottom, left, right, cv2.BORDER_CONSTANT, value=color)  # add border
return im, ratio, (dw, dh)
- 将填充量
dw和dh平均分配到图像的两侧。 - 如果缩放后的尺寸与目标尺寸不一致,则使用
cv2.resize函数对图像进行缩放。 - 计算上下左右的填充量,并使用
cv2.copyMakeBorder函数对图像进行填充。 - 返回处理后的图像、缩放比例和填充量。
测试代码分析
ori = cv2.imread(r"F:\python\object_detection\yolov7\test\2.jpg")
im, ratio, (dw, dh) = letterbox(im=ori)
cv2.imshow('ori', ori)
cv2.imshow('new_img_bbox', im)
cv2.imwrite("2.jpg", ori)
cv2.imwrite("3.jpg", im)
cv2.waitKey(0)
cv2.destroyAllWindows()
- 使用
cv2.imread函数读取一张图像。 - 调用
letterbox函数对图像进行处理,得到处理后的图像、缩放比例和填充量。 - 使用
cv2.imshow函数显示原始图像和处理后的图像。 - 使用
cv2.imwrite函数保存原始图像和处理后的图像。 - 使用
cv2.waitKey函数等待用户按键,然后使用cv2.destroyAllWindows函数关闭所有窗口。
总结
这段代码实现了一个功能强大的图像预处理函数 letterbox,可以对图像进行自适应缩放和填充,以满足特定的尺寸和步长要求。该函数在目标检测等领域中经常用于将不同尺寸的图像调整为统一尺寸,以便输入到神经网络中进行处理。测试代码展示了如何使用该函数对图像进行处理,并显示和保存处理结果。
运行结果💖
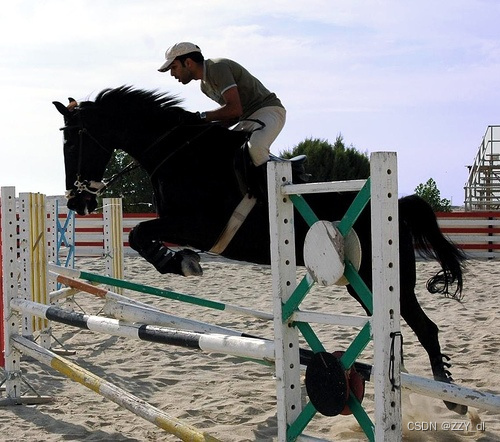
原图:
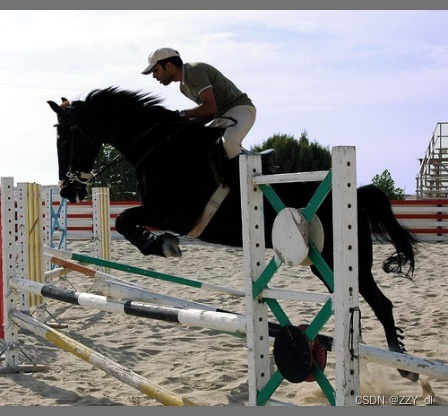
letterbox后
Mosaic数据增强介绍💖
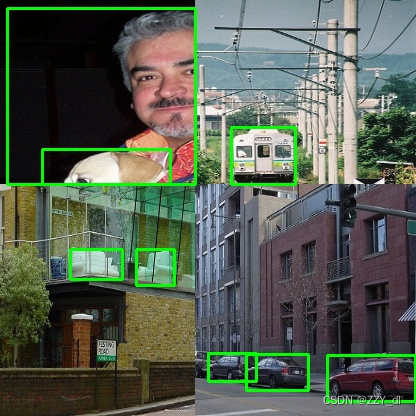
mosaic数据增强则利用了四张图片,对四张图片进行拼接,每一张图片都有其对应的框框,将四张图片拼接之后就获得一张新的图片,同时也获得这张图片对应的框框,然后我们将这样一张新的图片传入到神经网络当中去学习,相当于一下子传入四张图片进行学习了。论文中说这极大丰富了检测物体的背景!且在标准化BN计算的时候一下子会计算四张图片的数据!从而提升学习效率。
Mosaic数据增强代码💖
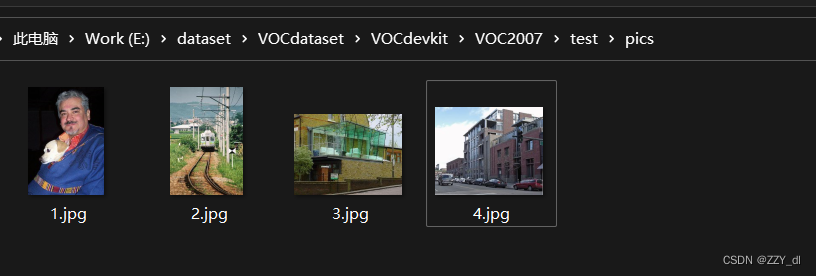
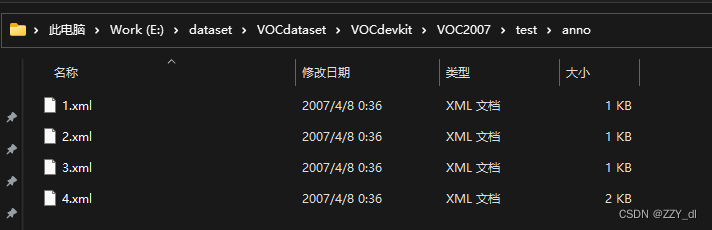
首先创建两个文件夹,一个放标注anno,一个放原图
from xml.etree import ElementTree as ET  # xml文件解析方法
import numpy as np
import cv2


# (3)处理超出边缘的检测框
def merge_bboxes(bboxes, cutx, cuty):
    # 保存修改后的检测框
    merge_box = []

    # 遍历每张图像,共4个
    for i, box in enumerate(bboxes):

        # 每张图片中需要删掉的检测框
        index_list = []

        # 遍历每张图的所有检测框,index代表第几个框
        for index, box in enumerate(box[0]):

            # axis=1纵向删除index索引指定的列,axis=0横向删除index指定的行
            # box[0] = np.delete(box[0], index, axis=0)

            # 获取每个检测框的宽高
            x1, y1, x2, y2 = box

            # 如果是左上图,修正右侧和下侧框线
            if i == 0:
                # 如果检测框左上坐标点不在第一部分中,就忽略它
                if x1 > cutx or y1 > cuty:
                    index_list.append(index)

                    # 如果检测框右下坐标点不在第一部分中,右下坐标变成边缘点
                if y2 >= cuty and y1 <= cuty:
                    y2 = cuty
                    if y2 - y1 < 5:
                        index_list.append(index)

                if x2 >= cutx and x1 <= cutx:
                    x2 = cutx
                    # 如果修正后的左上坐标和右下坐标之间的距离过小,就忽略这个框
                    if x2 - x1 < 5:
                        index_list.append(index)

                        # 如果是右上图,修正左侧和下册框线
            if i == 1:
                if x2 < cutx or y1 > cuty:
                    index_list.append(index)

                if y2 >= cuty and y1 <= cuty:
                    y2 = cuty
                    if y2 - y1 < 5:
                        index_list.append(index)

                if x1 <= cutx and x2 >= cutx:
                    x1 = cutx
                    if x2 - x1 < 5:
                        index_list.append(index)

                        # 如果是左下图
            if i == 2:
                if x1 > cutx or y2 < cuty:
                    index_list.append(index)

                if y1 <= cuty and y2 >= cuty:
                    y1 = cuty
                    if y2 - y1 < 5:
                        index_list.append(index)

                if x1 <= cutx and x2 >= cutx:
                    x2 = cutx
                    if x2 - x1 < 5:
                        index_list.append(index)

                        # 如果是右下图
            if i == 3:
                if x2 < cutx or y2 < cuty:
                    index_list.append(index)

                if x1 <= cutx and x2 >= cutx:
                    x1 = cutx
                    if x2 - x1 < 5:
                        index_list.append(index)

                if y1 <= cuty and y2 >= cuty:
                    y1 = cuty
                    if y2 - y1 < 5:
                        index_list.append(index)

                        # 更新坐标信息
            bboxes[i][0][index] = [x1, y1, x2, y2]  # 更新第i张图的第index个检测框的坐标

        # 删除不满足要求的框,并保存
        merge_box.append(np.delete(bboxes[i][0], index_list, axis=0))

    # 返回坐标信息
    return merge_box


# (1)对传入的四张图片数据增强
def get_random_data(image_list, input_shape):
    h, w = input_shape  # 获取图像的宽高

    '''设置拼接的分隔线位置'''
    min_offset_x = 0.4
    min_offset_y = 0.4
    scale_low = 1 - min(min_offset_x, min_offset_y)  # 0.6
    scale_high = scale_low + 0.2  # 0.8

    image_datas = []  # 存放图像信息
    box_datas = []  # 存放检测框信息
    index = 0  # 当前是第几张图

    # (1)图像分割
    for frame_list in image_list:

        frame = frame_list[0]  # 取出的某一张图像
        box = np.array(frame_list[1:])  # 该图像对应的检测框坐标

        ih, iw = frame.shape[0:2]  # 图片的宽高

        cx = (box[0, :, 0] + box[0, :, 2]) // 2  # 检测框中心点的x坐标
        cy = (box[0, :, 1] + box[0, :, 3]) // 2  # 检测框中心点的y坐标

        # 对输入图像缩放
        new_ar = w / h  # 图像的宽高比
        scale = np.random.uniform(scale_low, scale_high)  # 缩放0.6--0.8倍
        # 调整后的宽高
        nh = int(scale * h)  # 缩放比例乘以要求的宽高
        nw = int(nh * new_ar)  # 保持原始宽高比例

        # 缩放图像
        frame = cv2.resize(frame, (nw, nh))

        # 调整中心点坐标
        cx = cx * nw / iw
        cy = cy * nh / ih

        # 调整检测框的宽高
        bw = (box[0, :, 2] - box[0, :, 0]) * nw / iw  # 修改后的检测框的宽高
        bh = (box[0, :, 3] - box[0, :, 1]) * nh / ih

        # 创建一块[416,416]的底版
        new_frame = np.zeros((h, w, 3), np.uint8)

        # 确定每张图的位置
        if index == 0:
            new_frame[0:nh, 0:nw] = frame  # 第一张位于左上方
        elif index == 1:
            new_frame[0:nh, w - nw:w] = frame  # 第二张位于右上方
        elif index == 2:
            new_frame[h - nh:h, 0:nw] = frame  # 第三张位于左下方
        elif index == 3:
            new_frame[h - nh:h, w - nw:w] = frame  # 第四张位于右下方

        # 修正每个检测框的位置
        if index == 0:  # 左上图像
            box[0, :, 0] = cx - bw // 2  # x1
            box[0, :, 1] = cy - bh // 2  # y1
            box[0, :, 2] = cx + bw // 2  # x2
            box[0, :, 3] = cy + bh // 2  # y2

        if index == 1:  # 右上图像
            box[0, :, 0] = cx - bw // 2 + w - nw  # x1
            box[0, :, 1] = cy - bh // 2  # y1
            box[0, :, 2] = cx + bw // 2 + w - nw  # x2
            box[0, :, 3] = cy + bh // 2  # y2

        if index == 2:  # 左下图像
            box[0, :, 0] = cx - bw // 2  # x1
            box[0, :, 1] = cy - bh // 2 + h - nh  # y1
            box[0, :, 2] = cx + bw // 2  # x2
            box[0, :, 3] = cy + bh // 2 + h - nh  # y2

        if index == 3:  # 右下图像
            box[0, :, 2] = cx - bw // 2 + w - nw  # x1
            box[0, :, 3] = cy - bh // 2 + h - nh  # y1
            box[0, :, 0] = cx + bw // 2 + w - nw  # x2
            box[0, :, 1] = cy + bh // 2 + h - nh  # y2

        index = index + 1  # 处理下一张

        # 保存处理后的图像及对应的检测框坐标
        image_datas.append(new_frame)
        box_datas.append(box)

    # 取出某张图片以及它对应的检测框信息, i代表图片索引
    for image, boxes in zip(image_datas, box_datas):

        # 复制一份原图
        image_copy = image.copy()

        # 遍历该张图像中的所有检测框
        for box in boxes[0]:
            # 获取某一个框的坐标
            x1, y1, x2, y2 = box
            cv2.rectangle(image_copy, (x1, y1), (x2, y2), (0, 255, 0), 2)

        cv2.imshow('img', image_copy)
        cv2.waitKey(0)
        cv2.destroyAllWindows()

    # (2)将四张图像拼接在一起
    # 在指定范围中选择横纵向分割线
    cutx = np.random.randint(int(w * min_offset_x), int(w * (1 - min_offset_x)))
    cuty = np.random.randint(int(h * min_offset_y), int(h * (1 - min_offset_y)))

    # 创建一块[416,416]的底版用来组合四张图
    new_image = np.zeros((h, w, 3), np.uint8)
    new_image[:cuty, :cutx, :] = image_datas[0][:cuty, :cutx, :]
    new_image[:cuty, cutx:, :] = image_datas[1][:cuty, cutx:, :]
    new_image[cuty:, :cutx, :] = image_datas[2][cuty:, :cutx, :]
    new_image[cuty:, cutx:, :] = image_datas[3][cuty:, cutx:, :]

    # 显示合并后的图像
    cv2.imshow('new_img', new_image)
    cv2.waitKey(0)
    cv2.destroyAllWindows()

    # 复制一份合并后的原图
    final_image_copy = new_image.copy()

    # 显示有检测框并合并后的图像
    for boxes in box_datas:

        # 遍历该张图像中的所有检测框
        for box in boxes[0]:
            # 获取某一个框的坐标
            x1, y1, x2, y2 = box
            cv2.rectangle(final_image_copy, (x1, y1), (x2, y2), (0, 255, 0), 2)

    cv2.imshow('new_img_bbox', final_image_copy)
    cv2.waitKey(0)
    cv2.destroyAllWindows()

    # 处理超出图像边缘的检测框
    new_boxes = merge_bboxes(box_datas, cutx, cuty)

    # 复制一份合并后的图像
    modify_image_copy = new_image.copy()

    # 绘制修正后的检测框
    for boxes in new_boxes:
        # 遍历每张图像中的所有检测框
        for box in boxes:
            # 获取某一个框的坐标
            x1, y1, x2, y2 = box
            cv2.rectangle(modify_image_copy, (x1, y1), (x2, y2), (0, 255, 0), 2)
    cv2.imshow('new_img_bbox', modify_image_copy)
    cv2.waitKey(0)
    cv2.destroyAllWindows()


# 主函数,获取图片路径和检测框路径
if __name__ == '__main__':

    # 给出图片文件夹和检测框文件夹所在的位置
    image_dir = r'E:\dataset\VOCdataset\VOCdevkit\VOC2007\test\pics/'
    annotation_dir = r'E:\dataset\VOCdataset\VOCdevkit\VOC2007\test\anno/'

    image_list = []  # 存放每张图像和该图像对应的检测框坐标信息

    # 读取4张图像及其检测框信息
    for i in range(4):

        image_box = []  # 存放每张图片的检测框信息

        # 某张图片位置及其对应的检测框信息
        image_path = image_dir + str(i + 1) + '.jpg'
        annotation_path = annotation_dir + str(i + 1) + '.xml'

        image = cv2.imread(image_path)  # 读取图像

        # 读取检测框信息
        with open(annotation_path, 'r') as new_f:
            #  getroot()获取根节点
            root = ET.parse(annotation_path).getroot()

        # findall查询根节点下的所有直系子节点,find查询根节点下的第一个直系子节点
        for obj in root.findall('object'):
            obj_name = obj.find('name').text  # 目标名称
            bndbox = obj.find('bndbox')
            left = eval(bndbox.find('xmin').text)  # 左上坐标x
            top = eval(bndbox.find('ymin').text)  # 左上坐标y
            right = eval(bndbox.find('xmax').text)  # 右下坐标x
            bottom = eval(bndbox.find('ymax').text)  # 右下坐标y

            # 保存每张图片的检测框信息
            image_box.append([left, top, right, bottom])  # [[x1,y1,x2,y2],[..],[..]]

        # 保存图像及其对应的检测框信息
        image_list.append([image, image_box])

    # 缩放、拼接图片
    get_random_data(image_list, input_shape=[416, 416])
运行结果💖
✅💖⚠️▶️➡️🌿🍀🍄🌟⭐❄️✅💖⚠️▶️➡️🌿🍀🍄🌟⭐❄️✅💖⚠️▶️➡️🌿🍀🍄🌟⭐❄️✅💖⚠️


 1906
1906

 被折叠的 条评论
为什么被折叠?
被折叠的 条评论
为什么被折叠?
 到【灌水乐园】发言


