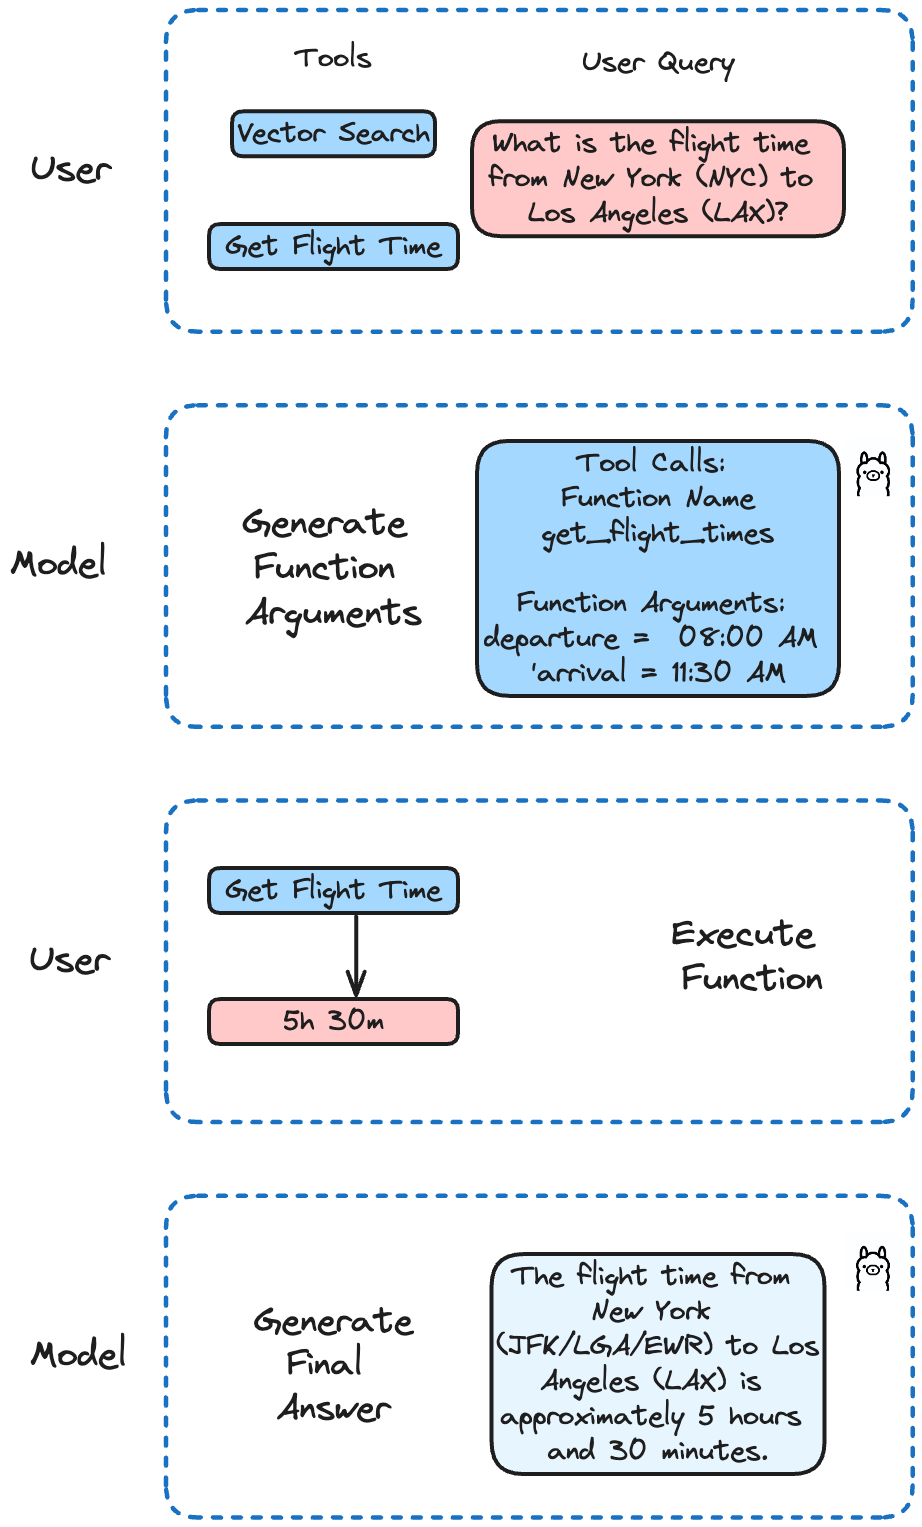
将函数调用(Function Calling)与 LLM 相结合能够扩展您的 AI 应用的能力。通过将您的大语言模型(LLM)与用户定义的 Function 或 API 集成,您可以搭建高效的应用,解决实际问题。
本文将介绍如何将 Llama 3.1 与 Milvus 和 API 等外部工具集成,构建具备上下文感知能力的应用。
01.Function Calling 简介
诸如 GPT-4、Mistral Nemo 和 Llama 3.1 之类的大语言模型(LLMs)现在可以检测何时需要调用函数,然后输出包含调用该函数参数的 JSON。这一突破能够有效提升您的 AI 应用的能力。
Functional calling 助力开发人员:
-
搭建 LLM 驱动数据提取和标记解决方案(例如:从维基百科文章中提取人物名字)
-
开发能够将自然语言转换为 API 命令或数据库查询语句的应用
-
打造对话式的知识库搜索引擎
使用的工具
-
Ollama: 支持在您的笔记本电脑上使用强大的 LLM,有效简化本地操作流程。
-
Milvus: 用于高效存储和检索数据的首选向量数据库
-
8B 模型的升级版本,支持多语言、更长的上下文长度(128K)和利用工具进行操作。

02.使用 Llama 3.1 和 Ollama
Llama 3.1 已经在 Function calling 方面进行了微调。它支持通过单一、嵌套和并行的方式调用函数,同时支持多轮调用函数。借助 Llama 3.1 您的 AI 应用可以处理涉及多个并行步骤的复杂任务。
在本文示例中,我们将通过不同的函数来模拟用于获取航班时间的 API,然后在 Milvus 中执行搜索。Llama 3.1 将根据用户的查询决定调用哪个函数。
03.安装依赖
首先,使用 Ollama 下载 Llama 3.1:
`ollama run llama3.1`
上述指令会将模型下载至您的笔记本电脑,您可以通过 Ollama 使用 Llama 3.1。接着,安装依赖:
! pip install ollama openai "pymilvus[model]"
本文安装 Milvus Lite 以及模型插件。Milvus 的模型插件支持用户使用 Milvus 中集成的模型将数据转换为 Embedding 向量。
04.将数据插入 Milvus
将数据插入至 Milvus 中。后续,Llama 3.1 将判断相关性并决定是否搜索此步骤中插入的数据。
05.创建 Collection 并插入数据
from pymilvus import MilvusClient, model``embedding_fn = model.DefaultEmbeddingFunction()`` ``docs = [` `"Artificial intelligence was founded as an academic discipline in 1956.",` `"Alan Turing was the first person to conduct substantial research in AI.",` `"Born in Maida Vale, London, Turing was raised in southern England.",``]`` ``vectors = embedding_fn.encode_documents(docs)`` ``# The output vector has 768 dimensions, matching the collection that we just created.``print("Dim:", embedding_fn.dim, vectors[0].shape) # Dim: 768 (768,)`` ``# Each entity has id, vector representation, raw text, and a subject label.``data = [` `{"id": i, "vector": vectors[i], "text": docs[i], "subject": "history"}` `for i in range(len(vectors))``]`` ``print("Data has", len(data), "entities, each with fields: ", data[0].keys())``print("Vector dim:", len(data[0]["vector"]))`` ``# Create a collection and insert the data``client = MilvusClient('./milvus_local.db')`` ``client.create_collection(` `collection_name="demo_collection",` `dimension=768, # The vectors we will use in this demo has 768 dimensions``)`` ``client.insert(collection_name="demo_collection", data=data)
新创建的 Collection 中含有 3 个元素。
06.定义需要使用的 Functions
本文将定义两个 Function。第一个与 API call 相似,用于获取航班时间。第二个用于在 Milvus 中执行搜索和查询。
from pymilvus import model``import json``import ollama``embedding_fn = model.DefaultEmbeddingFunction()`` ``# Simulates an API call to get flight times``# In a real application, this would fetch data from a live database or API``def get_flight_times(departure: str, arrival: str) -> str:` `flights = {` `'NYC-LAX': {'departure': '08:00 AM', 'arrival': '11:30 AM', 'duration': '5h 30m'},` `'LAX-NYC': {'departure': '02:00 PM', 'arrival': '10:30 PM', 'duration': '5h 30m'},` `'LHR-JFK': {'departure': '10:00 AM', 'arrival': '01:00 PM', 'duration': '8h 00m'},` `'JFK-LHR': {'departure': '09:00 PM', 'arrival': '09:00 AM', 'duration': '7h 00m'},` `'CDG-DXB': {'departure': '11:00 AM', 'arrival': '08:00 PM', 'duration': '6h 00m'},` `'DXB-CDG': {'departure': '03:00 AM', 'arrival': '07:30 AM', 'duration': '7h 30m'},` `}`` ` `key = f'{departure}-{arrival}'.upper()` `return json.dumps(flights.get(key, {'error': 'Flight not found'}))`` ``# Search data related to Artificial Intelligence in a vector database``def search_data_in_vector_db(query: str) -> str:` `query_vectors = embedding_fn.encode_queries([query])` `res = client.search(` `collection_name="demo_collection",` `data=query_vectors,` `limit=2,` `output_fields=["text", "subject"], # specifies fields to be returned` `)`` ` `print(res)` `return json.dumps(res)
07.向 LLM 提供指令并使用定义的 Functions
向 LLM 提供指令。这样一来,LLM 可以使用我们上述定义的 Functions。
def run(model: str, question: str):` `client = ollama.Client()`` ` `# Initialize conversation with a user query` `messages = [{"role": "user", "content": question}]`` ` `# First API call: Send the query and function description to the model` `response = client.chat(` `model=model,` `messages=messages,` `tools=[` `{` `"type": "function",` `"function": {` `"name": "get_flight_times",` `"description": "Get the flight times between two cities",` `"parameters": {` `"type": "object",` `"properties": {` `"departure": {` `"type": "string",` `"description": "The departure city (airport code)",` `},` `"arrival": {` `"type": "string",` `"description": "The arrival city (airport code)",` `},` `},` `"required": ["departure", "arrival"],` `},` `},` `},` `{` `"type": "function",` `"function": {` `"name": "search_data_in_vector_db",` `"description": "Search about Artificial Intelligence data in a vector database",` `"parameters": {` `"type": "object",` `"properties": {` `"query": {` `"type": "string",` `"description": "The search query",` `},` `},` `"required": ["query"],` `},` `},` `},` `],` `)`` ` `# Add the model's response to the conversation history` `messages.append(response["message"])`` ` `# Check if the model decided to use the provided function`` ` `if not response["message"].get("tool_calls"):` `print("The model didn't use the function. Its response was:")` `print(response["message"]["content"])` `return`` ` `# Process function calls made by the model` `if response["message"].get("tool_calls"):` `available_functions = {` `"get_flight_times": get_flight_times,` `"search_data_in_vector_db": search_data_in_vector_db,` `}`` ` `for tool in response["message"]["tool_calls"]:` `function_to_call = available_functions[tool["function"]["name"]]` `function_args = tool["function"]["arguments"]` `function_response = function_to_call(**function_args)`` ` `# Add function response to the conversation` `messages.append(` `{` `"role": "tool",` `"content": function_response,` `}` `)`` ` `# Second API call: Get final response from the model` `final_response = client.chat(model=model, messages=messages)`` ` `print(final_response["message"]["content"])
08.使用示例
让我们看看是否能顺利查询到特定航班的时间:
question = "What is the flight time from New York (NYC) to Los Angeles (LAX)?"`` ``run('llama3.1', question)
结果如下:
The flight time from New York (JFK/LGA/EWR) to Los Angeles (LAX) is approximately 5 hours and 30 minutes. However, please note that this time may vary depending on the airline, flight schedule, and any potential layovers or delays. It's always best to check with your airline for the most up-to-date and accurate flight information.
现在,让我们看看 Llama 3.1 是否能使用 Milvus 进行向量搜索。
question = "What is Artificial Intelligence?"`` ``run('llama3.1', question)
以下为 Milvus 搜索结果:
`data: ["[{'id': 0, 'distance': 0.4702666699886322, 'entity': {'text': 'Artificial intelligence was founded as an academic discipline in 1956.', 'subject': 'history'}}, {'id': 1, 'distance': 0.2702862620353699, 'entity': {'text': 'Alan Turing was the first person to conduct substantial research in AI.', 'subject': 'history'}}]"] , extra_info: {'cost': 0}`
如何学习大模型 AI ?
由于新岗位的生产效率,要优于被取代岗位的生产效率,所以实际上整个社会的生产效率是提升的。
但是具体到个人,只能说是:
“最先掌握AI的人,将会比较晚掌握AI的人有竞争优势”。
这句话,放在计算机、互联网、移动互联网的开局时期,都是一样的道理。
我在一线互联网企业工作十余年里,指导过不少同行后辈。帮助很多人得到了学习和成长。
我意识到有很多经验和知识值得分享给大家,也可以通过我们的能力和经验解答大家在人工智能学习中的很多困惑,所以在工作繁忙的情况下还是坚持各种整理和分享。但苦于知识传播途径有限,很多互联网行业朋友无法获得正确的资料得到学习提升,故此将并将重要的AI大模型资料包括AI大模型入门学习思维导图、精品AI大模型学习书籍手册、视频教程、实战学习等录播视频免费分享出来。

第一阶段(10天):初阶应用
该阶段让大家对大模型 AI有一个最前沿的认识,对大模型 AI 的理解超过 95% 的人,可以在相关讨论时发表高级、不跟风、又接地气的见解,别人只会和 AI 聊天,而你能调教 AI,并能用代码将大模型和业务衔接。
- 大模型 AI 能干什么?
- 大模型是怎样获得「智能」的?
- 用好 AI 的核心心法
- 大模型应用业务架构
- 大模型应用技术架构
- 代码示例:向 GPT-3.5 灌入新知识
- 提示工程的意义和核心思想
- Prompt 典型构成
- 指令调优方法论
- 思维链和思维树
- Prompt 攻击和防范
- …
第二阶段(30天):高阶应用
该阶段我们正式进入大模型 AI 进阶实战学习,学会构造私有知识库,扩展 AI 的能力。快速开发一个完整的基于 agent 对话机器人。掌握功能最强的大模型开发框架,抓住最新的技术进展,适合 Python 和 JavaScript 程序员。
- 为什么要做 RAG
- 搭建一个简单的 ChatPDF
- 检索的基础概念
- 什么是向量表示(Embeddings)
- 向量数据库与向量检索
- 基于向量检索的 RAG
- 搭建 RAG 系统的扩展知识
- 混合检索与 RAG-Fusion 简介
- 向量模型本地部署
- …
第三阶段(30天):模型训练
恭喜你,如果学到这里,你基本可以找到一份大模型 AI相关的工作,自己也能训练 GPT 了!通过微调,训练自己的垂直大模型,能独立训练开源多模态大模型,掌握更多技术方案。
到此为止,大概2个月的时间。你已经成为了一名“AI小子”。那么你还想往下探索吗?
- 为什么要做 RAG
- 什么是模型
- 什么是模型训练
- 求解器 & 损失函数简介
- 小实验2:手写一个简单的神经网络并训练它
- 什么是训练/预训练/微调/轻量化微调
- Transformer结构简介
- 轻量化微调
- 实验数据集的构建
- …
第四阶段(20天):商业闭环
对全球大模型从性能、吞吐量、成本等方面有一定的认知,可以在云端和本地等多种环境下部署大模型,找到适合自己的项目/创业方向,做一名被 AI 武装的产品经理。
- 硬件选型
- 带你了解全球大模型
- 使用国产大模型服务
- 搭建 OpenAI 代理
- 热身:基于阿里云 PAI 部署 Stable Diffusion
- 在本地计算机运行大模型
- 大模型的私有化部署
- 基于 vLLM 部署大模型
- 案例:如何优雅地在阿里云私有部署开源大模型
- 部署一套开源 LLM 项目
- 内容安全
- 互联网信息服务算法备案
- …
学习是一个过程,只要学习就会有挑战。天道酬勤,你越努力,就会成为越优秀的自己。
如果你能在15天内完成所有的任务,那你堪称天才。然而,如果你能完成 60-70% 的内容,你就已经开始具备成为一名大模型 AI 的正确特征了。
这份完整版的大模型 AI 学习资料已经上传CSDN,朋友们如果需要可以微信扫描下方CSDN官方认证二维码免费领取【保证100%免费】


 17
17

 被折叠的 条评论
为什么被折叠?


