


使用的是这个作者的代码:
GitHub - mjpramirez/Volvo-DataX
注意,他没有提供训练代码,只能跑出一个demo,因为我是只要一个可视化的效果,找了很多最终只有这个跑成功了。
官方提供了四个模型,思路大差不差,我跑了一个modelA
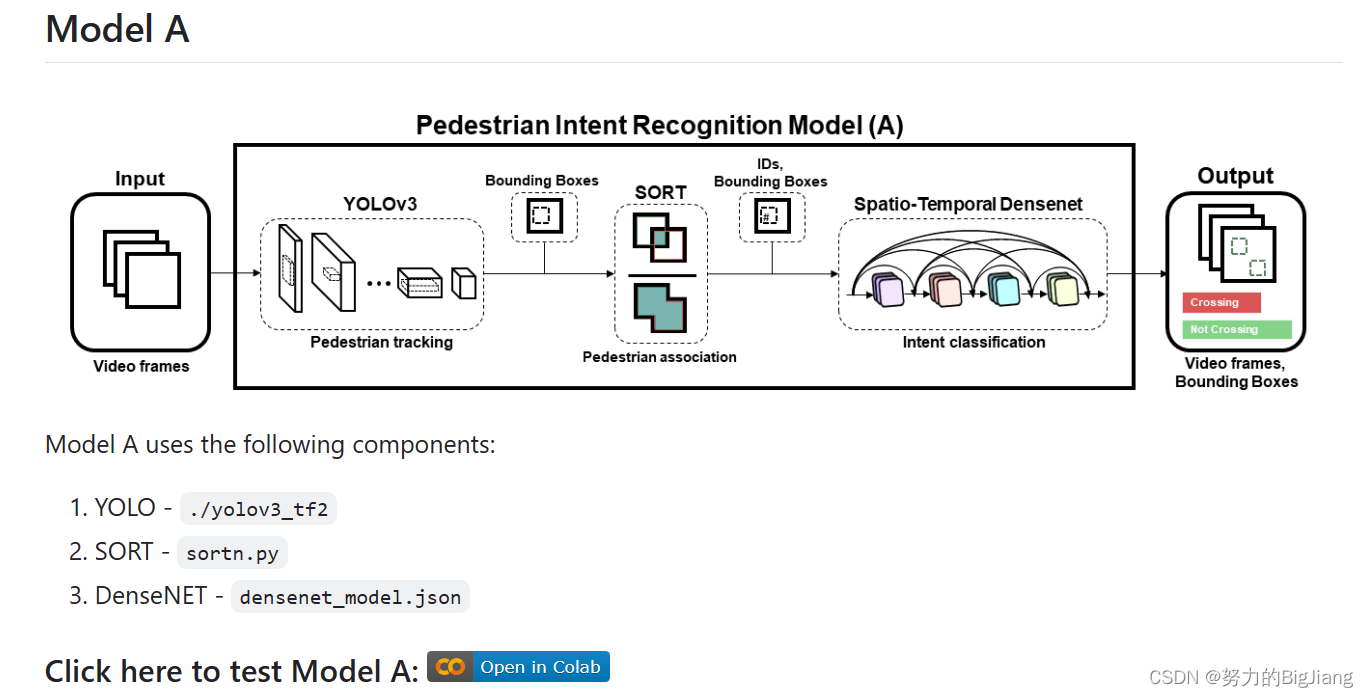 它是在colab上跑的,这玩意儿对我来说不好使,于是我把他的代码扒下来,作了一点小改动在我的Ubuntu系统用pycharm跑的。附上代码:
import sys
from absl import app, logging, flags
from absl.flags import FLAGS
import time
import cv2
import numpy as np
import tensorflow as tf
from yolov3_tf2.models import (
    YoloV3, YoloV3Tiny
)
from yolov3_tf2.dataset import transform_images, load_tfrecord_dataset
from yolov3_tf2.utils import draw_outputs

from sortn import *


def pred_func(X_test):
    predictions = model_j.predict(X_test[0:1], verbose=0)
    Y = np.argmax(predictions[0], axis=0)

    return Y

def run_model():
    print('Processing started.......')
    frame = 0

    try:
        vid = cv2.VideoCapture(int(FLAGS.video))
    except:
        vid = cv2.VideoCapture(FLAGS.video)

    out = None

    if FLAGS.output:
        # by default VideoCapture returns float instead of int
        width = int(vid.get(cv2.CAP_PROP_FRAME_WIDTH))
        height = int(vid.get(cv2.CAP_PROP_FRAME_HEIGHT))
        fps = int(vid.get(cv2.CAP_PROP_FPS))
        codec = cv2.VideoWriter_fourcc(*FLAGS.output_format)
        out = cv2.VideoWriter(FLAGS.output, codec, fps, (width, height))

    # create instance of SORT
    mot_tracker = Sort()
    rolling_data = {}

    while True:
        _, img = vid.read()

        if img is None:
            break

        frame += 1

        img_in = cv2.cvtColor(img, cv2.COLOR_BGR2RGB)
        img_orig = np.copy(img)
        img_in = tf.expand_dims(img_in, 0)
        img_in = transform_images(img_in, FLAGS.size)

        boxes, scores, classes, nums = yolo.predict(img_in)  # yolo prediction
        dets = boxes[:, :nums[0], :].reshape(nums[0], 4)  # filter pedestrians
        trackers = mot_tracker.update(dets[classes[0][:nums[0]] == 0])  # track the pedestrians

        for d in trackers:

            wh = np.flip(img.shape[0:2])
            x1y1 = tuple((np.array(d[0:2]) * wh).astype(np.int32))
            x2y2 = tuple((np.array(d[2:4]) * wh).astype(np.int32))

            y = 0

            if int(d[4]) in list(rolling_data.keys()):

                if len(rolling_data[int(d[4])]) == 16:

                    seq = np.stack(np.array(rolling_data[int(d[4])]), axis=2)  # (100*100*16*3)
                    seq = np.expand_dims(seq, axis=0)
                    y = pred_func(seq)  # classification output

                else:

                    seq = np.stack(np.array([rolling_data[int(d[4])][-1]] * 16), axis=2)
                    seq = np.expand_dims(seq, axis=0)
                    y = pred_func(seq)  # classification output

            # risky pedestrian identification thru box color

            if y == 1:
                color = (0, 0, 255)

            else:
                color = (0, 255, 0)

            image = cv2.rectangle(img, x1y1, x2y2, color, thickness)
            image = cv2.putText(image, str(int(d[4])), org=(x1y1[0], x1y1[1] - 5), fontFace=cv2.FONT_HERSHEY_SIMPLEX,
                                fontScale=1, color=color, thickness=thickness)
            image = cv2.putText(image, "Frame No: {}".format(frame), (0, 30), cv2.FONT_HERSHEY_COMPLEX_SMALL, 1,
                                (255, 0, 0), 2)

            # storing the data for last 16 frames
            try:

                if int(d[4]) in list(rolling_data.keys()):  # ID exists in dict

                    if len(rolling_data[int(d[4])]) < 16:  # bboxes values for 16 frames

                        cropped_seq = []
                        cropped_img = cv2.resize(img_orig[x1y1[1]:x2y2[1], x1y1[0]:x2y2[0]], (100, 100))
                        rolling_data[int(d[4])].append(np.asarray(cropped_img))  # append the image

                    else:

                        del rolling_data[int(d[4])][0]  # delete oldest frame bbox and append latest frame bbox
                        cropped_seq = []
                        cropped_img = cv2.resize(img_orig[x1y1[1]:x2y2[1], x1y1[0]:x2y2[0]], (100, 100))
                        rolling_data[int(d[4])].append(np.asarray(cropped_img))

                else:

                    cropped_seq = []
                    cropped_img = cv2.resize(img_orig[x1y1[1]:x2y2[1], x1y1[0]:x2y2[0]], (100, 100))
                    rolling_data[int(d[4])] = [np.asarray(cropped_img)]
            except:
                pass

        if FLAGS.output:
            out.write(img)
        cv2.imshow('output', img)
        if cv2.waitKey(1) == ord('q'):
            break


    cv2.destroyAllWindows()
    print('\nProcessing completed.......!!!')
    print('Check video file in Volvo-DataX folder!')

    return

if __name__ == "__main__":
 flags.DEFINE_string('classes', 'data/coco.names', 'path to classes file')
 flags.DEFINE_string('weights', 'Volvo-DataX-master/datax_volvo_additional_files/yolov3_train_5.tf',
                    'path to weights file')  #改为自己的权重文件路径
 flags.DEFINE_boolean('tiny', False, 'yolov3 or yolov3-tiny')
 flags.DEFINE_integer('size', 416, 'resize images to')
 flags.DEFINE_string('tfrecord', None, 'tfrecord instead of image')
 flags.DEFINE_integer('num_classes', 1, 'number of classes in the model')
 flags.DEFINE_string('video', 'data/2-3.mp4', 'path to video file or number for webcam)')#改为自己的测试视频路径
 flags.DEFINE_string('output', 'Result_model_A1.mp4', 'path to output video')#保存路径
 flags.DEFINE_string('output_format', 'mp4v', 'codec used in VideoWriter when saving video to file')

app._run_init(['yolov3'], app.parse_flags_with_usage)

#physical_devices = tf.config.experimental.list_physical_devices('GPU')
#tf.config.experimental.set_memory_growth(physical_devices[0], True)
# Reading the model from JSON file
with open('densenet_model.json', 'r') as json_file:
    json_savedModel = json_file.read()

model_j = tf.keras.models.model_from_json(json_savedModel)
model_j.load_weights('densenet_1.hdf5')
# print('Model loaded')
# Run this
FLAGS.yolo_iou_threshold = 0.5
FLAGS.yolo_score_threshold = 0.5

color = (255, 0, 0)
thickness = 2

yolo = YoloV3(classes=FLAGS.num_classes)
yolo.load_weights(FLAGS.weights).expect_partial()
logging.info('weights loaded')


class_names = [c.strip() for c in open(FLAGS.classes).readlines()]
logging.info('classes loaded')
run_model()
里面的权重文件yolov3_train_5.tf需要到作者的谷歌云盘里下载,这里我直接放上链接:
链接:https://pan.baidu.com/s/10i2nk1ugTNCmbwNu_G1syQ?pwd=5e99
提取码:5e99
--来自百度网盘超级会员V3的分享
很简单,只需要把相应的库配置好,就可以跑出结果了!
结果视频不好放,还是放链接吧:
链接:https://pan.baidu.com/s/1mH20VVR43dOSx7pNMWBVsg?pwd=slzo
提取码:slzo
--来自百度网盘超级会员V3的分享
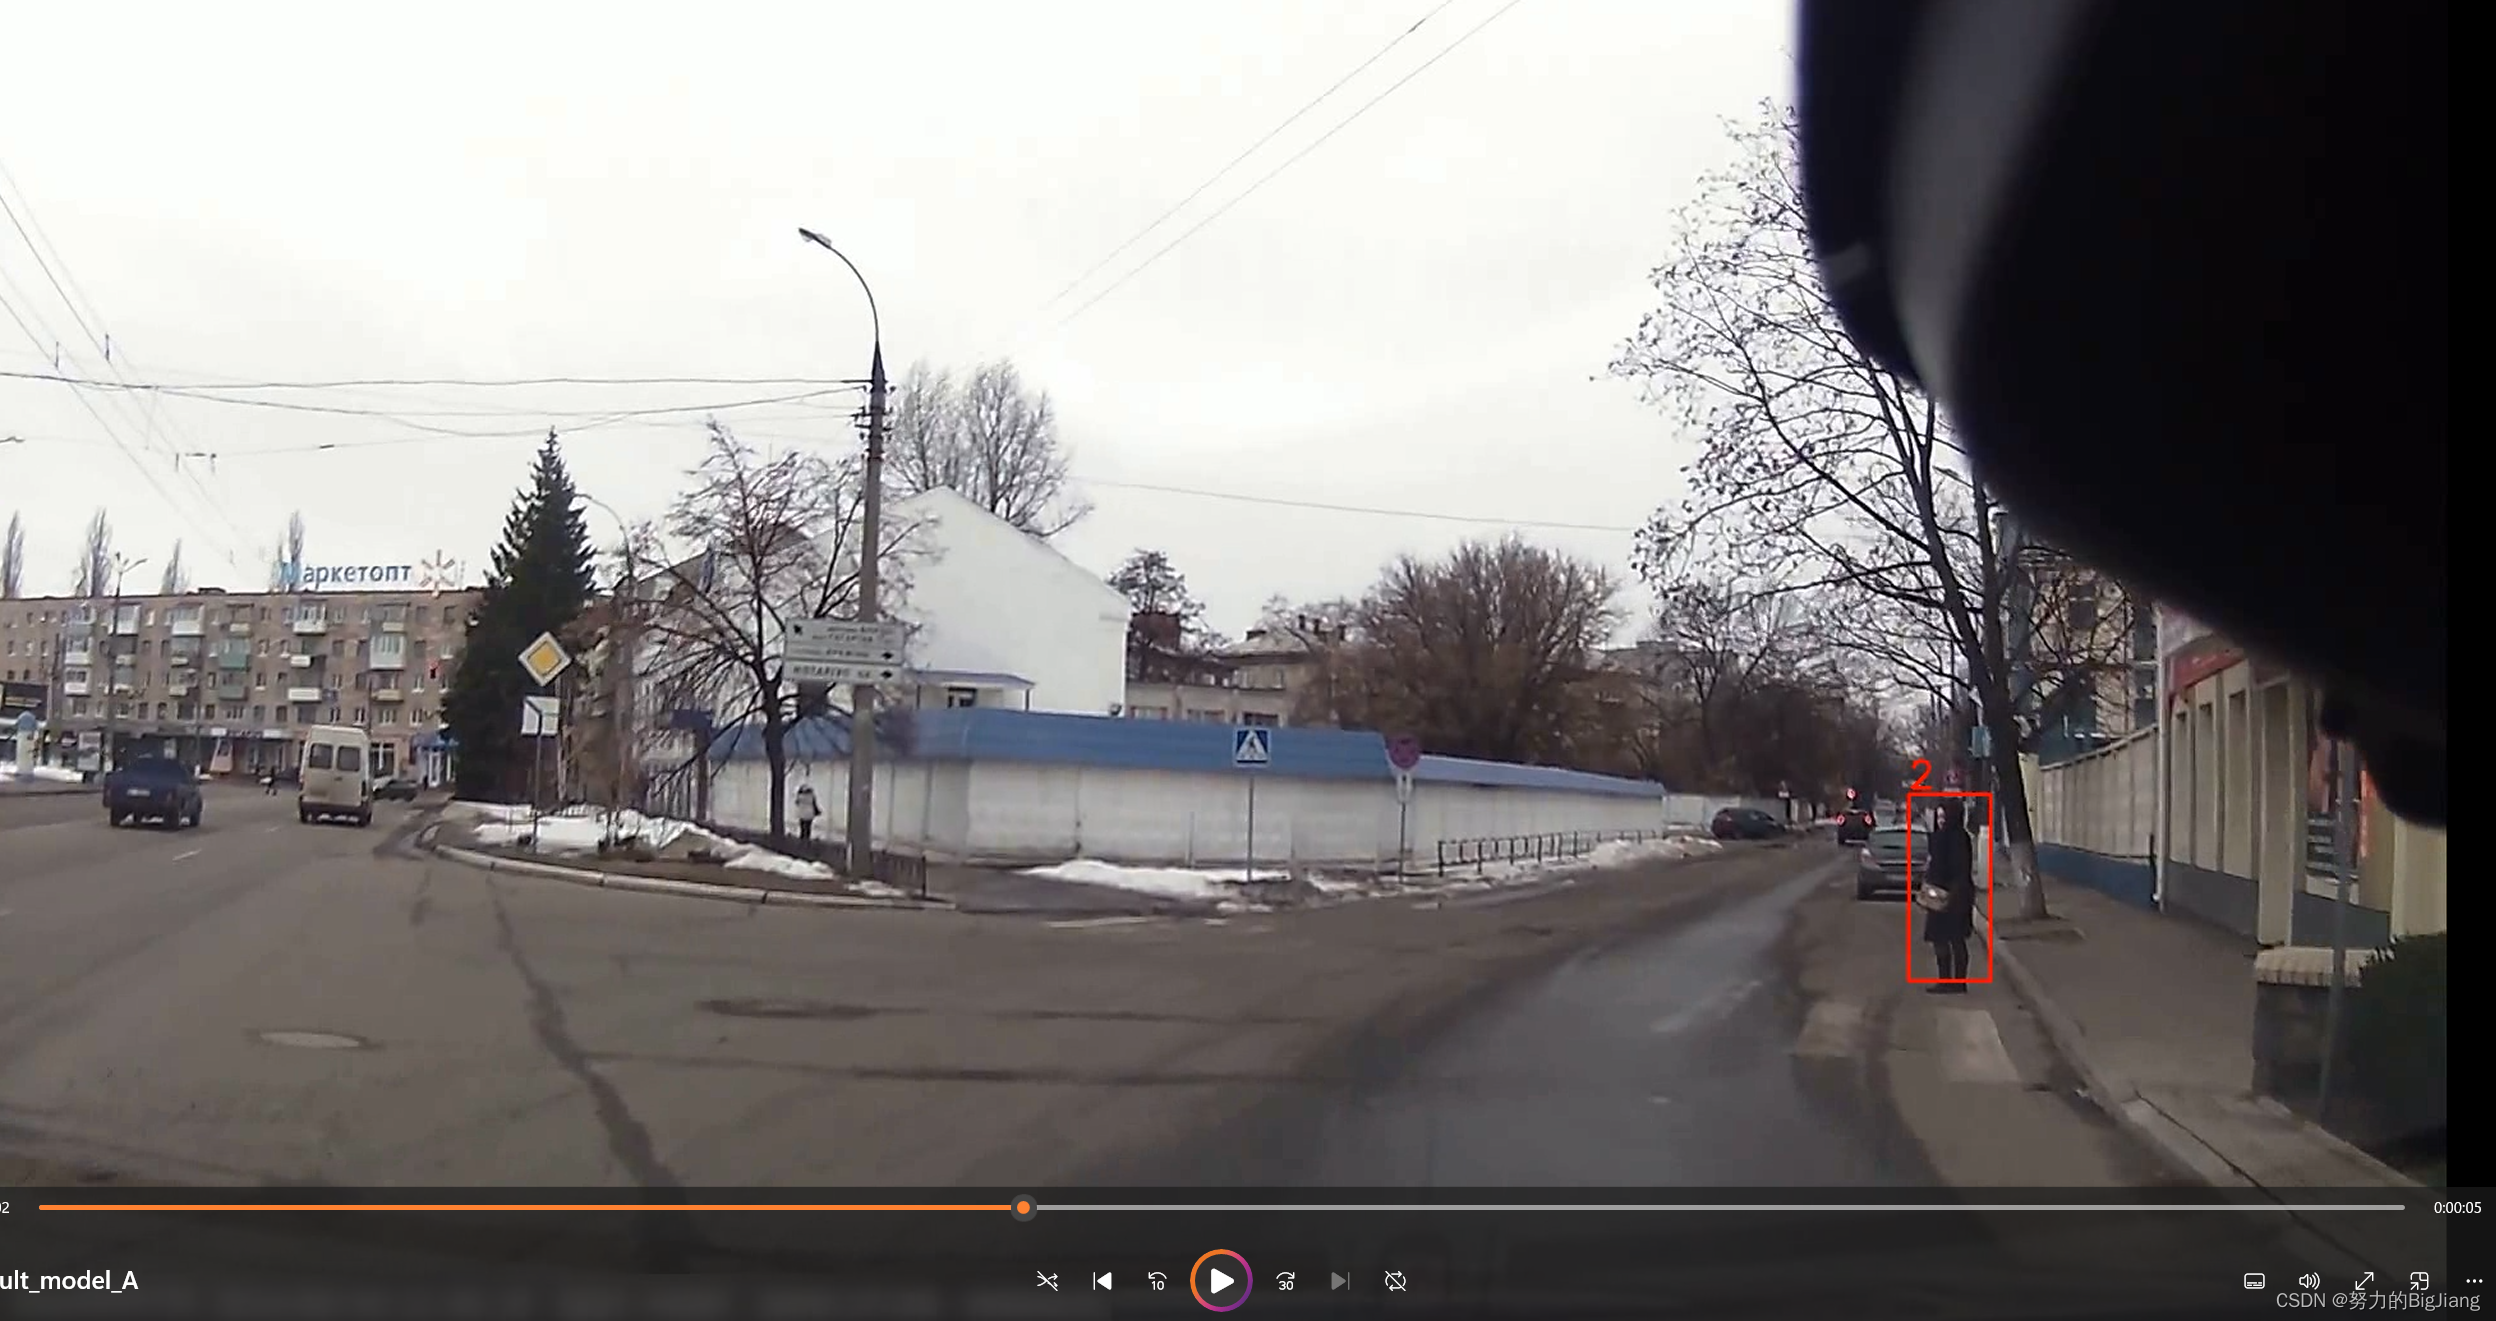
放张视频截图,当行人要穿越时,检测框会变成红色。
希望有空写一下配置显卡驱动,CUDA 这些问题。


 7913
7913


 被折叠的 条评论
为什么被折叠?
被折叠的 条评论
为什么被折叠?
 到【灌水乐园】发言


